![[Tutorial] Cool Signatures..With Animations!](https://www.ownedcore.com/forums/images/styles/OwnedCoreFX/addimg/menu4.svg)
Ok, Well I will show you how to make a cool Animated Signature like this one:
I have put the Guide into different Sections.
Chapter 1: Background
Chapter 2: Render
Chapter 3: Text
Chapter 4: Border
Chapter 5: Animations
Before I begin please Take these into mind-
-NO TAKING CREDIT FROM MY GUIDE!!
-DO NOT REPOST THIS ON ANOTHER WEBSITE STATING ITS YOURS
-THIS WAS MADE BY Dark_Angel on a Request
-IF you DO NOT HAVE PHOTOSHOP or YOU ARE TO LAZY, I WILL MAKE YOU a SIGNATURE here- http://www.mmowned.com/forums/graphi...g-service.html
Chapter 1: Background
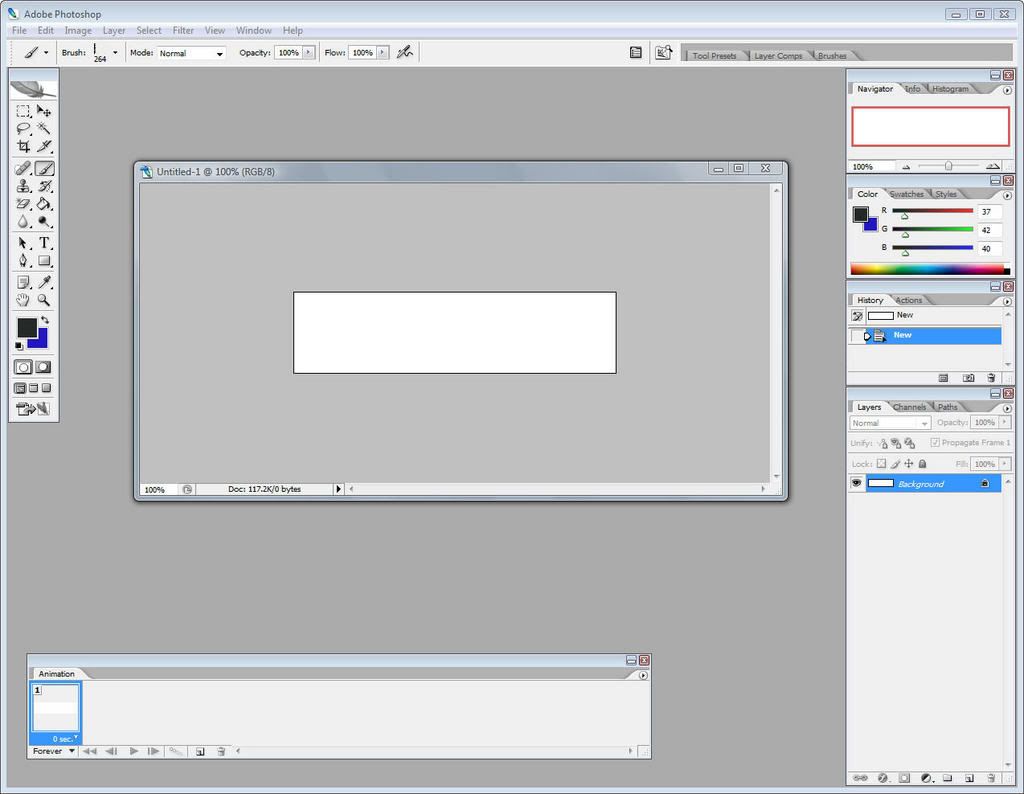
Ok to begin, I take it you have a version of Photoshop and have common sense. First of all make a start a new image. Should look like this:
Now, If you don't already have brushes, Go to deviantART: where ART meets application! and search for some brushes. Once you have them download go to photoshop and go to the brushes slide and hit the arrow. Go down tell you see "Load Brushes" And load the brushes you want. Find the colors you want and start painting the brushes on the Picture.
Should somewhat look like this with different colors:
And there you go! There you neat background!
Chapter 2: Render
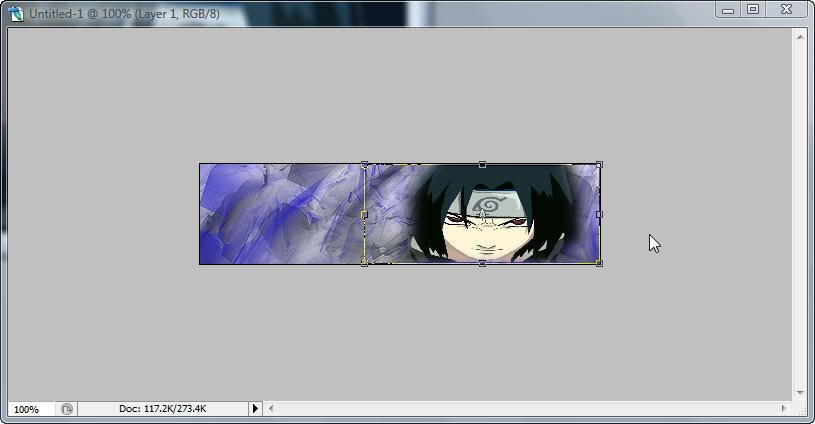
Ok find a render you might want for your Signature. For my Example I will use this Render: Planet Renders // Renders - Anime/Manga Renders/Sasuke
Ok, Open the picture with Photoshop. Choose the Lasso Tool on the side Panel. Make sure you get it pretty good, once you get it Lasso'd, right click the middle of the lasso'd part. A drag down menu will appear and hit "Feather" then a Box will come up and you can put 15-25 in the box. Then Hit Ctrl + C to copy the image. Now go to your Background And hit Ctrl + P to paste the image in there. If there is some parts of the image you don't want then use the Erase tool to Erase the Parts of the render you don't want but make sure you have the Render selected on the layer panel or you might accidentally Erase your Background. Once you get it nice and good where you want it, it should Look like this-
There you go! You got your Render in your Background!
Chapter 3: Text
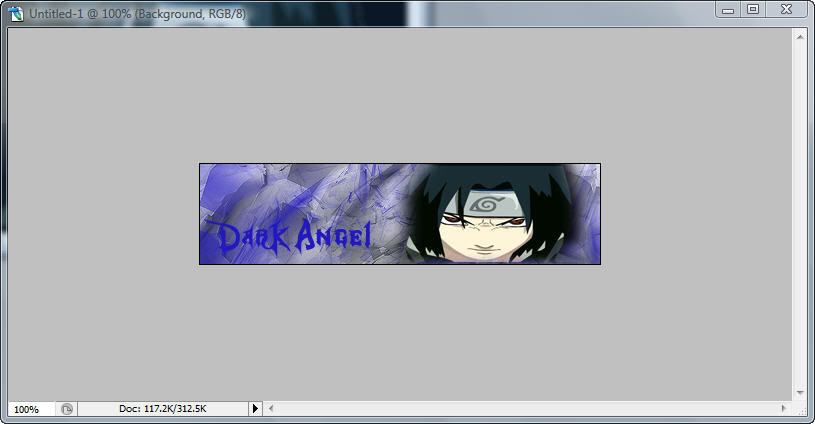
Ok now that you have your Background and your Render set up, Its now time for your Actual Name in the Signature.
First off, Find a Font you like that goes with your name at Download fonts | dafont.com
Set the Font in your Font folder to get the font which can be font by searching for font in your search.. You might have to save your Picture you have and restart Photoshop to get the font in there. I recommend you have the font already in there.
Ok once you got the font, you go to your Text tool and type your name. Should look like this-
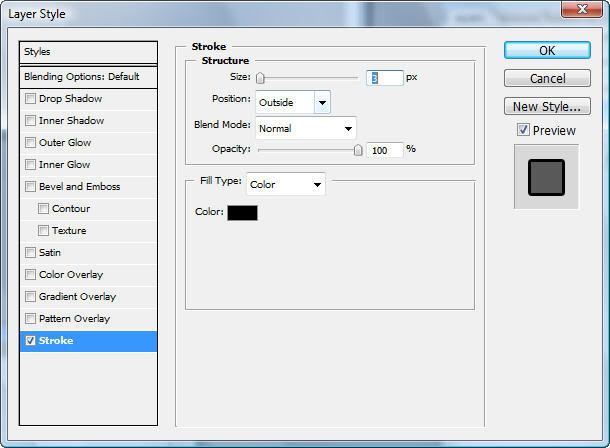
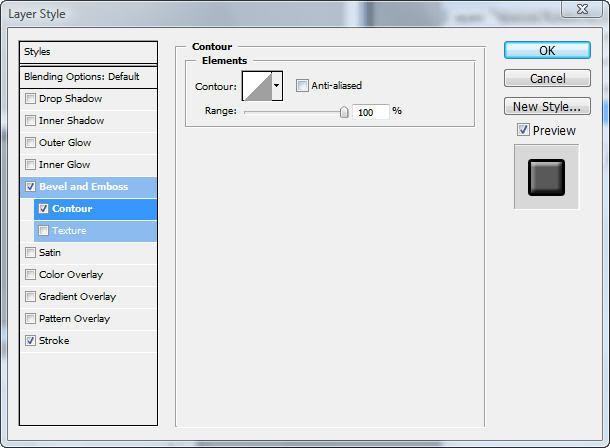
Next go over to your layer panel and find the Text layer that you just made. Right click it and find Blending options. Go down to Stroke and Find the color you want around the Text. Mine looks like this-
Do not Close the Blending options Yet! This next step is to make your text more 3d like. In the Blending options go up to the "Contour" option and Check it and instead of 50% make it 100%. Should look like this-
Hit ok and you should now have your Text Set up! Congrates!
Chapter 4: Border
This is pretty quick and simple step. There is 2 ways of doing this. The first on is the easyest way of doing it and that is by clicking th Background layer on your layer panel, And going to Blending Options (If Blending Options doesn't show up just Double click the layer and make the Layer name background and it should be unlocked) and Hit the "Contour" Button again and make it 100%.
The other way (Makes it look cooler) of doing this is going to deviantart.com and find a brush that is a border. Once you find one do the same thing you did with the brushes to load it.
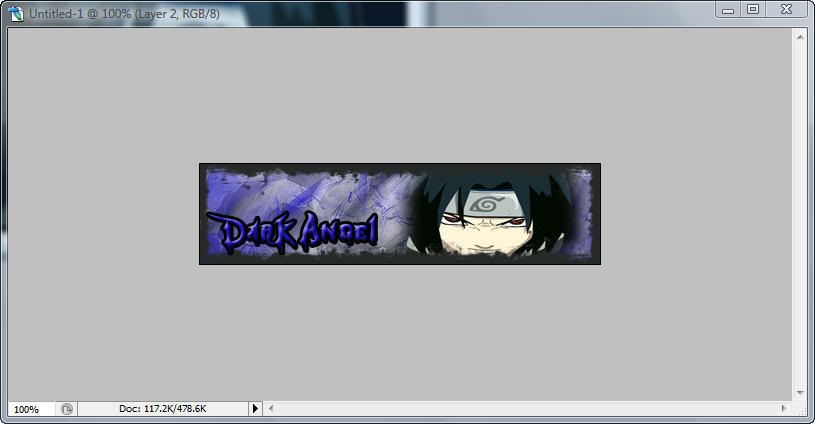
Now make a new layer. Select the brush and put it around all the sides of the Picture. Mine looked like this-
Now, you do what you did with the other way except this time instead of selecting the Background you select the new layer with the border. Do Blending Options and the go to "Contour" and make it 100%.
Should look like this-
There you go! There is your Border!
You can stop here if you want, Some people don't like Animations, But if you do then keep going on.
Chapter 5: Animations
Ok, to do this go up to windows at the top, and hit Animations. A panel should pop up and this is you animation panel. Your Image should be in there. Copy it 3 times. Should look like this-
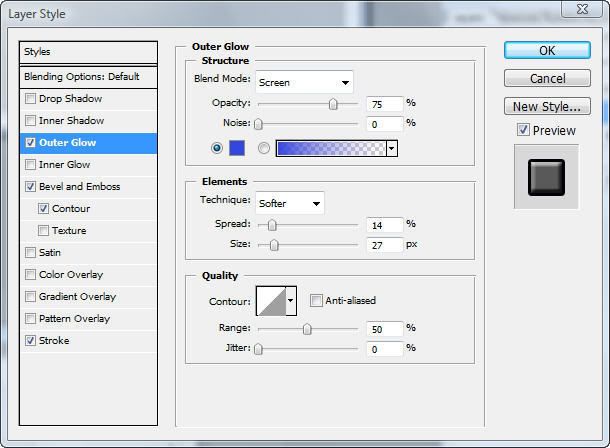
Select the Middle one. Now go over to you layers and find your Name Layer. Now go to "Blending Options and find the Option "Outer Glow".
Put a color that you would like your Text Glowing as. Mine looked like this-
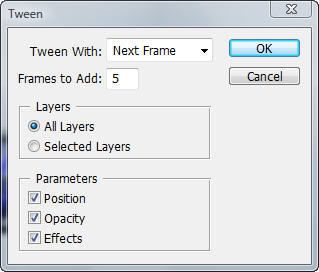
Now go to the "Contour" Option and make it some where in the 50's. Hit ok. Now, click the first Picture in your Animation Panel, Go over to the little arrow on your Animation window and find Tween. A window should pop up that looks like this-
Hit ok and you should see more picture show up in your Animation window, That whats its supposed to do. Now go to the 2nd to last image. Click it and do the same thing as above with the Tween. And there you go you have an Animation! Hit the Play button to see it play the Animation.
The Animation as a Unique way to save it. Go to ImageReady, Which is the little button on the very bottom of this panel-
Once open in ImageReady You have to hit Ctrl + Alt + S OR do it manually by going to file and "Save Optimized". Save it as a GIF file somewhere on your Computer.
And there you GO! You have a animated signature! A way to upload it is by going to Photobucket.com and making an Account and uploading it there.
I hope this Tutorial help you in some way! If you have any questions please leave a post. And remember these Rules!
-NO TAKING CREDIT FROM MY GUIDE!!
-DO NOT REPOST THIS ON ANOTHER WEBSITE STATING ITS YOURS
-THIS WAS MADE BY Dark_Angel on a Request
-IF you DO NOT HAVE PHOTOSHOP or YOU ARE TO LAZY, I WILL MAKE YOU a SIGNATURE here- http://www.mmowned.com/forums/graphi...g-service.html
This tutorial was made by Dark_Angel by a request from King-satchmo . Hope you enjoyed this! And Follow the rules please!
*FOR CS3 USERS* To save the Animation, Instead of using ImageReady you must go to File -> Save for Web and Devices then save.

![[Tutorial] Cool Signatures..With Animations!](https://www.ownedcore.com/forums/./ocpbanners/1/5/7/4/0/5/7/1eabc185930b19e4d608c1f9c25407a8.gif)
![[Tutorial] Cool Signatures..With Animations!](https://www.ownedcore.com/assets/mm/images/wits.png "TradeSafe Middleman")
![[Tutorial] Cool Signatures..With Animations!](https://www.ownedcore.com/forums/images/styles/OwnedCoreFX/addimg/wicc.png "CoreCoins")

User Tag List
Results 1 to 15 of 24
-
10-23-2007 #1
 Contributor

- Reputation
- 134
- Join Date
- Apr 2007
- Posts
- 795
- Thanks G/R
- 2/5
- Trade Feedback
- 1 (100%)
- Mentioned
- 0 Post(s)
- Tagged
- 0 Thread(s)
[Tutorial] Cool Signatures..With Animations!
Last edited by Dark_Angel; 10-24-2007 at 02:28 PM.

XMOD- Greenies are disgusting! Corrupt 2d was here~
![[Tutorial] Cool Signatures..With Animations!](https://www.ownedcore.com/images/ba/g/b2.gif)
-
10-23-2007 #2
Member
- Reputation
- 44
- Join Date
- Jul 2007
- Posts
- 300
- Thanks G/R
- 0/0
- Trade Feedback
- 0 (0%)
- Mentioned
- 0 Post(s)
- Tagged
- 0 Thread(s)
Re: [Tutorial] Cool Signatures..With Animations!
Nice guide, +rep
However, I dont see imageready....
-
10-23-2007 #3
Contributor
- Reputation
- 211
- Join Date
- Jan 2007
- Posts
- 373
- Thanks G/R
- 0/0
- Trade Feedback
- 0 (0%)
- Mentioned
- 0 Post(s)
- Tagged
- 0 Thread(s)


Re: [Tutorial] Cool Signatures..With Animations!
how do you copy the image in the animation part so that there is 2 of them?
EDIT, nvm i got itLast edited by Satchmo; 10-23-2007 at 11:00 PM.

-
10-23-2007 #4
Contributor
- Reputation
- 211
- Join Date
- Jan 2007
- Posts
- 373
- Thanks G/R
- 0/0
- Trade Feedback
- 0 (0%)
- Mentioned
- 0 Post(s)
- Tagged
- 0 Thread(s)
Re: [Tutorial] Cool Signatures..With Animations!

this is it but i couldnt get animation to work
-
10-24-2007 #5
Active Member

- Reputation
- 33
- Join Date
- Jan 2007
- Posts
- 227
- Thanks G/R
- 0/0
- Trade Feedback
- 0 (0%)
- Mentioned
- 0 Post(s)
- Tagged
- 0 Thread(s)

Re: [Tutorial] Cool Signatures..With Animations!
Really, really nice tutorial
 +rep
+rep
Cant find ImageReady (using CS3 Extended), but i guess its just to look ^^ thanks man!
EDIT: found the option to save animated in CS3: File -> Save for Web and Devices
Maybe you should add that for CS3 users ^^Last edited by Gorge; 10-24-2007 at 01:19 PM.

-
10-24-2007 #6
Contributor
- Reputation
- 134
- Join Date
- Apr 2007
- Posts
- 795
- Thanks G/R
- 2/5
- Trade Feedback
- 1 (100%)
- Mentioned
- 0 Post(s)
- Tagged
- 0 Thread(s)
Re: [Tutorial] Cool Signatures..With Animations!
Yeah, sorry, Don't have CS3 so Wasn't sure.Originally Posted by Gorgeman
XMOD- Greenies are disgusting! Corrupt 2d was here~
-
10-24-2007 #7
Contributor
- Reputation
- 134
- Join Date
- Apr 2007
- Posts
- 795
- Thanks G/R
- 2/5
- Trade Feedback
- 1 (100%)
- Mentioned
- 0 Post(s)
- Tagged
- 0 Thread(s)
Re: [Tutorial] Cool Signatures..With Animations!
You did a pretty nice job for your first time, Need a little work though, First of, The Text you need to fix cause of the colors, You should make it so black is in the inside and that blue is on outside...That might make it better but Maybe not. The background is pretty cool and the Render is pretty good. I give it a 7/10 for your first try.Originally Posted by King-satchmo
XMOD- Greenies are disgusting! Corrupt 2d was here~
-
10-24-2007 #8
Contributor
- Reputation
- 211
- Join Date
- Jan 2007
- Posts
- 373
- Thanks G/R
- 0/0
- Trade Feedback
- 0 (0%)
- Mentioned
- 0 Post(s)
- Tagged
- 0 Thread(s)
Re: [Tutorial] Cool Signatures..With Animations!

woohoo i got animation
-
10-24-2007 #9
Active Member
- Reputation
- 190
- Join Date
- Nov 2006
- Posts
- 588
- Thanks G/R
- 0/0
- Trade Feedback
- 0 (0%)
- Mentioned
- 0 Post(s)
- Tagged
- 0 Thread(s)
Re: [Tutorial] Cool Signatures..With Animations!
For CS3 you don't need imageready u can animate in photoshop

-
10-24-2007 #10
Contributor
- Reputation
- 134
- Join Date
- Apr 2007
- Posts
- 795
- Thanks G/R
- 2/5
- Trade Feedback
- 1 (100%)
- Mentioned
- 0 Post(s)
- Tagged
- 0 Thread(s)
Re: [Tutorial] Cool Signatures..With Animations!
I know, thats why I added that part to the bottom.Originally Posted by Bodach
XMOD- Greenies are disgusting! Corrupt 2d was here~
-
10-24-2007 #11
Member
- Reputation
- 44
- Join Date
- Jul 2007
- Posts
- 300
- Thanks G/R
- 0/0
- Trade Feedback
- 0 (0%)
- Mentioned
- 0 Post(s)
- Tagged
- 0 Thread(s)
Re: [Tutorial] Cool Signatures..With Animations!

alright... it is my first animated gif
-
10-24-2007 #12
Contributor
- Reputation
- 134
- Join Date
- Apr 2007
- Posts
- 795
- Thanks G/R
- 2/5
- Trade Feedback
- 1 (100%)
- Mentioned
- 0 Post(s)
- Tagged
- 0 Thread(s)
Re: [Tutorial] Cool Signatures..With Animations!
Congrates...Originally Posted by iccy
XMOD- Greenies are disgusting! Corrupt 2d was here~
-
10-25-2007 #13
Contributor
- Reputation
- 134
- Join Date
- Apr 2007
- Posts
- 795
- Thanks G/R
- 2/5
- Trade Feedback
- 1 (100%)
- Mentioned
- 0 Post(s)
- Tagged
- 0 Thread(s)
Re: [Tutorial] Cool Signatures..With Animations!
Bump bump bumpppp...
XMOD- Greenies are disgusting! Corrupt 2d was here~
-
10-25-2007 #14
I AM 100$ SERIOUS

- Reputation
- 525
- Join Date
- Oct 2006
- Posts
- 1,122
- Thanks G/R
- 0/1
- Trade Feedback
- 1 (100%)
- Mentioned
- 0 Post(s)
- Tagged
- 0 Thread(s)
Re: [Tutorial] Cool Signatures..With Animations!
Originally Posted by iccy
nice job =D
-
10-27-2007 #15
Contributor
- Reputation
- 134
- Join Date
- Apr 2007
- Posts
- 795
- Thanks G/R
- 2/5
- Trade Feedback
- 1 (100%)
- Mentioned
- 0 Post(s)
- Tagged
- 0 Thread(s)
Re: [Tutorial] Cool Signatures..With Animations!
Bump Bump Bump...
XMOD- Greenies are disgusting! Corrupt 2d was here~


 Reply With Quote
Similar Threads
-
[Tutorial] [How-To] Make a cool signature effect
By Spatt in forum Art & Graphic DesignReplies: 2Last Post: 11-07-2009, 12:53 PM -
[Tutorial] Make your own signature with photoshop
By Kevve in forum Art & Graphic DesignReplies: 10Last Post: 10-20-2008, 04:46 PM -
[Tutorial] Cool signature effect
By Chenquie in forum Art & Graphic DesignReplies: 10Last Post: 01-11-2008, 07:06 PM -
Making a transparant scan bar with animation tut (Signature)
By windybone in forum Art & Graphic DesignReplies: 30Last Post: 11-06-2007, 02:59 AM -
Cool thing with under world trick!
By Datonking in forum World of Warcraft ExploitsReplies: 3Last Post: 09-15-2006, 06:31 PM
-
OwnedCore Forums
casino news World of Warcraft Pokemon GO MMO Overwatch RTS Casino reviews bc game bc game -
casino
Casino Gambling Online casinos Casino en ligne vercel livescore bc game lovable vercel bc game no deposit bonus codes stake Top 10 Casinos Casino reviews Bitcoin casino Lucky8 1xbit heycasino [Service] Banning New Idea for givaways... WOTLK Scam - Help [GIVING] Full info 2 clean us accounts Sold an account legit, Free Gamecard's Youtube Chatlogs for scams.. Need help to make a -
CoreCoins
CoreCoins CoreCoins FAQ Shout-Out Banner Ads -
My OwnedCore
My Profile Notifications Settings Buy CoreCoins About Us


Privacy Policy | Cookie Policy | Terms | Contact Us
Available Payment Methods:-
![[Tutorial] Cool Signatures..With Animations!](https://www.ownedcore.com/images/paybutton/paypal.png)
![[Tutorial] Cool Signatures..With Animations!](https://www.ownedcore.com/images/paybutton/skrill.png)
![[Tutorial] Cool Signatures..With Animations!](https://www.ownedcore.com/images/paybutton/payop.png)
-
Casino
mystake | Mirax Casino | mwr life | MRQ Casino | mwr | mwr life | freebet tanpa | HashLucky Casino | mwr life | mwr life | Bitstarz Tournament | canada | Shuffle Casino | travel advantage | here | CryptoRoyal Casino | mwr life | mwr life | Instant Payout Methods | mwr life | Free casino games | mwr life | Top 5 canadian online casinos 2025 | iLucki Casino | mwr life | mwr life | mwr life | Aviator game casino | X | Blockchain gambling | stake | mwr life