
Taken from my own site and pasted here, so if the text is a bit weird then that is why, it was written by me though(some parts taken from other places such as release notes), for obot 1.08 – small updates will come in following days.
The Interface has changed a bit in 2.0
Okay, this is my tutorial on how to setup Openbot, the best bot for Innerspace in my opinion.
First of all this guide will not take you thru the steps of installing Innerspace and how to protect you from warden I count on you knowing how to do this yourself, therefore ANY questions regarding innerspace or ISXwarden will be deleted from this thread.
1. Installing
Go to Open-Bot - Home and download or go to the forums and into the Release section where you can find the newest openbot official releas, as im writing this, the current release is 1.08 – updates for the 2.0 will come along the way.
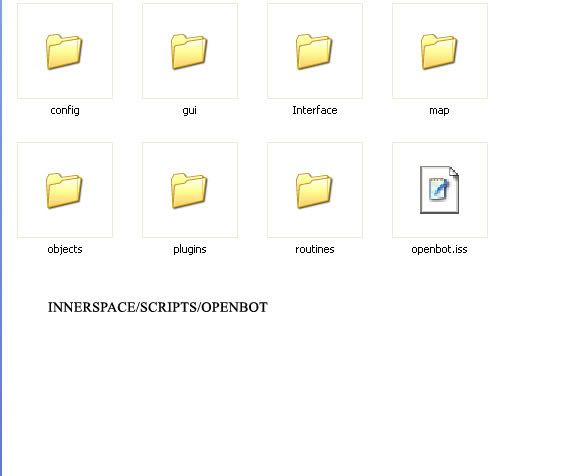
When the download is complete, unpack it into the scripts folder in Innerspace.
2. Routines
When the installation is complete, then you need to find a routine, for the class that you are going to bot, which can be found in the Routine forum.
If you wish to use another routine than the default ones, then you need to place it in the Routines folder in openbot and overwrite the existing class routine – however, you can use the default routines in openbot.
Remember ALWAYS open the routine file to see if there is anything you need to setup yourself.
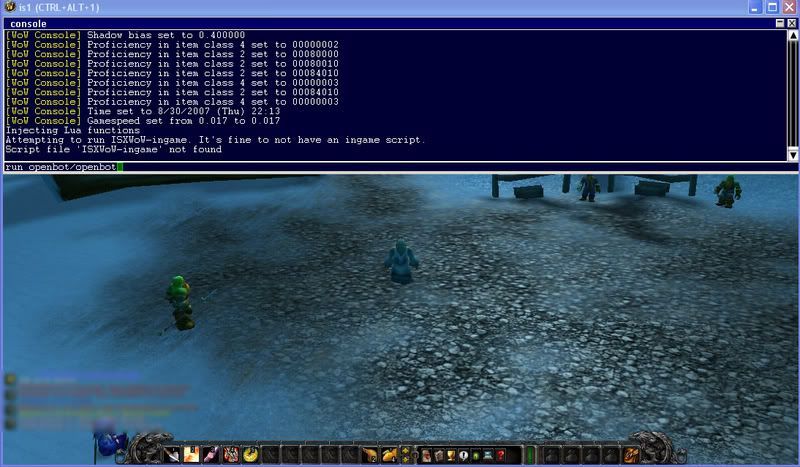
3. Loading up OPENBOT ingame
To load the openbot interface ingame, log into wow and go ingame, then when you are ingame bring down the Innerspace console and type(what you should type is coloured RED):
run openbot/openbot
It may take some time for it to load, but after it is loaded then you should see the interface, you can now remove the console.
console
After this, the Openbot Interface should pop up.
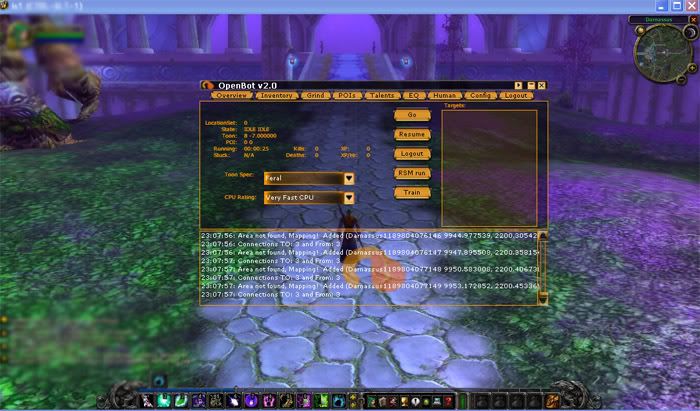
Configuring Openbot
I will now guide you through the different tabs in the openbot interface, the ones that aren’t self explanatory = some I won’t do because I cba.
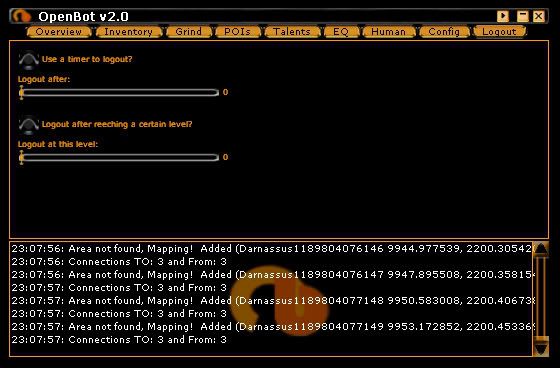
4: Logout tab
I don’t really use the logout tab much and I won’t go through it as it is pretty much self explanatory.
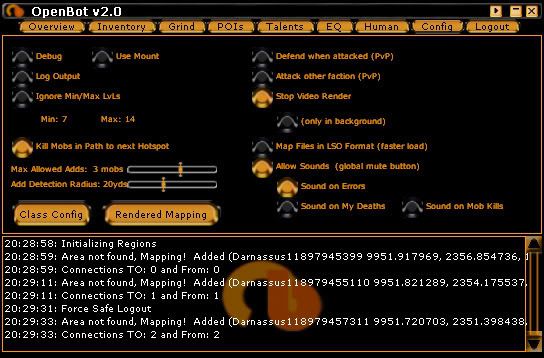
5: Config tab
DEBUG: debug dumps everything from output to the IS console and also includes some stuff that the developers use for debugging. It also dumps to an output file. Debug is not necessary unless people are curious or are trying to figure out a bug.
LOG OUTPUT: log output appends a log text file in the log directory with what is reported in the OB display window.
USE MOUNT: Your toon will use mount if the routine supports it.
Ignore min/max lvls: That sets it to not just attack things that give you xp.. But anything it can target that is a viable target from 1-80.
If that is turned off you will only kill things that are 7 levels below you - 2 levels above you.
Stop Video render: Will stop the videorendering, making your screen go black, this will reduce the CPU-load. I use this a lot when botting more than one toon at the same time.
Map files in LSO format: This will load and save the map files in LSO format which is a Binary version of the map, instead of XML version, for faster loading. LSO saves the map files in a different file format. the default is XML which is easily editable. LSO format is NOT easily editable, but is far faster.
Basically: keep it in LSO, unless you want to edit, then check LSO off, do your edits, load back up and check LSO again.
The sound tab and Kill mobs on the way to the next hotspot is quite obvious and shouldn’t need to be described.
The Rendered mapping is good to use when creating a new grinding area.
I have never been able to get the Class Config tab to work successfully for me.
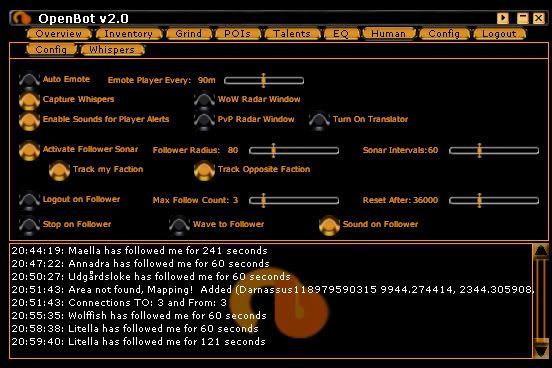
6: Human tab
Lots of human detection features including:
Auto Emoting back to players – doesn’t need an explanation
Translator toggle – Lets you see what other faction is saying, good for
tanaris for example “I’m gonna report that fking botter” then you are able to see it.
Follower Sonar – doesn’t need an explanation
Logout on Followers – doesn’t need an explanation
Stop on Follower – doesn’t need an explanation
Wave to Follower – doesn’t need an explanation
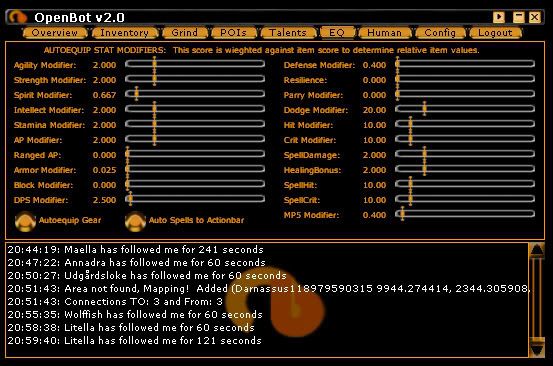
7: EQ tab (equip tab)
Auto equipping of items weighted based system. Change the weights
to fit your needs. You will NEED to change this to fir your own needs and characters.
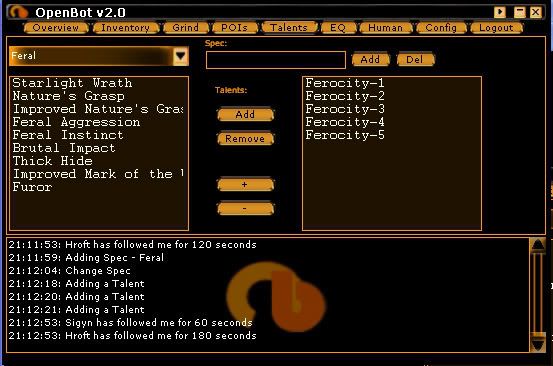
8: TALENTS tab
This is the talents tab. Here you can set the talents to your needs so that openbot will place your talentpoints on its own.
Under spec: put in your specname(feral for me) and press add. Then go to the scroll down menu and chose your spec. Then press the talents that you wish for openbot to chose and in the correct order.
If you look at my example, I have chosen to place my first 5 talents in ferocity.
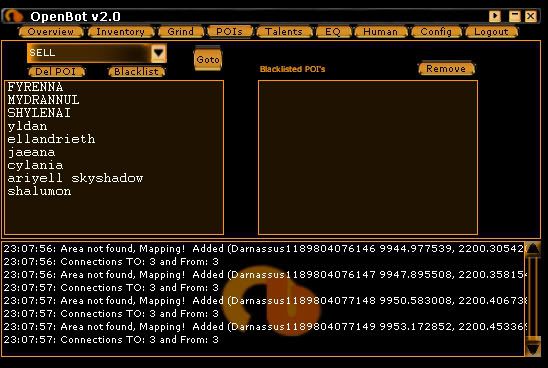
9: POI tab
This is a list of the NPC’s that are mapped, if one of them bugs you out then you can blacklist it and it will never be visited.
NPC’s in CAPITALIZED letters is a NPC you currently have a path to.
Any NPC in small letters is a NPC that you currently don’t have a path to.
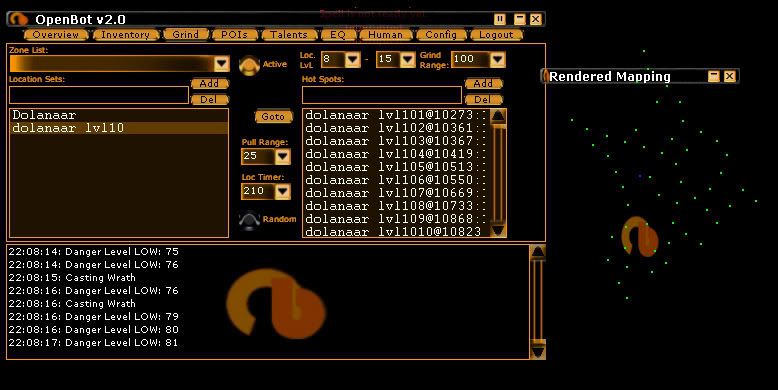
10: GRIND tab
A few things to go over in this tab, as it will most likely be the most crucial one to get right for your bot to work well. In my opinion it is a good thing to have rendered mapping turned on while creating your grinding area. (can be turned on under config tab)
Location sets:
Put in the name of your grinding area profile, I put in Dolonaar lvl 10 then press add. Now we are going to make hotspots and map the area.
Go to where you want to bot around, meaning where the mobs are and press Add under hotspots, do this a few places around the area that you are going to grind in. Hotspots are the areas that your bot will go to. if "random hotspot" is enabled... then it will randomly choose the next hotspot to go to when that hotspot is reached, if not then it will go in order.
Location level: This determines the min/max levels for the location so if your current location level is reached, then it will actively seek a new location that is connected to your current location. Location changes happen on the following events: level up, and location timer or when you hit GO or start the bot.
pull range: Pull range is the distance used by the bot to determine when to pull a mob.
Grind Range: Grind range is distance you or the mob needs to be from the hotspot for you to want to enter combat.
As you can see on my rendered map, I have pretty much covered all sections of the area that im going to bot in. What you should also do is to die once and run back to your farming area because it is needed to map the graveyard route as well for a successful bottingroute you should map the vendor and classtrainer as well. You can check in the POI tab if you have mapped it correctly
When you think that you have mapped it well enough, press active.
If you are still confused about mapping then read this thread on oBOT forums.
If you have trouble with a message saying NOT ENOUGH MAPPING DATA then you should map some more
11: Inventory
This tab is used for setting what you wish to sell, send, destroy and restock. To use these it is very important that you have mapped all vendors that you wish to use.
I will only go through the config tab under inventory because the rest explains itself.
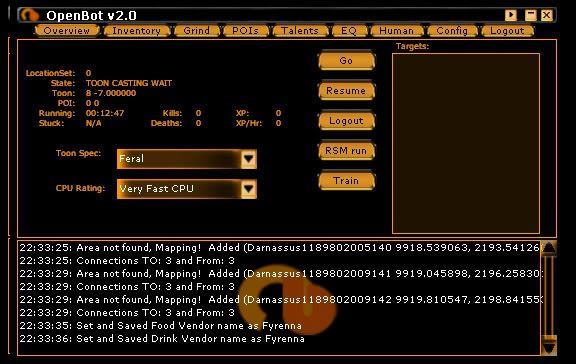
Under mule: set your mule’s name (the char that you will send your items to).
Food, drink and ammo merchant name, click the vendor for the different things and press “set”, you can see that my food and drink vendor is Fyrenna and that I haven’t set a ammo merchant.
Restocking doesnt work in 2.0 - should be working in 2.1
12: Overview
Toon spec: Here you can chose your characters spec and talent tree.
CPU rating: CPU rating is used play with it to get the best performance for youGO: Starts the bot
Resume, logout and train: doesn’t need explanation.
RSM: Forces a Repair, Sell and Mule run.
This was it, I hope that you know how to set up openbot now, if not then I feel for you.


Shout-Out
User Tag List
Results 1 to 15 of 253
-
08-30-2007 #1
 Admin
Admin


- Reputation
- 2984
- Join Date
- Apr 2006
- Posts
- 9,811
- Thanks G/R
- 353/298
- Trade Feedback
- 9 (100%)
- Mentioned
- 5 Post(s)
- Tagged
- 1 Thread(s)
setting up Openbot , noob friendly
Last edited by KuRIoS; 03-10-2008 at 10:53 AM.

-
08-31-2007 #2
 Banned
- Reputation
- 1169
- Join Date
- Jan 2007
- Posts
- 2,286
- Thanks G/R
- 0/5
- Trade Feedback
- 0 (0%)
- Mentioned
- 0 Post(s)
- Tagged
- 0 Thread(s)
Re: KuRIoS thread for layout for new tutorial
Looks good KuRIoS.
+rep
Last edited by Flying Piggy; 10-23-2007 at 01:04 AM.
-
09-01-2007 #3
Admin
- Reputation
- 2984
- Join Date
- Apr 2006
- Posts
- 9,811
- Thanks G/R
- 353/298
- Trade Feedback
- 9 (100%)
- Mentioned
- 5 Post(s)
- Tagged
- 1 Thread(s)
Re: setting up Openbot , noob friendly
ty, anyways its released to public now
-
09-01-2007 #4
Banned
- Reputation
- 245
- Join Date
- Feb 2007
- Posts
- 678
- Thanks G/R
- 0/0
- Trade Feedback
- 0 (0%)
- Mentioned
- 0 Post(s)
- Tagged
- 0 Thread(s)
Re: setting up Openbot , noob friendly
Awesome guide KuRIoS! Changing to Innerspace soon.
Snitch
-
09-01-2007 #5
Banned
- Reputation
- 124
- Join Date
- Jun 2006
- Posts
- 2,376
- Thanks G/R
- 0/0
- Trade Feedback
- 0 (0%)
- Mentioned
- 0 Post(s)
- Tagged
- 0 Thread(s)
Re: setting up Openbot , noob friendly
Great guide KuRIoS. If I had Innerspace, I would use it.
-
09-01-2007 #6
Member
- Reputation
- 1
- Join Date
- May 2007
- Posts
- 5
- Thanks G/R
- 0/0
- Trade Feedback
- 0 (0%)
- Mentioned
- 0 Post(s)
- Tagged
- 0 Thread(s)
Re: setting up Openbot , noob friendly
Originally Posted by vaz02
ISXWarden is your friend
-
09-01-2007 #7
Member
- Reputation
- 9
- Join Date
- Jun 2007
- Posts
- 52
- Thanks G/R
- 0/0
- Trade Feedback
- 0 (0%)
- Mentioned
- 0 Post(s)
- Tagged
- 0 Thread(s)
Re: setting up Openbot , noob friendly
great guide innerspace ftw
-
09-02-2007 #8
Contributor

- Reputation
- 92
- Join Date
- Mar 2007
- Posts
- 393
- Thanks G/R
- 0/0
- Trade Feedback
- 0 (0%)
- Mentioned
- 0 Post(s)
- Tagged
- 0 Thread(s)
Re: setting up Openbot , noob friendly
wtf this bot is free?
Edit: ofc not.. DohLast edited by WinRawr; 09-02-2007 at 03:14 PM.
-
09-03-2007 #9
Member
- Reputation
- 1
- Join Date
- Mar 2007
- Posts
- 11
- Thanks G/R
- 0/0
- Trade Feedback
- 0 (0%)
- Mentioned
- 0 Post(s)
- Tagged
- 0 Thread(s)
Re: setting up Openbot , noob friendly
hmmm niceee!!
-
09-03-2007 #10
Contributor
- Reputation
- 158
- Join Date
- Dec 2006
- Posts
- 627
- Thanks G/R
- 0/0
- Trade Feedback
- 1 (100%)
- Mentioned
- 0 Post(s)
- Tagged
- 0 Thread(s)
Re: setting up Openbot , noob friendly
Epix Kurios, gonna use it when i step over to IS.

-
09-05-2007 #11
Active Member

- Reputation
- 18
- Join Date
- Dec 2006
- Posts
- 392
- Thanks G/R
- 0/0
- Trade Feedback
- 0 (0%)
- Mentioned
- 0 Post(s)
- Tagged
- 0 Thread(s)


Re: setting up Openbot , noob friendly
Seems interesting, once again a great guide from teh Kurios.
- -
-
*sigh* 100 kb max file size :/.
-
09-06-2007 #12
Member
- Reputation
- 1
- Join Date
- Mar 2007
- Posts
- 1
- Thanks G/R
- 0/0
- Trade Feedback
- 0 (0%)
- Mentioned
- 0 Post(s)
- Tagged
- 0 Thread(s)
Re: setting up Openbot , noob friendly
What is this Innerspace console pls help me
-
09-07-2007 #13
Member
- Reputation
- 2
- Join Date
- Mar 2007
- Posts
- 36
- Thanks G/R
- 0/0
- Trade Feedback
- 0 (0%)
- Mentioned
- 0 Post(s)
- Tagged
- 0 Thread(s)
Re: setting up Openbot , noob friendly
I followed the directions and i have the map totally setup, the problem is that the priest routine won't attack yellow mobs and most of the mobs in the starting area are yellow. It says "not a good target"
-
09-07-2007 #14
Admin
- Reputation
- 2984
- Join Date
- Apr 2006
- Posts
- 9,811
- Thanks G/R
- 353/298
- Trade Feedback
- 9 (100%)
- Mentioned
- 5 Post(s)
- Tagged
- 1 Thread(s)
Re: setting up Openbot , noob friendly
yeah i had the same issue fonzi... try another routine
-
09-07-2007 #15
Contributor
- Reputation
- 142
- Join Date
- Oct 2006
- Posts
- 961
- Thanks G/R
- 0/0
- Trade Feedback
- 0 (0%)
- Mentioned
- 0 Post(s)
- Tagged
- 0 Thread(s)
Re: setting up Openbot , noob friendly
good guide KuRIoS Looks great
Oh ya....+rep
Ghey.... I forgot this computer doesnt view MMowned well (My rep scroll doesnt show up)
Ill rep you tonight when I can get on my other computerLast edited by Gelormino; 09-07-2007 at 01:52 PM.


 Reply With Quote
Similar Threads
-
An easy noob friendly guide to setting up MySql !!
By pattywhack in forum WoW EMU Guides & TutorialsReplies: 1Last Post: 07-18-2012, 10:08 AM -
[Guide]Arc-Emu Set-up a 3.3.5a server on mac! Noob Friendly.
By Asbfaw in forum WoW EMU Guides & TutorialsReplies: 4Last Post: 08-22-2010, 11:13 PM -
[Noob Friendly] Setting up a Aion Server
By P1raten in forum Aion Exploits|HacksReplies: 6Last Post: 05-14-2010, 08:15 AM -
[Guide] Set up your own 2.4.x private server [Noob Friendly]
By Etzzhy in forum WoW EMU Guides & TutorialsReplies: 75Last Post: 06-13-2008, 12:21 AM -
[Guide] Full Guide AC Web Repack. [Non Hamachi] [Website Set up] [Noob Friendly]
By Nubbadon in forum WoW EMU Guides & TutorialsReplies: 51Last Post: 05-19-2008, 01:38 PM
-
OwnedCore Forums
casino news World of Warcraft Pokemon GO MMO Overwatch RTS Casino reviews www.planet-casino.com lucky 8 lucky8 no deposit codes bc game bc game lucky8 -
casino
Casino Gambling Online casinos Casino en ligne bc game bc game bc game no deposit bonus codes roobet Top 10 Casinos Casino reviews Bitcoin casino Paypal Casino Lucky8 1xbit heycasino Phishing help [Giveaway] Demonoid Ahh!!!! hate u blizz! 3 EU accounts to giveaway US account giveaway Not sure if appropriate Question about paypal Need Instant Help! Novo nordisk email -
CoreCoins
CoreCoins CoreCoins FAQ Shout-Out Banner Ads -
My OwnedCore
My Profile Notifications Settings Buy CoreCoins About Us


Privacy Policy | Cookie Policy | Terms | Contact Us
Available Payment Methods:-


-
Casino
shuffle | shuffle | shuffle | this | stake | shuffle | shuffle | Aviator game casino | stake | shuffle | shuffle | shuffle | shuffle | stake | shuffle | casino | Instant Payout Methods | iLucki Casino | shuffle | stake | shuffle | HashLucky Casino | shuffle | this | shuffle | stake | shuffle | casino | shuffle | shuffle | shuffle | this url | Mirax Casino | freebet tanpa | shuffle | here | shuffle | this url | shuffle | shuffle | CryptoRoyal Casino | shuffle | stake | here | stake | shuffle | stake | shuffle | shuffle | Free casino games | this url | Top 5 canadian online casinos 2025 | stake | stake | stake | shuffle | shuffle | shuffle | casino | this url