![[Guide] Basic and advanced RAIDING.](https://www.ownedcore.com/forums/images/styles/OwnedCoreFX/addimg/menu4.svg)
Hey guys, i’m here to guide you through the raid required dungeon encounters
What this guide contains:
What to bring.
Which stats you need for whatever instance.
Tactics over every boss, what required for them and what to do.
What to bring:
It’s always nice when you’re in a raid that you bring potions and food with you. Here I’m gonna list what to bring for whatever spec. Also important is being fully gemmed and enchanted, and a plus is having 2 maxed out professions but aint necessarily needed.
Healers and casters:
Potion:
Flask of the Frost Wyrm
Requires Level 75
Use: Increases spell power by 125 for 1 hour. Counts as both a Battle and Guardian elixir. This effect persists through death.
Cooldown: 3 sec
Charges: 1 (Expendable)
Item Level 85
Cost to make: 16 Gold 25 Silver
Auction: 25 Gold 56 Copper (500 Gold 11 Silver for 20)
Vendor value: 25 Silver
Source: Recipe, Spell
Food:
Firecracker Salmon
Requires Level 70
Use: Restores 22500 health and 19200 mana over 30 sec. If you spend at least 10 seconds eating you will become well fed and gain 46 Spell Power and 40 Stamina for 1 hour.
Cooldown: 1 sec
Charges: 1 (Expendable)
Item Level 80
Cost to make: 1 Gold 61 Silver
Auction: 4 Gold 69 Silver (93 Gold 80 Silver for 20)
Vendor value: 5 Silver
Source: Recipe
For melee dps:
Potion:
Flask of Endless Rage
Requires Level 75
Use: Increases attack power by 180 for 1 hour. Counts as both a Battle and Guardian elixir. This effect persists through death.
Cooldown: 3 sec
Charges: 1 (Expendable)
Item Level 85
Cost to make: 14 Gold 75 Silver
Auction: 27 Gold 35 Silver (547 Gold 13 Silver for 20)
Vendor value: 25 Silver
Source: Recipe, Spell
Food:
Blackened Dragonfin
Requires Level 70
Use: Restores 22500 health and 19200 mana over 30 sec. If you spend at least 10 seconds eating you will become well fed and gain 40 Agility and 40 Stamina for 1 hour.
Cooldown: 1 sec
Charges: 1 (Expendable)
Item Level 80
Cost to make: 5 Gold 42 Silver
Auction: 7 Gold 66 Silver (153 Gold 25 Silver for 20)
Vendor value: 5 Silver
Source: Recipe
Dragonfin Filet
Requires Level 70
Use: Restores 22500 health and 19200 mana over 30 sec. If you spend at least 10 seconds eating you will become well fed and gain 40 Strength and 40 Stamina for 1 hour.
Cooldown: 1 sec
Charges: 1 (Expendable)
Item Level 80
Cost to make: 2 Gold 74 Silver
Auction: 3 Gold 71 Silver (74 Gold 25 Silver for 20)
Vendor value: 5 Silver
Source: Recipe
And for tanks:
Potion:
Flask of Stoneblood
Requires Level 75
Use: Increases the player's maximum health by 1300 for 1 hour. Counts as both a Battle and Guardian elixir. This effect persists through death.
Cooldown: 3 sec
Charges: 1 (Expendable)
Item Level 85
Cost to make: 14 Gold 57 Silver
Auction: 26 Gold 21 Silver (524 Gold 39 Silver for 20)
Vendor value: 25 Silver
Source: Recipe, Spell
Food:
Rhinolicious Wormsteak
Requires Level 70
Use: Restores 22500 health over 30 sec. If you spend at least 10 seconds eating you will become well fed and gain 40 Expertise Rating and 40 Stamina for 1 hour.
Cooldown: 1 sec
Charges: 1 (Expendable)
Item Level 80
Cost to make: 1 Gold 73 Silver
Auction: 4 Gold 72 Silver (94 Gold 45 Silver for 20)
Vendor value: 4 Silver
Source: Recipe
Fish Feast are ofcourse the best one for raiding atm, but the ones I listed are for specific if you don’t want to buy fish feasts every time you raid.
Now to the real deal, the dungeons!
When you’re a newly started raider its important to know what to do on whatever bosses, when to do it and how. I will explain how to do these things in the following section.
Dungeons:
So, you should start off by doing OS(10 and 25 man) since that is by far the easiest one when you aint doing any hard modes.
Obsidian Sanctum
Map of OS:
The boss (Sartharion) is in the middle of it, on the small platform surrounded by lava.
You will be killing the three smaller bosses that is on the northern, western and eastern side of the instance. They are very easy and there shouldn’t be any problem doing this at all. When you have done this and are encountering Sartharion you should look out for a few things:
Tail Swipe(Don’t stand behind him)
Lava Walls(Those will come from the sides).
Breath(Don’t stand in front of him unless you’re the MT)
You need to move in between the Lava Walls whenever they are coming for not taking damage.
How to do the boss:
You need the following:
A maintank.
An Offtank
2-3 healers(depends on how good they are)
5-6 DPS’ers
Let the maintank grab the boss and move him 90 degrees in a direction that he chooses to let his breath be away from the raid. Now start DPS’ing. Every now and then(I think there is 30-40 seconds in between) a Lava Wall will spawn, they will come from either the right, or the left side. Move in the gasps between to avoid taking any damage. Small fire elementals will spawn which should be picked up by the offtank. AOE those down during the fight or do it after it, doesn’t matter. Rinse/repeat this until he is dead(yes, he is that easy).
Stats needed for this fight:
Healer: 1,4k+ healing and 15k mana UB.
DPS: Superior archievement(186 item lvl items).
MT: 25k hp and defcapped.
OT: 21k hp and defcapped.
Now to VoA.
Vault of Archavon:
This instance is very easy aswell, but done just alittle harder with the new boss, Emalon. I will explain what to do in the following wall of text.
Map:
There are 2 bosses in here, Emalon and Archavon. But let’s start with Emalon.
Emalon got 4 adds, Emalon and the 4 adds should be tanked away from each other by 2 different tanks. So you should have your OT pick Emalon, and the MT picking the adds.
What to be aware of:
Lightning Nova(Aoe, stand away from Emalon and don’t stand near anyone, it will hit harder then).
Enrage of add(Will explain).
Now, every 45 second(I think it is) Emalon will enrage one of his adds, it will build up a buff that when it ticks to 10, it will explode and wipe the raid. What you need to do is nuking down the enraged add as quick as possible and then go back to Emalon. You rinse/repeat this until he is dead.
Archavon:
This guy is plain simple, what to do is just nuke him down and move away from the clouds he will be spawning. At a point of time he will swallow the MT and the OT needs to take over tanking, rinse/repeat this until he is dead.
Stats needed for this:
Healers: 1,6k+ healing and 16,8k mana UB
DPS: Hit capped and 2k dps ATLEAST
MT: 27k hp and defcapped.
OT: 26k hp and defcapped.
Naxxramas:
Map of naxxramas:
Arachnid Quarter
Anub’Rekhan is the first boss of the Arachnid Quarter in Naxxramas.
This guy is fairly simple, you just dps him until either an add spawns(then switch and dps that, an offtank should pick it up) or when he uses swarm. Whenever he does that you got 2 different options.
- Let the tank absorb it.
- Let the tank kite.
When you let the tank absorb it you just spamheal the tank until its over, tanks can time their abilities for less damaging(shield wall etc).
When you let the tank kite he should run on the outer side of the room to the entrance. Melee’s should move back during this and casters should stay at max range.
Grand Widow Faerlina is the second boss of the Arachnid Quarter.
Easier than 25man. You will need two tanks. One tank will pick up the worshippers and offtank them right under the stairs on the left side. Any tank class is good at tanking them, as they don't deal high loads of damage. The main tank will pick up Faerlina after the OT pulls the rest and drag her to the middle of the room where everyone will spread out around her. Every DPS should focus ONLY in Faerlina, ignoring the four adds till the enrage phase is near.
The off-tank will pick all four adds, and start DPSing one of them: the one who must be killed in order to stop Faerlina's enrage.
When the frenzy is about to come off cooldown (10 secs or so) every DPS should stop all DPS and switch target to the worshipper marked to kill. Do not start attacking it, just target it and be in range for attacks. The main tank should go where the OT is, the closer the better, taking Faerlina with him. The Offtank should have lowered the worshipper's health to 15% or less.
When the enrage is up, all DPS should burst their CD to insta-kill the worshipper. If done properly Faerlina's enrage should fade, and MT can move Faerlina back to the center of the room, where DPS can resume on her.
Rinse & Repeat every time the enrage timer is close.
Note: Off-Tank should stop DPS worshippers at some time, because he/she will kill them all otherwise.
Maexxna is the third boss of the Arachnid Quarter.
This is a quick encounter that will be over in 2-3 minutes and hinges almost entirely on keeping the tank alive through web spray. You will need one tank. The tank should pull Maexxna near a wall and face her towards the centre of the room, the raid should position themselves behind Maexxna. Ranged DPS classes will be on killing cocoons. At the 30 second mark Mages will need to be on top of Maexxna to frost nova the Maexxna spiderlings. At this point the raid needs to AoE them down within 10 seconds before Web Spray. If any are left alive it is likely they will kill someone during it as they attack very quickly. Healers will need to apply abolish poison and all of their heal over time effects on the tank just before Web Spray. It is advisable to stop DPS at ~33% and wait for a Web Spray then blow all cooldowns to kill Maexxna so that she never does a Web Spray while frenzied which will likely kill the tank.
Plague Quarter
Noth the Plaguebringer is the first boss of the Plague Quarter.
As with the 25-man encounter, prompt removal of the Curse of the Plaguebringer is critical. Cripple should also be dispelled as soon as possible, especially on the tank. It is possible to heal through one missed curse/wrath, but the total damage to the raid can be as much as 100,000 per application and this should be viewed as a last resort.
If no decursing is available, those targeted with the curse need to run to three separate locations more than 30 yards from the raid, so that Wrath only hits them.
Easiest for entry-level raids is to pursue a slow and steady strategy, where some dps is devoted to keeping the skeleton adds down to a reasonable number, and it is accepted that Noth will reach phase 2. This is most reliable if the raid has good healing endurance but overall dps is less than 14000. Assigning two dps (as well as a tank) to adds should be enough.
A quicker strategy, for raids with good dps (14000 or greater) and a suitable tank, is to tank all of the skeleton adds and just burn down Noth. In this case the goal is to kill Noth before he enters Phase 2, avoiding the Plagued Warriors entirely. If dps comes up short it is not necessarily a wipe, but as many as eight adds will be up at the beginning of Phase 2. Alternatively, this strategy can be done intentionally and the adds can be aoe'd down as a group at the start of phase 2. This tactic can be used for a group with two solid tanks and two heals focuses on each, as well as suitable aoe damage dealers.
In either case, two tanks are needed — one to pick up the adds as they spawn on the bone piles, and one for Noth. The better geared tank should be assigned to add tanking as the damage output of the skeletons will be greater than that of Noth once five or more of them are being held.
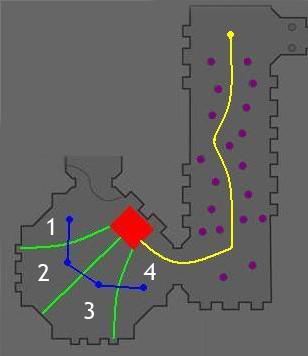
Heigan the Unclean is the second boss of the Plague Quarter.
This is the famous dance boss that is well-renowned all over the game. If you master the dance then you master the fight. Some may view this as an easy feat, while many players struggle to master the concept.
The RED square is safe from Eruption. During phase 1, all ranged DPS and healers stand here. During phase 2, a heavy damage disease DoT is placed on the platform.
The BLUE dots and lines are where the boss is tanked and moved between every lava burst.
The GREEN line is an approximate of where the lava bursts are split.
The PURPLE dots represent the gauntlet from the old 40 man Naxx, and the YELLOW dot and line was where you were teleported and how you had to run back to the boss. The new 10/25 version does not involve that area in the encounter.
The fight goes as a 135 second cycle:
Phase 1: Heigan is in the field for 90 seconds. Ground Eruptions move slowly, the tank has to move Heigan through the positions shown in the graphic.
Phase 2: Heigan teleports on the platform for 45 seconds. Ground Eruptions speed up, the entire raid needs to move through the safe zones. The platform has to be empty. Heigan will not use Spell Disruption, Teleport and Decrepit Fever during phase 2.
Tips
Whenever a phase change occurs, the safe zone is reset to zone 1.
Safe zones move in the following order: 1 - 2 - 3 - 4 - 3 - 2 - 1 - 2 - ...
Aggro does NOT reset between phases.
Due to latency, other players may or may not appear in the correct position for you. Move at your own pace, do not try to follow other players.
One of the most common reasons for death is running too far on either side of the room. If you are running from section 3 to section 4, you only need to take a few steps (between other pieces, you need to cross the entire next section, something not necessary for their sections one or four). It is possible to cast in the time this buys.
Safe zone cycle is, for phase one: 1-2-3-4-3-2-1-2~3. So, it is the way to 4, back to 1, and then almost to 3. It is this way at least for 10man. At the moment Heigan teleports, move QUICKLY back to zone 1. It will reset the cycle to zone 1 again.
In phase two, move forward as soon as you see the lava coming up (not too quick, though). The best timing is to move to safe spot, stop ONE second, then move to the next safe spot. JUST one second.
There is no enrage timer on this fight, so it can go on as long as you can keep some sort of DPS up. Heigan has been killed in fights taking longer than 15 minutes (due to deaths.)
Loatheb is the third and final boss of the Plague Quarter.
This boss is fairly simple. The boss itself is tank/spank. Every 30 seconds it will spawn a spore, every dps/healer should go to that spore quick and kill it to receive the 50% more crit buff. You can only heal 3 seconds out of 20 since Loatheb got a debuff. Now just slowly spank him down and retrieve the loots(prolly the easiest boss in here)
Military Quarter
Instructor Razuvious is the first boss in the Military Quarter.
There are 2 Death Knight Understudies and 2 controlling orbs in the 10-man version. The 2 orbs should be controlled by the tanks and the encounter is started by each tank selecting their own understudy, walking up to their orb and right-clicking it to control them. Razuvious will immediately aggro onto them and whichever tank is decided to tank first must immediately hit "6" on your new hotkey bar (pet bar) for Bone Barrier, then "5" to taunt. While tanking use the "4" key repeatedly to Blood Strike for holding aggro. Keep Razuvious tanked near the back of the circle where the understudies are located before the encounter starts, this way when you refresh your orb spell you will have plenty of time to re-control your understudy before he can run all the way to you. Bone Barrier lasts 20 secs so the 2nd tanking understudy must hit their Bone Barrier and taunt before the first tank's Bone Barrier runs out. There is a 30 second cooldown on the Bone Barrier. To help your healers and ensure the understudies always have Bone Barrier up, taunt closer to every 16 seconds, rather than 20. The tanks can see the Bone Barrier icon's 30 second cooldown timer on the pet bar. Once it goes past halfway, the tank should call out for a taunt. Calling out is helpful because when a tank has to dismiss and re-control an understudy, he can lose track of the timer. ALWAYS use the Bone Barrier ability BEFORE you taunt. This is all the fight is, the tanks trading taunts to ensure the tanking understudy has Bone Barrier up 100% of the time. Healers will need to help heal the understudies even with their Bone Barrier up to ensure both stay alive through the entire encounter.
When clicking an orb to control an understudy you will see that your character is channeling the spell and the channel lasts for 1 minute. To make sure the channel does not break while tanking Razuvious. Each tank should refresh the channeling spell every 2 taunt cycles. In order to do this after you've been taunted off of the second time IMMEDIATELY right-click the understudy's pet frame and select "dismiss". NOTE: you cannot use the "leave vehicle" button that shows up in the "=" of your hotbar, it does nothing, you must dismiss manually. As soon as you have dismissed the understudy click the orb again to control him, this refreshes your channeling spell and will leave you with enough time for the 5 second cooldown on your abilities to be off before the current tank's Bone Barrier falls off.
Tips: Tank the boss in the far center of the green floor. Whenever you need to dismiss and re-control the add, move the add to the right/left, far-end of the room. This way, the add will come straight to you and because all melee players are in the center, you have clear sight of him to target. Even better, you can start the fight by using /focus on your add, and click on his portrait to target it whenever you need to take control of it again. Dismiss, click on portrait, wait 2-3 seconds for the "uncontrollable" buff to wear off, and right-click on the orb without moving to re-control him again.
This technique is sometime hard to explain to people, however there are a few things the main tank can do to aid the off tank. If your off tank has not taunted the mob off, you are able to tank a few hits, and with 3 healers in the group, you can heal through the damage if they focus (i.e. 2 priests and druid, spam healed for the entire fight and survived the 10-man version).
Gothik the Harvester is the second boss of the Military Quarter.
Phase 1
Split your raid into 2 halfs, one going to the opposite room(the dead site) and the other stays at the living side, now when you engage Gothik he will call alot of adds that you need to kill as quick as possibly.
Phase 2
Gothik will teleport down and teleport between the 2 rooms you're standing in. Just keep nuking him when he is on your side until he will get down to 30% and the gates will open.
The Four Horsemen are the third and final boss encounter in the Military Quarter.
Easy 10-man Strategy
Need: 2 tanks, 3 healers (tested with 3, probably 2 possible too), at least 1 caster dps, preferably with selfhealing ability's.
Why / when to use: when your party dies from taking too much mark damage. This tactic will put less marks on the dps (@ switch from 3 to 3and1 instead of from 3 to 4and1) and migrate damage a bit more to the tanks (meteor, marks) instead of party, so in most cases it will become easier to heal. We got them down the first time using this tactic, after having problems with high raid damage.
How it works:
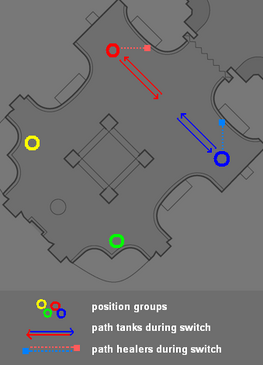
All 4 horsemen will run to a corner, where they need to be tanked. The key in this fight is that you need to switch tanking targets after each few marks, or the stacking damage from the marks gets too big. You need to split up raid into groups, and let them stick in a corner.
Group yellow, west corner: healer
Group green, south corner: ranged dps
Group red, north corner: tank + healer
Group blue, east corner: tank + healer + rest of dps
When the encounter starts, all groups start getting aggro on the bosses in your corner. BLUE group go ALLOUT on Kor'Thazz, with skills, cooldowns, etc. he needs to be down fast because of the meteor. RED group just tank Rivendare and stay alive. YELLOW, tank the ranged boss in your corner, and heal yourself and green/rangedtank. GREEN, tank your ranged. (note that Blaumeux and Sir Zeliek cast-attack the closest target in range, so all yellow and green need to do is stay with boss and don’t die. Though ofc any dps is nice)
Now comes the switch. At the moment the 3rd mark hits, YELLOW and GREEN need to switch. They do this simply by running to the others position, because the boss will target the closest person. Now they start to tank the other boss and stack 3 other marks. Switch again after 3. After the 3rd mark hits, the RED and BLUE tank move towards each other, so they can switch targets with taunt, before mark 4. Then move back to your old corner. Start dps/tanking/healing again. Switch every other 3 marks. Repeat till Kor is dead, then move to Riv, followed by Blau, then Zel. Congrats!
Classnotes
Tanks
Remember to coordinate with the other tank, move to each other after mark 3, taunt quickly, move back fast. Don't forget that marks lower threat by 50%.
Healers
Yellow heal yourself and green. Red heal yourself and red tank. Blue heal yourself and blue tank and DPS (AoE heals).
DPS rest
Nuke Kor’Thazz, save skills and CDs for Rivendare. Don’t walk along with the tanks or you may get an extra mark.
Construct Quarter
Patchwerk is the first boss of the Construct Quarter.
He is typically seen as a gear check, and is a prime example of a tank and spank fight. The tank should be the first to engage Patchwerk who will then aggro to the tank and cannot be pulled off by any other player, unless the Tank dies.
You will need the MT to be on top aggro(ofcourse) and the OT to be on second(since he will attack both the highest and the second highest on the damage meter). Now as this is just a gear check boss, you should simply ONLY heal tanks and keep an eye of them. If a tank dies, he will continue to oneshot melee’s and this guy will take way longer.
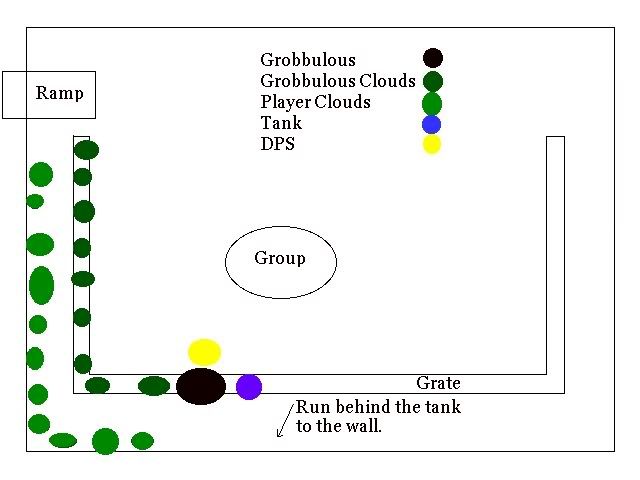
Grobbulus is the second boss of the Construct Quarter.
10 & 25-man Alternate Easy Strategy
Ranged and Healers stand in the middle of the room and move only to reposition themselves closer to the MT and Melee DPS as they go around the room.
An OT needs to pickup Fallout Slimes as they spawn. These should only spawn from the MT, they are from his spray. Melee DPS needs to be sure they are on his side, if they get hit with his spray, more slimes will spawn.
To begin the pull, have the tank stand on the grating by the ramp. The boss will body pull from here. Everyone else needs to stand back from the ramp.
The tank will then begin to kite the boss counter-clockwise keeping him on the grating. I find the best pace is for the tank to toggle his walk/run key to make him move at a walk speed. Once on the other side of the grate, from the ramp pulling position, go just a bit further out to be parallel to the ramp then turn in and head straight for the ramp. Once to the ramp get back onto the grate and continue as before.
When someone gets injected they will run behind the tank, where no clouds from Grobbulous are, and to the wall. This ensures that everyone knows where to go, that there is not a buildup of clouds and that the group is not closed in on by clouds.
By the time you get to the ramp again after kiting the boss around the grate and across the top of the room to the ramp, the first clouds emitted by Grobbulus will have dissipated allowing you to continue kiting him on the grate.
Gluth is the third boss of the Construct Quarter.
Drop into the room, in order, Main Tank, Off Tank, Healer's, DPS then kiter. Let everyone but the kiter run to the door at the far end, and have the tanks pull the boss to the door.
Tanking this encounter requires switching, and if vent is not avaliable, make a macro with a Raid Warning "Tank Switch" when the stacks get too high. Our tanks (although it was our first time in naxx) were fully geared from Heroic's and emblems, so we could survive 3 stacks of the de-buff then switch - if your tanks are def capped with low avoidance, or not def capped switch more often - however if you are not def capped it is unlikely u will make it this far.
The main tank should always be tanking gluth, unless he has 3 stacks, the OT will hold aggro for 12-15seconds while the de-buff wears off the main, tank, so the tank can take over again. Positioning here dosent matter, but if your healers are inexperienced and jumpy, its a good idea to position the off tank behind gluth till he needs to taunt. this makes gluth turn around, so the healers have a visual aid for the tank switch. (the off tank will run through gluth and take the Main Tanks place) Experienced groups can just stack the tanks on top of each other.
The most difficult part of this encounter is the zombie chow, as correctly stated above, they spawn from the grates periodically. in the 10man you only need one kiter, and the most effective is a frost mage,(if they are willing, have a mage re-specc for this encounter) Keep the chow as far away from the boss as possible, to avoid devouring, and use all slow/stun moves to aid the kiter.
WARNING! DO NOT ATTEMPT TO KILL THE CHOW. Even on normal, they have 500k health and there is usually 5-10 up at a time, and if a raid can do that much aoe damage they shouldn't be focusing on the chow :P.
After decimate have your mage use whatever shield he/she has access to and use frost nova, the rest of the dps shoul then run in and Aoe the chow. In the case of starter raids (slightly undergeared) divert all DPS onto the chow, leaving just the tank and Off tank on the boss.
Tips for kiting:
If an add goes stray from the pack the mage is kiting, done just let it run, have a hunter/paladin/lock pick it up (use what ever slowing abilities you have) - If the paladin is OT, do not have him help with the adds (we made a simular mistake and he was out of range to taunt the boss from our warrior when he had reached two stacks) - If your dps is lower than average (you beat patchwerk so it cant have been too bad) use everyone to take down the adds after decimate. - If you have 3 healers, pick the "worst" one and have them dedicated to keeping the mage up. This works well, if you have the boss on farm and are gearing up your "2nd team". 2 healers is more than enough to keep the tank alive. - If you have a druid be sure to watch the mages mana and innervate (there is likely to be no time for the mage to evocate during this fight as he/ she will be occupied for the duration. - Do NOT Attempt to tank the adds! - they stack a de-buff increasing damage done by 100 per stack. if you have 5 chow on ur tank, after 5 hits your tank will be taking 500 more damage and after 10 seconds, roughly 500 more.
One of the hardest things for new groups is actually beating gluths enrage timer, once the mage has got the kiting perfected, you need to focus on maxing dps. Soft cooldowns (anything which resets in 3mins or less) should be used on entry, with heavy cools like bloodlust, being saved.
There seems to be a fault with the Deadly boss mod enrage timer, where enrage does not happen till 32seconds after the mod declares it. so ignore it.
With your mage busy with the adds and your hunter/ ranged dps switching back and forth, you are heavily reliant on good melee dps to bring down gluth. shaman totems to enhance melee damage, warrior shouts/ paladin blessings and death knights "horn of winter" should be kept up at all times, Gulth has approximatly 3million health (assuming that your kiter lets a few chow through) so your dps needs to max out damage as often as possible.
After the 3rd decimate, roughly 4-5mins in, you need to hit all your Cool's, soft cools wil have refreshed, and big cools like bloodlust should be hit. gluth should be on approximatly 25-35% health, if he isn't chances are you will not beat the enrage timer. (well established groups may well have downed gluth by this point so ignore this)
This is the point where you burn your mana, healers should be running low, so top off the tank and use whatever youve got to do some extra boss damage, before using your "shadowfiend" type move. if gluth does not die before the next decimate, you will inevitably wipe at the decimate, because the chow will be piling up and your mage will be oom. have your dedicated healer leave the mage and apply some last min DPS on the boss. If he is below 5% at the next decimate, leave the adds alone, focus your fire and kill the boss, slowing not slaying the adds.
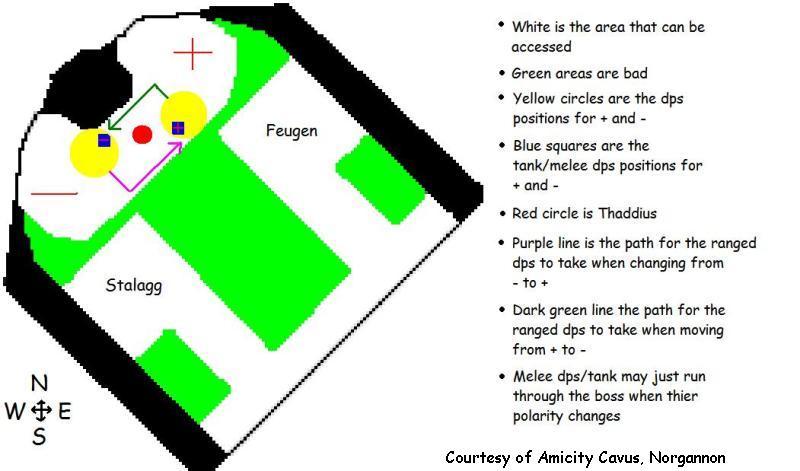
Thaddius is the fourth and final boss of the Construct Quarter.
The 10-man strategy is completed exactly the same as the 25-man strategy. The tanks, healers, and dps are split to kill Feugen and Stalagg simultaneously, and then Thaddius is engaged and the raid begins its rotations after the first polarity charge.
Notably, the pacing of dps on Feugen and Stalagg may have to be monitored more carefully in this version of the fight. For a 10-man group running 2 tanks, 3 healers, and 5 dps, splitting the raid will mean that one side has more dps players than the other. Consequently, dps on one side may need to slow down for a brief period of time, to ensure that Feugen and Stalagg are killed within 5 seconds of each other and do not resurrect.
The two polarity techniques for this encouter are the "Two-point" and "Four-point" - If you have done 40man naxx at level 60, you are likely to have learn't the 4point, but i would reccomend the two point here.
It basically involves assigning a direction to each polarity (usualy Minus = left and Plus = right). As you look in the room before you attack the two mini bosses you will see thaddius, to the left of him (as you are facing) and to the right are what is refered too by left and right.
You only need to get this bit right Once!
when you pull thaddius stack up on the tank (use raid markings on the tank so people know where to go - but remove it before the polarity shift) then when he does it a first time:
Go RIGHT if you have a PLUS LEFT if you have a MINUS
From then on the fight becomes simple. Stack ontop of each other in melee range - this assures that everyone gets the buff and due to thaddius's huge hitbox, you can be well out of range of the other group members with different charges.
Correct me if i'm wrong but, out tanks never got the same polarity throughout this encounter, so one was always at each side, if this is correct, you can then mark both tanks and use those so people know where to stack.
When Thaddius changes polarity again, you must look carefully - if your Polarity has CHANGED, run through the boss and stack on the other side.
If it didnt change STAY WHERE YOU ARE!
continue this for 4-5 mins and you will either kill him or kill yourself depending on how well your group has mastered the movement technique.
This technique requires fast reactions and good awareness of de-buffs - as there does seem to be some fault with some mods for this encounter. If you are part of the same group that Downed Grobbulus, you are likely to be able to posses the IQ to do this encounter.
In 10 man if one person messes up - this does not mean a wipe, if you are unsure where to go, move our of melee range and stand as far away from the boss and both groups as possible, until you understand the mechanic.
Frostwyrm Lair
Sapphiron:
This boss is all about having gear or not, frost resistance gear and aura/totem will help at this boss big time.
You engage Sapphiron by having the tank walking towards him. Now all of you should go to either right or left side. Avoid blizzard and keep dpsing him, when he goes into Air Phase you should wait for that some players will get transformed into an ice tomb and you should hide behind those, there will be spawned 2 on normal and 3 on heroic difficulty. This is just about rinse/repeat until he is dead.
The reason that this boss is hard is that he got an debuff doing 300-500 dmg every second on the whole raid, which requires awesome healing.
Kel'Thuzad
The 10-man version of Kel'Thuzad is significantly easier than the 25-man and should not give you much trouble if you are able to kill Sapphiron. Since the Guardians do not hit very hard on 10-man and since Kel'Thuzad cannot target the main tank with frost blast on 10-man it can be beneficial for the main tank to pick up both Guardians and tank them along with Kel'Thuzad. This eliminates the possibility of the offtank being frost blasted while tanking Guardians which can often result in death.
(Pre-Patch) The 10-man abilities only comprise of the Frost Bolts (single-target frost bolt can be interupted), the Raid-wide Frost Bolts (must be healed through) Mana Detonation (positional), and Shadow Fissure (instant death if in the area of effect). Healers, it's important to keep the raid topped off and heal the frost bolted target ASAP. A best case scenario will have a designated healer(s) watching for Frost Blast, a healer for the tank and aoe/chain heals for the raid-wise frost-bolts. The frost raid healer will need to stand more towards the center of the raid to have access to the entire raid. Healers should also be ready to heal each other in case of Frost Blasts, and to fill in for each other as needed.
If there is any more questions I’m willing to set up an FAQ and help you out,
Note: ULDUAR WILL COME SOON!
Note: SARTHARION 1-2-3D COMING SOON!
These bosses are exactly the same for 10 man as for 25 man. Shouldn’t be any different at all.
If there is any more questions I’m willing to set up an FAQ and help you out,
Note: ULDUAR WILL COME SOON!
Note: SARTHARION 1-2-3D COMING SOON!
These bosses are exactly the same for 10 man as for 25 man. Shouldn’t be any different at all.
Some of the credits goes to:
Thottbot.com
Allakhazam.com
raidguide.blogspot.com

![[Guide] Basic and advanced RAIDING.](https://www.ownedcore.com/forums/./ocpbanners/1/2/9/8/0/2/2/01d9781faec8bfe3abf9095ac9e57d1e.jpg)
![[Guide] Basic and advanced RAIDING.](https://www.ownedcore.com/assets/mm/images/wits.png "TradeSafe Middleman")
![[Guide] Basic and advanced RAIDING.](https://www.ownedcore.com/forums/images/styles/OwnedCoreFX/addimg/wicc.png "CoreCoins")

Shout-Out
User Tag List
Results 1 to 15 of 32
-
06-18-2009 #1
![[Ban Hammer]'s Avatar](https://www.ownedcore.com/forums/images/styles/OwnedCoreFX/addimg/noavatar.svg "[Ban Hammer]'s Avatar") Banned
Banned![[Ban Hammer] is offline](https://www.ownedcore.com/forums/images/styles/OwnedCoreFX/statusicon/user-offline.png)
- Reputation
- 394
- Join Date
- Dec 2007
- Posts
- 728
- Thanks G/R
- 0/0
- Trade Feedback
- 0 (0%)
- Mentioned
- 0 Post(s)
- Tagged
- 0 Thread(s)
[Guide] Basic and advanced RAIDING.
Last edited by [Ban Hammer]; 06-18-2009 at 12:28 PM.
![[Guide] Basic and advanced RAIDING.](https://www.ownedcore.com/images/ba/g/b2.gif)
-
06-18-2009 #2
Banned
- Reputation
- 394
- Join Date
- Dec 2007
- Posts
- 728
- Thanks G/R
- 0/0
- Trade Feedback
- 0 (0%)
- Mentioned
- 0 Post(s)
- Tagged
- 0 Thread(s)
67 views and no replies.. Cmon guys, say something...
-
06-18-2009 #3
Member
- Reputation
- 29
- Join Date
- Mar 2008
- Posts
- 365
- Thanks G/R
- 0/0
- Trade Feedback
- 0 (0%)
- Mentioned
- 0 Post(s)
- Tagged
- 0 Thread(s)
good stuff lol wish i woulda read this when i first started naxx. got kickd from so many pugs >.< took alot of time +rep
-
06-18-2009 #4
Banned
- Reputation
- 394
- Join Date
- Dec 2007
- Posts
- 728
- Thanks G/R
- 0/0
- Trade Feedback
- 0 (0%)
- Mentioned
- 0 Post(s)
- Tagged
- 0 Thread(s)
Thanks for rep and love you (<3) for replyingOriginally Posted by raze1225 and btw, saying +rep doesnt give it to me ^_^ You need to press a button hehe
Last edited by [Ban Hammer]; 06-18-2009 at 03:28 PM.
-
06-18-2009 #5
Member
- Reputation
- 11
- Join Date
- Jun 2009
- Posts
- 138
- Thanks G/R
- 0/2
- Trade Feedback
- 0 (0%)
- Mentioned
- 0 Post(s)
- Tagged
- 0 Thread(s)
Tactics seem good
What stuck out:
You say 2k dps and demand hit-capped -2k dps is 2k dps -doesn't matter how much hit your have, also don't know about all classes but for example rogues don't get hit-capped, you reach style-cap and are happy and after that you whatch out for hitting the poison hit cap (from there on hit becomes worth less than several other stats)
Another Suggestion: Your post is huge giving the headline of each bossfight in naxx a color according to the quarter will help finding the right part when people come back hereLast edited by bt411; 06-18-2009 at 03:36 PM.
-
06-18-2009 #6
Active Member

- Reputation
- 30
- Join Date
- Oct 2007
- Posts
- 252
- Thanks G/R
- 0/0
- Trade Feedback
- 0 (0%)
- Mentioned
- 0 Post(s)
- Tagged
- 0 Thread(s)
Holy cow you've been busy mate

+rep for all that effort
Hows the hunter btw?
-
06-18-2009 #7
Member
- Reputation
- 29
- Join Date
- Mar 2008
- Posts
- 365
- Thanks G/R
- 0/0
- Trade Feedback
- 0 (0%)
- Mentioned
- 0 Post(s)
- Tagged
- 0 Thread(s)
ya i did rep u my comps slow on mmowned though
-
06-18-2009 #8
Member
- Reputation
- 35
- Join Date
- Apr 2007
- Posts
- 491
- Thanks G/R
- 0/0
- Trade Feedback
- 0 (0%)
- Mentioned
- 0 Post(s)
- Tagged
- 0 Thread(s)
Assuming you wrote this all your self, amazing job. +Repx3 from me.

-
06-18-2009 #9
Member

- Reputation
- 2
- Join Date
- Sep 2008
- Posts
- 30
- Thanks G/R
- 0/0
- Trade Feedback
- 0 (0%)
- Mentioned
- 0 Post(s)
- Tagged
- 0 Thread(s)
Very nice guide indeed.
May i just say that Healers/casters can also use the 'Flask of pure Mojo' to help mana regeneration.
Flask of Pure Mojo - Item - World of Warcraft
+rep BtwLast edited by elliojohny; 06-18-2009 at 06:25 PM.
-
06-18-2009 #10
Member
- Reputation
- 53
- Join Date
- Oct 2008
- Posts
- 264
- Thanks G/R
- 0/0
- Trade Feedback
- 0 (0%)
- Mentioned
- 0 Post(s)
- Tagged
- 0 Thread(s)
A bit of copy and paste here or there, but enough text written by yourself to call it original I think. Rep from me.
-
06-18-2009 #11
Member
- Reputation
- 13
- Join Date
- Sep 2008
- Posts
- 82
- Thanks G/R
- 0/0
- Trade Feedback
- 0 (0%)
- Mentioned
- 0 Post(s)
- Tagged
- 0 Thread(s)
U cant compare the poor mp5 vs 120 sp, Frost wyrm is way better.Originally Posted by elliojohny
btt: Nice Guide espacially its nota wall of text and easy to read. Usefull to new starting ppl, but Ulduar should be more uptodate.+Rep
-
06-18-2009 #12
Member
- Reputation
- 2
- Join Date
- Sep 2008
- Posts
- 30
- Thanks G/R
- 0/0
- Trade Feedback
- 0 (0%)
- Mentioned
- 0 Post(s)
- Tagged
- 0 Thread(s)
I aggree and disagree :POriginally Posted by lolnej7
Dps casters of will use 120sp flask ofc, however Healers (not all but some) are likley to go with Mana regen flask as they have to heal their ass off alot of the time or find they go oom rather quickly specailly on bosses that often enrage throughout the fight, or bosses that have debuffs (Sapth in naxx).
-
06-18-2009 #13
Contributor

- Reputation
- 88
- Join Date
- May 2008
- Posts
- 485
- Thanks G/R
- 0/1
- Trade Feedback
- 0 (0%)
- Mentioned
- 0 Post(s)
- Tagged
- 0 Thread(s)
+Rep. None of this helps me (10/13 Heroic Ulduar Glory), but I can see you put a lot of time into this guide, it is well constructed, and can help those that are new to raiding.

-
06-19-2009 #14
Member
- Reputation
- 4
- Join Date
- Nov 2007
- Posts
- 21
- Thanks G/R
- 0/0
- Trade Feedback
- 0 (0%)
- Mentioned
- 0 Post(s)
- Tagged
- 0 Thread(s)
+2 rep, very good write-up mate.
-
06-19-2009 #15
Banned
- Reputation
- 394
- Join Date
- Dec 2007
- Posts
- 728
- Thanks G/R
- 0/0
- Trade Feedback
- 0 (0%)
- Mentioned
- 0 Post(s)
- Tagged
- 0 Thread(s)
I love the hunterOriginally Posted by Flipperfin
How's the paladin?
And guys/girls, so glad you like it
and @ at flask thing, i would rather go with 120+ SP than 24 mp5 considering that a hell lot of classes will give you mana regen like replenishment, totems, innervate and alot of other things
Last edited by [Ban Hammer]; 06-19-2009 at 07:03 AM.


 Reply With Quote
Similar Threads
-
Basic WoW Gold Making Guide (Leatherworking and Mining)
By Spinewhip in forum World of Warcraft GuidesReplies: 6Last Post: 07-09-2008, 06:07 PM -
Ahoq's and Blomstershot's guide for Survival and Beastmaster raiding.
By gcbdm in forum World of Warcraft GuidesReplies: 7Last Post: 05-12-2008, 09:10 AM -
[Guide] Basic Do's and Dont's of GFX
By Greed in forum Art & Graphic DesignReplies: 12Last Post: 01-27-2008, 07:49 AM
-
OwnedCore Forums
casino news World of Warcraft Pokemon GO MMO Overwatch RTS Casino reviews www.planet-casino.com lucky 8 lucky8 no deposit codes bc game bc game lucky8 -
casino
Casino Gambling Online casinos Casino en ligne bc game bc game bc game no deposit bonus codes roobet Top 10 Casinos Casino reviews Bitcoin casino Paypal Casino Lucky8 1xbit heycasino Renting Sites IP-changer? How to protect yourself [question] is this Giving away warlock Neelz Scamming Help Name Google-Fu? [Question] Program name Help with my phishing -
CoreCoins
CoreCoins CoreCoins FAQ Shout-Out Banner Ads -
My OwnedCore
My Profile Notifications Settings Buy CoreCoins About Us


Privacy Policy | Cookie Policy | Terms | Contact Us
Available Payment Methods:-
![[Guide] Basic and advanced RAIDING.](https://www.ownedcore.com/images/paybutton/paypal.png)
![[Guide] Basic and advanced RAIDING.](https://www.ownedcore.com/images/paybutton/skrill.png)
![[Guide] Basic and advanced RAIDING.](https://www.ownedcore.com/images/paybutton/payop.png)