
All credit goes to http://wowmb.net/forums/f100/30457-wrath_lich_king_dailies_list_your_guide_not_missing_any/
The dailies list below are for...
Borean Tundra
Howling Fjord
Grizzly Hills (Alliance)
Grizzly Hills (Horde)
Dragonblight
Zul'Drak
Sholazar Basin - Choosing your faction!
Sholazar Basin - Oracles Dailies
Sholazar Basin - Frenzyheart Dailies
Icecrown Glacier - Alliance
Icecrown Glacier - Activating Horde Quests
Icecrown Glacier - Horde Dailies
Icecrown Glacier - Neutral Dailies
Storm Peaks
This again is not my guide. I just simply COPY/Paste and put it all in one spot for MMowned viewers.
Borean Tundra
There are two Dailies in Borean Tundra, both available to Alliance and Horde. There is no order in doing them as they are both in separate locations.
[71] Drake Hunt (Both)
From: Raelorasz at the Transitus Shield on the south-east edge of Coldarra, location 33.2, 34.4
Objective: Raelorasz wants you to use the Blood-tipped Spear to subdue a Nexus Drake Hatchling with the Raelorasz's Spear provided, and return it to him at the Transitus Shield
Reward: 20100 experience and 7g 10s, Sweltering Robes and 250 reputation with The Wyrmres Accord for the first hand in. 20100 experience, 4g 70s and 250 reputation with The Wyrmres Accord for each daily completion.
Getting there: The Coldarra is a huge rocky island just out from Borean Tundra, you can't really get there by foot. If you have not been there before, you will need to make your way to Amber Ledge, where you can speak to Surristrasz, the large dragon, for a flight. This will land you inside the Transitus Shield where you can speak to Raelorasz.
Pre-requisites: Before you can accept the Drake Hunt daily quest, you will need to do a couple of quests for Raelorasz. The first one offered is Basic Training, which is an easy kill quest. Simply kill 10 Coldarra Spellweavers which can be found basically everywhere. After you have completed that, the next one is Hatching a Plan which requires you to kill Coldarra Wyrmkin and use the frozen axes they drop to break 5 blue dragon eggs. Each axe only breaks one egg, so you will need to collect 5 axes, then head down to the area right outside The Nexus and break the eggs by right clicking on them. Eggs look like they have spikes and will be sparkly.
Once you have done those two quests, Drake Hunt becomes available for you and you can do it each day.
The drakes for this quest are flying around Coldarra, at well over 30 yards up in the sky. You can reach them with the spear provided, so no need to wait for them to come close to ground. You also don't have to kill them, simply 'tank' them for 25 seconds until they turn friendly. Don't start running back as soon as you harpoon them as they will stay at that spot and you will get too far away, causing the hatchling to break free. Simply stand there for 25 seconds, and once you have successfully captured it and it turns friendly, return it to Raelorasz before the 3 minute timer is up.
Tip: Take the elevator of the western platform, and capture the hatchling that pass over it. Simply head straight out (west) from the quest giver and down into the ravene that runs around The Nexus. Following it clockwise (left) you want the first exit out which will bring you up right in front of the elevataor. Once at the top, spam your macro (below) until you have your drake.
Note: You can mount to return the drake. If you are having trouble seeing the drake's, you may need to turn your video settings up. The following macro might also simplify your life ...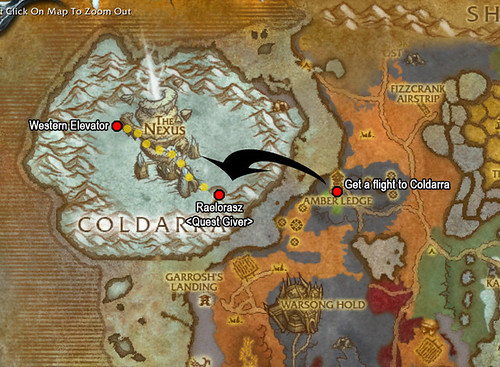
[72] Preparing for the Worst (Both)
From: Utaik at Kaskala
Objective: Utaik wants you to gather 8 Kaskala Supplies in Kaskala.
Reward: 20300 experience, 9g 86s and 500 reputation with The Kalu'ak for the first hand in. 20300 experience, 5g and 500 reputation with The Kalu'ak for each additional daily hand in.
Pre-requisites: No real pre-requisites for this. The quest is available immediately, and becomes a daily after you have completed it for the first time.
Really easy quest. The Kaskala Supplies are scattered all around the Kaskala camp and look like picnic hampers - sparkling picnic hampers. If you are doing this quest for the first time, you can combine it with Not Without a Fight! which is accepted from Ataika right near Utaik.
[80] Aces High! (Both)From: Corastrasza on the upper ring of the Nexus in ColdarraObjective: Ride Corastrasza's drake and kill 5 Scalesworn ElitesReward: 14g 80s, Incursion Vestments and 350 reputation with The Wyrmrest Accord the first hand in. 7g 40s and 350 reputation for each additional hand in.Corastrasza is located on top of one of the floating rings above Coldarra, approximate location 29, 25, so you will need a flying mount to reach her. Many feel this quest is great practice for the Malygos encounter, as it provides access to riding a drake with identical abilities to those found during phase 3 of his encounter. The drake you are riding has 5 abilities:
- Flame Spike - Damaging fire attack causing 943-1057 fire damage and awarding 1 combo point at the cost of 10 energy.
- Engulf in Flames - Finishing move which launches a blast of flame igniting target for 1500 fire damage every 3 seconds. The effect can stack and will last longer per combo point up to 22 seconds. Costs 50 energy.
- Revivify - A Heal over time that lasts for 10 seconds healing 500 per second and awarding 1 combo point at the cost of 10 energy.
- Life Burst - Huge healing finishing move which increases the casters healing done by 50% and lasts longer per combo point. Max combo points award a 15k heal over 25 seconds. Costs 50 energy.
- Flame Shield - Finishing move to protect your drake. Shield surrounds you reducing all damage taken by 80% and lasting up to 6 seconds for max combo points. Costs 25 energy with a 30 second cooldown.
The general idea is to keep up Revivify to 5 stacks and open with 5 Flame Spikes then an Engulf in Flames. From there it's a balancing act of refreshing Revivify to keep the 5 stack and using Flame Spikes and Engulf in Flames. The faster you can stack Engulf in Flames, the better, but it's expensive and you need to always have energy and hopefully a combo point available for when the blue dragon casts Arcane Surge. The Arcane Surge deals a lot of damage and that's when you need to use Flame Shield. Just like rogues, they have a one-second global cool down and changing targets wipes combo points.
Once you have killed your Scalesworn, return to Corastrasza to hand in.
Howling Fjord
[71] Break the Blockade (Alliance)
From: Bombardier Petrov at Westguard Keep
Objective: Take Petrov's Cluster Bombs and drop them on enough pirates to kill or destroy 25 Blockade Pirates and 10 Blockade Cannons.
Reward: 20100 experience, 4g 70s, 125 reputation with Alliance Vanguard and 250 reputation with Valiance Expedition (7g 10s at level 80)
You will find Bonbardier Petrov standing on the 'docks' of Westguard Keep. Speaking to him will give you the quest and some cluster bombs. You are to hitch a ride on the zeppelin that Harrowmeiser has apparently 'loaned' to Petrov and bomb the pirate scoundrels residing on the decks of the ships at see. You can see the ships from the docks. The zeppelin takes a very long trip around the bay, pass multiple ships for you to bomb, so you should be able to get it done in one trip. If you group with other people on the boat, you will guarantee to complete it, so there's no reason not to group with them really. In fact, it can work against you not grouping with people, because if they throw their bombs before yours, they can take the kills leaving you with nothing but wasted explosions.Tip: Stand at the very front nose of the boat for the best angle to bomb.Breaking the cannons can be a bit of a sticking point if you're doing it solo. The best way to do it is to try to aim the center of the firing circle directly at the cannon. Doing so will hopefully destroy it in one shot. Aiming between the cannons to try and hit multiples does far far less damage and is a waste of time as you will more than likely not complete the objective on one pass.
The zeppelin stays docked for 2 minutes in between trips and you can tell how long is left by talking to the goblin, or waiting for his yell. There are no pre-requisites for this quest, and it's very easy to do, so if you are leveling in the area, be sure to do it each day. Easiest 20k experience. And be sure to take in the view once you are complete, beautiful view. And for something a little bit fun, on the very last ship, at the top of the mast, there is a pirate dancing.

[71] Steel Gate Patrol (Alliance)
From: Steel Gate Chief Archaeologist at Steel Gate
Objective: You're Steel Gate's ace pilot now, so the Steel Gate Chief Archaeologist wants you to keep patrol around the dig site and fight off anything that attacks. Report back to him when you're done with your patrol.
Reward: 20100 experience, 4g 70s, 2 x Super Healing Potion and 250 reputation with Explorers' League
Pre-requisites: In order to open up the daily, you need to prove yourself. First thing is to speak to Explorer Irena Stonemantle for the quest See to the Operations. You will find Irena on the raised platform a few feet away from Chief Archaeologist. Apparently you need to prove to Irena that you can walk a few feet and begin a conversation. The quest simply asks you to speak with a Steel Gate Chief Archaeologist at Steel Gate. I guess that's in case you weren't able to see him without her assistance.
After you hand that extremely difficult step in, Chief Archaeologist will give you your first task - I've Got a Flying Machine! The Steel Gate Chief Archaeologist wants you to transport 3 Sacks of Relics from the bottom of the site and take them to the platform on the north or south side of Steel Gate. This is a rather fun quest, if not a little difficult to actually fly the machine.
Using your right mouse key is the easiest way to maneuver the flying machine I found. Unfortunately it doesn't behave anything like a normal flying mount, rather it goes forward in the direction it is pointed and doesn't stop until it hits something (like the cliff wall, the tent or the platform in my case). If you think about how a normal (real life) plane flies, you will be ok. You can't go straight up like we're used to with our flying mounts by pressing the space bar - instead doing so will tilt the planes nose upward while still moving forward. You can't go backwards, instead you will have to turn around in place...
The sacks you are looking for are large cream bags. Since I was having such trouble flying the plane, I found it easier to just start spamming the grappling hook until I got something. Once you have picked up a sack, fly over one of the square platform with the hunters arrow over it on either side of the site. Once you have returned 3 sacks, fly over to Chief Archaeologist and hit the dismount option (red arrow).


Hand in and you are now able to collect the daily!! Back onto the flying machine, only this time you are equipped with a machine gun and rockets!! You're Steel Gate's ace pilot now, so the Steel Gate Chief Archaeologist wants you to keep patrol around the dig site and fight off anything that attacks. Around the dig site is lots of gargoyles - simply target and fire! The good news (for me) is that the machine guns will fire at your target no matter which way you are facing. I was pleased to see it could should right out my aah.... the back of the plane.Once you're done killing, return the plane and hand in. Done! Come back tomorrow for more air time...


[71] The Way to His Heart... (Both)
From: Anuniaq at Kamagua.
Objective: Toss Tasty Reef Fish at a Reef Bull to lead it to a Reef Cow. Once you have helped the two to find true love, return to Anuniaq at Kamagua.
Reward: 20100 experience, 7g 10s and 500 reputation with The Kalu'ak
Pre-requisites: In order to be able to complete this daily, you need to do a quest from Scuttle Frostprow, who unfortunately, is quite hostile towards you. So first, you need to raise your Street "Cred".
For this quest you need to collect fish with Anuniaq's Net provided, found in schools off the coast of the Isle of Spears in the southern region where you cross over to the isle with the Scalawag Point on it. Simply swim close to one of the schools and right click your net to collect them. You can collect up to 5 fish from each school, so you will need to pick up 2 or 3 schools worth of fish. These schools are not trackable with the Find Fish ability. Apparently the Sharks also drop these tasty reef fish as well.
Now that you have the fish, you have to be able to get a Bull to the Cow. To do this stand 20 yards from the bull on the isle with the scalawag point on it - and throw the bull a fish. Once you do this he will run at you. Back up 20 more yards and throw another fish, each time you throw one he'll run to the pt you were standing at, so continue to back up until you are able to stand on the isle of the spears and on a rock w/ a cow on it. The two should have hearts over their heads and you should get quest credit.
It takes about 6-10 of these Tasty Reef Fish to finish the quest, so you may as well get them all before you do it. Also note that when you turn in the quest, any leftover Tasty Reef Fish will be automatically deleted from your inventory. Don't waste time trying to save up for the next day.


User Tag List
Thread: WotLK Dailiest Walkthrough
Results 1 to 15 of 20
-
02-25-2009 #1
 Member
- Reputation
- 36
- Join Date
- Mar 2007
- Posts
- 82
- Thanks G/R
- 0/0
- Trade Feedback
- 0 (0%)
- Mentioned
- 0 Post(s)
- Tagged
- 0 Thread(s)
WotLK Dailiest Walkthrough
Last edited by KTTnVST; 02-25-2009 at 11:15 PM.

-
02-25-2009 #2
Member
- Reputation
- 36
- Join Date
- Mar 2007
- Posts
- 82
- Thanks G/R
- 0/0
- Trade Feedback
- 0 (0%)
- Mentioned
- 0 Post(s)
- Tagged
- 0 Thread(s)
All credit goes to http://wowmb.net/forums/f100/30457-wrath_lich_king_dailies_list_your_guide_not_missing_any/
The dailies list below are for...
Grizzly Hills (Alliance)
Grizzly Hills (Horde)
This again is not my guide. I just simply COPY/Paste and put it all in one spot for MMowned viewers.
Grizzly Hills - Alliance
Venture Bay and other posts along the main river are one of the lesser PvP areas of Northrend - except on a wider scale with more daily PvP quests. The best thing about it however, is that you can group your quests together and knock them out at the same time. Running around killing other players, while collecting parts and returning shredders. What could be better than that? Getting experience every day for it! So for those players who love PvP, but late the leveling required to get involved, this may be your answer.
Below is a list of all the quests, broken into Alliance and Horde sections. They are not in any particular order at the moment, once I get a chance to experience them (and level to get there), I may rearrange them into the best 'grouped' order.
Alliance Quests
[74] Riding the Red Rocket (Alliance - PvP)From: Commander Howser at the lighthouse in Venture Bay
Objective: Destroy the Horde lumber shipment.
Reward: 20750 experience, 5g 60s and 10 Venture Coins (see what you can spend the coins on here)
Note: General Gorlok will only be present at the lighthouse when the Alliance have it in their possession. How do you take over the lighthouse from the other faction? Flag and tap the flag right near the Lighthouse. It has to be fully in your factions control to have the quest NPC spawn.
Achievement: Grizzled Veteran Complete the Grizzly Hills PvP daily quests.
The fuel required is Element 115 located at the goblin boat (16,81). Take the Element 115 to the rockets at (14,89) and then steer it into the Lumberboat. Steer by just holding down right click and directing - it doesn't turn very fast so you gotta get used to it and prolly won't get it on your first try.
Useful things to note when doing this:
- While carrying the Element 115 you can mount up without dropping it, but you won't run any faster than normal running speed, so don't bother. You can however swim or water-walk across the water instead of running around the piers.
- When you're riding the torpedo, use the keys to turn and not the mouse. If you use your mouse, the camera will turn faster than the rocket and disorient you. The keys will turn at the same speed as the rocket and keep your camera forward all the time.
- The boat you have to destroy is the wooden Horde boat up by the lumber mill, NOT the central metallic one with the captain. Don't waste your time aiming for the one in the middle, your target is northwest of this.
- Avoid all the ice while on the torpedo, if you hit any of the ice floating on the water, or an iceberg, the torpedo will explode and you'll have to go back and get the element all over again.
[74] Blackriver Skirmish (Alliance - PvP)
From: Scout Captain Carter at Amberpine Lodge
Objective: Scout Captain Carter wants you to kill 10 Horde units or players in the Blackriver Logging Camp.
Reward: 20750 experience, 5g 60s, 10 Venture Coins and 250 reputation with Valiance Expedition
Achievement: Grizzled Veteran Complete the Grizzly Hills PvP daily quests.
Although, upon accepting the quest you will be flagged for PvP, the quest text is a little misleading. You do not have to kill horde players, just mobs. Conquest Hold Raiders will do. Nice and easy... providing no delays in PvP action. Of course, killing Horde players also works!
[74] Keep Them at Bay! (Alliance - PvP)
From: Lieutenant Stuart just east of Venture Bay
Objective: Defeat 10 Horde units or players in Venture Bay and return to Lieutenant Stuart.
Reward: 20750 experience, 5g 60s and 10 Venture Coins
Achievement: Grizzled Veteran Complete the Grizzly Hills PvP daily quests.
Very simple - kill 10 Horde you can find in Venture Bay.
[74] Kick 'Em While They're Down (Alliance - PvP)
From: Sergeant Hartsman found just off the path between Grizzlemaw and Blue Sky Logging Grounds
Objective: Sergeant Hartsman wants you to defeat 15 Horde units or players in Blue Sky Logging Grounds.
Reward: 20750 experience, 5g 60s and 250 reputation with Valiance Expedition
Achievement: Grizzled Veteran Complete the Grizzly Hills PvP daily quests.
Again, easy. Just locate and kill 15 Horde units or players in Blue Sky Logging Grounds.
[74] Life or Death (Alliance - PvP)
From: Rheanna at Blue Sky Logging Grounds
Objective: Use the Renewing Bandage on 10 Wounded Westfall Infantry units to heal them
Reward: 20750 experience, 5g 60s and 250 reputation with Valiance Expedition
Achievement: Grizzled Veteran Complete the Grizzly Hills PvP daily quests.
You'll find these kneeling around the Blue Sky Logging Grounds. Simply right click the bandages while targeting one to use.
[74] Pieces Parts (Alliance - PvP)
From: Pipthwack in Blue Sky Logging Grounds
Objective: Collect 4 Grooved Cogs, 3 Notched Sprockets, and 2 High Tension Springs.
Reward: 20750 experience and 5g 60s
Achievement: Grizzled Veteran Complete the Grizzly Hills PvP daily quests.
Found lying all around Blue Sky Logging Grounds, a simple collect mission.
[74] Shredder Repair (Alliance - PvP)
From: Synipus at Blue Sky Logging Grounds
Objective: Return 3 Broken-down Shredders
Reward: 20750 experience, 5g 60s and Key to Refurbished Shredder
Achievement: Grizzled Veteran Complete the Grizzly Hills PvP daily quests.
There are two Broken-down Shredders within the Blue Sky Logging Grounds. They look like the goblin shredders found in Thousand Needles etc.
- Location 32.8, 39.7 North side of the mini 'island' like patch of ground. Under the 'gg' in logging...
- Location 37.1, 43.0 Just south-east of the river
[74] Smoke 'Em Out (Alliance - PvP)
From: Sergeant Downey just east of Venture Bay
Objective: Use the Smoke Bomb to drive 20 Venture Company Stragglers from their buildings
Reward: 20750 experience, 5g 60s and 10 Venture Coins
Achievement: Grizzled Veteran Complete the Grizzly Hills PvP daily quests.
If you stand at location 17, 77 you can see the bunkhouse, sawmill, and stables. The mobs stop attacking you once you activate the bomb, so aggro as many as you can (instant corruption/curse of Agony if no one around, wand them if it's busy) and once they are all at your side, throw the bomb at your feet. Can complete the quest in 2 - 3 pulls baring other people taking all the mobs.
[74] Down With Captain Zorna! (Alliance - PvP)
From: Baron Freeman at Venture Bay
Objective: Slay Captain Zorna
Reward: 20750 experience, 5g 60s and 10 Venture Coins
Achievement: Grizzled Veteran Complete the Grizzly Hills PvP daily quests.
This quest is labeled for group, recommended 3 players, but a lot of players are reporting that it is easy soloable. As Warlocks, we should have no trouble *smirk*.
[74] Seared Scourge (Both)
From: Mack Fearsen at Granite Springs
Objective: Mack at Granite Springs wants you to use his grog to burn 30 Famished Scourge Trolls.
Reward: 5g
Around location 16.6, 30.6 you can stay on the road and throw the grog at the famished trolls on the ground. They group really bad you are lucky to get one on every toss. Alternatively since we have minions, you send the pet in grab a couple of them, gather them together and keep your distance enough to toss the bottle then run off to leave battle and redo it. If you have a Mage friend with you, this is an easy quest. Simply mount up, round as many as you can; then frost nova them, blink and use the grog.
Grizzly Hills - Horde
Venture Bay and other posts along the main river are one of the lesser PvP areas of Northrend - except on a wider scale with more daily PvP quests. The best thing about it however, is that you can group your quests together and knock them out at the same time. Running around killing other players, while collecting parts and returning shredders. What could be better than that? Getting experience every day for it! So for those players who love PvP, but hate the leveling required to get involved, this may be your answer.
[74] Blackriver Brawl (Horde - PvP)
From: Raider Captain Kronn at the Blackriver Logging Camp.
Objective: Kill 10 Alliance units or players
Reward: 20750 experience and 5g 60s
Achievement: Grizzled Veteran Complete the Grizzly Hills PvP daily quests.
If you enter Grizzly Hills via Conquest Hold, this is the closes Daily, and in my opinion, easiest to complete. Which is why I have listed it first.

As above, the quest advises you before you accept that you will be PVP flagged for the duration of the time you have the quest - from accept to turn in, even if you leave the zone, if it's in your log book, you're pvp enabled. So, if you are wanting to do this daily, do it and hand in. Once you hand in, the 5 minute count down timer begins until you are un-flagged.
This quest requires you to kill either Alliance players, or you can kill the Amberpine Scout's found in and around Blackriver Logging Camp. As I've yet to come across any Alliance myself when doing the quest, I chose the NPC's. Just across from the quest giver is the Logging Camp, and to help you slaughter, there are Horde NPC's scattered all around. Simply do damage on 10 NPC's (or players) and hand in. Very easy!


North west of the Blackriver Logging Camp you will find Granite Springs...
[74] Seared Scourge (Both)
From: Mack Fearsen at Granite Springs
Objective: Mack at Granite Springs wants you to use his grog to burn 30 Famished Scourge Trolls.
Reward: 5g
Pre-requisites: In order to do this daily, you need to do a couple of quests that will then activate the pre-requisite:
- If you are in or near Conquest Hold, you can speak to Sergeant Thurkin to accept Good Troll Hunting. This simply sends you where you need to go anyway.

- Once you speak to Samir, you can accept Filling the Cages which is the first real 'quest' you need to do. This quest, I found, is a bit annoying and doesn't give you anywhere near the amount of information it should. Once you have to quest, you want to locate Budd, who is sitting in the tent Samir is facing (sort of), location 16, 48. If he's not there, someone might have grabbed him recently, so just wait a few seconds for him to reappear (there can be multiple Budd's). Talking to him causes him to follow you for 10 minutes.Note: You can't have a Pet and Budd at the same time as you need Budd's 'pet bar'...Make your way to the Ruins of Drak'Zin, which is directly south of Granite Springs - location 13, 61. This is where it can get a bit tricky, but luckily for you I did every stuff up possible to learn what not to do, so you don't have to.
 Ok, so basically:Be aware of anyone else around doing the same quest, because it can cause both Budd's to go for the same target. Budd despawns once you use him, so you don't want to waste him. If he does despawn, simple return to Granite Springs and grab another one.
- Locate a lone Troll - you want a single one on it's own. Make sure you clear any wandering trash around it - including any Windserpents.
- Do not agro the Troll!
- Select the 'stun' ability on Budd's Toolbar. This will cause him to stun the nearest Troll, not necessarily your target.
- Once the Troll is stunned, move in closer and right click the trap from your inventory to trap it.
Once you are done, return and hand in.
- Drakuru, just down from Samir will now give you the quest Truce? Very simple. Beside Drakuru is a tree stump with a knife sticking out of it. Right click the knife to loot it, and then right click it from your inventory to cut your hand. Once you have done that, speak to Drakuru and shake his hand to complete the pact. Done. Complete quest.
- Next is Vial of Visions, also from Drakuru. Talk to the female troll standing a couple of yards away to purchase the imbued vials, then head due north towards the river. While you are running you will (hopefully) see the Haze Leaf, they are sparkly bushes scattered all around. The Waterweeds are from the bottom of the river, which you may need to clear a couple of Threshers to get to. Location is approx 14, 40.


- Once you return and hand that in, Subject to Interpretation will become available. But, don't worry about that quest. The one you're after now is Scourgekabob from Prigmon just a few feet away. This is the pre-requisite line you need for the daily. If you want to continue Subject to Interpretation, by all means, but it's not needed for the daily. Instead, you want to right click one of the Mummified Troll Carcass' to loot it, run over to where Mack Fearsen is standing (who is near Drakuru) and right click the carcass again to throw it on the fire.

- You can now collect the quest that becomes the daily - Seared Scourge. First time you do it, you only need to burn 20 Famished Scourge Trolls - the daily requires you to burn 30. If you've been to Drak'Tharon, you will know the big stairs that lead into it. Either side of the stairs you will find the Famished Scourge Trolls. If you've not yet been to Drak'Tharon, just make your way north from Granite Springs to 17, 30.
The grog that Mack gives you is long range - you can't drop it at your feet. This is good though, as you can stand just in off the path and bomb the trolls from a safe distance. The trolls walk all around the area, in no particular pattern, so aim where you think a few might wander to try to burn more than one at a time. The good part is that when you do throw your grog, multiple trolls can walk through it, both as it lands as well as the few seconds after. It's possible to get up to 5 Trolls in a go.
The easiest way to do it as a Warlock is to use your pet - Voidwalker works best. Get him to hit a few and round them up, then throw your grog to burn them. If you have a mage, rounding and Frost Nova to hold them in place, then bomb. Easy. If you run out of grog before you obtain your burn count, simply return to Mack and request some more.


Once you hand this in, the exact same quest becomes available as a daily version. Only, you need to kill 30, not 20. Easy, and no PvP required!
Blue Sky Logging Ground
Next on my PvP route is the Blue Sky Logging Ground. Found just north-east of Granite Springs, it provides 4 quick and easy dailies that can be done together. All four quests are picked up at the same area - on the north west side river bank, location approximately 34, 33. Like the first quest, you will be PvP flagged for as long as the quests remain in your log.
[74] Keep 'Em on Their Heels (Horde - PvP)
From: Commander Bargok at the Blue Sky Logging Ground.
Objective: Kill 15 Alliance units or players
Reward: 20750 experience, 5g 60s and 250 reputation with Warsong Offensive
Achievement: Grizzled Veteran Complete the Grizzly Hills PvP daily quests.
[74] Making Repairs (Horde - PvP)
From: Lurz at Blue Sky Logging Grounds
Objective: Collect 4 Grooved Cogs, 3 Notched Sprockets, and 2 High Tension Springs
Reward: 20750 experience, 5g 60s and 250 reputation with Warsong Offensive
Achievement: Grizzled Veteran Complete the Grizzly Hills PvP daily quests.
[74] Overwhelmed! (Horde - PvP)
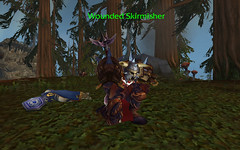
From: Aumana at Blue Sky Logging Grounds
Objective: Use the Renewing Tourniquet on 10 Wounded Skirmishers
Reward: 20750 experience, 5g 60s and 250 reputation with Warsong Offensive
Achievement: Grizzled Veteran Complete the Grizzly Hills PvP daily quests.
[74] Shred the Alliance (Horde - PvP)
From: Grekk at Blue Sky Logging Grounds
Objective: Acquire 3 shredders
Reward: 20750 experience, 5g 60s, 250 reputation with Warsong Offensive and Key to Refurbished Shredder
Achievement: Grizzled Veteran Complete the Grizzly Hills PvP daily quests.
Once you have collected the quests above, make your way over to the main 'island' part over the bridge. There are four main things you are looking for:
- Wounded Westfall Infantry. These are Alliance NPC's which you can kill to count towards your 15 needed. If there are Alliance players around, they'll do too.

- Wounded Skirmisher's. These are our Horde NPC's we need to heal with the Renewing Tourniquet provided. Target and right click the Tourniquet.
- Broken-Down Shredders. There are a few of these around the camp - I saw at least 4. They look like the goblin shredders found in Thousand Needles, and when you mouse over them will give you the curved arrow, indicating you can 'mount' them. Simply get close enough to mount one, and direct it back to where you got your quests from. The shredders have 3 main features:Number 5 allows you to deliver the shredder once you arrive. Do this 3 times to complete the quest. I tend to grab them when ever I can as they can be hot property if the area is busy.
- Short Circuit - Hurls a lightning bolt at the enemy, dealing 728 to 844 damage and then jumps to additional nearby enemies.
- Backfire - Blinds nearby enemies, causing them to wander disorientated for up to 10 sec. Any damage caused will remove the effect.
- Overclock - Increases the shredder's movement speed by 300% for 5 seconds.
- Short Circuit - Hurls a lightning bolt at the enemy, dealing 728 to 844 damage and then jumps to additional nearby enemies.
- And last but not least, you are looking for sparklies!! Lying all around the place are Grooved Cogs, Notched Sprockets and High Tension Springs. They all sparkle, so just look for those and collect when you see.
I find the easiest way to do it is to run in looking for the sparklies and shredders. Return any shredders I find while looting the cogs and sprockets as it gets those out the way nice and quickly. Then you are free to kill and heal until complete. There is no real 'order' to do them though, find your own routine that suits. Four easy quests for some nice experience and gold.


Venture Bay
I choose to leave Venture Bay till last as it can be a busier area, but also because one of the quests, if you choose to do it, stops all speed enhancements as well as surrounds you with big flashing, yellow "come kill me" sparkles. Like the Blue Sky Logging Grounds, you collect your quests from a central location, run in to do them, then hand in. They will also keep you flagged for as long as they are in your quest log.
The quests are collected just north west of the Bay area, on a separate little island. See the map below. Two are collected from inside the lumber mill, one outside. If this is your first time here, there is a fourth quest that you can do - not a daily, more PvP related. But it does become repeatable for 2 coins each time you do it.
Venture Coins
Completing the quests in Venture Bay rewards you with Venture Coins. You can then use the coins to purchase items. In order to unlock the vendors, your faction must control the Venture Bay. This happens through an event similar to the Eastern Plaguelands Towers event, or Halaa - people of your faction on the southern island cause progression. Whichever faction has more people there moves the bar in their direction. Beware, the area is full of elite NPCs with ~33k hp if your faction is not controlling the Isle.
[74] Crush Captain Brightwater! (Horde - PvP -Group)
From: General Khazgar at Venture Bay
Objective: Slay Captain Brightwater
Reward: 20750 experience, 5g 60s and 10 Venture Coins
Achievement: Grizzled Veteran Complete the Grizzly Hills PvP daily quests.
[74] Smoke 'Em Out (Horde - PvP)
From: Stone Guard Ragetotem just out from Venture Bay
Objective: Use the Smoke Bomb to drive 20 Venture Company Stragglers from their buildings and then report to Stone Guard Ragetotem.
Reward: 20750 experience, 5g 60s and 10 Venture Coins
Achievement: Grizzled Veteran Complete the Grizzly Hills PvP daily quests.
[74] Keep Them at Bay (Horde - PvP)
From: Centurion Kaggrum just west of Venture Bay
Objective: Defeat 10 Alliance units or players in Venture Bay
Reward: 20750 experience, 5g 60s and 10 Venture Coins
Achievement: Grizzled Veteran Complete the Grizzly Hills PvP daily quests.
Although the Captain Brightwater quest is labeled for group, it is very easy (for most) to solo. I did it without really blinking as a BM Hunter, so Warlocks should have no trouble. You will find the good captain on the furthest boat from the Horde camp. Run along the docks until you reach the second last pier, where the paddle boat is. It actually looks like a motorcycle more than a paddle boat, but if you look under the 'rear wheel' you can see it. I've included a picture below in case I've just utterly confused you.
The Captain is out on the deck. I got him with one friend, and didn't even really need to board the boat to agro him, so don't go running blindly on. He is elite, but very easy. I tend to go for him first to get him out the way.
Once you have dispatched of the captain, make your way to the buildings that overlook the piers. In there you will find the Venture Company Stragglers you need to smoke out. Each building has 5 - 10 or so in there. The best way I found to do it was to run in (or send your pet in if you're unsure) to gather them all up. They're all melee, so it's no problem. Once they are all together, throw your bomb down at their feet. The bomb stuns them and they take off, so you shouldn't take too much damage. Be aware though that hitting them does pushback the bomb cast time, but I've yet to have it be any real problem.
While you are clearing those, kill any Alliance NPC's (or players) that you pass to complete your kill count. Voila! Done!


[74] Seeking Solvent
From: Gurtor at the Venture Bay Horde baseObjective: Retrieve a canister of Element 115Reward: 20750 experience, 5g 60s and 10 x Venture Coins (2 coins for each repeat)
This is the non PvP/Daily quest I mentioned above. I tend to do it on my way back because, well, I'm heading back anyway. If there is a lot of player PvP happening though, you can return your quests above to help drop your PvP flag and then go back and do this. The Element 115 is located in the captains quarters of the middle boat. It's full of Venture Company who won't flag you for PvP, but will give you XP and loot!
When you board the boat, you will have two options - to go up the stairs, or to go in the door. Ignore the stairs, take the door. This will take you practically to the captains quarters, where you need to kill a single mob and then loot one of the barrels you see there. Looting it will bind it to you, as well as give you a debuff that stops any form of movement enhancement (meaning there's no point mounting, hitting a sprint potion, etc) as well as increase the damage you take by 35%. The real kicker though is the bright yellow pulsating "come kill me" sparkles that surround you. This is why, if it's busy, you may want to do this unflagged.
Simply return the canister to Gurtor to hand in. Do it as many times as you like.


[74] Riding the Red Rocket (Horde - PvP)From: General Gorlok at the lighthouse in Venture Bay
Objective: Destroy the Alliance Lumber Boat.
Reward: 20750 experience, 5g 60s and 10 Venture Coins
Note: General Gorlok will only be present at the lighthouse when the Horde has it in their possession. How do you take over the lighthouse from the other faction? Flag and tap the flag right near the Lighthouse. It has to be fully in your factions control to have the quest NPC spawn.
Achievement: Grizzled Veteran Complete the Grizzly Hills PvP daily quests.
This quest is a bit tricky, especially if you are alone. General Gorlok will only be present at the lighthouse when the Horde have it in their possession. If it's under Alliance control, you need to flag up (/pvp on) and stand near the Lighthouse until the little ticker bar moves all the way across to Horde. Of course, the island will be covered with Alliance Guards... Elite guards, just to liven things up. The easiest way to convert the flag is to run along the dock closest to the Horde outpost, and jump into the water before you reach the island. Swim around until you see the dock with the rocket ship beside it. If there is an NPC standing near the dock, wait as he will walk away. Once it's safe, run up onto land and to the back
of the lighthouse. Stand there (see screenshot at the end) until the lighthouse caps Horde. Takes about 15 - 20 minutes with just one person there.
Once it does, General Gorlok will spawn at the lighthouse door. There will be some fighting going on as the Horde kill all the Alliance NPCs, feel free to help out. Especially if the general is being attacked because if he gets killed, he doesn't respawn. Instead Alliance would have to covert it, and then Horde recap it. Once General Gorlok is available to talk, accept the quest.
Now you need to head over to the Venture Co boat and grab an Element 115. See the above notes on how to get one of those. Once you have it, make your way back to the island and back to do the dock behind the lighthouse. At the very end, in the water, you will see four little red rockets. As you get closer, you will see the green arrow indicating you can mount one, which you want to do. You only see the mount option when you have the Element 115 on your character.
The rocket will take off immediately, and this is where it gets tricky. You must avoid all icebergs and ice floes along the way and thread through them! You WILL get stuck in them, be ejected from your rocket, and have to get that annoying Element 115 again. It's advisable to steer the rocket with your keyboard, not your mouse, as the rocket is very slow to turn and using your mouse can disorientate you slightly.
You need to aim your rocket for the Alliance Lumberboat is located at 22, 84. Don't mistake it for the Alliance ship with Captain Brightwater on it - it's a big wooden one (east of the docks) with the alliance banners on it. See the screenshots below before you head out if you are unsure. Aim your rocket directly for the lumberboat - yes you want to crash right into it. Once you hit it, you'll be ejected high into the air with a parachute, and you should see some lovely fiery explosions on the boat.Tip: Try to aim for an area on the lumberboat that doesn't have obstructions above. If you hit anything after you are ejected, it can cause it to fail, thus requiring you to do it all over again.


-
02-25-2009 #3
Member
- Reputation
- 36
- Join Date
- Mar 2007
- Posts
- 82
- Thanks G/R
- 0/0
- Trade Feedback
- 0 (0%)
- Mentioned
- 0 Post(s)
- Tagged
- 0 Thread(s)
All credit goes to http://wowmb.net/forums/f100/30457-wrath_lich_king_dailies_list_your_guide_not_missing_any/
The dailies list below are for...
Dragonblight
Zul'Drak
This again is not my guide. I just simply COPY/Paste and put it all in one spot for MMowned viewers.
Dragonblight
[71] Planning for the Future (Both)
From: Trapper Mau'i at Moa'ki Harbor
Objective: Collect 12 Snowfall Glade Pups and deliver them to Trapper Mau'i at Moa'ki Harbor.
Reward: 20300 experience, 5g and 500 reputation with The Kalu'ak
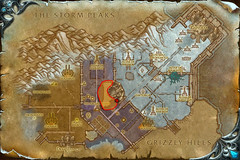
If you catch the turtle boat from Howling Fjord, you come in at Moa'ki Harbor, right where you grab this daily from. Very easy quest, simple head to the Snowfall Glade wolva camps just North of the Harbor and look for cute little Snowfall Glade Pups. I've outlined the two main areas on the map below, but there are a few small ones in between and scattered around.
The pups are actually lootable, simply right click to snatch them. You will have to fight through some rather upset and enraged Den Mothers plus friends, but they are dispatched of easily. Snatching the pups is instant, so you can grab them while you're fighting - handy if you're in trouble or someone else runs up to steal them. One of the easier quests so far... if you can ignore the guilt of taking away a mother's young.
Tip: If you're doing this daily for the first time, pair it up with Let Nothing Go To Waste, as the goods drop from the same mobs you have to kill.


[74] Defending Wyrmrest Temple (Both)
From: Lord Afrasastrasz at Wyrmrest Temple
Objective: Afrasastrasz at Wyrmrest Temple has asked you to slay 3 Azure Dragons, slay 5 Azure Drakes, and to destabilize the Azure Dragonshrine while riding a Wyrmrest Defender into battle.
Reward: 20750 experience, 5g 60s and 250 reputation with The Wyrmrest Accord
Achievement: Rapid Defense Complete the Defending Wyrmrest Temple quest in under 2 minutes while not in a group
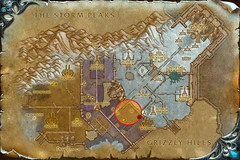
Pre-requisites: Before you can accept this daily, you have a few pre-requisites to do. If you did the above daily first, grab the quest Your Presence is Required at Agmar's Hammer from Envoy Ripfang at Moa'ki Harbor. This sends you to the Image of Archmage Aethas Sunreaver at Agmar's Hammer. Speaking to the Archmage gives you the second quest:For this you need to head to the Moonrest Gardens located south-west of Agmar's Hammer (see map). You are looking for Dead Mage corpses, which will come in all races - the Tauren ones being easier to spot than the Blood Elf. The bodies are lootable, with no cast bar, so be sure to loot as quickly as you can if the area is busy. Each body will drop a Mage Hunter Personnal Effects, a bag that you open. You will probably get a few bits of junk, but eventually one should contain the Moonrest Gardens Plans. Once you have them, return to the Image of Archmage Aethas Sunreaver at Agmar's Hammer to hand in.Tip: Grab Avenge this Atrocity! from the Ethenial Moonshadow there as you can kill the mobs needed as you are running around.
 After you have returned the Moonrest Gardens Plans the Aethas, he sends you back to the Moonrest Gardens - more specifically, the larger two-story building overlooking the pit. When you are running back to the gardens, follow the egde around to the right, where you should be able to see a really large building / ruins area. There is an archway directly on the side of the pit farther away from Stars' Rest, under which you will find Wind Trader Mu'fah. The building entrance is actually at 18, 59. After you have killed Mu'far, pass through the archway where Mu'fah is standing, turn left and go up the ramp. There you will find Goramosh. Kill both and return to Aethas.


Goramosh's Strange DeviceWhen you kill Goramosh while on the quest above, Goramosh's Strange Device will drop. Right clicking this will begin the quest A Strange DeviceA Strange Device (H). All you have to do is deliver Goramosh's Strange Device to the Image of Archmage Modera at Stars' Rest. This now begins the actual chain that leads to the daily!
(A) /Note: This item will only drop when you are on the quest above.
Now begins the very long quest chain you need to complete in order to do the daily. I'm not going to step through everything here, it would be far too long and I think you're all smart enough to be able to follow basic quest instructions. I will however, give a quick overview. Please note that as I play Horde, I will be linking the Horde versions of the quests, if you are Alliance, click here and then follow the links to your versions.
- After you hand in the strange device you collect Projections and Plans. Simply head back to the Moonrest Gardens and click the Surge Needle Teleporter. This will teleport you to the Surge Needle floating above Moonrest Gardens, where upon you need to take 3 - 5 steps in and wait for the complete message to appear. By stepping in I agroed one mob, easy kill. If you haven't managed to kill all the mobs needed for Avenge this Atrocity, the mobs at the top count towards it, and there's usually little competition.
Once you are done, click the teleporter to take you back down to the ground, and return to Archmage Aethas to hand in.
- Next quest is The Focus on the Beach. You need to head to the beach just down from the Moonrest Gardens and find Captain Emmy Malin. He will be near the Ley Line Focus (arch object), to the left of the crevice if you are facing in - location 26,65. Killing him gives you the Ley Line Focus Control Ring, which you right click near the Ley Line Focus and wait for completion. Once done, return to Aethas.


- Atop the Woodlands is very much the same, only this time you are heading to Lake Indu'le - location 32,70 (check your map). This time you have to kill Lieutenant Ta'zinni, retrieve the Ley Line Focus Control Amulet and use it on the arch there.
Note: Lieutenant Ta'zinni can also drop Lieutenant Ta'zinni's Letter, which begins a quest. Simply hand in to Overlord Agmar at Agmar's Hammer.
- Search Indu'le Village asks you to search for the commander of the mage hunter forces at Indu'le Village and Lake Indu'le. Around location 39, 67 - at the bottom of the Lake, you will find another Ley Line arch. Just near there you will find Mage-Commander Evenstar with a familiar yellow question mark above his name. Simply hand in to him, then use the Ley Line Focus Control Talisman on the Ley Line Arch there. After you have done that, make your way to the Azure Dragonshire (location 53, 66) to look over the western ledge to complete the second step of The End of the Line.
Note: You don't have to go down into the dragonshire, simply run along the western ledge until you get the complete message.


- After you have returned to Archmage Aethas, you receive a letter for the quest Gaining an Audience. All you have to do is see Tariolstrasz at Wyrmrest Temple, and then onto Golluck Rockfist for the next step.
Tip: Don't forget to grab the flight path when you are here. It's around the bottom level outside edge.
- Report to the Ruby Dragonshrine asks you to report to Vargastrasz on a ridge outside of the Ruby Dragonshrine, just east of Agmar's Hammer. The Ruby Dragonshrine is the small green patch in the middle of all the snow. You are looking for a group of Horde fighting off the Ghouls and Abominations that continuously stream up from the Dragonshire.
Note: If you are Alliance, please be sure to read your question link Report to the Ruby Dragonshrine as you have a different person to speak to, although not far from Horde. It's not directly obvious which is Horde or Alliance areas, and you don't want to run to the wrong team.
- After handing in you are given Heated Battle in which you are asked to participate in the death of 12 Frigid Ghoul Attackers, 8 Frigid Geist Attackers, and 1 Frigid Abomination Attacker. Notice the word 'participate' - you're just helping out. Stand among the line of NPC's and help kill what comes up. Very easy, just make sure you hit as many mobs as possible - you don't have to do the killing blows. AE works really good here, as does a pet on aggressive.
- Return to the Earth, the next step in the chain, requires a little more participation from you. For this you need to enter the Ruby Dragonshrine and search for Ruby Acorns. The acorns are little red sparkly things that are all over the place. When you have some, locate one of the fallen dragons, and use the acorn (right click) to return them to the earth.


- Through Fields of Flame is the last stage in the Ruby Dragonshire and requires you to kill 6 Frigid Necromancers and eliminate the source of the corruption under the shrine. The source of the corruption is Dahlia Suntouch, who you will find under the tree - just run around the base until you see the way in. Dahalia is the only mob under there, so very easy. The Necromancers are all around the outside of the base. Once done, return to Vargastrasz.
Note: You will pick up a Ruby Brooch which gives you the quest The Fate of the Ruby Dragonshrine for some extra experience.
- After that, simply return to Tariolstrasz at Wyrmrest Temple. Lord Afrasastraszthen sends you to Queen Alexstrasza, who is at the top of the temple. Speak to Tariolstrasz and select the top speech option that sends you to the top of the temple, and locate the Queen to hand in.
- After speaking to the queen, you need to head down to Lord Afrasastrasz who is on the middle level. Return to the big dragon that flew you up and request a flight to the middle. Hand into Lord Afrasastrasz and now, you are able to accept the daily!!! Normally when you come to do the daily, you can speak to Tariolstrasz on the bottom level and go straight to Lord Afrasastrasz.
Ok, so after all of that, you are finally able to do what you came here to do - the daily quest. Once you have accepted the quest, walk out to the balcony in the direction Lord Afrasastrasz is facing and speak to one of the dragons on either side. Speaking to them places you on a drake of your own, under your control. You want to fly it to out over the Azure Dragonshire - the drakes you have to destabilize are around there, not at Wyrmrest.
Very simple fights - target a drake or dragon (dragons are the much larger versions compared to the drakes) and use your abilities:
- Flame Breath - Inflicts 21875 to 28125 Fire damage to the current enemy dragon. Nuke.
- Immolation - Inflicts physical damage to the current enemy dragon every 3 seconds for 9 seconds. Does approximately 25,000 damage over the course of the 9 seconds.
- Renew - Heals the wyrmrest defender 10% of it's health every 3 seconds for 15 seconds.
- Blazing Speed - Increase flight speed by 100%
- Destabilize Azure Dragonshrine - Attack the eruption of power at the Azure Dragonshire in and attempt to destabilize it.
Easiest way is to put Immolation on the smaller drakes first, hit them with one Flame Breath and move on - that should be enough to kill them. For the larger dragons, cast Immolate and spam Flame Breath 2 - 3 times to kill them, and if you're hitpoints drop to around 60%, cast renew on yourself. The hardest bit really, will be finding the mobs. If you are trying to complete the achievement, the best way is to do it when your server is quite (first thing in the morning) as the dragons are all quite close the Wyrmrest Temple and the NPC drakes help you kill.
To destabilize the Azure Dragonshrine, you need to fly into the Dragonshire, directly in line with the stream of energy. I needed to get fairly low in order to complete it, but if you hover around for a while, it should work. Once done, return to Lord Afrasastrasz and voila, you are done! Return tomorrow to try again!!

Note: If you do get overwhelmed by dragons be sure to use the speed boost to run away. Also if your dragon is about to die head back to Wyrmrest Temple and just grab a new one - it doesn't reset the quest. If you do happen to die, don't worry. Your drake will disappear and you slow fall to the ground safe and sound.
Zul'DrakThe daily quests in Zul'Drak work a little differently. Commander Kunz, located at the Argent Strand, gives you a quest (daily) which requires you to visit four NPC's at Argent Crusade posts and complete their dailies. The quests from the Captains are random each time, but if you complete all four within 20 minutes, when you return to Commander Kunz to hand in, you'll receive a 'bonus' quest titled 'Congratulations!' Nothing required for that, simply more rewards for doing it all in such good time.
Pre-Requisites: You have to complete two starter quests before Commander Kunz will give you the daily. Very simply quests.[74] Defend the Stand (Both)
From: Commander Falstaav at the Argent Stand
Objective: Destroy any 10 Scourge in the courtyard at The Argent Stand
Reward: 21150 experience, 6g 20s and 250 reputation with Argent Crusade
[74] Parachutes for the Argent Crusade (Both)
From: Commander Falstaav at the Argent Stand
Objective: Equip 10 Argent Crusaders or Argent Shieldmen out in the courtyard with parachutes.
Reward: 21150 experience, 250 reputation with Argent CrusadeBlade of Valorous Service reward. (Can't see the cloth rewards being an upgrade to anyone).
You can do both of these quests together. Commander Falstaav is facing the courtyard you complete both quests in, so head down the steps. The scourge are obvious, and all you have to do is kill them. For the Parachutes, simply locate any Crusader or Shieldman and right click the Crusader Parachute
Once you have completed both, return to Commander Falstaav and hand in. The daily will now become available from Commander Kunz just a few feet away.
and a further 9g 42s by choosing and vendoring the provided. Sometimes the flying mobs will pick up NPC's and try to take them away. If they escape or the mob gets killed, the NPC is dropped from the air. Therefore they need parachutes. They must not be in combat to receive them.

[76] Troll Patrol (Both)
From: Commander Kunz at the Argent Stand
Objective: Visit the four Argent Crusade posts, follow their captain's orders, and then return and report to him.
Reward: 21150 experience and 6g 20s.
Troll Patrol is the daily quest, although the first time you do it, you will be doing 'Patroll'. This quest requires you to visit Captain Brandon, Captain Rupert, Captain Grondel and Alchemist Finklestein to complete their tasks. I've attached a map outlining their locations, and the route I take. I find it's easier to go:Alchemist Finklestein >> Captain Grondel >> Captain Rupert >> Captain BrandonObviously this is not the only way to do it, so choose which ever way is easiest for you. As mentioned above, there is a bonus quest if you complete all the tasks in under 20 minutes, which is also why I choose to do Finklestein first, that can be the clincher on if you'll make it on time or not. If you do fail his task, you can also abandon the Troll Patrol and go get it again, thus resetting your timer. It definitely helps to be level 77 with a flying mount for this quest because the travel time between the different bases is considerable.

Ok, so lets get on with the tasks...
Alchemist Finklestein's's Task Location 35.1, 52.1 inside the building
[76] Troll Patrol: The Alchemist's Apprentice
Objective: Alchemist Finklestein at Heb'Valok wants you to assist him in the creation of a truth serum.
Reward: 5300 experience, 1g 58s and 75 reputation with Argent Crusade
Note: Quest will be 'Lab Work' the first time you do it.
On the map above, you will see the 'x' just out from a building, Alchemist Finklestein is inside that building. The building has Finklestein standing in the middle room, which another room full of bookshelves and ingredients on either side. This daily quest requires 6 ingredients for a truth serum. Ingredients will vary from day to day, but there is a constant pattern to the ingredients required:
- The 1st, 2nd and 3rd ingredients are common (i.e. either room will have it in multiple spawns.)
- The 4th and 5th are uncommon (i.e. found in multiple spawns only in one room.)
- The last or 6th ingredient is rare (i.e. one spawn only.)
This would be the daily that makes or breaks your chances of getting the timer completed, so it's usually wise to do this one first. After you accept the quest, you need to talk to Finklestein again to begin the quest.

Once it begins, you will have large yellow text flash up on your screen asking you for what is required. The actual quest itself is relatively easy. Finklestein asks for different ingredients, you run to the room and right click to loot them. Run back to the cauldron beside Finklestein and right click that to throw the ingredient in.
Locations for Alchemical materials are as follows :

It's basically a game of memory. I've put together the images below to help you 'study' what each of the parts look like. Click to enlarge...


Mod Helper - EasySerum
EasySerum is an addon to help you do this quest. When Alchemist Finklestein whispers you the name of an item to find, such as "Pickled Eagle Egg", the addon will print a message that says "Pickled Eagle Egg: Right side, Case 1, Row 2, Item 2". EasySerum avoids the top row of shelves which are inaccessible. Also, this prefers the right side - since this is nearest to Finklestein's Cauldron. Cases and Items are numbered left-to-right and Rows are numbered top-to-bottom.

Warlocks: Time to put your Demonic Circle to use! Simple place it in front of his cauldron and it allows you more time to find the ingredient he is asking for.
Captain Grondel's Task Location 48.1, 63.9
You'll find Captain Grondel inside a building with large banners out the front. This dwarf has three different quests in his rotation:
- Creature Comforts which requires you to Collect 20 pieces of Dead Thornwood
- Couldn't Care Less which is a simple kill quest for 7 Mossy Rampagers
- And Whatdya Want, a Medal? which requires you to Collect 7 Drakkari Medallions from the nearby Drakkari Corpses
All three quests reward you with 5300 experience, 1g 58s and 75 reputation with Argent Crusade.
Since the objective is to do the quests as quickly as possible, the first two quests are the easiest. All 3 quests are done in the same area, the watery section just out from the quest giver. The Dead Thornwood is very easy, simply look for big thorns coming out of the water. The Moss Rampagers inhabit this same area (along with Lurking Basilisks), so if you get the kill quest you simply look for those guys - they are the Northrend equivelent to the Bog Lords of the Spawning Glen in Zangarmarsh.
The Drakkari Medallions is the hardest one, if you had to label one 'hard'. The guys you are looking for are the 'Drakkari Corpses', but because of the water that covers the ground, it can make them very hard to find. If you have trouble finding them, the following macro may help: /target drakkari corpse Hot key or button that and spam it to quickly find your targets.
You'll be able to run through most of the water (even as a gnome), however there are deeper areas to avoid since they force you to swim, which slows you down. You can "loot" the corpses while being mounted on a vehicle mount, e.g. Mechano-Hog, Flying carpet or mammoths.


Captain Rupert's Task Location 58.1, 72.5
Next I head straight across to Captain Rupert. He'll also be in a little building/area, and if it's your first time there, the mini map will glow with yellow exclamation marks. He also has three quests in his rotation:
- Intestinal Fortitude - Restore courage to the cowering Crusade Recruits
- Throwing Down - Use the High Impact Grenades near 5 Nethurbian Craters
- And Done to Death - Use the Incinerating Oil on 5 Defeated Argent Footmen in Drak'Sotra
All three quests reward you with 5300 experience, 1g 58s and 75 reputation with Argent Crusade.
And again, all three quests are done in and around the same area as the quest giver. The cowering Crusade Recruits are everywhere, and the best part about this one is you don't even have to dismount. Simply run up, talk to them and move on. If at all possible, avoid the recruits hiding in buildings with intact roofs, because entering one will dismount you. There are ghouls wandering around the area, but they don't aggro the recruits, and so long as you hover when you talk to the recruits, they won't go after you, either. If you're still on a ground mount, you'll have to pay more attention to those ghouls, but so long as you can avoid being dazed off, they shouldn't present much of a difficulty.
To make it even easier you can make a macro with the following command: /target Crusade recruit - just spam it to help you find them easier.
The Nethurbian Craters are a little more difficult. They look like brown ant hills (see image below), usually guarded by a large Nerubian. You don't have to target the mound, simply right click your grenades from your inventory and wait for them to explode. You need to be very near after you throw your grenade to get the credit. If you throw it and run off you may not get it. Don't worry about the small nerubi (little spiders), they do not put you into combat and don't attack so don't bother with them.
Be sure to check inside the main building there as they can be sometimes found in either the left or right room.
For Done to Death, the Defeated Argent Footmen that you want are just southwest of the quest giver. Do NOT use the Defeated Argent Corpses that are just southeast of the quest giver by the spiders, as the oil will give an "invalid target" message.


Captain Brandon's Task Location 48.8, 78.9
Captain Brandon is the last one I do as he is closest to the Argent Strand to hand in. Like above, there are three different quests you might get:
- High Standards which asks you to place the Argent Crusade Banner in the Drakkari Pedestals at Drak'Sotra
- Something for the Pain which you need to collect 5 Mature Water-Poppies from Drak'Sotra Fields
- And Can You Dig It? which you need to use the Steel Spade on the nearby Ancient Dirt Mounds to recover the Ancient Drakkari Relic
High Standards is the easiest and quickest quest. All you have to so is head into the same courtyard that the above series takes place in and place the Argent Crusade Banner in the Drakkari Pedestals. You can just do a big loop around the yard to get all three. The pedestals sparkle and have a large flag on top, so they are very easy to spot. The locations for each are:
- North 50.4, 73.1
- East 53.2 72.3
- South 52.5, 76.6
- Wowhead Map Link
Of the other two quests, the Water Poppies are the easiest. If you look on your map, just south west of the quest giver are fields. In these fields you will find water elementals and lots of water poppies. You are looking for the large sparkling kind for this quest. Simply loot 5. You can do it all pretty much without agroing any elementals.
Beside the fields (south east) is where you need to be to recover the Drakkari Relics. I've included a picture of what the area looks like, and if you look closely (very closely) you can just make out the dirt mounds. They are rather hard to see, even in game. Once you do spot one, run near and right click the spade to hopefully uncover a relic. If it's not a relic, it will be an aggressive troll.


[76] Congratulations!
From: Commander Kunz at the Argent Stand
Objective: Nothing...
Reward: 31450 experience, 18g 60s, 350 reputation with Argent CrusadePatroller's Pack.
If you manage to complete all the quests in under 30 minutes, this quest is the 'bonus' reward. All you have to do is accept and then hand in. The pack may reward you with:
and
- Distinctive Feathers
- A Slimming Ankle Bracelet
- A Stylish Toe Ring
- Or if you're really lucky, some Scruffy Toe Lint
- There are lots of green items also
- Deputy Pa'trolla Badge is the only purple.
Note: Handing this quest in, does take up a 2nd Daily quest slot when you turn it in.
And there you have it, the Zul'Drak Dailies. This has become a regular run for me as it results in some fairly nice XP and a bit of gold. Since I am still leveling (as of writing this), I do these first and then go and quest. This gives me a mini boost to my experience, without eating into the normal quests available that I am relying on for additional gold once I reach 80.
The totals for this daily series is:
- The four sub-dailies give 21,200 experience and an average of 341 rep and 12g 72s
- Troll Patrol adds 21,150 experience, 250 rep and 12g 69s
- And Congratulations adds a further 31,450 experience, 350 rep and 19g 05s.
- Total = 73,800 experience 941 rep and 44g 46s
If you don't have a lot of play time, this can be a nice easy way to always be gaining experience without having to travel far.
-
02-25-2009 #4
Member
- Reputation
- 36
- Join Date
- Mar 2007
- Posts
- 82
- Thanks G/R
- 0/0
- Trade Feedback
- 0 (0%)
- Mentioned
- 0 Post(s)
- Tagged
- 0 Thread(s)
All credit goes to http://wowmb.net/forums/f100/30457-wrath_lich_king_dailies_list_your_guide_not_missing_any/
The dailies list below are for...
Sholazar Basin - Choosing your faction!
Sholazar Basin - Oracles Dailies
Sholazar Basin - Frenzyheart Dailies
Sholazar Basin - Choosing your faction!
Before you can begin doing the daily quests, you need to first complete a lot of pre-requisites which end in you choosing which faction you would like to support. The 'Oracles vs Frenzyheart' is the Northrend equivalent to the Scryers vs Aldors, only instead of simply following an NPC around and choosing at the end, you have to work for your choice here. I'm not going to go into great detail on how to complete every quest, they are all pretty self explanatory, below is more a brief overview.Note: These quests only apply if you are doing this for the first time, ie choosing your faction. It's a different set of quests to switch factions, which is outlined below.The Quest Chain!
[76] The Part-time Hunter
From: Tamara Wobblesprocket at Lakeside Landing
Objective: Obtain Pitch's Remains
Rewards: 21150 experience (or a 12g 69s compensation at level 80), and a further 6g 20s.
This quest kicks off the long chain that ends in choosing your faction. It simply requires you to kill Pitch, a large black panther, and return his remains to Tamara Wobblesprocket at Lakeside Landing. You will find Pitch at location 50, 77. Just left of the The Skyreach Pillar. (map) When you kill Pitch, Tracker Gekgek located just near Pitch will begin the quest line.
[77] Playing Along
From: Tracker Gekgek
Objective: Report to High-Shaman Rakjak at Frenzyheart Hill as the new "slave."
Rewards: 5350 experience (or a 3g 212 compensation at level 80), a further 1g 66s and 700 reputation with Frenzyheart Tribe
Frenzyheart Hill is just north of Pitch and Gekgek's location. Location 55, 69 - located at the top of the mountain.Note: Once you hand in, you become unfriendly with The Oracles. This is ok. The following quest line makes it seem as if you are choosing the Frenzyheart Tribe faction, however, it is all simply part of the chain. Don't worry about that for now, it does not affect your final choice.- The Ape Hunter's Slave from High-Shaman Rakjak at Frenzyheart Hill
- Tormenting the Softknuckles from Goregek the Gorilla Hunter who becomes your pet when you accept the above quest
When you accept The Ape Hunter's Slave, Goregek the Gorilla Hunter appears as your pet. He will have a quest for you which you want to accept as they are done in the same area. You will find both the Foragers and Chargers all near by.
In order to draw the Hardknuckle Matriarch out of hiding, you need to 'poke' the Softknuckles, which are the adorable baby Gorillas. The poker is in your inventory, so target and then right click. To get the matriarch to come out poke 3 softknuckles so that they are all running around at the same time. The matriarch will scream and than come out to attack you. Don't worry, no Softknuckles are hurt completing this quest. You will find the softknuckles and Matriarch around location 66, 74. (map) Once you have completed both, return to High-Shaman Rakjak and hand in.
- The Wasp Hunter's Apprentice from High-Shaman Rakjak in Frenzyheart Hill
- The Sapphire Queen from Elder Harkek in Frenzyheart Hill
Directly east of Frenzyheart Hill you will find the Sapphire Hive. This is where you will find the Wasps and packs of Drones. Inside the cave is the Sapphire Queen who drops the stinger. Very easy quests. Once done, return to High-Shaman Rakjak and hand in. This should now have your reputation at a Friendly level.
- Flown the Coop! from Elder Harkek in Frenzyheart Hill
This quest gives you good practice for the daily version of it. The Chickens are all around the base of the Frenzyheart Hill running around like their heads are cut off. Tip: You can do this quest while mounted! If you hit Ctrl + V it will bring up the name plates which make the chickens much easier to find. If you use Dajik's Worn Chalk to summon Dajik, he will tell you to make chicken sounds and maybe they'll come to you. /Chicken and they will come running. Makes it easy to net and loot them. Alternatively just run around on your mount throwing the net down and looting.
- The Underground Menace from Elder Harkek
- Mischief in the Making from High-Shaman Rakjak
Serfex is one of the burrowing worms, who has two 'spawn' locations - approx 58, 85 and 49, 84. If you follow the river just under The Skyreach Pillar, you should be able to track him down, look for the tell tale dirt cloud. While you are looking for him, keep your eye out for the Skyreach Crystal Formations to loot. Again, nice and easy quests.
- A Rough Ride from High-Shaman Rakjak
Quests don't get much easier. The Captive Crocolisk is just out from the tribe area, just above the 'H' on your map. (see here) Speaking to it places you atop is head and he leads you to the Mistwhisper Refuge. Hand into Zepik the Gorloc Hunter who should be beside you.
- Lightning Definitely Strike Twice from Zepik the Gorloc Hunter
- The Mist Isn't Listening from Zepik the Gorloc Hunter
In your inventory you will find the Skyreach Crystal Clusters. Fight your way into the Mistwhisper Refuge you are at until you find the 'lake', which is actually a little puddle of water in the middle of the village, not the gigantic lake that Mistwhisper Refuge borders. Right click the Crystal Cluster from your inventory to place it, then right click the placed version to crush it. After you've done that, continue killing until you have killed 12 Mistwhisper Gorlocs. Hand in both quests to Zeptik.
- Hoofing It from Zepik
Simply find your way back to Frenzyheart Hill. Handing in this now makes you Honored with Frenzyheart, but as mentioned above, you don't need to be concerned.
- Just Following Orders from High-Shaman Rakjak
Locate an Injured Rainspeaker Oracle. There are about 5 spots they spawn all at once (map) so they are fairly easy to find. When you speak to the injured Oracle, a crocodile will spawn and attack you. Kill it and complete the quest. Doing so reverses your faction to be hostile with the Frenzyheart and friendly with the Oracles, and a Frenzyheart Shaman spawns, sees that you've helped the Oracle (by killing the croc) and runs to taddle on you.Remember: This is all part of the chain. Don't be upset when your faction switches.
- Fortunate Misunderstandings from the Injured Rainspeaker OracleSimple escort - take the Injured Rainspeaker Oracle to Rainspaker Canopy and speak to High-Oracle Soo-say. Once you accept the quest, speak to him again to get him to start moving.
- Make the Bad Snake Go Away from High-Oracle Soo-say at Rainspeaker Canopy- Gods like Shiny Things from Lafoo that appears when you accept the above questJust north-west of Rainspeaker Canopy you will find the Emperor Cobras. At the base of the mini waterfall along the river you should find Venomtip. Lafoo should spawn when you accept the first quest, but if he doesn't, you have a bag in your inventory to summon him. While you are running around killing, keep your eye out for shiney spots on the ground. Stand over them to make Lafoo dig and then loot the crystals, aka 'the shiny things'.
- Making Peace from High-Oracle Soo-sayLocate Shaman Vekjik who is overlooking the Rivers Heart (map). Speak to him and, enjoy the dip... that's all I'm saying. Return to High-Oracle Soo-say once done.
- Back So Soon? from High-Oracle Soo-say
As the quest says, travel to Mistwhisper Refuge and speak to Mistcaller Soo-gan. (map)
- The Lost Mistwhisper Treasure from Mistcaller Soo-gan
- Forced Hand from Mistcaller Soo-gan
From Mistwhisper Refuge, head North to Spearborn Encampment, approximate location 40, 22. You will find the Frenzyheart Spearbearers and Scavengers all around the camp, so killing those is easy. For Warlord Tartek you need to locate the 'treasure', which looks more like a crystal ball than a pot of gold. When you get close to the ball, Warlord Tartek and his Warlord Tartek ride will approach. Kill both (the dragon and Tartek) and then loot the treasure.
- Home Time! from Mistcaller Soo-gan
As the quest says, return to Rainspeaker Canopy. You hand in to High-Oracle Soo-say.
- The Angry Gorloc from High-Oracle Soo-say
This quest isn't exactly self explanitory. You are given Moodle's Stress Ball, which in fact 'Moodle' himself. You need to locate the Mosswalker Village, and upon discovering it, Moodle's question mark turns yellow and you can hand in. You will find Mosswalker Village east of Rainspeaker Canopy, around location 75, 51. (map)
- The Mosswalker Savior from Moodle
- Lifeblood of the Mosswalker Shrine from Moodle
The Mosswalker Victims are either dragged behind some scourge, or lying around through out the camp. Right click and check for a pulse and you will either save them (hurray) or it is too late and they will leave behind their belongings in the form of a lootable bag. You just need to keep checking pulses until you rescue six. You also want to be checking the bags as they can drop the Lifeblood Shards you need. Don't worry too much if about trying to collect them from the bags after you have rescued your six, you're better off the follow the path south-west and loot them straight off the ground. (map) Hand into Moodle - right click the stress ball in your inventory if he has despawned on you.
- A Hero's Burden from MoodleFinally, the quest this has all been leading up to! THIS is the quest that allows you to choose if you want assist the Oracles or the Frenzyheart! You need to make your way into a cave around location 72, 57 and clear to the end where you will find Artruis the Heartless. If you are on a flying mount, dismount before you enter. Although the path has invisible walls to stop you falling off the edge when you are walking, these do not apply when flying and you will be dismounted to enjoy a very long plummet to your death.
Very simple fight really. When you come to Artuis, you will see him and two others in frozen blocks of ice. They are Jaloot and Zeptik. Artuis acts like a Mage with Frostbolts and ice traps, but over all isn't hard. At 30% he will become immune and both Jaloot and Zeptik attack you. You need to kill which ever one you DON'T want to ally yourself with!
- If you want to do Frenzyheart Dailies - kill Jaloot
- If you want to do Oracle Dailies - kill Zeptik
After you have killed one of the two, the other will assist you in finishing off Artuis. Once done, hand in your quest to Artruis's Phylactery which spawns on his death. Either Jaloot or Zeptik, which ever one is left standing, will have a blue exclamation mark over their head which allows you to align with their faction and you're done.
Return to the base camp of the faction you have chosen to begin doing your dailies!


Sholazar Basin - Switching Factions
If you've already chosen a faction and simply want to switch, the process is a lot easier. All you need to do is the final stage of the above chain - killing Artruis the Heartless. Read the above for details on the fight itself. Remember, you need to kill which ever one you DON'T want to ally yourself with!
- If you want to switch from Oracles to Frenzyheart - kill Jaloot
- If you want to switch from Frenzyheart to Oraclse - kill Zeptik
After you have killed one of the two, the other will have a blue exclamation mark over their head which allows you to align with their faction and you're done. Return to the base camp of the faction you have chosen to begin doing your dailies!Note: When you complete the switch, you will automatically become hated with your previous choice and automatically honored with your new allegiance.
Sholazar Basin - Oracles
[77] Appeasing the Great Rain Stone
From: High-Oracle Soo-say in Rainspeaker Canopy
Objective: Take a companion to dig up and collect 6 Shiny Treasures.
Reward: 21400 experience, 6g 50s and 500 reputation with The Oracles
Achievement: Savior of the Oracles Complete the 8 daily quests for the Oracles.
This is the daily version of Gods like Shiny Things which you did in the original chain to select your faction. You will need a gorloc buddy tagging along to unearth the treasures, but it doesn't have to be Lafoo. If you'd prefer the assistance of Jaloot or Moodle, they will work just as well. Moodle is clearly unenthusiastic, though, and will complain loudly about having to dig for what he considers to be worthless trinkets. I personally prefer Jaloot not only for the enthusiasm, but the +10% movement speed and 100% swimming speed buff. To obtain your assistant, simply speak to High-Oracle Soo-say and choose the text option for the one you want.
As with "Gods Like Shiny Things", search for glints of light sparking just above the ground. They won't look like loot sparkles, but rather singular white gleams that pulse in and out. Once your gorloc gets close, he will start digging. Sometimes your gorloc won't find treasure, but instead will dig up Glinting Bugs or a Sparkling Hare. The bugs will put you into combat, but won't actually attack you. Jafoot and Lafoo will enthusiastically hunt them down, but Moodle disdainfully ignores them. If you kill the hare, you will get a minute-long speed buff.
The sparkling treasures can look like gems or little piles of gold.
Oracle Soo-nee's Quests


Oracle Soo-nee at Rainspeaker Canopy has four (4) daily quests, however you will only do one at a time. Like the Zul'Drak dailies, the quest will be chosen at random. Each quest rewards the same - 21400 experience, 13g 60s (or 12g 84s if you're level 80) and 500 reputation with The Oracles. They also all contribute to the Savior of the Oracles achievement. The quests are:
[80] A Cleansing Song
Objective: Play the Cleansing Chime at Bittertide Lake, Wintergrasp River and River's Heart and slay the evil spirits that plague the waters there.
As the quest text states, simply take the Chime of Cleansing provided and play it at the three locations. Each time a spirit will attack you which you need to kill. The quest itself is extremely easy, the only delay you will have it waiting for the 2 minute cool down on the chime... since it only takes about 30 seconds to fly between the different areas.
- The Spirit of Koosa can be summoned anywhere along the river between River's Heart and The Skyreach Pillar.
- The Spirit of Ha-Khalan is summoned from River's Heart itself.
- While The Spirit of Atha can be summoned at Bittertide Lake, the north-west most patch of water, directly west of Glimmering Pillar.


[80] Song of Fecundity
Objective: Go to the Stormwright's Shelf, northwest of the Maker's Perch, and play the Horn of Fecundity near 8 piles Soaked Fertile Dirt.
Very easy. You've probably seen the patches of dirt around the Stormwright's Shelf already if you've spent any time there. For this quest, all you need to do it stand near one and play the Horn.


[80] Song of Wind and Water
Objective: Use the Tempest Drums at the Stormwright's Shelf and help Haiphoon devour 3 Storm Revenants and 3 Monsoon Revenants.
The Stormwright's Shelf is the plateau between the Maker's Perch and the North Sea in the northwest part of Sholazar Basin. Once you're there, use the Drums of the Tempest to transform into Haiphoon. Initially you'll be in his water form, so go after one of the Storm Revenants. You'll have a Water Bolt for your attack and Frost Nova to hold it in place. Once it's low on health, use the Devour Wind power. This will kill the revenant and transform you into Haiphoon's air elemental phase. Now you'll want to go after an Aqueous Spirit. Alternate between Lightning Bolt and Windshear, the latter of which has a knockback, until its low on health. Then use Devour Water to go back to the water form. Alternate between the two types of mobs until you've completed the quest.
There are a few things to be aware of:
- Be careful not to kill the quest mobs with Haiphoon's normal attacks. You must devour them to receive quest credit.
- In addition to the elementals, golems called Stormwatchers patrol the area. They're not elite, and you can kill them in either form.
- You can kill both water and air elementals in either form, but you can only use your Devour ability on the opposing element.
- While you're riding Haiphoon, you cannot loot. The corpses do seem to stick around for awhile, though, so if you finish the quest quickly enough you'll be able to loot them before they disappear.


[80] Song of Reflection
Objective: Use the Didgeridoo of Contemplation at the top of the Glimmering Pillar, the Suntouched Pillar, the Mosslight Pillar and the Skyreach Pillar.
There are four major pillars in Sholazar Basin, which you can see when you open your map. For this quest, you simply need to fly to the tops of the four intact pillars and activate the Didgeridoo (provided) near the crystals in the center. You may have to take out some Cultist Saboteurs at the top of the northern Glimmering Pillar, but otherwise there's no fighting involved. I tend to do this quest in a big loops, leaving Rainspeaker Canopy towards The Glimmering Pillar, and then follow it around anti-clockwise until I'm at the last pillar, Skyreach. The pillars are hard to miss, but the coordinates are:
- The Glimmering Pillar: 49, 37
- The Suntouched Pillar: 33, 52
- The Mosslight Pillar: 36, 75
- The Skyreach Pillar: 53, 79
You don't have to be exactly on the crystals to activate the didgeridoo, just close to the center.


Oracle Soo-dow's Quests
Like Oracle Soo-nee, Soo-dow offers a random quest each day. Each quest rewards the same - 21400 experience, 13g 60s (or 12g 84s if you're level 80) and 700 reputation with The Oracles. They also all contribute to the Savior of the Oracles achievement. There are three quests available from Soo-dow, however you take note that you hand into a different NPC. You hand all three into Lightningcaller Soo-met at Sparktouched Haven(map). The Quests are:
[78] Mastery of the Crystals
Objective: Retrive the crystal defenses at Sparktouched Haven and use them to kill 50 of the nearby Frenzyheart wolvar.
Around the Sparktouched Haven you will find a small chest that contains the crystals. I found the chest right near Lightningcaller Soo-met who you hand in to, but they can spawn at random locations within the area. The chest contains three cystals:
- Crystal of the Violent Storm - Place the Crystal of the Violent Storm, summoning a storm to damage all nearby wolvar.
- Crystal of the Frozen Grip - Place the Crystal of the Frozen Grip, severely hindering the movement of all nearby wolvar.
- Crystal of Unstable Energy - Place the Crystal of Unstable Energy, firing frequent bolts of energy at nearby wolvar.
You don't need the cystals in order to complete the quest, you can kill the wolvar on your own and still get the kill count. But the crystals do certainly make it must more fun. There's a platform on the west side of Kartak's Hold with 22 Frenzyhearts on it. With your flying mount, drop down onto this platform and drop all 3 crystals. You should kill all with little trouble. Note that if you let the crystals do all the work you won't be able to loot them, so I suggest using rank 1 Rain of Fire or similar AoE ability, or doing a little damage to each one before you use the crystals.


[78] Power of the Great Ones
Objective: Charge the Dormant Polished Crystal at the exposed Lifeblood Pillar. Travel to Sparktouched Haven and use the power the crystal bestows to slaughter 30 of the nearby Frenzyheart wolvar.
Take the dormant polished crystal you are given to the top of the Lifeblood Pillar. There you will see a huge red crystal, which if you land near, you will be able to right click the dormant version to convert it to an Energized Polished Crystal. Once you have done that, make your way to Sparktouched Haven to stop off and click the newly energized crystal to receive a buff for 10 minutes that helps you kill as well as heals you - nice! A hop skip and a jump south to Kartak's Hold and kill the 30 Frenzyheart wolvar.


[78] Will of the Titans
Objective: Obtain a Tainted Crystal from the wolvar near Sparktouched Haven and bring it to the Great Lightning Stone to call Soo-holu. With the aid of Soo-holu's shared powers, kill 50 of the nearby Frenzyheart wolvar.
Fly to Sparktouched Haven, southwest of Rainspeaker Canopy, and just to the west of the Mosslight Pillar, and kill Frenzyhearts until one of them drops a Tainted Crystal. It has a very high drop percentage, perhaps even 100%. Once you've got the crystal, take it to the Great Lightning Stone (33, 75), and activate it. This will transform you into Soo-holu, a Spirit Beast which fights like a cross between a rogue, feral druid, and DPS warrior. Then kill more Frenzyheart while transformed.
At least that's one way to do it. You don't actually have to take control of Soo-holu to complete the quest. Because you can't loot while you're transformed, I prefer to just kill them myself. I also found it awkward fighting with Soo-holu's abilities. It may take longer, but you'll still get quest credit, and you won't miss out on the loot.
No matter how you do it, I recommend running to Kartak's Hold, rather than trying to pick off the raiders attacking Sparktouched Haven. It's the Frenzyheart village just to the southwest. Just be careful not to let yourself get overwhelmed. The respawn rate is very high and there are lots of them.

Sholazar Basin - Frenzyheart
[77] Chicken Party! (Both)
From: Elder Harkek at Frenzyheart Hill
Objective: Capture 12 Chicken Escapees
Reward: 21400 experience, 6g 50s and 500 reputation with Frenzyheart Tribe
Achievement: Honorary Frenzyheart Complete the 8 daily quests for the Frenzyheart
This is a repeat of the quest you did while choosing your faction. Very easy daily. The Chickens are all around the base of the Frenzyheart Hill running around like their heads are cut off. Tip: You can do this quest while mounted! If you hit Ctrl + V it will bring up the name plates which make the chickens much easier to find. If you use Dajik's Worn Chalk to summon Dajik, he will tell you to make chicken sounds and maybe they'll come to you. /Chicken and they will come running. Makes it easy to net and loot them. Alternatively just run around on your mount throwing the net down and looting.


Rejek's Quests
Rejek at Frenzyheart Hill has four (4) daily quests, however you will only do one at a time. Like the Zul'Drak dailies, the quest will be chosen at random. Each quest rewards the same - 21400 experience, 13g 60s (or 12g 84s if you're level 80) and 500 reputation with Frenzyheart Tribe. They also all contribute to the Honorary Frenzyheart achievement. The quests are:
[80] Rejek: First Blood
Objective: Blood Rejek's Blade on the corpses of a Sapphire Hive Wasp, a Hardknuckle Charger, and 3 members of the Mistwhisper Tribe. You may blood the sword on either Mistwhisper Oracles or Mistwhisper Warriors.
- Hardknuckle Charger's are the dark coloured Gorillas just out from Frenzyheart Hill.
- Sapphire Hive Wasp's are the single wasps (not the packs) found at the Sapphire Hive just south of Frenzyheart.
- And the Mistwhisper members are at the Mistwhisper camp. Any Oracle will suffice.


[80] A Hero's Headgear
Objective: Get Venture Co. Explosives from any of the Venture Company units at Swindlegrin's Dig and use them to obtain a Stormwatcher's Head. Bring the Stomwatcher's Head to Rejek.Head to the Swindlegrin's Dig and start killing the Venture Co. Excavators and Ruffians until the Venture Co. Explosives drop. After you have that, head over to The Stormwright's Shelf and kill a Stormwatcher. Use the explosives on the corpse (loot it first) and a head will appear. Loot the quest item from the head, return and hand in. I really like what happens after you hand it lol, made me chuckle.


[80] Strength of the Tempest
Objective: Gather 3 Essences of the Monsoon and 3 Essences of the Storm and take them to the Shrine of the Tempest. Return to Rejek with the True Power of the Tempest.For this quest, you want to head straight to The Stormwright's Shelf, only this time you want to kill the Storm Revenants (Air Elementals) and Aqueous Spirits (Water Elementals), not the Stormwatchers. Once you have obtained the 3 Essences of the Monsoon and 3 Essences of the Storm, you want to locate the stone Shrine located around location 22,34 - at the top of the hill looking out to the beach. Stand close to the shrine and you will be struck by lightening and the essences will convert into the True Power of the Tempest. Then simply return it to Rejek.


This quest involves a bit of running around, but certainly isn't hard. In order to create the Suntouched Heartblood, you first need to get Matriarch's Heartblood, which you loot after killing Goretalon Matriarch, located at 59, 23. Goretalon is a white eagle sitting up the cliff face next to a white egg. He will post no threat. Once you have dispatched of him, fly to the Suntouched Pillar at 33, 50 and right click Rejek's Vial which is provided. This will give you Suntouched Water. Right click the Suntouched Water at the same location and it will combine with the Heartblood and give you ... Suntouched Heartblood. Return the finished product to Rejek.


Vekgar's Quests
Like Rejek, Vekgar offers a random quest each day. Each quest rewards the same - 21400 experience, 13g 60s (or 12g 84s if you're level 80) and 700 reputation with Frenzyheart Tribe. They also all contribute to the Honorary Frenzyheart achievement. There are three quests available from Vekgar, however you take note that you hand into a different NPC. You hand all three into Shaman Jakjek at Kartak's Hold (map). The Quests are:
[78] Kartak's Rampage
Objective: Bring a pure sample of Oracle Blood to the Altar of Kartak to summon Kartak. With the aid of Kartak's shared powers, slaughter 50 of the nearby Sparktouched GorlocsMake your way to Kartak's Hold. You can either hang around the safety of the Frenzyheart Tribe here and kill any Oracles that wander over, or you can head north-east across the path to the Sparktouched Haven and kill the Oracles there. If you wait for a group of Frenzyheart Ravagers to go over, it makes for easier killing. Simply kill 50 Oracles.
You should get the samples of Oracle Blood fairly early in your killing, which you can then take to the Altar of Kartak which is at the far back of the camp, to summon Kartak to help you kill. You don't have to have him out in order to obtain the kill count. Once you have killed your 50, hand into Shaman Jakjek.

[78] Tools of War
Objective: Retrieve some of Zepik's traps from his stash in Kartak's Hold. Using the traps, slaughter 50 of the nearby Sparktouched GorlocsOver Kartak's hold to pickup the Traps. The box is in between two cages on the western rise of the southern "house" shown on the world map. (24.0, 83.1) Once again the Oracles are at the Sparktouched Haven, only this time, instead of just killing them, you're going to have some fun blowing them to kingdom come!!
How I used the traps:
- Mount up and gather as many mobs as you can handle - or as many as you can gather before you get knocked off.
- Use Volatile Trap to damage and knock back.
- Immediately place the Spike Bomb trap to finish them up.
- Rinse and repeat!
Using that method I was killing anywhere from 2 - 10 Oracles at a time. If you are having trouble and being hit, don't forget to make use of the Ensnaring Trap to keep all the mobs together while you back up and/or use the second trap. After a few runs however, you should be a pro.


[78] Secret Strength of the Frenzyheart
Objective: Obtain Thunderbrew's Hard Ale and combine them with Wolvar Berries that Vekgar provided to make the secret Frenzyheart drink. Using the drink's power, slaughter 30 of the Sparktouched Gorlocs around Kartak's Hold This is probably the easiest of Vekgar's dailies. Grimbooze Thunderbrew at Nesingwary's camp (26 , 60) sells Thunderbrew's Hard Ale and the Wolvar berries are given to you. Simply fly to Thunderbew, purchase the Ale and combine it with the berries. Note: Right click the berries, not the ale.
Right clicking the ale consumes it. Once it's combined, drink the newly created ale called 'Secret Strength of the Frenzyheart' which will grant a 10 minute buff that reduce all damage you take by 50%,an extra 2775 to 3225 physical damage on top of all attacks (subject to mitigation) and adds a knockback effect to all your spells and abilities. Then it's just a case of killing 30 Oracles at the Sparktouched Haven.
-
02-25-2009 #5
Member
- Reputation
- 36
- Join Date
- Mar 2007
- Posts
- 82
- Thanks G/R
- 0/0
- Trade Feedback
- 0 (0%)
- Mentioned
- 0 Post(s)
- Tagged
- 0 Thread(s)
All credit goes to http://wowmb.net/forums/f100/30457-wrath_lich_king_dailies_list_your_guide_not_missing_any/
The dailies list below are for...
Icecrown Glacier - Alliance
Icecrown Glacier - Activating Horde Quests
Icecrown Glacier - Horde Dailies
Icecrown Glacier - Neutral Dailies
Storm Peaks
This again is not my guide. I just simply COPY/Paste and put it all in one spot for MMowned viewers.
Icecrown Glacier - Alliance Quests
[80] Assault by Air (Alliance)
From: Ground Commander Koup at the edge of the glacier east of Ymirheim
Objective: Use the Skybreaker Suppression Turret to keep the Skybreaker Troop Transport alive long enough to make all of its drops.
Reward: 13g 23s and 250 reputation with Valiance Expedition.
Hop on a turret that's on the front of a plane (at ground level) and it flies you to the area to complete the quest - it's a tiny little alliance quest hub close to the area.
[80] Assault by Ground (Alliance)
From: Skybreaker troops
Objective: Escort the Skybreaker troops to the gates of Ymirheim. Return to Ground Commander Koup at the edge of the glacier east of Ymierheim for compensation after the task is complete.
Reward: 13g 23s and 250 reputation with Valiance Expedition.
Mobs pop out four at a time, 3 times through out the escort. You do start with more than 4 troops, and so long as at least 1 makes it to the finish you complete. So you can lose a couple. Pick up Blood of the Chosen from Knight-Captain Drosche on the Skybreaker before you begin this escort, as the Ymirheim Defenders that spawn during the event all count toward the 20 kills you need for the other quest.
[80] Blood of the Chosen (Alliance)
From: Knight-Captain Drosche on the Skybreaker
Objective: Kill 20 vrykul in Ymirheim.
Reward: 13g 23s and 250 reputation with Valiance Expedition.
It's in the center of the map, they're all around the place...
[80] Drag and Drop (Alliance)
From: Thassarian aboard the Skybreaker
Objective: Collect Orbs of Illusion from Bitter Initiates at Aldur'thar and use them on 3 Dark Subjugators there.
Reward: 13g 23s and 250 reputation with Valiance Expedition.
Mobs are all around the area south, across the bridge, from Aldur'thar.
[80] Not a Bug (Alliance)
From: Thassarian aboard the Skybreaker
Objective: Collect 5 Dark Matters and summon a Dark Messenger at Aldur'thar.
Reward: 13g 23s and 250 reputation with Valiance Expedition.
Info to come...
[80] Retest Now (Alliance)
From: Chief Engineer Boltwrench aboard the Skybreaker
Objective: Drink the Diluted Cult Tonic, kill any Cultists at Aldur'thar and take their Tainted Essences. You are then to combine 10 of the essences into a Writhing Mass and throw it into any of their cauldrons.
Reward: 13g 23s and 250 reputation with Valiance Expedition.
Head towards 49,33 and right click the quest item, which allows you to farm the items needed. You need to kill 10 of the "Cult of the Damned" people, who most likely will drop " [Tainted Essence]" (100% drop rate), and when you have them, you can turn them into a Writhing Mass, which you then throw into one of the cauldrons. Each cauldron will give you a 2 hour buff when you toss the Writhing Mass into it.
- Blue: Attack Power
- Green: Stamina
- Dark: Spell Power
[80] Static Shock Troops: the Bombardment (Alliance)
From: Kibli Killohertz south of Aldur'thar
Objective: Kill 50 x Bombardment Infantry, 20 x Gargoyle Ambushers, 12 x Frostbrood Sentries and 12 x Scourge War Machines.
Reward: 13g 23s and 250 reputation with Valiance Expedition.
Pre-requisites: Watts My Target
Info to come...
[80] Slaves to Saronite (Alliance)
From: Absalan the Pious aboard the Skybreaker
Objective: Rescue 10 Saronite Mine Slaves.
Reward: 13g 23s and 250 reputation with Argent Crusade
The entrance to the mine is at 57, 57 right in the middle Ymirheim. It looks like a cave on the world map. You run into the mine, take out the guards and just talk to the slaves and click on the "You're free" chat option. Then they will either:
- Run out of the mine, free
- Go berserk and attack you
- Rant, rave and throw themselves off the ledges at the back of the cave
How quick you finish this quest depends on how lucky you get.
[80] Static Shock Troops: the Bombardment (Alliance)
From: Kibli Killohertz south of Aldur'thar
Objective: Kill 50 x Bombardment Infantry, 10 x Bombardment Captains and 20 x Gargoyle Ambushers.
Reward: 13g 23s and 250 reputation with Valiance Expedition.
Info to come...
[80] That's Abominable! (Alliance)
From: Thassarian on the Skybreaker
Objective: Use the Abomination Reanimation Kit to create a Reanimated Abomination, which you are to use to kill 15 Icy Ghouls, 15 Vicious Geists, and 15 Risen Alliance Soldiers.
Reward: 13g 23s and 250 reputation with Valiance Expedition.
Info still to come...
[80] The Solution Solution (Alliance)
From: Chief Engineer Boltwrench aboard the Skybreaker
Objective: Use the Smuggled Solution at the Broken Front.
Reward: 13g 23s
Info still to come...
[80] Capture More Dispatches (Alliance)
From: High Captain Justin Bartlett aboard the Skybreaker
Objective: Capture 6 Orgrim's Hammer Dispatches from Orgrim's Hammer Scouts
Reward: 13g 23s
Info still to come...
[80] Neutralizing the Plague (Alliance - Group)
From: Thassarian aboard the Skybreaker
Objective: Use Pustulant Spinal Fluid on a plague cauldron at Mord'rethar.
Reward: 22g 20s
Info still to come...
[80] No Rest For The Wicked (Alliance - Group)
From: Thassarian aboard the Skybreaker
Objective: Defeat Alumeth the Ascended at Aldur'thar.
Reward: 22g 20s
Info still to come...
[80] King of the Mountain (Alliance - PvP)
From: Frazzle Geargrinder in Ymirheim
Objective: Frazzle Geargrinder in Ymirheim wants you to use her Geargrinder's Jumpbot to plant the Alliance Battle Standard in the skulls at the top of the mountain.
Reward: 13g 23s
Ymirheim Peak Skulls is at 54, 60. Click anywhere on the surface of the mountain to jump to that spot. Defy physics and gravity! You don't have to land before you jump again. Which means you can jump straight up vertical walls if you just keep the jumps coming.
[80] No Mercy! (Alliance - PvP)
From: High Captain Justin Bartlett aboard the Skybreaker
Objective: Kill 15 Horde Players in Icecrown.
Reward: 13g 23s
Kill some Hordies!
Icecrown Glacier - Horde Dailies
[80] Assault by Air (Horde)
From: Ground Commander Xutjja at the edge of the glacier north of Ymirheim
Objective: Use the Kor'kron Suppression Turret to keep the Kor'kron Troop Transport alive long enough to make all of its drops.
Reward: 13g 23s and 250 reputation with Warsong Offensive
The airplane you get into is at 59.6, 46.0. (Just east of where you pick the quest up). Make sure there are infiltrators in the plane before you go, if it's empty, just jump out and wait for it respawn. Click on the gun at the front of the plane and wait as the plane flies to the town. When there, shoot at the canon like things on the ground to stop them from firing back.
[80] Assault by Ground (Horde)
From: Kor'kron troops
Objective: Escort the Kor'kron troops to the gates of Ymirheim. Return to Ground Commander Xutjja at the edge of the glacier north of Ymierheim for compensation after the task is complete.
Reward: 13g 23s and 250 reputation with Warsong Offensive
Info to come...
[80] Blood of the Chosen (Horde)
From: Warbringer Davos Rioht on Orgrim's Hammer
Objective: Kill 20 vrykul in Ymirheim.
Reward: 13g 23s and 250 reputation with Warsong Offensive
It's in the center of the map, they're all around the place
[80] Drag and Drop (Horde)
From: Koltira aboard Orgrim's Hammer
Objective: Collect Orbs of Illusion from Bitter Initiates at Aldur'thar and use them on 3 Dark Subjugators there.
Reward: 13g 23s and 250 reputation with Warsong Offensive
Mobs are all around the area south, across the bridge, from Aldur'thar.
[80] Not a Bug (Horde)
From: Koltira aboard Orgrim's Hammer
Objective: Collect 5 Dark Matters and summon a Dark Messenger at Aldur'thar.
Reward: 13g 23s and 250 reputation with Warsong Offensive
Info to come...
[80] Retest Now (Horde)
From: Chief Engineer Copperclaw aboard Orgrim's Hammer
Objective: Drink the Diluted Cult Tonic, kill any Cultists at Aldur'thar and take their Tainted Essences. You are then to combine 10 of the essences into a Writhing Mass and throw it into any of their cauldrons.
Reward: 13g 23s and 250 reputation with Warsong Offensive
Head towards 49,33 and right click the quest item, which allows you to farm the items needed. You need to kill 10 of the "Cult of the Damned" people, who most likely will drop " [Tainted Essence]" (100% drop rate), and when you have them, you can turn them into a Writhing Mass, which you then throw into one of the cauldrons. Each cauldron will give you a 2 hour buff when you toss the Writhing Mass into it.
- Blue: Attack Power
- Green: Stamina
- Dark: Spell Power
[80] Riding the Wavelength: The Bombardment (Horde)
From: Fringe Engineer Tezzla at Aldur'thar
Objective: Kill 5 x Bombardment Infantry, 10 x Bombardment Captains and 20 x Gargoyle Ambushers.
Reward: 13g 23s and 250 reputation with Warsong Offensive
Grab a bomber and nuke everything on the ground and in the air You can use the vehicles abilities to extinguish the fire on it, or switch to anti air defense either. (To get in a bomber talk to a nearby goblin)
[80] Slaves to Saronite (Horde)
From: Brother Keltan aboard Orgrim's Hammer
Objective: Rescue 10 Saronite Mine Slaves.
Reward: 13g 23s
The entrance to the mine is at 57, 57 right in the middle Ymirheim. It looks like a cave on the world map. You run into the mine, take out the guards and just talk to the slaves and click on the "You're free" chat option. Then they will either:
- Run out of the mine, free
- Go berserk and attack you
- Rant, rave and throw themselves off the ledges at the back of the cave
How quick you finish this quest depends on how lucky you get.
[80] Total Ohmage: The Valley of Lost Hope! (Horde)
From: Fringe Engineer Tezzla at Aldur'thar
Objective: Kill 50 x Bombardment Infantry, 20 x Gargoyle Ambushers, 12 x Frostbrood Sentries and 12 x Scourge War Machines.
Reward: 13g 23s and 250 reputation with Warsong Offensive
Pre-requisites: Amped for Revolt!
Info to come...
[80] That's Abominable! (Horde)
From: Koltira Deathweaver on Orgrim's Hammer
Objective: Use the Abomination Reanimation Kit to create a Reanimated Abomination, which you are to use to kill 15 Icy Ghouls, 15 Vicious Geists, and 15 Risen Alliance Soldiers.
Reward: 13g 23s
Info to come...
[80] Keeping the Alliance Blind (Horde)
From: Sky-Reaver Korm Blackscar aboard Orgrim's Hammer
Objective: Use the SGM-3 to destroy 6 Skybreaker Recon Fighters
Reward: 13g 23s
Info to come...
[80] Volatility (Horde)
From: Chief Engineer Copperclaw aboard Orgrim's Hammer
Objective: Use Copperclaw's Volatile Oil at the Broken Front to attract 3 Frostbrood Skytalons.
Reward: 13g 23
Info to come...
[80] Neutralizing the Plague (Horde - Group)
From: Koltira Deathweaver aboard Orgrim's Hammer
Objective: Use Pustulent Spinal Fluid on a blight cauldron at Mord'rethar.
Reward: 22g 20s
Info to come...
[80] No Rest For The Wicked (Horde - Group)
From: Koltira Deathweaver aboard Orgrim's Hammer
Objective: Slay Alumeth the Ascended at Aldur'thar.
Reward:22g 20s
Info to come...
[80] King of the Mountain (Horde - PvP)
From: Blast Thunderbomb in Ymirheim
Objective: Blast Thunderbomb in Ymirheim wants you to use his Thunderbomb's Jumpbot to plant the Horde Battle Standard in the skulls at the top of the mountain.
Reward: 13g 23s
Pile of Bones = 55 : 60 If you are facing the NPCs, you basically look up and slightly to the left. The mountain peak is behind the house. You don't have to land before you jump again. Which means you can jump straight up vertical walls if you just keep the jumps coming.
[80] Make Them Pay! (Horde - PvP)
From: Sky-Reaver Korm Blackscar
Objective: Kill 15 Alliance Players in Icecrown.
Reward: 13g 23s
Kill some Allies!
Icecrown Glacier - Neutral (Both) Dailies
[80] Leave Our Mark
From: Baron Sliver at The Shadow Vault
Objective: Plant 15 Ebon Blade Banners near the corpses of vrykul found within the greater Jotunheim region.
Reward: 13g 23s and 250 reputation with Knights of the Ebon Blade
Very easy quest. You are given an Ebon Blade Banner which looks more like a sword than a banner, but anyway, you need to plant this into any Vrykul corpse you find. They can be copses you have created, or those left by others. Simply target the corpse and right click the banner to place it. Easy. As the quest text states, you will find the Vrykul within the greater Jotunheim region.Note: If you are doing this quest for the first time, combine it with, Crush Dem Vrykuls!, Ebon Blade Prisoners, Vandalizing Jotunheim, and hand in The Bone Witch.

[80] Shoot 'Em Up
From: The Leaper at The Shadow Vault
Objective: Use a Jotunheim Rapid-Fire Harpoon to shoot down 20 Jotunheim Proto-Drakes and their riders.
Reward: 13g 23s and 250 reputation with Knights of the Ebon Blade
For this you need to 'mount' one of the harpoons located around location 32, 24. If you fly towards Jotunheim, as you approach it, fly along the cliff face and you should be able to spot the balconies with the harpoons. Land on the balcony and you will see the arrow that allows you to mount the harpoon to fire it. You will see you have two abilities:
- Fire Harpoon
- Replenish energy
There are two ways you can do this. You can choose one harpoon and just stay on it until you get all your kills. Or, you can jump between harpoons. If you want to jump around harpoons it's very simple: Spam all 10 harpoon shots off as fast as possible, use your reserve instantly and spam those 10. Dismount vehicle, move over and use the next one. Each new turret will always have full energy and the reserve wont be on CD.
The problem with this quest is the harpoons don't fire as soon as you hit the button, so it's really hard to "aim" it at any particular Proto-Drake. You basically need to just spam the button and hope you hit something. You can try and lead some close up mobs coming from left to right, but don't bother with the ones in the distance as the harpoon detonation seems random and there's no way you can judge the distance and their turn rate to lead them with any success.
Also note, You might often not get credit for killing drakes. For the first few you shoot down, you'll probably be cleaning up someone else's mess. Once they're tagged they tend to stay tagged until they die.


[80] Vile Like Fire!
From: Vile at The Shadow Vault
Objective: Steal a Njorndar Proto-Drake and use it to set fire to 10 vrykul buildings in the greater Jotunheim region.
Reward: 3g 70s and 250 reputation with Knights of the Ebon Blade
Once you have shot down the drakes, it's time to steal one and use it to burn their buildings down! You will find the Njorndar Proto-Drakes at location 27, 39 within the Jotunheim area itself. You will see an open area with the drakes along the edge. Simply mount one and fly it like you do your own flying mount. You have two abilities - basically a speed boost and the 'burn the buildings' flame balls.
This is a very easy quest as you don't even really need to aim your shots, simply hit the fire button as you fly past a building. Also note that each side of the roof can be burned, so you can use fire on each building twice or more times. Nice!


Note: The following three quests are obtained from Death's Rise.
[80] From Their Corpses, Rise!
From: Setaal Darkmender at Death's Rise
Objective: Setaal Darkmender at Death's Rise has given you the Darkmender's Tincture. Apply it to the corpses of 10 of any of the Scarlet Onslaught units found there.
Reward: 13g 23s and 250 reputation with Knights of the Ebon Blade
Onslaught Harbor, where you need to go to, is the Island located just north west of where you collect the quest - around location 10, 44. Kill the Scarlet NPCs, and then target their corpse to use the tincture. Note that using the Tincture makes the bodies disappear so make sure you loot first, particularly if you're doing Intelligence Gathering at the same time.
Also be aware that the Tincture only has 10 charges, and you can waste a charge by trying to use it on a corpse while in combat (won't work) or by using it on a corpse that has already been raised, or presumably tagged by someone else. Setaal will not give you a second Tincture unless you abandon the quest and take it up again.
Overall though, a very easy quest.


[80] Intelligence Gathering
From: Aurochs Grimbane at Death's Rise
Objective: Collect 5 Onslaught Intel Documents.
Reward: 13g 23s and 250 reputation with Knights of the Ebon Blade
While you're killing the Scarlet NPC's, you will also notice lots of Scarlet Onslaught Trunk Keys being looted. You need these keys to open the Scarlet Onslaught Trunk's, in which, you might find Onslaught Intel Documents. The drop Rate for the documents seems to be close to 50%, the rest of the times its mostly a few silver. The NPC's can also drop them, but at a much lower rate. The best location for the trunks is aboard the two boats located at the Onslaught Harbor.
It's advised by a lot of people to avoid this quest as it's (currently) more pain than gain. If you have a particularly bad run with the trunks not giving the documents, you can spend a long time on this quest. For gold, you could spend that time doing other dailies, and for reputation, you are better off running heroics with your tabard on. That said, the first time I did this, it only took about 10 minutes. So it's up to you.
Note: The keys are quest items, and are therefore destroyed upon turning the quest in. Don't bother stockpiling them.

[80] No Fly Zone (Both)
From: Uzo Deathcaller at Death's Rise
Objective: Kill 10 Onslaught Gryphon Riders.
Reward: 13g 23s and 250 reputation with Knights of the Ebon Blade
You're given a Bone Gryphon which comes with four abilities (listed in the order they are located on the action bar):
- Frost Breath - instant primary spam attack; no cooldown
- Plague Strike - deals a small amount of direct damage and applies a DoT; has a 12 second cooldown
- Bone Armor - instantly gives your gryphon four "bones" that absorb damage (basically a shield); has a 20 second cooldown
- Speed Burst - doubles your flight speed for 8 seconds; has a 1 minute cooldown
Head over to Onslaught Harbor to the west of Death's Rise and find a safe spot to land, then use the the Bone Gryphon to hop on. Use Bone Armor whenever the cooldown is finished. When fighting the Onslaught Gryphon Riders, start off with Plague Strike and spam Frost Breath until the rider is dead. Kill ten riders to complete the quest.
If your Bone Gryphon's health is low, find a safe spot to dismount and re-summon it. You'll hop on a new Bone Gryphon will full health.
When turning in the quest, make sure to dismount your Bone Gryphon and use your own mount to fly back to Death's Rise. If you leave Onslaught Harbor, you will get a warning that says you might lose your Bone Gryphon. Although it's possible to get to Death's Rise while on the Bone Gryphon, you should just play it safe and use your own mount.
Of course, you can always kill the riders the old fashioned way: with your own weapons and spells.
Storm PeaksNote: the Hyldnir dailies give "Hyldnir spoils" which apparently has a small chance of containing a bear mount![80] Spy Hunter (Alliance)
From: Frostworg Denmother in Dun Niffelem
Objective: Defeat 3 Stormforged Spies in the Valley of Ancient Winters. Using the Ethereal Worg's Fang at the Corpse of the Fallen Worg will summon an Ethereal Frostworg, which will expose hidden enemies. You are to return to the Frostworg Denmother in Dun Niffelem when the valley has been cleansed of spies.
Reward: 7g 40s
Go out to 57,63, use the horn, follow the wolf around and kill the Dwarves when he spawns them.
[80] Overstock (Horde)
From: Ricket at K3
Objective: Use Improved Land Mines at Garm's Bane to fend off the attackers from Garm. Both Garm Invaders and Snowblind Followers will count towards this goal.
Reward: 6g 80s
More info to come..
[80] Back to the Pit (Both)
From: Gretta the Arbiter in Brunnhildar Village
Objective: Use the Reins of the Icemaw Matriarch inside the Pit of the Fang and defeat 6 Hyldsmeet Warbears.
Reward: 7g 40s
Pre-Requisites: The Last of Her Kind, The Warm-Up and Into the Pit. Back into the Pit is the repeatable daily version of Into the Pit.
More info to come..
[80] Blowing Hodir's Horn (Both)
From: Hodir's Horn in Dun Niffelem
Objective: You are to defeat 5 Niffelem Forefathers and 5 Restless Frostborn at Thunderfall. You are then to blow Hodir's Horn over their corpses, then return to Hodir's Horn in Dun Niffelem.
Reward: 22050 experience, 7g 40s and 250 reputation with The Sons of Hodir
Thunderfall is the frozen battle scene to the north of Frostfield Lake and northeast of Dun Niffelem. Use Hodir's Horn over the corpses of Niffelem Forefathers and both Restless Frostborn Ghosts and Restless Frostborn Warriors to receive quest credit. Make sure you loot before you use the horn, though, as the corpse will disappear. I found I was able to use the horn over corpses I hadn't had the tag on, which was convenient, but also a potential source for abuse.
[80] Defending Your Title (Both)
From: Gretta the Arbiter in Brunnhildar Village
Objective: Defeat 6 Victorious Challengers.
Reward: 7g 40s
Pre-Requisites: Quest series that begins with They Took Our Men! from Gretchen Fizzlespark.
More info to come..
[80] Feeding Arngrim (Both)
From: Arngrim's frozen image in Dun Niffelem
Objective: You must go to the Valley of Ancient Winters and use Arngrim's Tooth on the Roaming Jormungar there. Once they have become disembodied, you must fight them until they are weakened.
Reward: 7g 40s and 250 reputation with The Sons of Hodir
More info to come..
[80] Hot and Cold (Both)
From: Fjorn's Anvil in Dun Niffelem
Objective: You are to go to Frostfield Lake, kill the Brittle Revenants there and use the Essence of Ice on the Smoldering Scraps at Fjorn's Anvil. You are then to collect 5 of the Frozen Iron scraps and return to Fjorn's Anvil in Dun Niffelem.
Reward: 22050 experience, 7g 40s and 250 reputation with The Sons of Hodir
You get Essence of Ice from Brittle Revenants at Frostfield Lake. You can carry 10 Essence of Ice, but you can only loot 5 Frozen Iron Scraps at a time. So you could stock up on Essence of Ice, but only use 5 per day, else you waste them.
[80] Maintaining Discipline (Both)
From: Gretta the Arbiter in Brunnhildar Village
Objective: Use the Disciplining Rod on 6 Exhausted Vrykul inside the Forlorn Mine
Reward: 5g 50s
More info to come..
[80] Polishing the Helm (Both)
From: Hodir's Helm at Dun Niffelem
Objective: Enter Hibernal Cavern west of Dun Niffelem and collect 5 units of Viscous Oil from the Viscous Oils there. Then return to Dun Niffelem and apply the oil to Hodir's Helm.
Reward: 7g 40s and 250 reputation with The Sons of Hodir
Located at 55.59, 62.94 -- directly west of Dun Niffelem. Kill the neutral slimes for the oil. Appears to be a 100% drop rate.
[80] Pushed Too Far (Both)
From: Fjorlin Frostbrow at Frosthold
Objective: Ride with a Stormcrest Eagle and kill 16 Stormpeak Wyrms in the Foot Steppe
Reward: 6g 80s
When you start this quest, you'll mount up on a Stormcrest Eagle. Fly to the Foot Steppes in the Northeast and look for Stormpeak Wyrms. Your biggest challenge will be catching the things, since they can fly faster than your eagle does. The preferred prey will be the wyrms who are either roosted on the mountains and rocks or are attacking rhinos. If you find one of those, they're easy pickings. They melee and have a weak frost breath attack, but are no threat to your eagle. If you can't find any who are roosted or distracted, you can catch the fliers by heading them off. They may be faster, but you're much more maneuverable.
Your eagle has three attacks:
- Swoop: This is your basic attack. It does a good deal of damage and has a short cooldown.
- Eye Gouge: It has a thirty second cooldown, but once you use it on a drake, it's as good as dead. When you use it, just hit it once and let your eagle do the rest of the work. It will claw at the drake's head for a few seconds, killing it. Performing any other action while the Gouge is in process will interrupt it.
- Storm Bolt: This is your ranged attack (5 - 45 yards). It does a lot of damage and stuns the target, but has a minimum range and a cast time. You can be in motion while you're casting, though.
[80] The Aberrations Must Die (Both)
From: Gretta the Arbiter in Brunnhildar Village
Objective: Go to Valkyrion and obtain Vials of Frost Oil from the Valkyrion Aspirants. Use the Vials of Frost Oil to destroy 30 Plagued Proto-Drake Eggs.
Reward: 7g 40s
More info to come..
[80] Thrusting Hodir's Spear
From: Lorekeeper Randvir in Dun Niffelem
Objective: Use Hodir's Spear to challenge a Wild Wyrm in the Valley of Ancient Winters. Once in its grip, you are to fight to the death.
Reward: 14g 80s
Pre-Requisites: Honored with Sons of Hodir and have completed Raising Hodir's Spear
Take the Spear and find a wild wyrm flying around west of Dun Niffelem and throw the spear. You will find yourself flying around on a wild wyrm gripping onto its belly and you gain a new action bar as if you were in a vehicle, there are 4 abilities for phase 1 (theres a total of 2 phases).
- Grab On - Tighten your grip increasing the number on the grip buff by 10.
- Dodge Claws - Moves you closer to the wyrm allowing you to dodge its only attack for the next 2 seconds. 4 second cooldown (does NOT have a global cooldown)
- Thrust Spear - Jab Hodir's Spear at the wyrm dealing 1000 to 1300 damage. Decreases grip by 5
- Mighty Spear Thrust - Thrust Hodir's Spear deep into the wyrm dealing 9k to 11k damage but you cannot take any action for the next 5 seconds while you pull the spear out (this includes dodging). 10 second cooldown Decreases grip by 15
So basically you cannot let your grip fail and it decays over time, slowly at first but will eventually become too much to handle. (I think its about 1-3 min don't know exactly before it becomes too much to handle). If the buff fades you will fall to your death. Constantly be using Thrust Spear on the wyrm while keeping your grip above 35-40. When a warning pops up alerting you to its claw attack use the Dodge Claw ability and after it use Mighty Spear Thrust. The objective is to get the wyrm to 25% of its health to force it into phase 2. If you think your grip is decaying too fast use Mighty Spear Thrust and hope for the best. At 25% you go into phase 2.
In phase 2 you are in its mouth you have 2 abilities.
- Pry Jaws Open - Prys the wyrm's jaws open by 5 degrees increasing your chance to hit with fatal strike by 5% per application. (stacks 20 times)
- Fatal Strike - Throws Hodir's Spear into the wyrm's throat instantly killing it has a 0% hit chance on its own you NEED to use Pry Jaws Open.
So now youre flying around in its mouth. You gain a debuff called Jaws of Death which hit me (premade hunter with all that blue premade gear) for about 632 a second. The damage is physical so it might be affected by armor not sure though. All you need to do for this phase is pray you didn't get hit by too many claws in phase 1 and use Pry Jaws Open as much as you can before attempting fatal strike (10+ stacks is nice but I live on the edge and go to 20 with almost no health left its intense!) If you are close to death and not at 20 pray your fatal strike hits.
Once he dies you fall to the ground (still in its mouth very cool) hit the ground and jump out. Congrats you just killed a giant wyrm with only a spear. ^.^
-
02-26-2009 #6
Member
- Reputation
- 17
- Join Date
- Feb 2008
- Posts
- 91
- Thanks G/R
- 0/0
- Trade Feedback
- 0 (0%)
- Mentioned
- 0 Post(s)
- Tagged
- 0 Thread(s)
frosted butts

-
02-26-2009 #7
Member
- Reputation
- 1
- Join Date
- Mar 2008
- Posts
- 39
- Thanks G/R
- 0/0
- Trade Feedback
- 0 (0%)
- Mentioned
- 0 Post(s)
- Tagged
- 0 Thread(s)
Omg this is the best guide ever thanks!!
-
02-26-2009 #8
Member
- Reputation
- 18
- Join Date
- May 2007
- Posts
- 128
- Thanks G/R
- 0/0
- Trade Feedback
- 0 (0%)
- Mentioned
- 0 Post(s)
- Tagged
- 0 Thread(s)
epic share!!!! Thanks +2 rep
-
02-26-2009 #9
Active Member

- Reputation
- 45
- Join Date
- Dec 2007
- Posts
- 184
- Thanks G/R
- 0/0
- Trade Feedback
- 0 (0%)
- Mentioned
- 0 Post(s)
- Tagged
- 0 Thread(s)
It's on some random website on the internet, I thought I should say this even tho he credited them in the middle of the huge thread.

-
02-26-2009 #10
Member
- Reputation
- 17
- Join Date
- Sep 2008
- Posts
- 265
- Thanks G/R
- 0/0
- Trade Feedback
- 0 (0%)
- Mentioned
- 0 Post(s)
- Tagged
- 0 Thread(s)
How much would you earn by doing all of the dailies?
-
02-26-2009 #11
Member
- Reputation
- 36
- Join Date
- Mar 2007
- Posts
- 82
- Thanks G/R
- 0/0
- Trade Feedback
- 0 (0%)
- Mentioned
- 0 Post(s)
- Tagged
- 0 Thread(s)
Its in every Reply I've made. First line I wrote was crediting it to them =)Originally Posted by Pina
Originally Posted by Casperx
You can make up to 250g+ a day just doing dailies. Not including drops such as vendor trash, silver, and even greens and blues. I myself only do about 10 a day and I'm surprise that so far I've made over 500g+ since I started doing it.
It all depends on how much of it you do and how often.
-
02-26-2009 #12
Contributor

- Reputation
- 88
- Join Date
- Mar 2008
- Posts
- 295
- Thanks G/R
- 0/0
- Trade Feedback
- 0 (0%)
- Mentioned
- 0 Post(s)
- Tagged
- 0 Thread(s)
Eventhough you did not write this yourself it must have taken some time to present it like this, also i didnt know about some of theese dailies. +Rep'd
-
02-26-2009 #13
Member
- Reputation
- 36
- Join Date
- Mar 2007
- Posts
- 82
- Thanks G/R
- 0/0
- Trade Feedback
- 0 (0%)
- Mentioned
- 0 Post(s)
- Tagged
- 0 Thread(s)
Thanks =)
Yeah I didn't know the dailies myself. I think Im'ma try some of these to make some extra gold
-
02-26-2009 #14
Member
- Reputation
- 17
- Join Date
- Aug 2008
- Posts
- 131
- Thanks G/R
- 0/0
- Trade Feedback
- 0 (0%)
- Mentioned
- 0 Post(s)
- Tagged
- 0 Thread(s)
ZOMG THIS IS SICK!
ty mate!
-
02-26-2009 #15
 Contributor
- Reputation
- 204
- Join Date
- Nov 2008
- Posts
- 1,093
- Thanks G/R
- 0/1
- Trade Feedback
- 2 (100%)
- Mentioned
- 0 Post(s)
- Tagged
- 0 Thread(s)

:|
tl;dr much?____________________________________________

____________________________________________


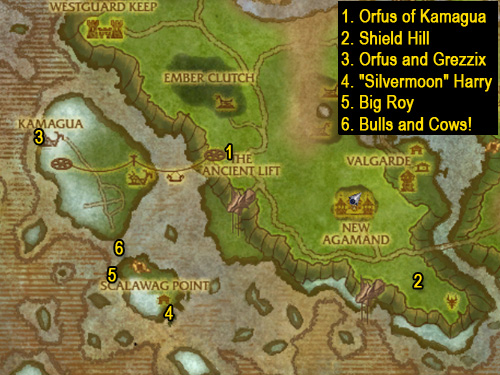

 Reply With Quote


Similar Threads
-
Paladin talents walkthrough (Comments)
By Nugma in forum WoW UI, Macros and Talent SpecsReplies: 15Last Post: 08-01-2007, 01:40 PM -
A Macintosh Walkthrough: Troll male -> Undead Male
By Knarr Kill in forum WoW ME Questions and RequestsReplies: 1Last Post: 05-26-2007, 07:18 PM -
Valley of Trials Walkthrough
By Alkhara Majere in forum World of Warcraft GuidesReplies: 9Last Post: 05-08-2007, 11:36 AM -
Low Level Night Elf Walkthrough
By x_jonnyb.good_x in forum World of Warcraft GuidesReplies: 4Last Post: 10-18-2006, 12:43 PM -
Low Level Undead/Tirisfal Glades Walkthrough
By x_jonnyb.good_x in forum World of Warcraft GuidesReplies: 0Last Post: 10-16-2006, 09:39 PM
-
OwnedCore Forums
casino news World of Warcraft Pokemon GO MMO Overwatch RTS Casino reviews www.planet-casino.com lucky 8 lucky8 no deposit codes bc game bc game lucky8 -
casino
Casino Gambling Online casinos Casino en ligne bc game bc game bc game no deposit bonus codes roobet Top 10 Casinos Casino reviews Bitcoin casino Paypal Casino Lucky8 1xbit heycasino Can you hack him? US tournament Acc Request) Reward involved! Help Wotlk IE Question 70 pala eu Need help to encode Looking for a VERY Demonoid Invite Codes -
CoreCoins
CoreCoins CoreCoins FAQ Shout-Out Banner Ads -
My OwnedCore
My Profile Notifications Settings Buy CoreCoins About Us


Privacy Policy | Cookie Policy | Terms | Contact Us
Available Payment Methods:-


-
Casino
vave | amazon | amazon | amazon | amazon | casino | casino | casino | casino | casino | casino | casino | casino | mystake | casino | casino | amazon | amazon | amazon | casino | amazon | casino | amazon | vave | casino | casino | amazon | casino | casino | mystake | casino | amazon | amazon | casino | casino | casino | casino | casino | amazon | casino | casino | casino | casino | amazon | mystake | amazon | casino | casino | casino | casino | casino | amazon | casino | amazon | mystake | vave | amazon | casino | casino | amazon