
Hello!:wave:
Well i have already seen, some Quice tutorials, but they only cover the install part, but I would like to create a tutorial on how to use AND install itI have leeched for a while now, so i feel i have to give something back to the great community on MMOwned! This is the 1st of hopefully many tuts for dummies!!
Requirements -
Working Mangos server for 2.4.3
"Creds" -
Thanks to Image hosting, free photo sharing & video sharing at Photobucket for free image hosting
Thanks to Indomit for creating this great DB editor!
Thanks to 711 for his good and easy to use repack
1. Download Quice from Quice - MaNGOS DataBase Editor.
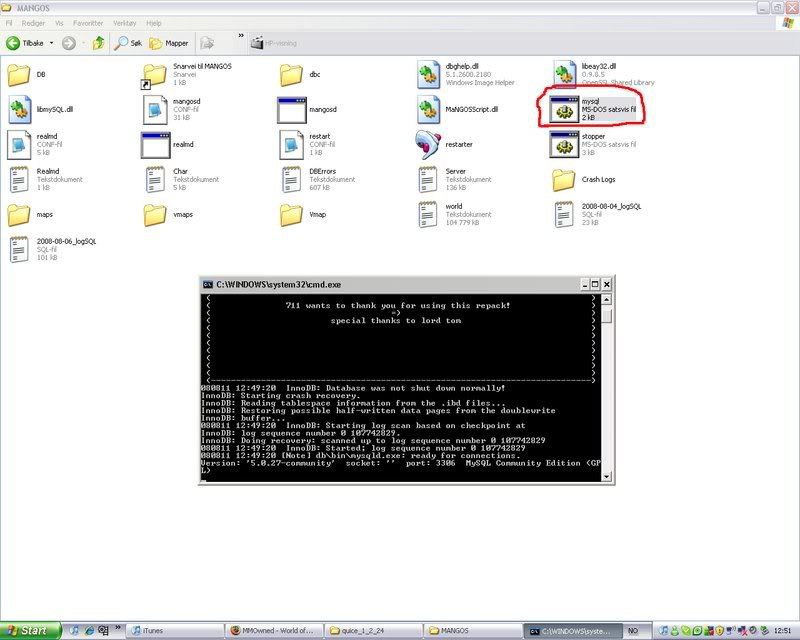
2. While you are downloading you can launch your MySQL server ( for those with the 711 Repack you can open mysql.bat in your mangos folder
3. ( Choose A or B, A is Recommended for better Search Performance )
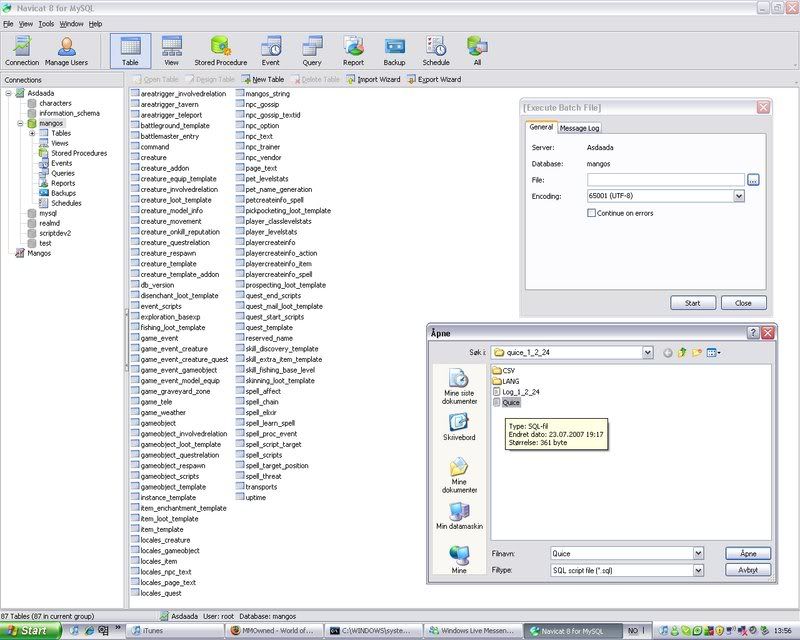
3A. When you are done downloading, extract the files to wherever you want, then go to your MySQL Client, ( for example Navicat ), when connected to MySQL, right click your Mangos DB, and choose execute Batch file. Browse for your quice folder and inside of it choose quice.sql, then start and when its finished, go back to your quice folder, and launch Quice.exe. Then go onto step 4.
3B. When you are done downloading extract the file to wherever you want, open your quice folder and launch quice.exe
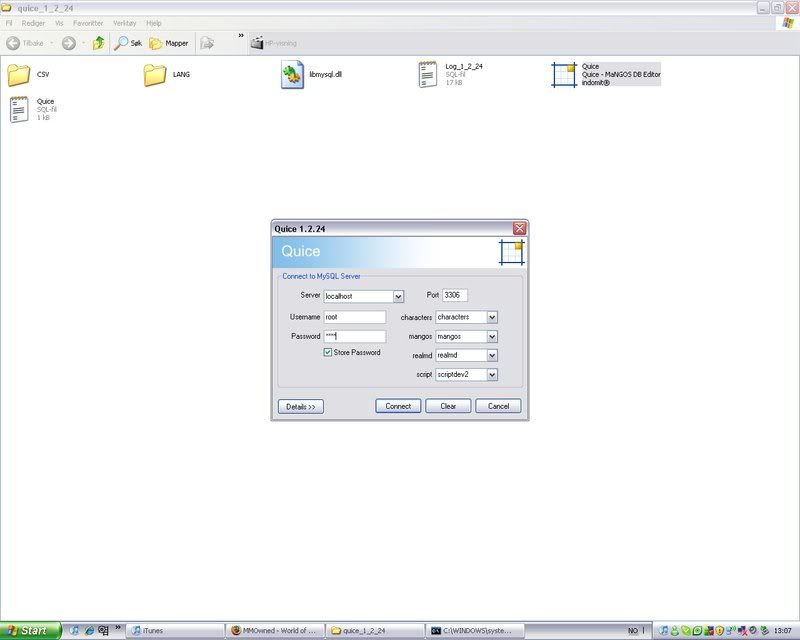
4. Here you have to fill in your mysql server, port, username and password.
If you used the 711 repack, your server should be localhost (127.0.0.1 / your computer ) Your port should be 3306 unless you have changed it. The Username and password should be root and root, unless you have setup mysql yourself, in that case it should be whatever you set it to!
5. Then, to the right, it says characters, mangos, realmd and script. If you sucsessfully connect to the MySQL server, you can choose where the different DB's are in the dropdown menu's.
Characters - characters
Mangos - Mangos
Realmd - realmd
Script - scriptdev2
5. If a new window called Quice pops up, you have installed it correctly, but now lets start using it!
With Quice you can do loads of stuff, edit and create npc's, items, quests, objects and more!
6. Lets start off with the item editor, you will have a search bar which is easy to use, lets search for Devastation ( Two-Handed Axe, obtained in Tempest Keep, disappears after 15 minutes and if you're not in TK, used for killing last boss ).
Double-click Devastation, and you should now see something like this... You can edit pretty much everything.
I edited the image to explain some of the basics...
1. Entry ID - the Entry ID is the unique ID for every item, the entry ID is for example used when you add an item ingame, using ".additem ..." in this case ".additem 30316" Usually its a pain in the ass to make a new item in other DB Editor's when you have to come up with a unique entry ID, i mean, you run out of numbers like 333333, 666666, of course there are many, but Quice generates Unique Entry ID's automatically when you make a new item...
- Also if you are making a new item, under Entry ID it says Display ID, this decides how the weapon should look like. The Icon in your inventory and the design. If you are making a new weapon and want it to look like Devastation type in 41560, you can find Display ID's inside Quice or in WoW search engines like Thottbot or WoW.Allakhazam.
2. Quality - Here you can set what quality you wish for your item, anything from 0 (Grey/Poor) - 6 (Red/Artifact) should work, you can always click the three blue dots to the right of the remind yourself of what is what.
3. Name - Name of your weapon...
4. Description - On some items there is a yellow text, like a "Quote" in its information, this can be written here...
5. This is the itemset the item you are editing belongs to, i am currently looking into how to change an itemset name and its bonuses. If you don't know yet, and you are rolling a twink server (like me
6A. Item Bonding - This is if the item is Bind when picked up, Bind on equipped and so on, just click the blue dots and a small menu should pop up.
6Bonus.
-You can make an item Unique by going to Flags, ( right next to quality, num. 2)
click the blue dots, then to the right find and click "Unique Equipped" , BUT if you want to make a ring double-unique equipped like "Unique (2)" Then don't click unique equipped, but find "maxcount" (Num 17).
7. Delay - This is the speed in milliseconds for weapons, so... if you want your off-hand sword to be at the speed of 1.70 you type in 1700, if you want a two-handed sword with 3.40 you type in 3400 and so on....
8. Sockets - Here you have 3 rows, where you can fill what type of sockets you want on your item... You can leave the socket content column empty, you only need to fill in the socketColor column...
1 - Meta Socket
2 - Red Socket
4 - Yellow Socket
8 - Blue Socket
So then if you fill in 2 in the socketColor column you will then have a red socket space on your item...
8B. Socket bonus - I am not fully sure how to find a socket bonus just yet, but will update when i have a solution, PM me if you have!
9. Required Level - This is pretty much self-explained, just fill in the level requirement you want...
9Bonus1. - So you want to make your mount lvl 10 and no skill required or you want to make some engineering googles to not require engineering skill... Then below required lvl you can see RequiredSkill and Required SkillRank, but both those down to 0, then if you want to remove the reputation requriement put RequiredReputationFaction and RequiredReputationRank down to 0.
9Bonus2. - If you want lower lvl items to be enchanted with Moongoose, etc... You can put the Item Level up to 35, and so on, if you don't want some high lvl item to have moongose or any other high lvl enchant on it, put it down below 35. Savagery is Item Level 60 i think, and some other Pre-Made Enchants are also about 60.
-Still working on more!!


User Tag List
Results 1 to 9 of 9
-
08-11-2008 #1
 Member
- Reputation
- 9
- Join Date
- Aug 2008
- Posts
- 79
- Thanks G/R
- 0/0
- Trade Feedback
- 0 (0%)
- Mentioned
- 0 Post(s)
- Tagged
- 0 Thread(s)
MaNgOS - Quice (DB Editor) For Dummies! - With Images
Last edited by scarfaze; 08-17-2008 at 07:49 AM. Reason: Added more to Items Tutorial

-
08-14-2008 #2
Contributor

- Reputation
- 93
- Join Date
- Jun 2007
- Posts
- 263
- Thanks G/R
- 0/0
- Trade Feedback
- 1 (100%)
- Mentioned
- 0 Post(s)
- Tagged
- 0 Thread(s)
Looks good so far. I'm ordering windows to get on my mac, and once I get it installed, I'm putting Quice on it. If you wouldn't mind, please do a tutorial on the quest section next
-Tator
-
08-15-2008 #3
Member
- Reputation
- 9
- Join Date
- Aug 2008
- Posts
- 79
- Thanks G/R
- 0/0
- Trade Feedback
- 0 (0%)
- Mentioned
- 0 Post(s)
- Tagged
- 0 Thread(s)
Oh yes, soon done with all that stuff, have worked on the tutorial lots, but in notepad
soon up
-
08-16-2008 #4
Member
- Reputation
- 1
- Join Date
- Jan 2007
- Posts
- 2
- Thanks G/R
- 0/0
- Trade Feedback
- 0 (0%)
- Mentioned
- 0 Post(s)
- Tagged
- 0 Thread(s)
sweet action
-
08-22-2008 #5
Member
- Reputation
- 13
- Join Date
- Aug 2008
- Posts
- 67
- Thanks G/R
- 0/0
- Trade Feedback
- 0 (0%)
- Mentioned
- 0 Post(s)
- Tagged
- 0 Thread(s)
+Rep , great guide!
Now I want to know how to add this weapon/skill/npc whatever ingame!
I tried to use ¨execute script" but it wont work.. Lets see what I can do with that..
-
08-24-2008 #6
Member
- Reputation
- 9
- Join Date
- Aug 2008
- Posts
- 79
- Thanks G/R
- 0/0
- Trade Feedback
- 0 (0%)
- Mentioned
- 0 Post(s)
- Tagged
- 0 Thread(s)
You have to click on the Show Item Template Script in lower right corner, then execute script, in-game after a restart, i recommend you using mangadmin to search for your item, ( could make a tutorial on this later ) , but if you haven't got it, .additem "entry ID" and it should be in your bags, if you're targeting yourselfOriginally Posted by WhiteCrow
-
09-05-2008 #7
Member
- Reputation
- 1
- Join Date
- Aug 2008
- Posts
- 3
- Thanks G/R
- 0/0
- Trade Feedback
- 0 (0%)
- Mentioned
- 0 Post(s)
- Tagged
- 0 Thread(s)
I am having a problem i put the display ID # of what i want a crossbow that i made in and when i go into the game and .additem it it looks like my toon is holding a blue and white checkered box instead of somthing that should have looked like the Brutal Gladiator's Heavy Crossbow .... know what im doing wrong or how to fix this i tried using different display ID's and it always comes up the same ...PLEASE HELP!!!!
-
02-02-2011 #8
Private
- Reputation
- 1
- Join Date
- Dec 2010
- Posts
- 2
- Thanks G/R
- 0/0
- Trade Feedback
- 0 (0%)
- Mentioned
- 0 Post(s)
- Tagged
- 0 Thread(s)
Ei this is realy nice but i wanted to Know number 18 ^^ Just to know if on mounts is that to put how many people can get in? i would like to know how can i put for example at Makginner chooper a place for the 2nd Player :S i already have patch 3.3.5 on my server ^^
-
02-02-2011 #9
 Contributor
- Reputation
- 116
- Join Date
- Mar 2007
- Posts
- 307
- Thanks G/R
- 0/0
- Trade Feedback
- 0 (0%)
- Mentioned
- 0 Post(s)
- Tagged
- 0 Thread(s)
This thread is over 2 years old.
hey ervyone whats up gamboys


 Reply With Quote
Similar Threads
-
[MaNGOS] Quice - DB editor tool
By Dythzer in forum WoW EMU ProgramsReplies: 9Last Post: 09-01-2008, 11:06 AM -
Need help with mangos+WOTLK will +rep for help
By Benchwarmer in forum WoW EMU Questions & RequestsReplies: 22Last Post: 08-20-2008, 12:17 PM -
compile you own mangos server(with images)
By vittwow in forum WoW EMU Guides & TutorialsReplies: 5Last Post: 08-10-2008, 09:35 AM -
2D's Repack of Doom 2.643 SQL Dump Version and Guide for dummies (image heavy)
By Drathnar in forum WoW EMU Guides & TutorialsReplies: 37Last Post: 11-30-2007, 08:31 AM -
[GUIDE] yet another How-To model edit for dummies (with abuse) :D
By Snuggles in forum World of Warcraft Model EditingReplies: 35Last Post: 05-31-2007, 10:29 AM
-
OwnedCore Forums
casino news World of Warcraft Pokemon GO MMO Overwatch RTS Casino reviews bc game bc game -
casino
Casino Gambling Online casinos Casino en ligne vercel livescore bc game lovable vercel bc game no deposit bonus codes stake Top 10 Casinos Casino reviews Bitcoin casino Lucky8 1xbit heycasino Bunch of accounts GLIDER ELITE CODE 110mb How to get an account Gamecards Recalling an account Giwing away 3 Frozen Lousy EU account, Frozen Need help with phishing -
CoreCoins
CoreCoins CoreCoins FAQ Shout-Out Banner Ads -
My OwnedCore
My Profile Notifications Settings Buy CoreCoins About Us


Privacy Policy | Cookie Policy | Terms | Contact Us
Available Payment Methods:-


-
Casino
mwr life | MRQ Casino | here | Instant Payout Methods | Aviator game casino | Bitstarz Tournament | mwr life | mwr | freebet tanpa | X | mwr life | canada | mwr life | HashLucky Casino | mystake | Free casino games | CryptoRoyal Casino | mwr life | mwr life | Mirax Casino | iLucki Casino | Blockchain gambling | mwr life | mwr life | travel advantage | mwr life | mwr life | mwr life | Top 5 canadian online casinos 2025 | Shuffle Casino | stake | mwr life