
How to Make Your Server Public Without Hamachi. (THIS GUIDE ACTUALLY WORKS) UPDATED 3/21/11 PATCH 4.0.3+ Compatible!
[This Guide Is celebrating being on the toplist for 3 years!!]
SOME INFO My Ideas
Im tired of guids being posted that only show parts of what needs to be done. some guides will show you just change the realm.cofig there will be about 10k views and about 500 comments with people needing help who will never recieve it. Well Not with this one it is as well put as can be and you will be sure to get it public with this guide.
NEXT
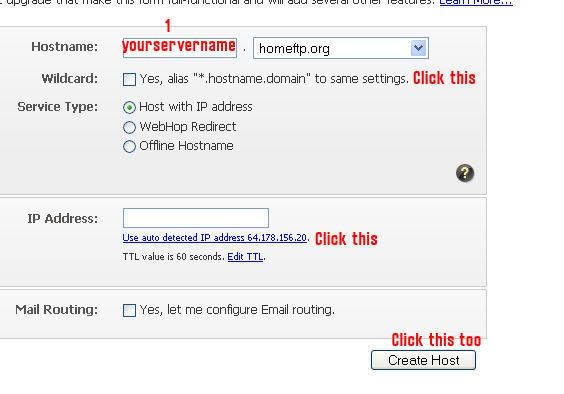
Step 1 part one) Sign Up: DNS Service.
Dynamic DNS, E-Mail Delivery and Other Services and sign up for an account. Verify the account by checking the email and clicking the link.
Follow directions on image
Follow directions on image
Follow directions on image
Follow directions on image
Hostname: this is the realmlist players will use to connect to you, and also what you use to forward some information in your config files.
This is your DNS SERVER
NEXT
Step 1 part two) get aPen and a peace of Paper: To Write this down
Write down the DNS server you made in step 1a).
Write down 127.0.0.1
Write down 0.0.0.0
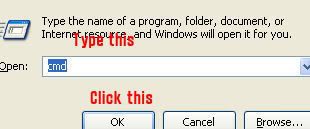
Now open up a command promt (Windows key + r) (cmd) and type
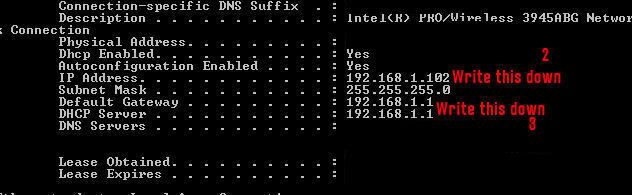
ipconfig/all
This will list a bunch of connections, and their protocols.
You are looking for this:
Your NUMBERS should look different, but they are in the SAME AREA.
WRITE THEM DOWN!!.
NEXT
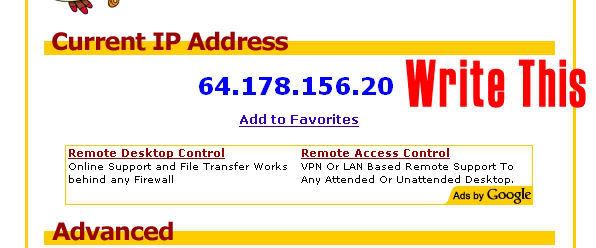
Step 1 part three) IP ADDY
IP Chicken - Whats my IP address? ip address lookup
So by now you should have 3 sets of numbers written down and the DNS Server.
To make it simple for the rest of this guide, we will name the numbers you wrote down
127.0.0.1 = localIP (not needed YET in this guide, may edit later)
192.168.1.x = routerIP (3 on the pic)
192.168.1.X = MYIP (2 on the pic)
(value from chickenIP) =ChickenIP
DNSSERVER = DNSRV
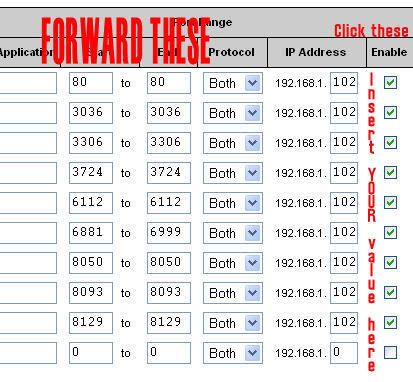
Step 2 part 1) PORT FORWARDING
LOMG!!!!
In your address bar type the value you wrote down that was DEFAULT GATEWAY.
The login/password information should be one of these combinations. IF non of these work, press and hold the RESET button on your ROUTER for 30 seconds until it resets. Usually the POWER light will start blinking and then go steady again.
Login Pass
Admin Admin <-- most of the time.
Admin (none)
(none) (none)
(Admin) (password)
Now, find out by looking around and clicking links on how to PORT FORWARD. Mine was under a tab called Applications and Gaming.
Forward the ports shown in the below image.
Make the protocol selection BOTH. If you don’t have a choice, leave it blank, this usually also does TCP/UDP.
NEXT
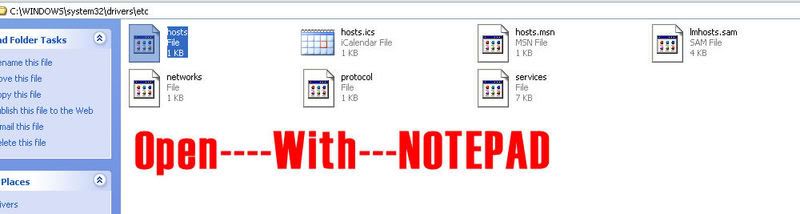
Step 2 part 2) Hosts File
Goto
C:\WINDOWS\system32\drivers\etc
And open the file
Hosts
Now you need to write THREE THINGS!!
127.0.0.1 yourservername.hostnameyouchose
CHICKENIP yourservername.hostnameyouchose
It should look similar to this ^
Code: to show which goes with which this is not the correct format above u must substitute you dns host name and ips in.
-Important Note!!- If you cannot save your hosts file, close out of it then go to start search notepad right click run as administrator, then open the hosts file in it and you can save!
SAVE AND EXIT.
NEXT
Step 3 part one) Config Files
Go into your ascent folder and open your 3 config files (realms, logon, world)
Code:In the World and Logon configure your mysql username and password to match what you have created. changing the bottom of your logon may be required if you follow all these steps but cannot get past errors on loading, if so change to your chicken ipRealms.ConfigCode:AllowedIPs = "127.0.0.1/32" AllowedModIPs = "127.0.0.1/32">
Edit in red to you your ipchicken or dns
NEXTCode:/*********************************************************************** * ArcEmu Modded Configuration File ***********************************************************************/ <LogonServer Address = "127.0.0.1" Port = "8093" Name = "logon" RealmCount = "1"> /****************************************************** * The type of realm (PVP, Normal, RPPVP, RP) ******************************************************/ <Realm1 Name = "Project Anthrax's Funserver" Address = "127.0.0.1:8129" Icon = "PVP" Population = "1.0" TimeZone = "1">
Step 3 part 2) seting the Realmlist
Now you open your realmlist.wtf file and input this
Code:
set realmlist DNSSVR
ex set realmlist make it your DNSSVR
updates made to accommodate the recent patches!


Shout-Out
User Tag List
Results 1 to 15 of 678
-
04-26-2008 #1
 Contributor

- Reputation
- 180
- Join Date
- Nov 2007
- Posts
- 993
- Thanks G/R
- 0/0
- Trade Feedback
- 0 (0%)
- Mentioned
- 0 Post(s)
- Tagged
- 0 Thread(s)

[Legends guide] to public non hamichi 100% working
Last edited by project anthrax; 03-21-2011 at 03:39 PM. Reason: Updated Version upto 4.0.3 Patch upgrade
removed by Unholy

-
04-27-2008 #2
Member
- Reputation
- 1
- Join Date
- Jan 2008
- Posts
- 8
- Thanks G/R
- 0/0
- Trade Feedback
- 0 (0%)
- Mentioned
- 0 Post(s)
- Tagged
- 0 Thread(s)
idk just wondering what it meant when it says port value is out of range do you know if there something i did wrong
-
04-27-2008 #3
Contributor
- Reputation
- 180
- Join Date
- Nov 2007
- Posts
- 993
- Thanks G/R
- 0/0
- Trade Feedback
- 0 (0%)
- Mentioned
- 0 Post(s)
- Tagged
- 0 Thread(s)
what numbers did u enter in might be to large a number
-
04-27-2008 #4
Member
- Reputation
- 1
- Join Date
- Jan 2008
- Posts
- 8
- Thanks G/R
- 0/0
- Trade Feedback
- 0 (0%)
- Mentioned
- 0 Post(s)
- Tagged
- 0 Thread(s)
Um here ill send you a screen shot in a sec
-
04-27-2008 #5
Member
- Reputation
- 1
- Join Date
- Jan 2008
- Posts
- 8
- Thanks G/R
- 0/0
- Trade Feedback
- 0 (0%)
- Mentioned
- 0 Post(s)
- Tagged
- 0 Thread(s)
Wait nvm i got it but when he is insert this in our host file 127.0.0.1 gmtricks.servegame.org192.168.1.1 gmtricks.servegame.orgmyip gmtricks.servegame.org says can not create
-
04-27-2008 #6
Contributor
- Reputation
- 180
- Join Date
- Nov 2007
- Posts
- 993
- Thanks G/R
- 0/0
- Trade Feedback
- 0 (0%)
- Mentioned
- 0 Post(s)
- Tagged
- 0 Thread(s)
u need to space then and put around each one
127.0.0.1 worldofheros.selfip.com
71.XXX.XXX.X worldofheros.selfip.com
Last edited by project anthrax; 12-29-2008 at 01:12 AM.
-
04-27-2008 #7
Member
- Reputation
- 2
- Join Date
- Jul 2007
- Posts
- 18
- Thanks G/R
- 0/0
- Trade Feedback
- 0 (0%)
- Mentioned
- 0 Post(s)
- Tagged
- 0 Thread(s)
ok so i got everything done, but what do i do after that? open wow and log in? i tried that and it just gets stuck at connecting.

-
04-27-2008 #8
Contributor
- Reputation
- 180
- Join Date
- Nov 2007
- Posts
- 993
- Thanks G/R
- 0/0
- Trade Feedback
- 0 (0%)
- Mentioned
- 0 Post(s)
- Tagged
- 0 Thread(s)
post your configs
-
04-27-2008 #9
Member
- Reputation
- 11
- Join Date
- Feb 2007
- Posts
- 242
- Thanks G/R
- 0/0
- Trade Feedback
- 0 (0%)
- Mentioned
- 0 Post(s)
- Tagged
- 0 Thread(s)
Hope this guide work

-
05-04-2008 #10
Contributor
- Reputation
- 180
- Join Date
- Nov 2007
- Posts
- 993
- Thanks G/R
- 0/0
- Trade Feedback
- 0 (0%)
- Mentioned
- 0 Post(s)
- Tagged
- 0 Thread(s)
lol my rep got deleted along with most of my views and posts xD but yea it works
-
05-05-2008 #11
Member
- Reputation
- 1
- Join Date
- Jun 2007
- Posts
- 7
- Thanks G/R
- 0/0
- Trade Feedback
- 0 (0%)
- Mentioned
- 0 Post(s)
- Tagged
- 0 Thread(s)
great job man! definately getting +rep from me!
-
05-05-2008 #12
Member
- Reputation
- 1
- Join Date
- Apr 2008
- Posts
- 1
- Thanks G/R
- 0/0
- Trade Feedback
- 0 (0%)
- Mentioned
- 0 Post(s)
- Tagged
- 0 Thread(s)
Thanks
Just wanted to thank you! Ive tried al these lousy guides but this one rocks!
-
05-05-2008 #13
Contributor
- Reputation
- 180
- Join Date
- Nov 2007
- Posts
- 993
- Thanks G/R
- 0/0
- Trade Feedback
- 0 (0%)
- Mentioned
- 0 Post(s)
- Tagged
- 0 Thread(s)
thanks lol im a leacher again 0.o
-
05-05-2008 #14
Member
- Reputation
- 1
- Join Date
- Apr 2008
- Posts
- 11
- Thanks G/R
- 0/0
- Trade Feedback
- 0 (0%)
- Mentioned
- 0 Post(s)
- Tagged
- 0 Thread(s)
ok i got this problem I did all those parts right and i can log in But it will logging to game server and go to realm selection and again and again what did i do wrong?
-
05-05-2008 #15
Contributor
- Reputation
- 180
- Join Date
- Nov 2007
- Posts
- 993
- Thanks G/R
- 0/0
- Trade Feedback
- 0 (0%)
- Mentioned
- 0 Post(s)
- Tagged
- 0 Thread(s)
This means the realm config isn’t connecting right, double check your config files and ensure the proper values are input.
DNSRV and CHICKENIP


 Reply With Quote
Similar Threads
-
[Misc] Public Non-Hamachi not working
By handofoberon in forum WoW EMU Questions & RequestsReplies: 3Last Post: 07-08-2010, 01:06 PM -
How to public your server(100% work)+guide port forwading
By Avatarxxx in forum WoW EMU Guides & TutorialsReplies: 5Last Post: 05-31-2009, 03:29 AM -
[Guide] How to Make your server public NON HAMACHI
By xUrbanx in forum WoW EMU Guides & TutorialsReplies: 32Last Post: 09-09-2008, 06:40 PM
-
OwnedCore Forums
casino news World of Warcraft Pokemon GO MMO Overwatch RTS Casino reviews bc game bc game -
casino
Casino Gambling Online casinos Casino en ligne vercel livescore bc game lovable vercel bc game no deposit bonus codes stake Top 10 Casinos Casino reviews Bitcoin casino Lucky8 1xbit heycasino sell/recall accnts Need Scam E-mail help Need help Need a Photo ID [Question] Need help how to not get banned? Wicked ACC Help [EU] lv 70 hunter and The end to many scammers? -
CoreCoins
CoreCoins CoreCoins FAQ Shout-Out Banner Ads -
My OwnedCore
My Profile Notifications Settings Buy CoreCoins About Us


Privacy Policy | Cookie Policy | Terms | Contact Us
Available Payment Methods:-


-
Casino
canada | mystake | mwr life | CryptoRoyal Casino | Shuffle Casino | iLucki Casino | Mirax Casino | Instant Payout Methods | MRQ Casino | mwr life | mwr life | mwr life | X | mwr life | HashLucky Casino | mwr life | mwr life | mwr life | mwr life | Free casino games | travel advantage | freebet tanpa | Top 5 canadian online casinos 2025 | mwr life | Bitstarz Tournament | Blockchain gambling | Aviator game casino | mwr life | mwr life | here | mwr | stake