![[Guide] ~sInX's Walkthrough to Mount-Swapping!](https://www.ownedcore.com/forums/images/styles/OwnedCoreFX/addimg/menu4.svg)
Introduction:
Before I begin, I’d first like to conceptualise with you what exactly you do when you ‘Swap’ a Mount. Well, in reality there are two, very different ways. Not only are they different in the technique, but mostly the result:
1. Extracting and renaming .m2, .anim and .skin files
2. Changing variables within Database Caches
The first can be EXTREMELY tedious, as many of you will have learned, as firstly you have to find the .m2s, then the .anims, then the .BLPs, which can all be located in separate .MPQs. Moreover, the eventual result can be anything but ideal as skins can turn out to be bright green or white, without an alpha layer, and some mounts can also result in unbalanced sizes therefore turning out unnecessarily big or small; as their initial size depends upon the variables controlling the size of the primary mount before the swap.
In order to avoid all the above palaver, we’re going to follow the second process. Tbh all you’ll be doing is using a piece of software to delete numbers, replace them, save and pack into the correct location. Extremely simple stuff. A baby could do it afaik.
Required Tools:
DBC Editor:
Filebeam - Beam up that File Scottie!
MyWarcraftStudio:
MyWarCraftStudio.rar
WoWModelViewer:
WoW WOTLK Model Viewer - Download here
Once you’ve downloaded the above, we can begin.
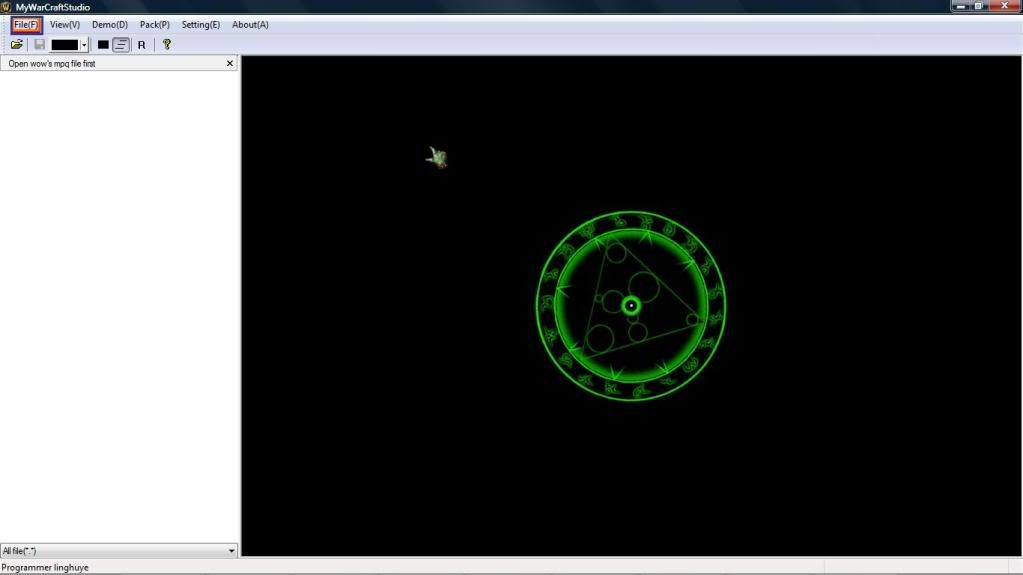
The first thing we’re going to need to do is acquire the locations for the variables we’ll be changing (Display Ids). In order to do this you’ll need to open MyWarcraftStudio. Once there, hit ‘Open’ in the top left:
From there, hit “Open MPQ Archive“. Now - locate your World of Warcraft Folder. Once you’re there, enter your /Data folder. From there enter either your enGB or enUS folder depending on whether you’re from the US or the EU. Once there you should be able to see a .MPQ archive called patch-enGB.MPQ OR patch-enUS.MPQ; open accordingly.
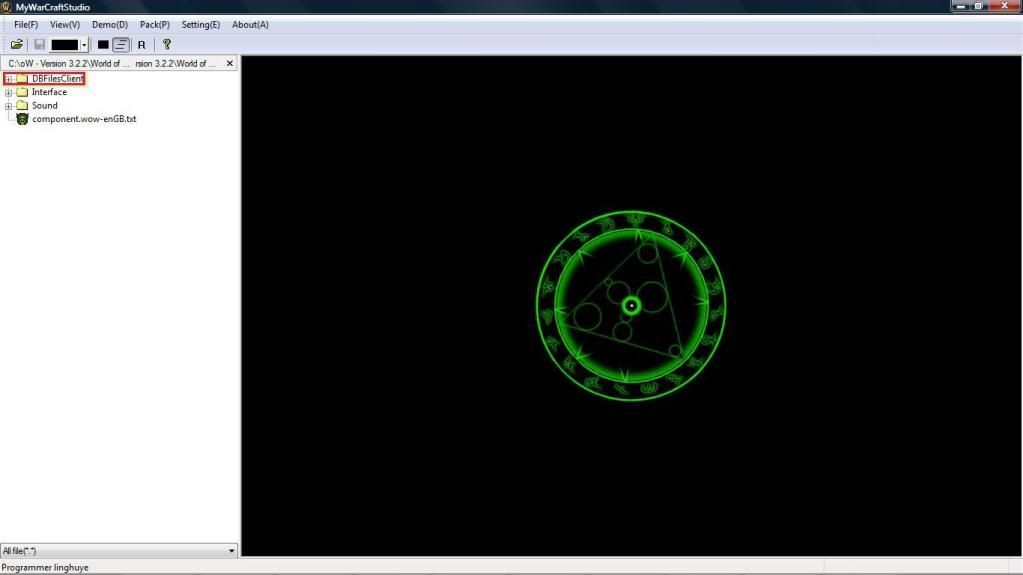
Once there you should see a menu pop up on the left identical to the one portrayed below:
From there double click “DBFilesClient“. This actually abbreviates to DatabaseFilesClient (Where the database variables are kept). This is the location which we will be editing in order to swap how your mount looks.
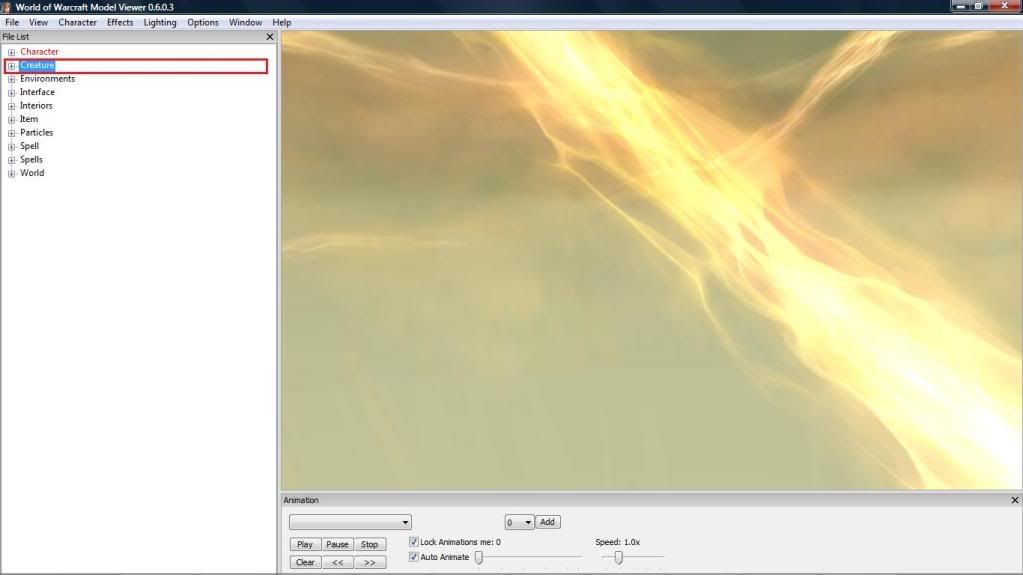
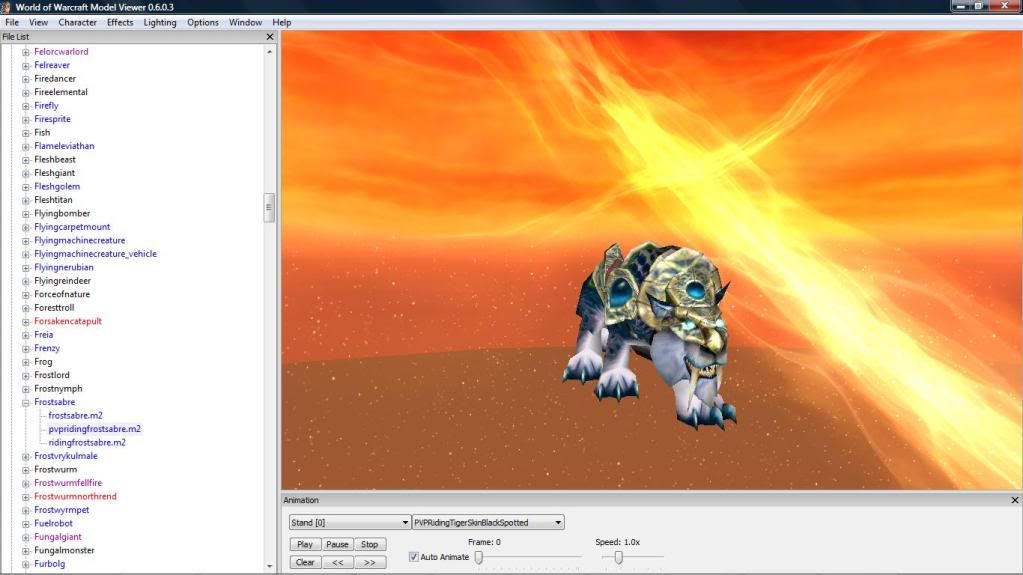
Scroll down the menu until you reach a .DBC table named CreatureModelData.dbc. Once you’ve located that, you can minimize your MyWarcraftStudio. Now; for this guide I’ll be swapping a NightElf Sabre-mount for a Ravenlord. In order to acquire the necessary Ids to swap, I’ll need to locate the .m2 file for both mounts. Including their .BLP texture files. Open WoWModelViewer;
From there, hit ‘Creature’ and scroll down until you find your desired Mount model:
My mount just so happens to be under Creature\Frost sabre\pvpridingfrostsabre.m2.
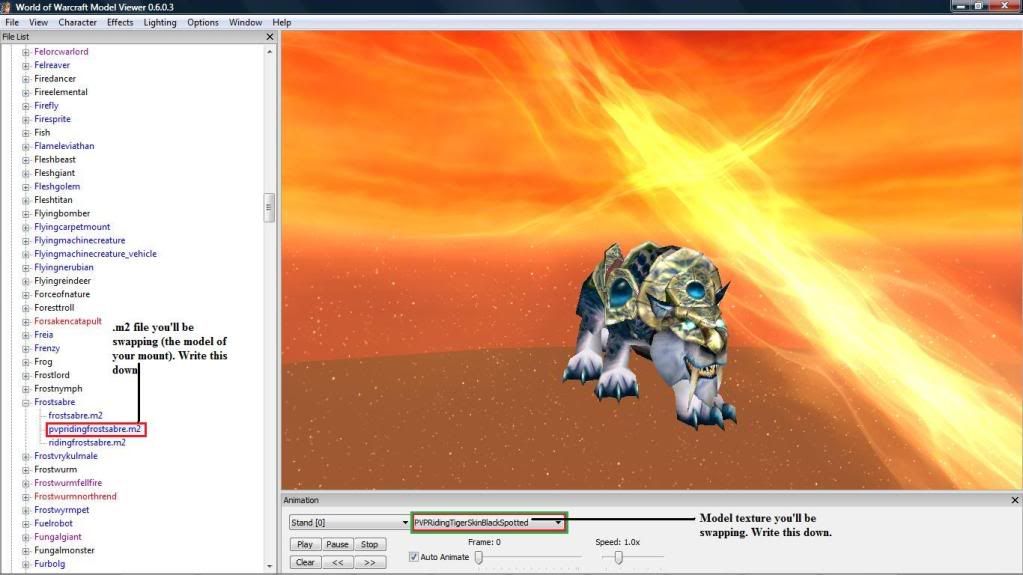
Now - in order to swap the model, you’ll need a record of the name of the model you’ll be swapping. Therefore, write down the name of your model (name).m2. This has to be exact.
Moreover, in order to swap the textures of your model, so your mount doesn’t appear bright green, white, or texture-less, you’ll also need to make a record of the .BLP locations for that model (in this case, the variables we’ll be swapping in Field 6, 7 or perhaps even:
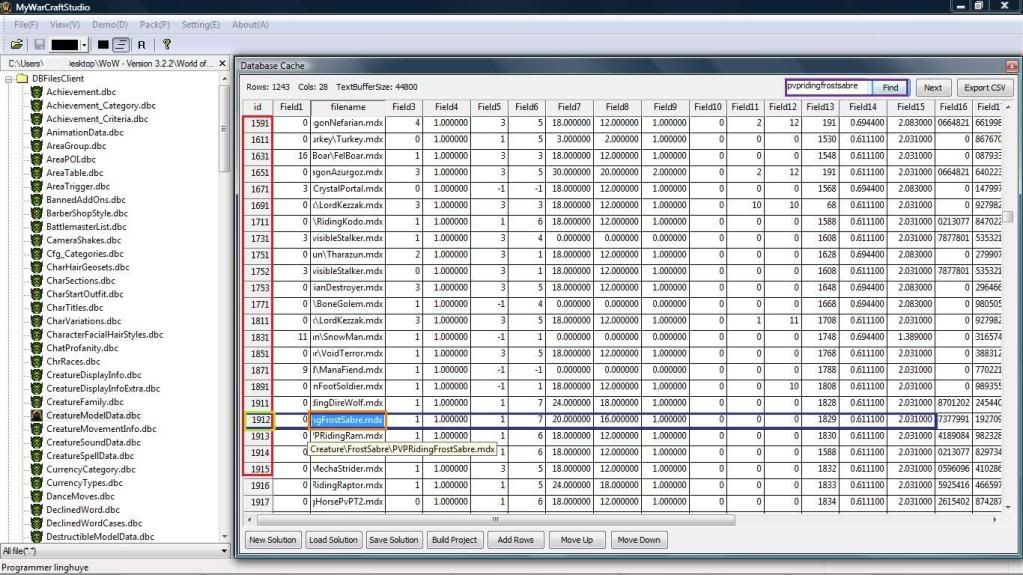
Now - go back to MyWarcraftStudio; where you have CreatureModelData.dbc selected. On the right of your client, a large .dbc table should have popped up when you initially opened the Database Cache. Hit the search bar at the top and type in the .m2 (qualitative) data for your two mounts that you found in WoWModelViewer (name).m2. .DBC tables record models via .mdx rather than .m2. So rather than typing the entire thing (including the .m2), just type out the initial name of the model (for me this would be pvpridingfrostsabre) disregarding the .m2 on the end.
Hit ‘Search’. Once you’ve done that, it should take you to the Column relative to that model:
The ‘ID’ on the far left of the table is also going to be a necessity in order to swap your Mount; as this number acts as the initial field for the CreatureDisplayInfo.dbc (the .dbc we’ll be editing via DBC Editor in order to change the ‘DisplayInfo’ of your mount) Field 1.
Now - write down the number under ‘ID’ for both mounts (the one you’re swapping, and the one you’re swapping it for). In my case, I’ll be recording the ID numbers of ‘ravengod.mdx’, and ‘pvpridingfrostsabre.mdx’.
Exit CreatureModelData.dbc - we won’t be needing anything else from that table anymore. Instead, scroll up slightly to ‘CreatureDisplayInfo.dbc’. Highlight it, right click, and hit “Extract to…”. Extract it to a convenient directory such as your desktop.
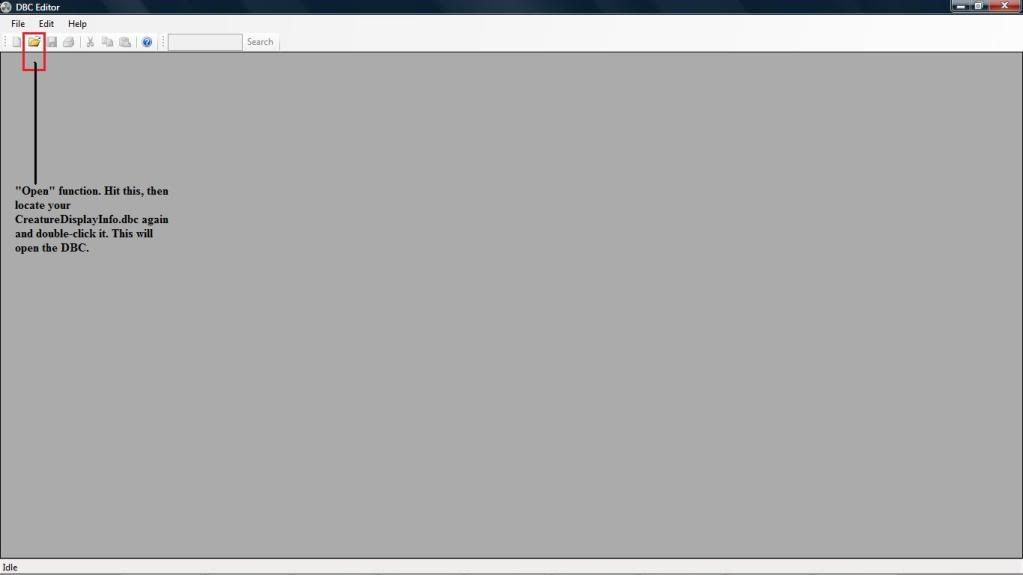
Now - time to use DBC Editor to edit the .dbc you’ve just extracted. Go to the location of your CreatureDisplayInfo.dbc (where you placed it); and double-click it. This should open DBC Editor:
From there, as stated in the above pic, hit the ‘Open’ function on the toolbar at the top of the client window. From there, locate your CreatureDisplayInfo.dbc and open it.
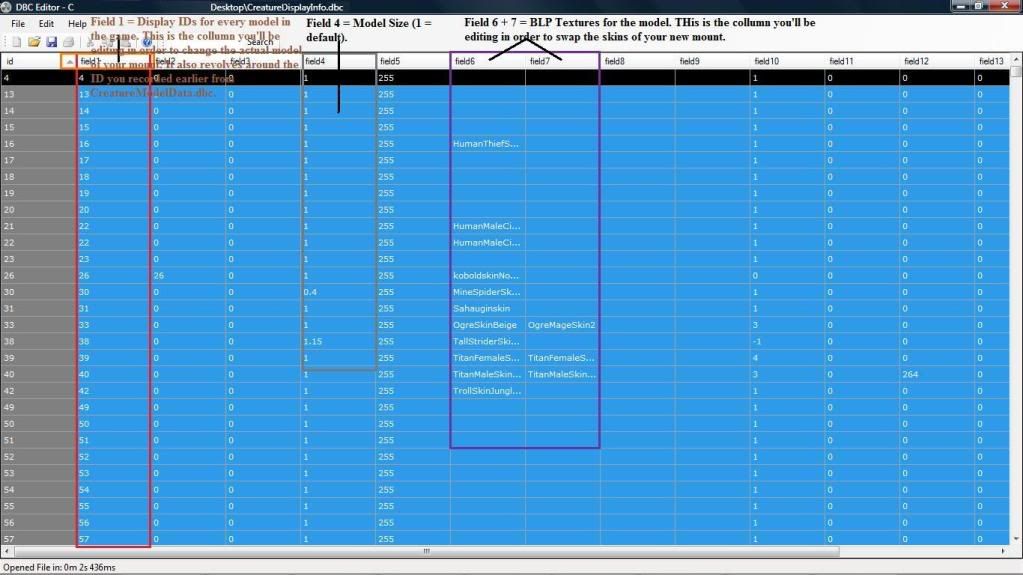
Once you’ve done that, the DBC table should open, looking something like this;
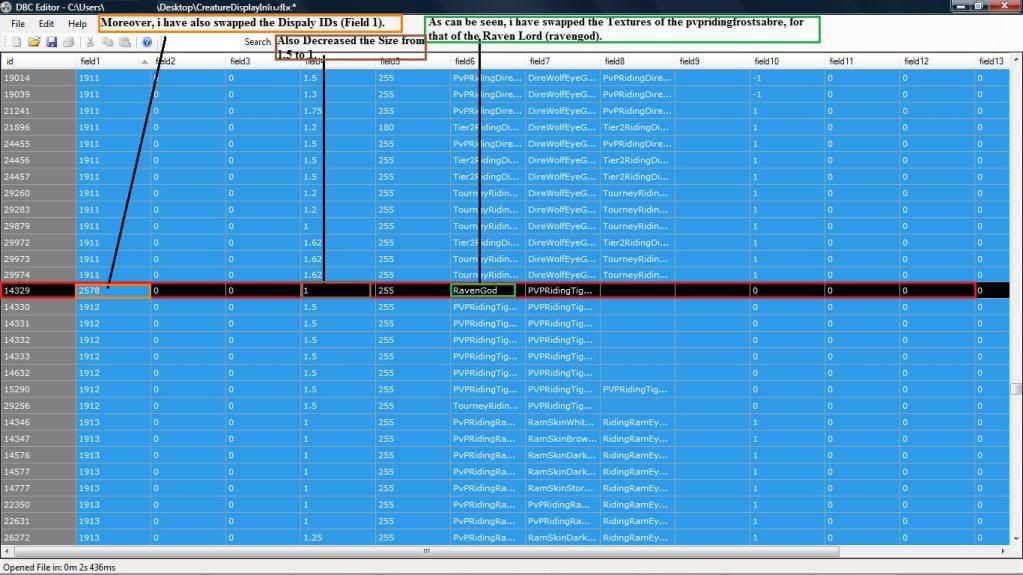
As you can see on the above pic - Field 1 is the ‘Display’ field - it also relates to the ID you acquired earlier on from CreatureModelData.dbc. This is the field you’ll be swapping (Ids) in order to swap the models of your mounts. Field 6 + 7 are the textures - you’ll also be swapping these in order to avoid a model without a skin (plain white or green). In my case, I’ll be swapping the data I acquired for ‘pvpridingfrostsabre’ for ‘ravengod’ (NightElf 100% Mount for Raven Lord Mount). Therefore, I will be swapping the ID (from Field 1) ‘1912’ (pvpridingfrostsabre) with ‘2578’ (ravengod), and the BLP textures with also, that of the ravengod:
Once you’ve done that, hit ‘File’ and ‘Save’ located atop the top-left hand side of your client toolbar (DBC Editor).
Close DBC Editor - go back to MyWarcraftStudio. All that’s left is to Pack your edit into a .MPQ patch so that you can place it into your WoW/Data folder and play with your changes in-game.
Once you’re at MyWarcraftStudio - hit ‘File’ and ‘Close Current Archive’. This will close CreatureModelData.dbc, however the table will remain. In order to close that merely hit the red cross on the top left hand corner of the TABLE (NOT MyWarcraftStudio).
Once you’ve done that, hit ‘Pack’ before ‘Create MPQ Archive’. Locate where you want your MPQ to go (your patch containing your changes). Place it in your wow/data folder (usually C://Program Files/World of Warcraft/Data. Call it ‘patch-3.MPQ’. The “MPQ” is case-sensitive (it must be in capitals or WoW will not read your patch).
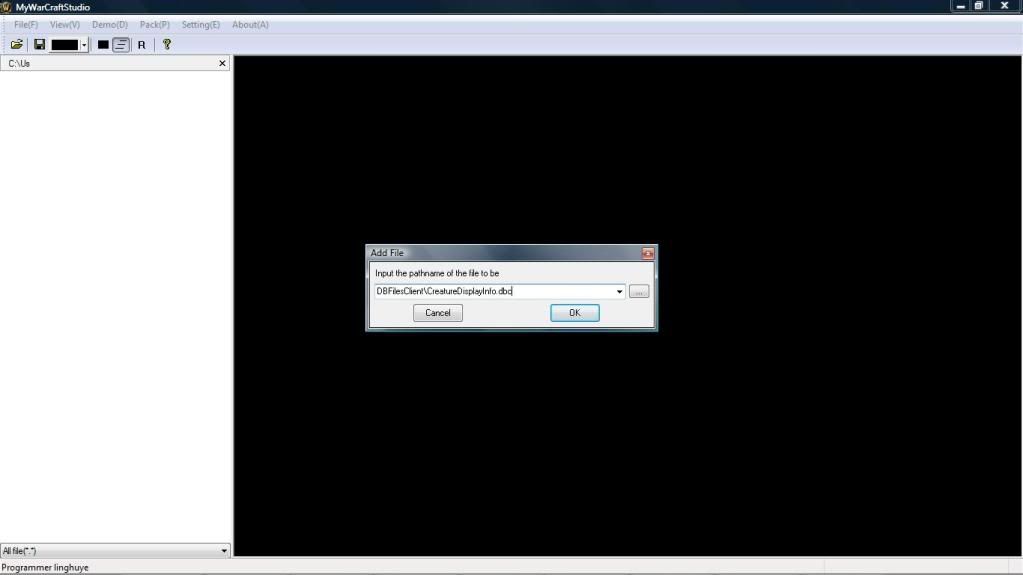
Once you’ve done that, hit ‘Pack’ once again, and ‘Add File to Archive…’. Once you’ve done that a small textbox should appear with a box showing an elipse sign (…). Hit the elipse sign, and locate your CreatureDisplayInfo.dbc file that you saved earlier on! (with your changes intact)
Once you’ve selected your CreatureDisplayInfo.dbc it should appear in the textbox directly left of the (…). Now - in order for WoW to locate your changes you must assign a location for your new DBC edit to go. In order to do this, direct your curser to before the ‘C’ in ‘CreatureDisplayInfo’. Basically, type ‘DBFilesClient\’ BEFORE the ‘CreatureDisplayInfo.dbc’. Of course, disregarding the apostrophes. So it looks something like this:
Once you’ve done that, hit ‘Ok’.
Now - all that’s left is to save your MPQ. In order to do this, hit ‘Pack’, before hitting ‘Save and close Archive’.
Result:
Congratulations - you’ve just swapped your mount
Thanks for reading

![[Guide] ~sInX's Walkthrough to Mount-Swapping!](https://www.ownedcore.com/forums/./ocpbanners/1/3/9/6/9/4/8/08b6377e7ee13e5b1d2306cbeed08f8c.png)
![[Guide] ~sInX's Walkthrough to Mount-Swapping!](https://www.ownedcore.com/assets/mm/images/wits.png "TradeSafe Middleman")
![[Guide] ~sInX's Walkthrough to Mount-Swapping!](https://www.ownedcore.com/forums/images/styles/OwnedCoreFX/addimg/wicc.png "CoreCoins")

Shout-Out
User Tag List
Results 1 to 15 of 91
-
10-12-2009 #1
 Contributor

- Reputation
- 283
- Join Date
- Jan 2009
- Posts
- 746
- Thanks G/R
- 0/0
- Trade Feedback
- 0 (0%)
- Mentioned
- 0 Post(s)
- Tagged
- 0 Thread(s)
[Guide] ~sInX's Walkthrough to Mount-Swapping!
Last edited by ~sInX; 10-13-2009 at 03:38 PM.
![[Guide] ~sInX's Walkthrough to Mount-Swapping!](https://www.ownedcore.com/images/ba/g/b2.gif)
-
10-13-2009 #2
 Member
- Reputation
- 1
- Join Date
- Apr 2008
- Posts
- 11
- Thanks G/R
- 0/0
- Trade Feedback
- 0 (0%)
- Mentioned
- 0 Post(s)
- Tagged
- 0 Thread(s)
Great, I requested a guide like this. I will try it out
Your the king if it works 
Does it work without WoWME too since its 3.2.2?
+Rep
-
10-13-2009 #3
Member
- Reputation
- 1
- Join Date
- Apr 2008
- Posts
- 11
- Thanks G/R
- 0/0
- Trade Feedback
- 0 (0%)
- Mentioned
- 0 Post(s)
- Tagged
- 0 Thread(s)
I'm using a EU wow version, and I entered the enGB folder and found the patch-enGB.MPQ file, however. When I open it, it only shows the "Interface folder" and no other folders, I tried to open all the others MPQ without any luck about the DBG folders as you marked with red :/
Any thoughts?
-
10-13-2009 #4
Member
- Reputation
- 1
- Join Date
- Apr 2008
- Posts
- 11
- Thanks G/R
- 0/0
- Trade Feedback
- 0 (0%)
- Mentioned
- 0 Post(s)
- Tagged
- 0 Thread(s)
Sorry my mistace, I forgot to press the "show all files" on studio hehe
-
10-13-2009 #5
Member
- Reputation
- 1
- Join Date
- Apr 2008
- Posts
- 11
- Thanks G/R
- 0/0
- Trade Feedback
- 0 (0%)
- Mentioned
- 0 Post(s)
- Tagged
- 0 Thread(s)
Alright, I've been trying this two times now. Im not sure about that with Field 6+7 when your swapping the text such as (NorthrendBearMountSkinWhite1) to (RidingSilithidTankSkinArmoredRed) I think I am doing it correctly, but then again, on your picture you changed the text on Field 6 (the field 7 had NorthrendBearMountSkinWhite2) observe, the number 2 instead of 1 as field 6 got. However, my first try was just to change Field 6 with RidingSilithidTankSkinArmoredRed, didnt work. Then I changed both field 6+7 from MountSkinWhite to RidingSilithidTankSkinArmoredRed on both fields, didnt work.. Is it correct just that mount swapps not working on 3.2.2? or im I doing it wrong? I dont use WoW ME.exe anymore is thats why it doesnt work?
Need help
-
10-13-2009 #6
Contributor
- Reputation
- 283
- Join Date
- Jan 2009
- Posts
- 746
- Thanks G/R
- 0/0
- Trade Feedback
- 0 (0%)
- Mentioned
- 0 Post(s)
- Tagged
- 0 Thread(s)
Ever heard of the 'Edit' function? Tbh i should report you for reposting three times.
The version of your WoW won't influence whether or not an edit you're currently making will work. Edits on 3.2.2 do work rofl. You're evidently doing something wrong.
If the mount you're swapping has two skins whilst the one you're swapping it for has 1, leave the second skin of the initial mount the way it was previous to you swapping it.
Edit: You repped me with 0 rep when you can award 2? wtf? why bother?Last edited by ~sInX; 10-13-2009 at 10:41 AM.
-
10-13-2009 #7
Active Member

- Reputation
- 36
- Join Date
- Aug 2009
- Posts
- 112
- Thanks G/R
- 0/0
- Trade Feedback
- 0 (0%)
- Mentioned
- 0 Post(s)
- Tagged
- 0 Thread(s)
Awesome ~sInX!
I followed your guide, and this is the result as expected Picture
Last edited by Uberjason; 10-13-2009 at 01:26 PM.
-
10-13-2009 #8
Member
- Reputation
- 1
- Join Date
- Apr 2008
- Posts
- 11
- Thanks G/R
- 0/0
- Trade Feedback
- 0 (0%)
- Mentioned
- 0 Post(s)
- Tagged
- 0 Thread(s)
Sorry Im new to this reputation thing will retry so you get your reputation. Could you make Black War Tiger or White Polar Bear or Warhorse (ally charger) to Red Quiraj Battle Tank and post it to show me that it works, I will have to give rep to someone again before I can give you, so I will be back very soon to rep you, sorry again new to this really sorry, will behave better
What I did was, first I took care of ID numbers such as
northrendbearmountarmored - ID 2897
NorthrendBearMountSkinWhite1
then I opened that DB editor program and exchanged ID with this
ridingsilithid - ID 2219
RidingSilithidTankSkinArmoredRed
So I changed 2897 to 2219 and the Fields 6+7 to the text
RidingSilithidTankSkinArmoredRed
Do I have to change id 2219 to 2897 also or that doesnt matter?
Thats all I did, found the ID text and all that, changed the line and pressed saved, made a new MPQ file with this new change from my desktop and saved it as blabla\CreatureInfothing (dont remember the names on the file/folder) but that part I know is correct, stored it at Data folder where I got my Race to Race MPQ which works.
Tried the mount file without a success
-
10-13-2009 #9
Active Member
- Reputation
- 36
- Join Date
- Aug 2009
- Posts
- 112
- Thanks G/R
- 0/0
- Trade Feedback
- 0 (0%)
- Mentioned
- 0 Post(s)
- Tagged
- 0 Thread(s)
Tbh it's not brain surgery, click on the shiney +Rep in the top right cornor of his post, then select how many you want to award, a reason why, and you're done..Originally Posted by patrickvox
-
10-13-2009 #10
Contributor
- Reputation
- 283
- Join Date
- Jan 2009
- Posts
- 746
- Thanks G/R
- 0/0
- Trade Feedback
- 0 (0%)
- Mentioned
- 0 Post(s)
- Tagged
- 0 Thread(s)
Nice nice Jason
Glad you got it to work. Including your pic in thread 
Edit: @ patrick, just bothered to read your post:
Conflicting Database Caches can cause one edit not to work in spite of another. Your race swap probably used database caches - therefore, the variables are unbalanced (AKA the database cacha relative to your race swap is telling wow that your mount hasn't been changed - regardless of what your newly-created patch says). In order to fix this, you'd have to implement either the race swap edit into the mount swap dbc, or vice versa; therefore relieving any possibility of conflicting dbcs (as there's only one) and confirming the stability, balance and equality of Variables throughout your patch.stored it at Data folder where I got my Race to Race MPQ which works.Last edited by ~sInX; 10-14-2009 at 01:47 AM.
-
10-13-2009 #11
Active Member
- Reputation
- 36
- Join Date
- Aug 2009
- Posts
- 112
- Thanks G/R
- 0/0
- Trade Feedback
- 0 (0%)
- Mentioned
- 0 Post(s)
- Tagged
- 0 Thread(s)
Originally Posted by ~sInX
Sure, no problem
-
10-16-2009 #12
Member
- Reputation
- 1
- Join Date
- Jun 2007
- Posts
- 18
- Thanks G/R
- 0/0
- Trade Feedback
- 1 (100%)
- Mentioned
- 0 Post(s)
- Tagged
- 0 Thread(s)
I just can't get it to work with a zebra mount -> zulian tiger.. tried it like 10 times all over, I can't see anything happening ingame :/
edit: got it to work!

Last edited by bubblepwns; 10-16-2009 at 01:23 PM.
-
10-16-2009 #13
Contributor
- Reputation
- 96
- Join Date
- Jan 2008
- Posts
- 447
- Thanks G/R
- 0/0
- Trade Feedback
- 0 (0%)
- Mentioned
- 0 Post(s)
- Tagged
- 0 Thread(s)
Best Metal Fest in the World.
https://www.rockstarmayhemfest.com/mayhem/index.asp
-
10-17-2009 #14
Banned
- Reputation
- 141
- Join Date
- Sep 2008
- Posts
- 368
- Thanks G/R
- 14/53
- Trade Feedback
- 1 (100%)
- Mentioned
- 0 Post(s)
- Tagged
- 0 Thread(s)
 Beat me to posting a noob friendly guide cause I'm a procrastinator, +Rep for you though sInX
-
10-17-2009 #15
Member
- Reputation
- 1
- Join Date
- Oct 2009
- Posts
- 1
- Thanks G/R
- 0/0
- Trade Feedback
- 0 (0%)
- Mentioned
- 0 Post(s)
- Tagged
- 0 Thread(s)
Hey and thanks for this. +rep
Might be worth adding that there may be more to change for flying mounts. I switched my Netherdrake for a Red Protodrake, as I was nearly finished with the DBC editor I noticed that Fields 7 and 8 had Netherdrake skins still attached - I believe one was hair and one was for the saddles.
I simply copied the data in these fields for the real Red Protodrake to fix it. I didn't log in without correcting these fields so I'm not entirely sure what it does but I'd imagine having a Netherdrake saddle on a Protodrake would be a little out of position.
Imageshack - wowscrnshot101709223027


 Reply With Quote
Similar Threads
-
[Guide] ~sInX's Walkthrough to Adding Water & Waterfalls
By ~sInX in forum WoW ME Tools & GuidesReplies: 9Last Post: 11-25-2010, 09:06 AM -
[Request] Mount Swapping Guide
By silentshot in forum WoW ME Questions and RequestsReplies: 7Last Post: 03-10-2009, 12:13 PM -
Searching for Mount Swap Guide
By Seraphita2k in forum WoW ME Questions and RequestsReplies: 1Last Post: 03-08-2009, 10:22 AM -
[Guide] Mount Swapping
By Fault in forum WoW ME Tools & GuidesReplies: 229Last Post: 03-06-2008, 06:16 PM -
[Guide] Mount Swapping
By Tristan in forum WoW ME Tools & GuidesReplies: 11Last Post: 10-13-2007, 11:18 AM
-
OwnedCore Forums
casino news World of Warcraft Pokemon GO MMO Overwatch RTS Casino reviews bc game bc game bc game bc game bc game bc game bc game bc game bc game bc game bc game bc game bc game bc game bc game bc game bc game bc game bc game bc game bc game bc game bc game bc game bc game bc game bc game bc game bc game bc game bc game bc game bc game bc game bc game bc game bc game bc game bc game bc game bc game bc game bc game bc game bc game bc game bc game bc game bc game bc game bc game -
casino
Casino Gambling Online casinos Casino en ligne bc game bc game bc game bc game bc game bc game bc game bc game bc game bc game bc game no deposit bonus codes roobet Top 10 Casinos Casino reviews Bitcoin casino Paypal Casino Lucky8 1xbit heycasino Top 10 Slots Machine on Pinnacle Bookmaker Stake Casino Bonus Sans Live Casinos - Best Live ✅Gamdom casino - 15% Stake.com Casino Welcome Best Slots Machines - Provider : Netent Top 10 Bitcoin Online -
CoreCoins
CoreCoins CoreCoins FAQ Shout-Out Banner Ads -
My OwnedCore
My Profile Notifications Settings Buy CoreCoins About Us


Privacy Policy | Cookie Policy | Terms | Contact Us
Available Payment Methods:-
![[Guide] ~sInX's Walkthrough to Mount-Swapping!](https://www.ownedcore.com/images/paybutton/paypal.png)
![[Guide] ~sInX's Walkthrough to Mount-Swapping!](https://www.ownedcore.com/images/paybutton/skrill.png)
![[Guide] ~sInX's Walkthrough to Mount-Swapping!](https://www.ownedcore.com/images/paybutton/payop.png)
-
Casino
USA CASINO | Dublinbet | Millionz | Bonus code | Rollino Casino | Casino deposit offers | Bitstarz | Slot machines | InstantPay | Stake Casino | Jackpotcity | No deposit bonus | PalmSlots Casino | Oshi Casino | Sportsbook | BuzzLuck | Lucky31 | MrGreen | Casino Bonus | Betflip Casino | Lucky8 | Casobet | Crypto Casino | Mystake Casino | Bovada casino | ZenCasino | Cresus Casino | BitCasino