![[How] Make an artistic UI with EEpanels](https://www.ownedcore.com/forums/images/styles/OwnedCoreFX/addimg/menu4.svg)
Hi there! I would like to start off by saying that it took me awhile to figure this stuff out myself, and that I am pretty noob at Photoshop. That being said, if I can do you it you can too. All it takes is patience, and maybe alittle bit of photoshop knowledge. The main mod used is EEpanels, and is very handy when making eye catching User Interfaces. It can used for making a simple gradient or a more advanced looking border! This tutorial will show you how to add brushes, make a border in Photoshop, use an alpha channel, and then how to add that art ingame. At the end of this guide you will find sample UnitFrame borders.
Materials Needed-
* eepanels http://files.wowace.com/eePanels/eePanels.zip (It should be the second to last link on that page.)
* Photoshop
* Any Unit frames of your choice! I use X_perl
* The macro /print GetMouseFocus():GetName() Put that on the action bar and keybind it. Hover your mouse over something on your ui and hit the keybind. In your chat log will show what the name of the Parent is (this will be explained later in the guide)
Optional Materials-
* Wowace Updater http://www.wowace.com/wiki/WowAceUpdater (You need to use IE7 to DL this/ or if your a serious Firefox Fanboy you can use this add-on for Firefox https://addons.mozilla.org/en-US/firefox/addon/1608 )
Table of Contents
1.0 - Photoshop skills
1.1 - Adding brushes
1.2 - Getting that creative side out
1.3 - Make an Alpha Channel
1.4 - Save and Save as
2.0 - In Game
2.1 - Get to know eepanels
2.2 - Making Panels with Global Settings
2.3 - Docking to a parent
2.4 - Getting those settings exactly how you want them
Lets get started
1.0 - Photoshopskills
1.1 - Adding Brushes
First, go to your favorite artsy site to dl some photoshop brushes. My favorite is Deviantart.com. They have a large selection of brushes users have made and uploaded.
For this tutorial I will use asunderstock's brush sets-
* Grunge Grit 2 - Borders by ~AsunderStock on deviantART
Grunge Grit 2 - Borders by ~AsunderStock on deviantART
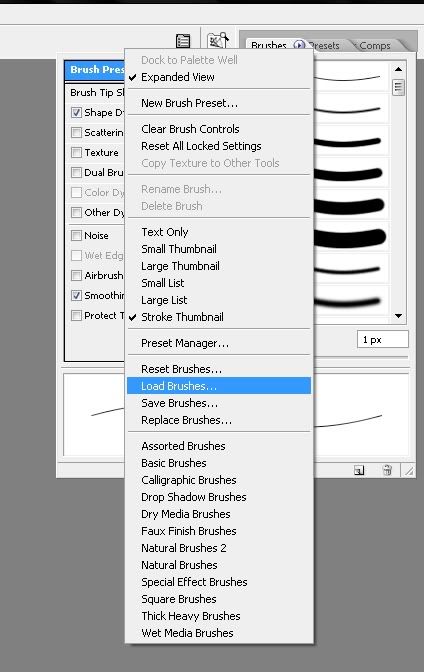
To install these, save them to anywhere you like, then open photoshop. Click on the brushes tab, then click the little button next to the word "Brushes". It somewhat resembles the ">". Then click load brushes and navigate to the place where you saved the brushes file.
Here is a pic of what it looks like when clicking load brushes:
1.2 - Getting that creative side out
Now that you have your brushes we can get started on making some crazy unique stuff.
Lets Make a nice Unit Frame Border shall we?
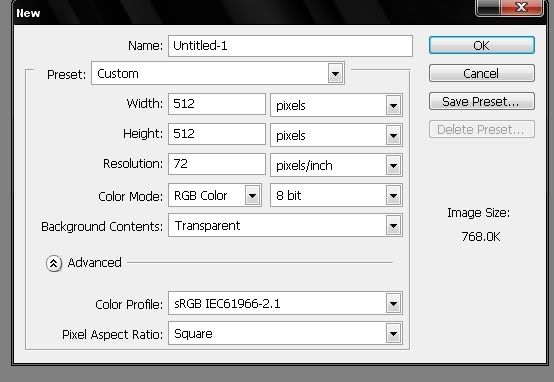
Click on File>New
And make your new canvas with these settings:
* Width: 512
* Height: 512
* Resolution: 72
* Color Mode: RBG Color
* Background Contents: Transparent
Should look like this:
Hit ok. Now maximize the canvas. (Makes it easier imo lol)
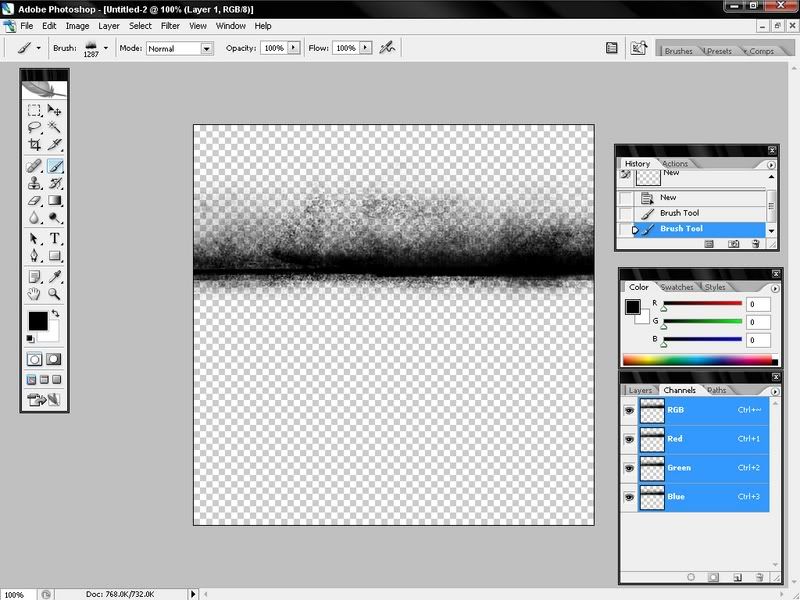
Click on the Brush tool icon. Now go over to your Brushes tab and scroll all the way to end of the list. Now click on the Brush labeled "1287" It looks like Flames, kinda, that are going upward NOT to the left/right/down. (If it is different for someone else please tell me. And if anyone has an idea on a name that is constant with the brushes please tell me. Thank you)
Then add it on about the 3/4ths mark on the page like so:
Now add sides and a bottom to that and make it look like so (You don't have to make it look like mine, but for purpose of this guide I suggest you do. It helps when trying to follow along.) :
Once that is finished add anything you think may add to it but not make it too cluttered
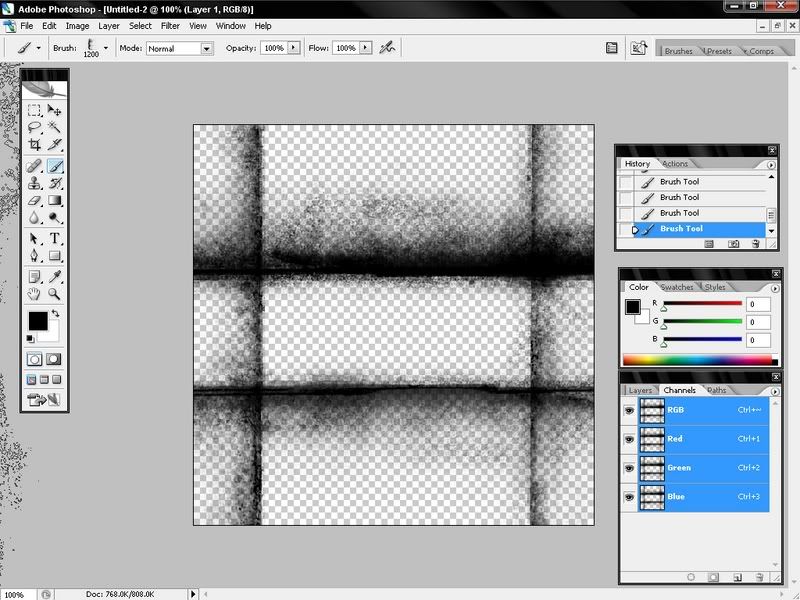
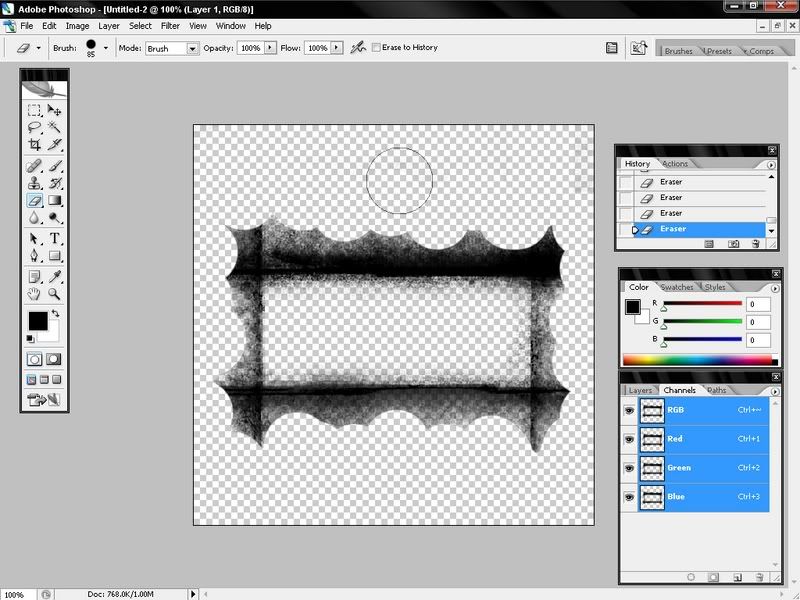
After that use the eraser tool to add finishing touches to your border for your UF (I used the 85 point eraser size for this because it was just to the outer edges of the border.Just do single clicks with this tool. Do NOT drag the eraser tool. Imo its looks ugly when you do lol.) This is what mine looks like now:
Then use the blur tool to smooth the edges like so:
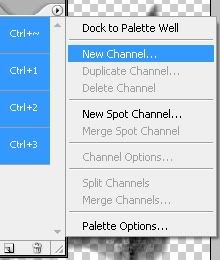
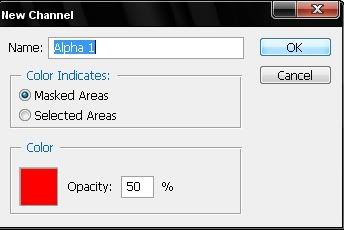
1.3 Make an Alpha Channel
An Alpha channel is a type of layer that adds a red kind of tint to the canvas. This red tint is showing you what will be transparent, so you need to erase the red tint to show whats underneath. This will allow you to make the unused areas of the canvas transparent so you do not have a box looking thing. ( that probably made no sense but trust me this is a needed step.)
Lets make that Alpha Channel now.
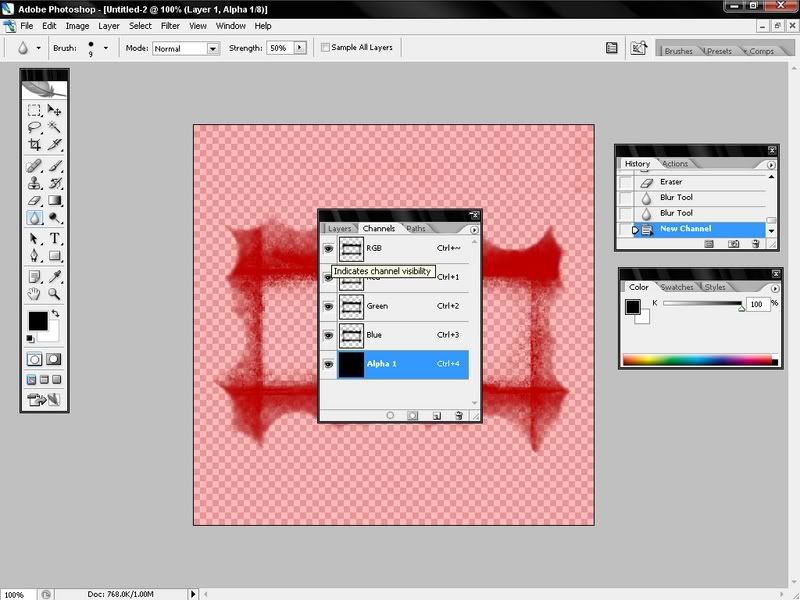
Bring up your Channels toolbox, looks like this:
Then add a new channel:
With these settings:
Click ok. Now the canvas has gone black, Don't freak out this is normal. Just click the little box next to the channel named RGB, this will make the Red, Green, and Blue channels visible. And should look like this:
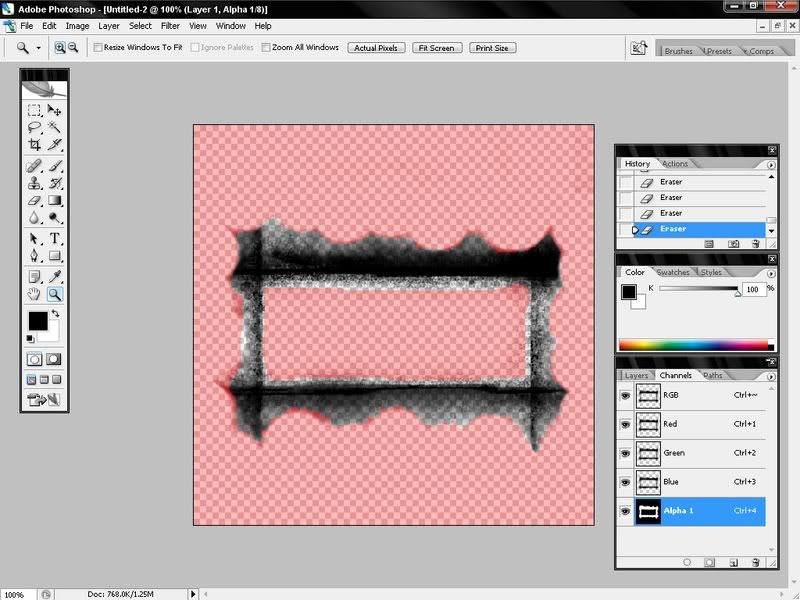
Now start erasing the Red tint until the Border is showing through. As you get closer to the outside of the border use a smaller eraser point. This will reduce the amount of the white fill showing through. This is an example of what mine looks like:
1.4 Save and Save as
Save it anywhere as a .psd file. Then "Save As" in your eepanels folder in the wow addons folder as a .tga file, with the name "UnitFrames" (without quotation marks), and save it as a 32 bit.
This is the end of the Photoshop Part of the tutorial. Now onto The ingame Part!

![[How] Make an artistic UI with EEpanels](https://www.ownedcore.com/forums/./ocpbanners/1/2/9/8/0/2/2/01d9781faec8bfe3abf9095ac9e57d1e.jpg)
![[How] Make an artistic UI with EEpanels](https://www.ownedcore.com/assets/mm/images/wits.png "TradeSafe Middleman")
![[How] Make an artistic UI with EEpanels](https://www.ownedcore.com/forums/images/styles/OwnedCoreFX/addimg/wicc.png "CoreCoins")

User Tag List
Results 1 to 15 of 62
-
10-30-2007 #1
 Active Member

- Reputation
- 48
- Join Date
- Sep 2007
- Posts
- 158
- Thanks G/R
- 0/0
- Trade Feedback
- 0 (0%)
- Mentioned
- 0 Post(s)
- Tagged
- 0 Thread(s)
[How] Make an artistic UI with EEpanels
Last edited by pyrojunkie; 10-31-2007 at 02:17 PM.
![[How] Make an artistic UI with EEpanels](https://www.ownedcore.com/images/ba/g/b2.gif)
-
10-30-2007 #2
Active Member
- Reputation
- 48
- Join Date
- Sep 2007
- Posts
- 158
- Thanks G/R
- 0/0
- Trade Feedback
- 0 (0%)
- Mentioned
- 0 Post(s)
- Tagged
- 0 Thread(s)
Re: [How] Make an artistic UI with EEpanels (under construction)
2.0 - In Game
2.1 Get to know eepanels
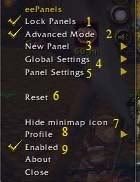
1. Lock Panel-This locks all panels so they can not be moved. This is Usually only used when you do not have a Parent to dock it to. Which is rare.
2. Advanced Mode-Keep this checked at all times. This allows custom borders to be imported and allows you to change settings within custom settings.
3. New Panel- This creates a new panel. When creating a new panel you have 2 choices, Create a Panel with Default Settings or Create a Panel with Global Settings. For this Tutorial we will use Global Settings.
4. Global Settings- This appears when you make a new panel. It allows you to set global settings accross all the Global Panels. This helps when setting transparencies as it will set all global panels with the same transparencies.
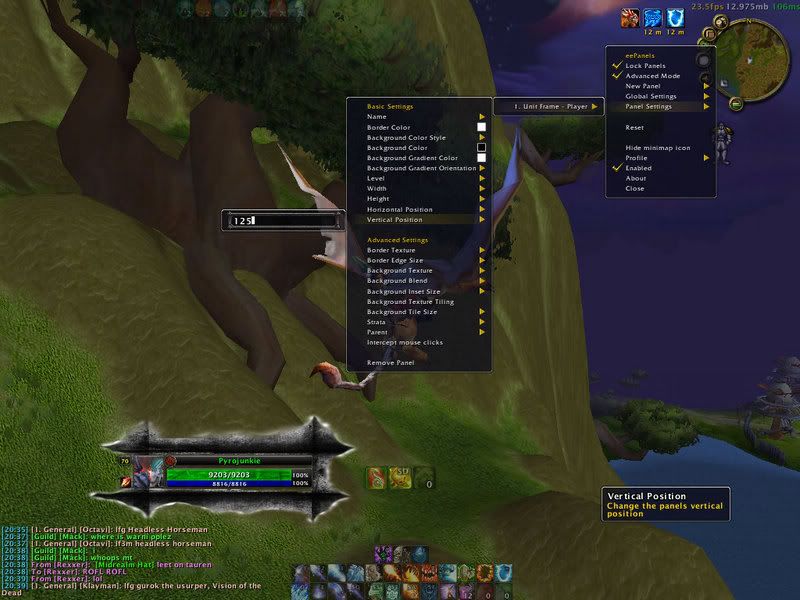
5. Panel Settings- This will also appear when you make a new panel. This is where you will be allowed to change the panel name/size/position/dock settings/add our custom art.
6. Reset- This will completely reset the addon Deleting any and all settings you had.
7. Hide MiniMap Icon- This hides the MiniMap icon. Very usefull if you have a clutered MiniMap. To bring it back after using this option type /eepanels hide.
8. Profile- this allows you to change profiles and add new ones so you can have different UIs on Different characters/copy a profile to a different Character.
9. Enabled- If you dont have this checked, then the addon isnt on.
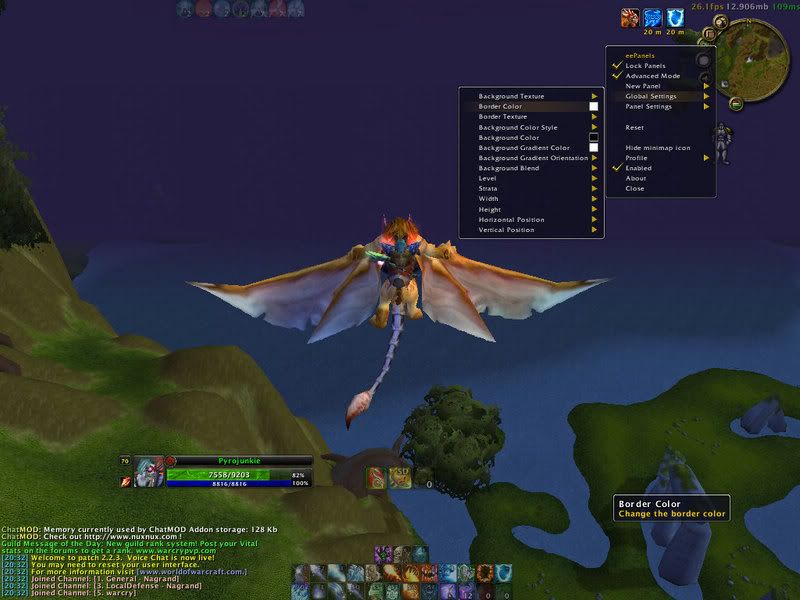
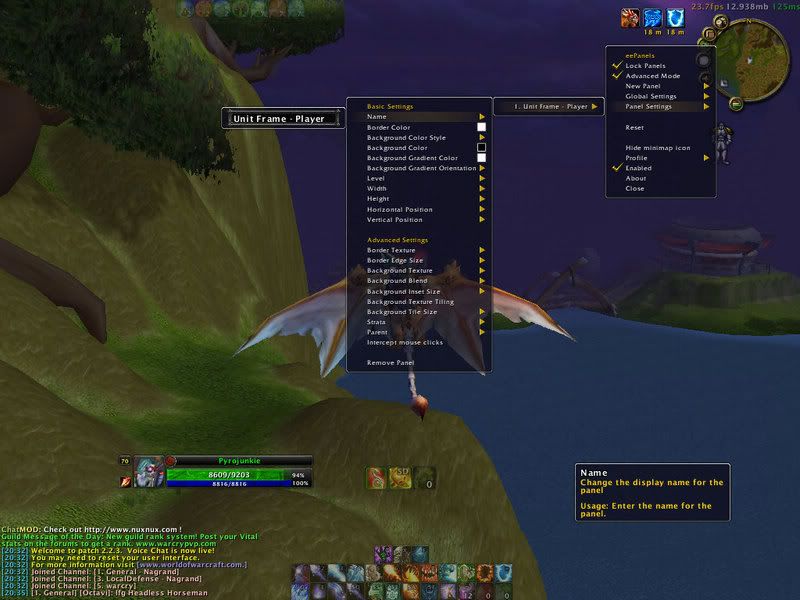
2.2 Making Panels with Global Settings
This step is very simple. Click on New Panel > Global settings. As shown here:
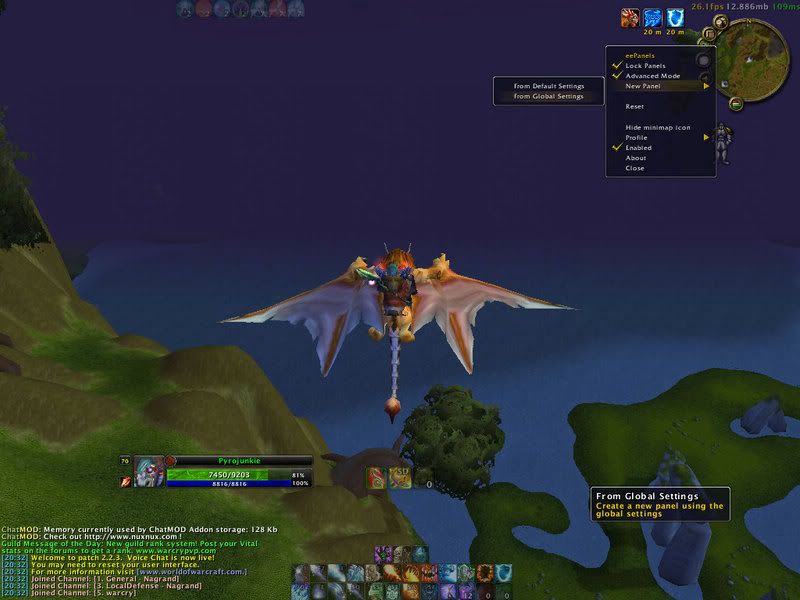
Now to change the Global settings. Click on Global settings > Border color. Set the Opacy to 0% (the slide bar on the right of the toobar that pops up).
Next do the same with Global Settings > Background Color.
Dont forget to name it!
2.3 Adding The texture
This is also very simple once you get the hang of it.
First lets add our custom texture. If you followed the first part of the guide you would have saved our art with the name "UnitFrame" In Interface\Addons\eepanels. So in the Panel Settings Dropdown Box, hover the mouse over "Background Texture > Custom Texture".
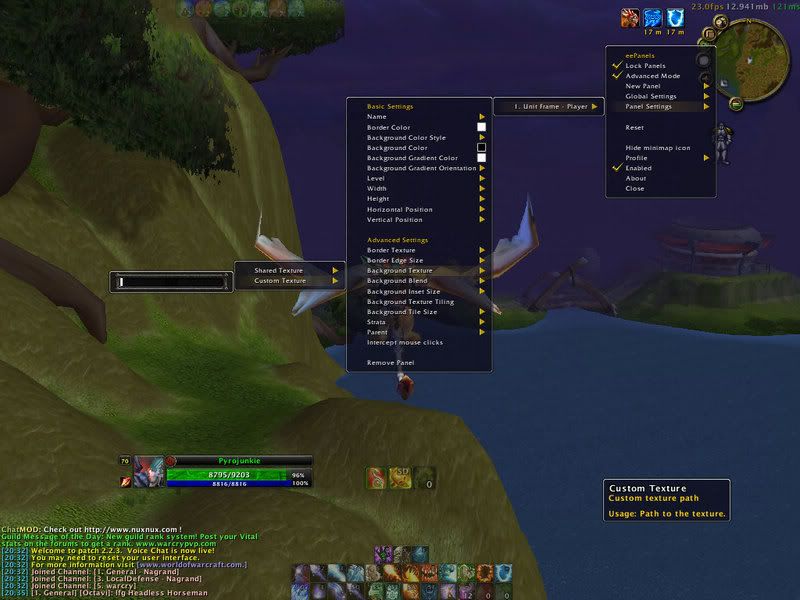
Now type in the textbox this string of text. Interface\Addons\eepanels\UnitFrames.tga and then hit enter.
Now you should have something that looks like this:
(mine looks abit different than the one we made above, for the file got deleted somehow...)
2.4 Docking to a Parent
This means that when we dock it to a frame, if the frame moves so will the panel. This is very usefull for making borders on the Unit Frame, as those are easy to move, and its easier to move if you have the panels docked so you dont have to go back into settings and change the placement. It also allows it to flow better with the UF.
Ok to do this add this macro to your Action Bars and Keybind it.This macro will allow you to mouse over any frame and find the name of it. EX: I mouse over the Player frame of XPerl and hit the macro keybind. In the chatlog it says the words XPerl_Player. Thats the parent name. This is the set of words that will go in the Parent text box. As shown:Code:/print GetMouseFocus():GetName()
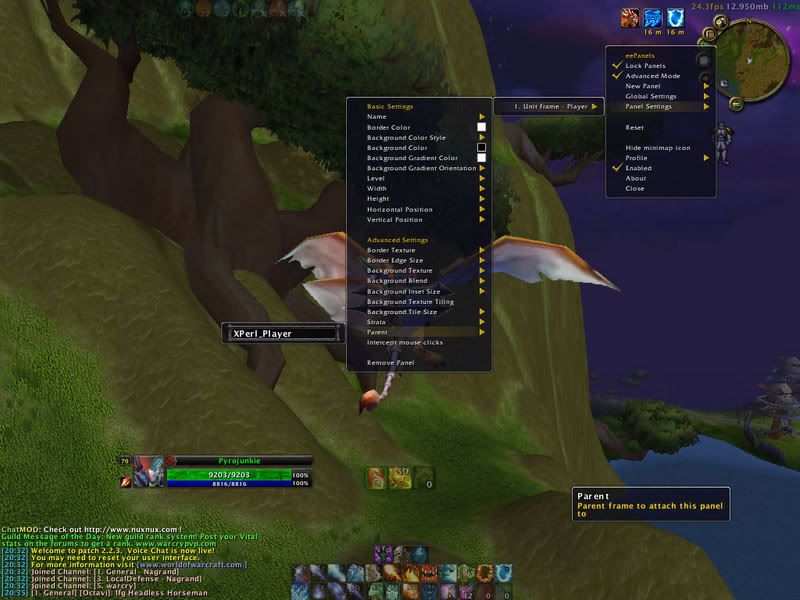
Now if you have a different unit frame than me, then the parent name will be different. This is why that macro is so handy.
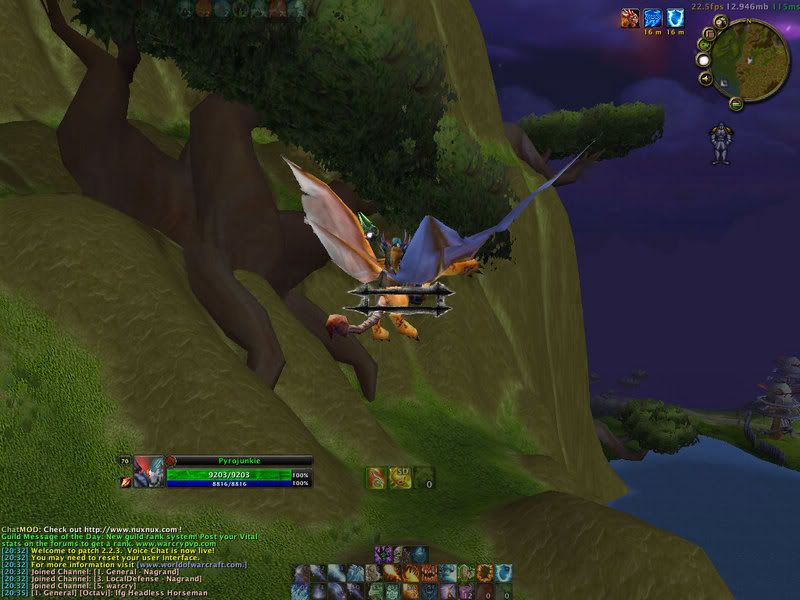
If have done everything correctly so far you be able to see a little bit of the texture behind the Unit Frame. Lets change that.
2.5 Getting those settings exactly how you want them
We have to change the height and width of the panel first. For me the Width of the panel was 160% and the Height was 500%. Your settings may be different, depending on resolution and the size of your art. Remember you must hit enter after entering in the text or it will just go back to default. Just fiddle with the settings until you find the exact size you want, and also make it the size of your UF.
Next we need to Position it. To do this hover over Horizontle/ Verical Position. Try to get the border around the UF. The Horizontle Position will most likely be in the negetives, and the veritcal position number will most like be in the positives. My numbers for these were: Horizontle -90, Vertical 125. Yours will most likely be different.
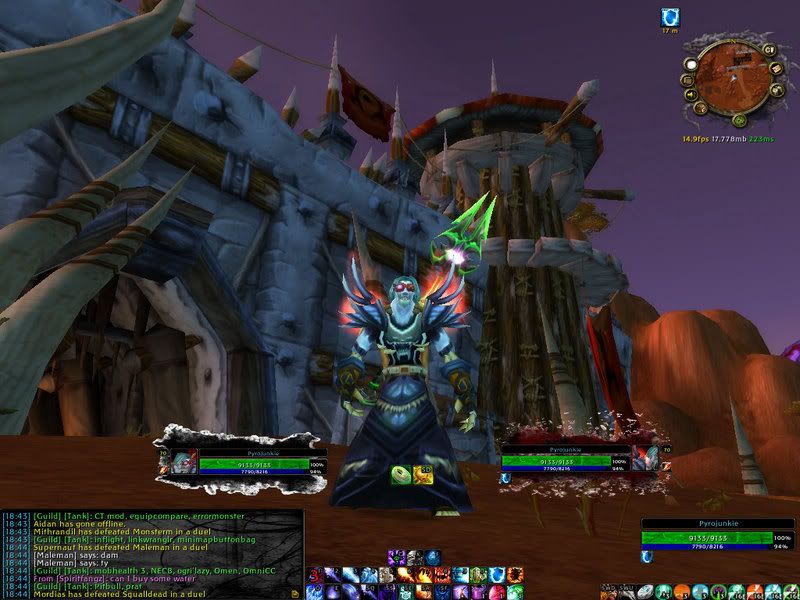
Here is the end result:
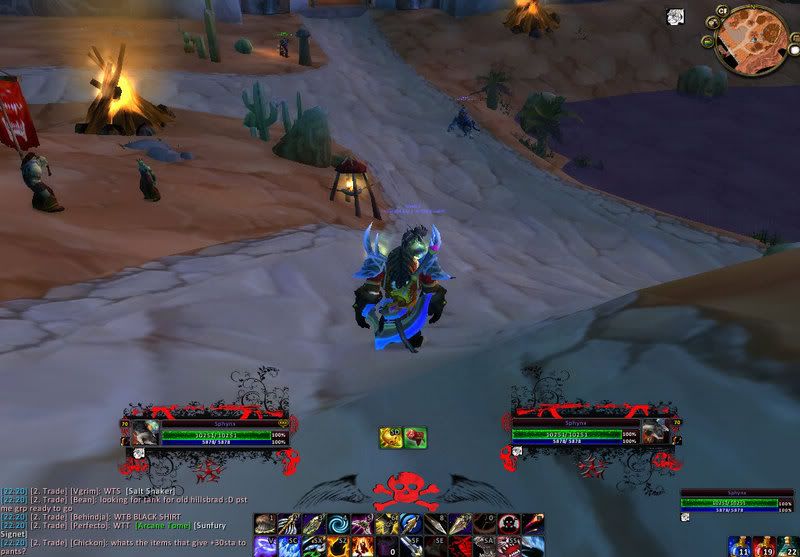
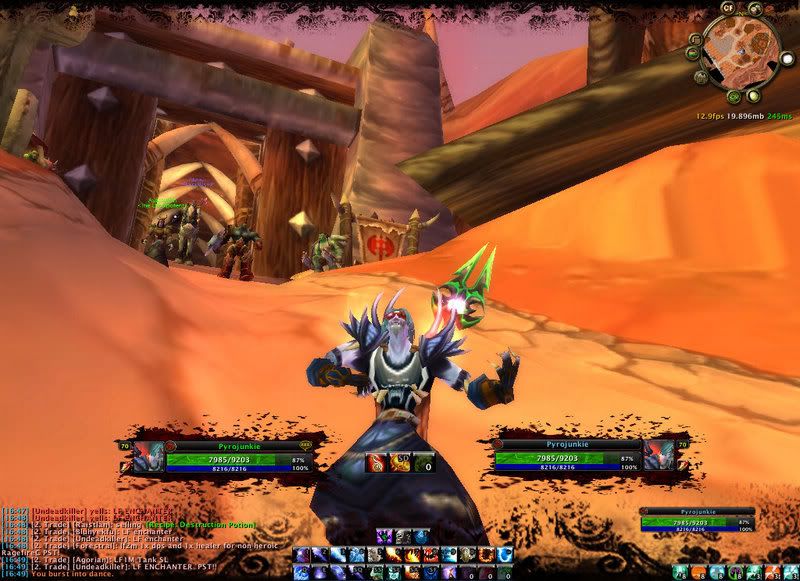
Here is some of the types of things i have done with this addon:
Here are some example Unit Frame Borders:
RapidShare: 1-Click Webhosting
To install these, Extract the files to Interface\Addons\eepanels
Then go in game and then add this string of text to the Custom Background Texture text box, "Interface\Addons\eepanels\UnitFrames#.tga (Change the # with any number from 2-6. For the first Unit Frame just type in UnitFrames.tga no number.
This is the Top and Bottom borders for the second to last pic.
RapidShare: 1-Click Webhosting
Same install as above; except, for these you dont dock em. Just resize to the size you want. The bottom Panel has a weird line on it that i dont know how to get ride of. Also to stretch it across the screen you need to select tiling. and then make the tile size accordingly.
Last edited by pyrojunkie; 11-05-2007 at 03:01 AM.
-
10-30-2007 #3
Member
- Reputation
- 2
- Join Date
- Oct 2007
- Posts
- 69
- Thanks G/R
- 0/0
- Trade Feedback
- 0 (0%)
- Mentioned
- 0 Post(s)
- Tagged
- 0 Thread(s)
Re: [How] Make an artistic UI with EEpanels (under construction)
good tut but i was wondering if you could post some screenies of what you have done with this ingame: im a huge photoshop person and i always like to see creations when they are actually being used

-
10-30-2007 #4
Active Member
- Reputation
- 48
- Join Date
- Sep 2007
- Posts
- 158
- Thanks G/R
- 0/0
- Trade Feedback
- 0 (0%)
- Mentioned
- 0 Post(s)
- Tagged
- 0 Thread(s)
Re: [How] Make an artistic UI with EEpanels (under construction)
As i said before im still making i just want some constuctive criticism so i can edit the one i have and make the next part of the guide even better
edit: that and i cant log on right now to make screenies of the game.
The rest of the guide will be done tonight/ tomorrow morning
edit2:Finished!Last edited by pyrojunkie; 10-31-2007 at 10:55 AM.
-
10-30-2007 #5
Active Member
- Reputation
- 15
- Join Date
- Jan 2007
- Posts
- 142
- Thanks G/R
- 0/0
- Trade Feedback
- 0 (0%)
- Mentioned
- 0 Post(s)
- Tagged
- 0 Thread(s)
Re: [How] Make an artistic UI with EEpanels (under construction)
cant freakin wait to see the rest
-
10-30-2007 #6
Contributor


- Reputation
- 91
- Join Date
- Apr 2007
- Posts
- 405
- Thanks G/R
- 0/0
- Trade Feedback
- 0 (0%)
- Mentioned
- 0 Post(s)
- Tagged
- 0 Thread(s)
Re: [How] Make an artistic UI with EEpanels (under construction)
nice might use this +rep
-
10-30-2007 #7
 ✬✬✬✬✬✬✬✬✬✬


- Reputation
- 908
- Join Date
- Jan 2007
- Posts
- 1,897
- Thanks G/R
- 59/76
- Trade Feedback
- 2 (100%)
- Mentioned
- 0 Post(s)
- Tagged
- 0 Thread(s)
Re: [How] Make an artistic UI with EEpanels (under construction)
+rep nice guide
 hopefully u do more

-
10-31-2007 #8
Member

- Reputation
- 1
- Join Date
- Aug 2007
- Posts
- 52
- Thanks G/R
- 0/0
- Trade Feedback
- 0 (0%)
- Mentioned
- 0 Post(s)
- Tagged
- 0 Thread(s)
Re: [How] Make an artistic UI with EEpanels (under construction)
Awesome work !
+rep ( If I only could >.< )Last edited by Eliasl; 10-31-2007 at 10:54 AM.
-
10-31-2007 #9
Active Member
- Reputation
- 48
- Join Date
- Sep 2007
- Posts
- 158
- Thanks G/R
- 0/0
- Trade Feedback
- 0 (0%)
- Mentioned
- 0 Post(s)
- Tagged
- 0 Thread(s)
Re: [How] Make an artistic UI with EEpanels
/bump (sorry if its not allowed i just want to get this guide out to as many people as possible, for i worked very hard on it.)
-
11-01-2007 #10
Active Member
- Reputation
- 25
- Join Date
- Oct 2007
- Posts
- 161
- Thanks G/R
- 0/0
- Trade Feedback
- 0 (0%)
- Mentioned
- 0 Post(s)
- Tagged
- 0 Thread(s)

Re: [How] Make an artistic UI with EEpanels
Haha, I've been looking for one of these types of guides for a long time.
I didn't know you could do this stuff with eepanels though, I had that mod at one point. I tried to do the tricky stuff with photshop/psp but couldn't figure it out.
I'd give +rep if I could ..atleast I don't see where to (I'm new.)
Neway, this guide rocks, thanks.
-
11-01-2007 #11
 Contributor
- Reputation
- 212
- Join Date
- Jun 2007
- Posts
- 1,765
- Thanks G/R
- 0/0
- Trade Feedback
- 0 (0%)
- Mentioned
- 0 Post(s)
- Tagged
- 0 Thread(s)
Re: [How] Make an artistic UI with EEpanels
how did you get the bottom ones their?
-
11-01-2007 #12
Member
- Reputation
- 1
- Join Date
- Sep 2007
- Posts
- 22
- Thanks G/R
- 0/0
- Trade Feedback
- 0 (0%)
- Mentioned
- 0 Post(s)
- Tagged
- 0 Thread(s)


Re: [How] Make an artistic UI with EEpanels
Woot Nice !!!!

Need peeps who want to make server base PM ME!
-
11-01-2007 #13
Active Member
- Reputation
- 48
- Join Date
- Sep 2007
- Posts
- 158
- Thanks G/R
- 0/0
- Trade Feedback
- 0 (0%)
- Mentioned
- 0 Post(s)
- Tagged
- 0 Thread(s)
Re: [How] Make an artistic UI with EEpanels
The bottom borders in one of last pics is a free panel, its not docked to anything. i simply used one brush, and put an alpha channel down then used the eraser tool of the same brush and erased the bit of the alpha channel then went in game, and enlarged the panel, made it tile. made the tile size about 700(lol) and then thru it at the bottom of the frame.
-
11-01-2007 #14
Member
- Reputation
- 11
- Join Date
- Jul 2007
- Posts
- 29
- Thanks G/R
- 0/0
- Trade Feedback
- 0 (0%)
- Mentioned
- 0 Post(s)
- Tagged
- 0 Thread(s)
Re: [How] Make an artistic UI with EEpanels
Cant get it working...
Saved the file where it should be, checked the path 20 times, but eepanels just wont load it ;/
The panels you have posted wont work either..Last edited by Robus; 11-01-2007 at 12:49 PM.
-
11-01-2007 #15
Active Member
- Reputation
- 48
- Join Date
- Sep 2007
- Posts
- 158
- Thanks G/R
- 0/0
- Trade Feedback
- 0 (0%)
- Mentioned
- 0 Post(s)
- Tagged
- 0 Thread(s)
Re: [How] Make an artistic UI with EEpanels
How are you trying to load it? Is Advanced Mode on eepanels mod checked?(this is an option at the beginning of the list in the ingame menu)Originally Posted by Robus
Are you using "/" instead of "\" for the address path?
It should look like this in the address path "Interface\Addons\eepanels\UnitFrames#.tga"
Remember, you need the extension.


 Reply With Quote
Similar Threads
-
How make ALOT of gold with JC / Ench
By Numi2 in forum World of Warcraft GuidesReplies: 10Last Post: 04-28-2009, 10:44 AM -
How to make a private server with ac web repack
By Wonderchild in forum WoW EMU Guides & TutorialsReplies: 19Last Post: 02-24-2008, 01:12 PM -
How to Make your characters start with Tier 6!
By wowcomputer in forum WoW EMU Guides & TutorialsReplies: 14Last Post: 01-08-2008, 05:37 PM -
How To Make Your Server Public With Out Hamachi Problem Solved
By bomber1392 in forum WoW EMU Guides & TutorialsReplies: 7Last Post: 12-12-2007, 03:35 AM -
How can I make my server work with a static ip?
By freezer1012 in forum World of Warcraft Emulator ServersReplies: 0Last Post: 12-01-2007, 11:57 PM
-
OwnedCore Forums
casino news World of Warcraft Pokemon GO MMO Overwatch RTS Casino reviews bc game bc game -
casino
Casino Gambling Online casinos Casino en ligne vercel livescore bc game lovable vercel bc game no deposit bonus codes stake Top 10 Casinos Casino reviews Bitcoin casino Lucky8 1xbit heycasino [EU] Account Giveaway! Free US account, full Comment on my Video LF > Chinese that recall [US] WOTLK Account [Service] Fake Ids [PLEASE help me]Am i in Spreading a Phisher Help selling an account -
CoreCoins
CoreCoins CoreCoins FAQ Shout-Out Banner Ads -
My OwnedCore
My Profile Notifications Settings Buy CoreCoins About Us


Privacy Policy | Cookie Policy | Terms | Contact Us
Available Payment Methods:-
![[How] Make an artistic UI with EEpanels](https://www.ownedcore.com/images/paybutton/paypal.png)
![[How] Make an artistic UI with EEpanels](https://www.ownedcore.com/images/paybutton/skrill.png)
![[How] Make an artistic UI with EEpanels](https://www.ownedcore.com/images/paybutton/payop.png)
-
Casino
iphone | roborock | roborock | roborock | iphone | iphone | iphone | roborock | roborock | roborock | iphone | iphone | roborock | iphone | iphone | iphone | iphone | roborock | iphone | roborock | iphone | iphone | roborock | roborock | iphone | iphone | iphone | roborock | iphone | iphone | roborock | iphone | roborock | roborock | roborock | roborock | iphone | iphone | iphone | iphone | iphone | roborock | roborock | iphone | roborock | roborock | iphone | iphone | roborock | roborock | iphone | iphone | roborock | iphone | iphone | roborock | roborock | iphone | iphone | roborock