
Posting this for my friend who created the guide over at Trading with Zoxy. I just compiled all his posts into one guide.
What is TradeSkillMaster (TSM)?
TradeSkillMaster is a MODULE BASED system to help both NEW Auctioneers and the MOST ELITE AUCTION GOBLINS manage everything related to the Auction House! Our goal is to work hand-in-hand with our community to develop an all-inclusive suite of modules that, when used together, follows our users through every single auction and crafting related function, making them as much gold in as automated of an environment as possible while still following blizz Terms of Service very closely.
You can read more about TSM over at it's FAQ
Index:Section 1 Auctioning module
- Setting up Groups
- AH Posting ,Cancelling and Shopping
Section 2 The Crafting Module
- General Settings
- Crafting Settings
- The Craft Queue
Section 3 Auto Mail module
- Auto Mail
Section 1 Auctioning module - Setting up the groups
Welcome to the First Part of the Guide to TradeSkillMaster - Auctioning Setting up groups for Sale
TSM Auctioning Function for Setting up Groups is Pretty much the same as APM , if you are currently using APM then when you log in with TSM installed you will get the Below message . This will then Move your current groups over to TSM form APM - WARNING it will not setup the The Fallback or Thresholds Carry on reading for a Exploration on how to set it up.
Step 1 General Settings:
I normally leave these as they are set to ignore Auctions with more then 1000 items listed and to ignore the lowest if the price difference is more then 1000% . So leave these at there normal Settings.
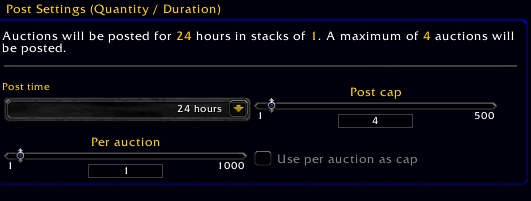
Step 2 Post Settings:
I change the time for all my auctions to 24hrs: Also choose your post cap depending on the item your selling customise this.
Per auction - Stack Size if your selling mats then Set the size of stack you want to be selling.
Step 3 General Price Settings:
Undercut buy is set at 1c as standard and I see no reason to change it.
Bid Percent - This will allow you to change the Bid prices of your auction for when you list them.
Step 4 Minimum Price threshold:
This sets up the price that you will stop listing the items at.
Step 5 Maximum Price:
This is the fallback setting .Meaning If there are no other items on the ah then this is the price it will post at.
Step 6 Advanced Price Setting :
This is when you can choose to have your item posted at the Fallback , not at all at a custom value or at your threshold. I always set mine at the Fallback.
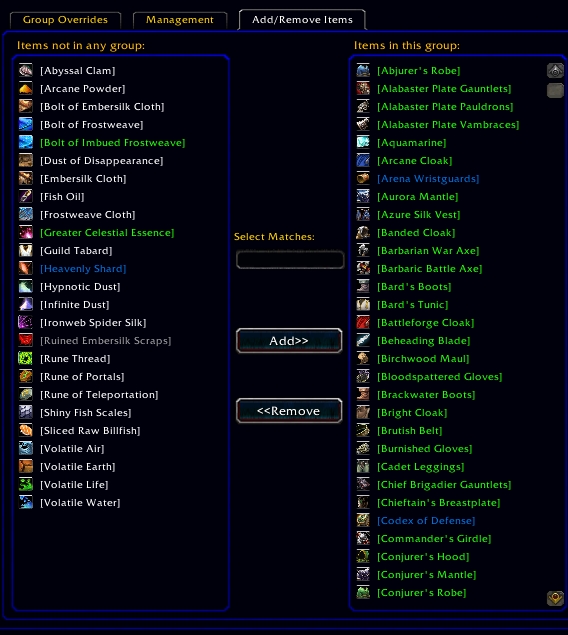
To add items to a group just select the Add/Remove tab and then click on the item.
Section 1 Auctioning module - Setting up the groups
Welcome to Part 2 of the TSM guide
I will now Explain which each of the buttons do
- Auctioning Post
- Auctioning Cancel
- Auctioning Cancel All
- Auctioning Status/config
- AuctionDB Run Scan
- Shopping General Buying
- Shopping Milling/Disenchanting.Prospecting
- Shopping Crafting Mats!
- Shopping Dealfinder
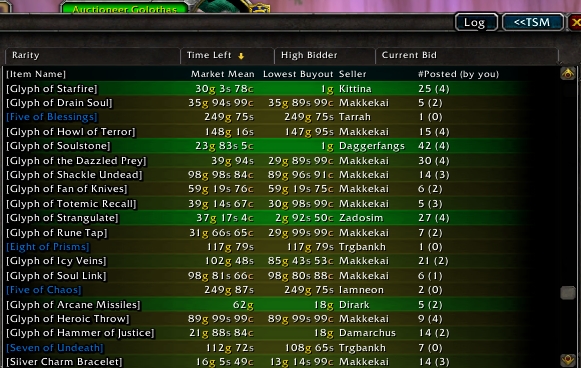
Auctioning Post :
This is the Main button that you will be using to sell items in your groups that have been set up previously.
Before the item goes live it will display the information Displayed in the image , at this stage you can choose to Post Auction ,Skip Item or Stop Posting.
Auctioning Cancel :
When this button is pressed it does a scan of the AH and will then produce a list of all the items that you have been under cut on .
It will then give you the option to cancel Auction Skip Item or Stop Cancelling .
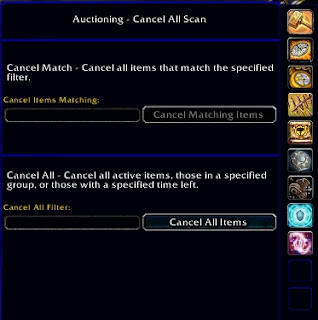
Auctioning Cancel All :
Cancel all give you the option to cancel Actions in Bulk Based on a couple of different Factors
- Items matching: For example you could type 'Glyph of ' and it would select all Glyphs to canceled.
- Cancel All Filter: You can filter by a Specific grup or By time left by typing into the Box. IT would then select all items with that Criteria to be cancelled.
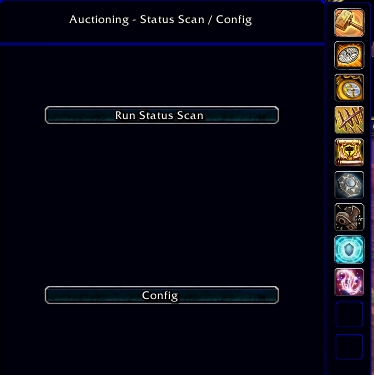
Auctioning Status/config:
This runs a scan that Helps to Identify what items can be brought out to raise the price of he the groups you are managing . To access this once the scan has completed a Log Button will appear next to the TSM button click that and that is where the information will be.
The Config Button will take you to the Group Config page.
AuctionDB Run Scan:
There are two option here the first is the Get All Scan and the second is a smaller scan just focusing on professions.
The Get all will scan all items on the AH when the Profession Scan will just can the Trade goods and items made by and needed for that profession.
Shopping General Buying:
This is simply a search of the AH , the item must be spelled exact or it wont be found. You are able to input the number you want and also the maximum price
This will then produce the Result of the lowest priced item that you have searched for.
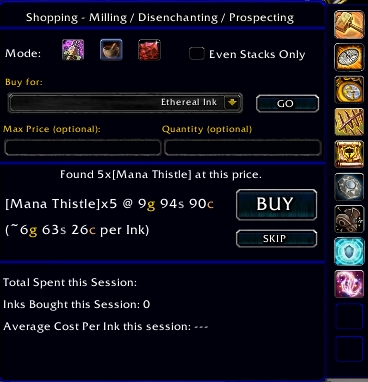
Shopping Milling/Disenchanting.Prospecting
In this Tab it allows you to search for items such as Herbs to mill , Items to DE and also and gems to Cut.
So for Milling as the example , You choose form the drop down and then it will Search all the Herbs in that produce it and then Give you the option to buy them .
It will also Record the amount of inks you have brought and the Average cost per ink.
Shopping Crafting Mats!
This is designed to work with the Crafting Queue Which i will go into Further detail in the next module.
From the list produced from the items you have queued in TSM Crafting module this will individually go through each item and select the cheapest on the AH for you .
You have the options to Buy and Skip each item.
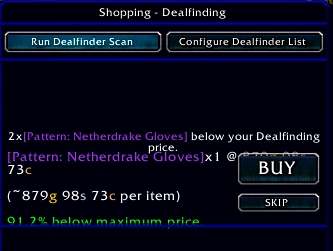
Shopping Dealfinder:
This is the Snatch List - This allows you to setup a list of items that you want to quickly scan for .The Dealfinder allows you to set the mexium price when you add the item into the Deal finder .
Adding a item into Dealfinder _
Select the Configure Dealfinder List .You can then Add the item by either the Shift Clicking on a item or adding the item numberID ( this can be found on wow head).
When you have added the Item you then need to set the maximum price for the item . Then Select Add item and it will be added to the List .
Next run the DealFinder Scan and see what appears ,It will scan the Items in the AH window next to it so make sure you have it on browse so you can see what it is scanning .
Hope that makes it Clear on how to use the AH Functions of TSM
Let em know if you have any questions.
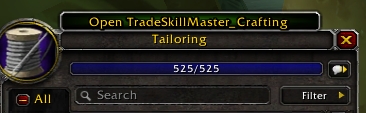
Section 2 The Crafting Module - General Settings
To Access the General Settings just press the Button that look like a Gem on the Right hand side of the TSM main window. This will then give you a option 3 Tabs Data, Craft management and Profiles.
Step 1 Price Settings:
Include Vellums in Costs - This is simple check box that allows you to include the cost when working out the profit .
Get Mat Prices and Get Craft Prices from this allows you to set your source for where you want the Material prices to come from Auctioneer -Appraiser, Auctioneer - Market Value, Auctioneer, Minimum Buyout, AuctionDB Market Value, AuctionDB - Minimum Buyout or Manual Entry.
Profit Deduction - This slider allowed you to set a percentage for profit Deduction if you set at 5% it would cover the AH Fees when calculating profit
Step 2 Inventory Settings:
This Box allows you to set up the Inventory setting choosing what Guilds and alts you can access stock from.
Addon to use for Alt Data - you can choose Gathering ( TSM Built in ) or Datastore.
Characters to Include and Guilds to include - Both have drop down boxes that allow you to tick which characters and Guild you want to have included for Mats for the Crating queue.
Step 3 General - Craft Management Window:
The First option is the Frame Scale so you can increase or Decrease the Size of the Crafting window.
Double Click Queue - This sets the number of item you want to add when using the Crafting window.
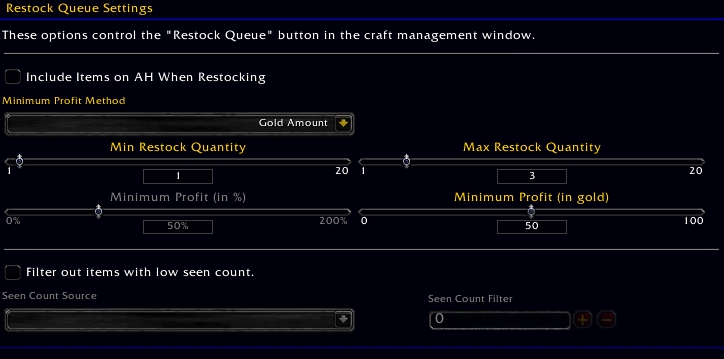
Step 4 Restock Queue Settings:
Include Items on AH when Restocking - If this tick box is checked then When you are restocking you will include items already listed on the AH in your Stock
Min Restock Quantity - Item that will be added to the restock Quantity EG if you wanted to make items in batches then having the number 10 here would only add 10 of the item when you need 10 rather then adding them once at a time.
Max Restock Quantity - This sets the maximum number of items to be in your craft queue for any one item type. Minimum Profit ( in %) or (in gold).
Filter out Items with Low Seen Count - This allows you to ignore items with Low Seen count and Select the source Either TSM_AuctionDB or Auctioneer and then Set a seen count filter.
Section 2 The Crafting Module - Crafting Settings
Before you start using the Crafting window you need to Set up what item you can craft and some additional Settings.
Step 1 - Profession Item Selection:
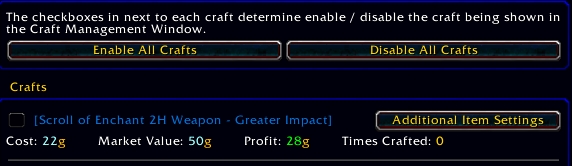
First you need to go into your profession and then Select which items you want to add to your crafting window , the easiest option is to enable all Crafts and I would recommend it the first time that you setup and look over what is profitable.
If you don't want a item to appear in your Crafting window leave the Check Box unchecked as in the image Below.
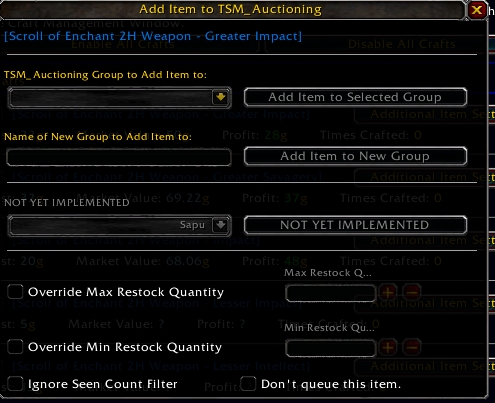
Step 2 - Additional Item Settings:
For each items it gives you the following options:
- TSM _Auctioning Group to add too - This allows you to add the item to any of your existing Groups
- Name of New Group to add item - This allows you to create a new Group
- Override Max restock- This will override the Maximum restock level for this item
- Override Min Restock -This will override the Minimum Restock level for this item
- Ignore Seen Count Filter - Will ignore the Seen count for this item
- Don't Queue this item -If you don't want this item to be queued( wont make item)
I go into more detail into the what the Settings mean in the general settings post.
You will need to go through Each item and Item Group to set up them all up.
Step 3 - Material Costs:
For each of the Crafts there is a page after the Item groups that allows you to set the Prices of the Base Material Costs, if you want to change any of the prices just check the box and edit the price .
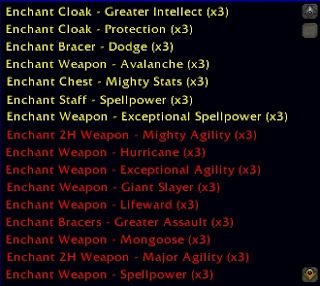
Section 2 The Crafting Module - The Craft Queue
The Above image is of the Crafting window in TSM to open it just click the Button on top of the normal Crafting window.
Once open you will then be able to select from the list what items you want to look at below is the information that will be displayed when you.
- Name - This is the Item name that can be made
- AH/Bags/Bank/Alts - This shows how many of that item you have and its location
- Market Value - Current Market Value ( Sale Price )
- Profit - How much profit is made by making the item
How to use the Restock and On hand Queue:
Restock Queue If you have followed the previous Sections of the Guide then you have already setup your Setting for the Restock Queue .To use the queue it very simple Just press the Restock queue button and the list will then Populate .This is the same for the On-Hand Queue But will only use items in your current Bags.
Once you have Populated the Queue it will appear in a List like this , i have Set my restock amount at 3 items the colours have different meaning
- Green - Have items on hand to make
- Yellow - Have mats on a alt
- Red - Don't have mats
This will also then give you a break down of the Mats that are required to make the items working with the same colour coding
- Green - Have items on hand to make
- Yellow - Have mats on a alt
- Red - Don't have mats
Then once you are ready to craft just press the Craft next button this will then process your list of items that you can make.
For any items that you didn't have they will appear in the Queue in the AH panel under Buy Crafting Mats .So please Check out this section of the Guide if you haven't read it yet.
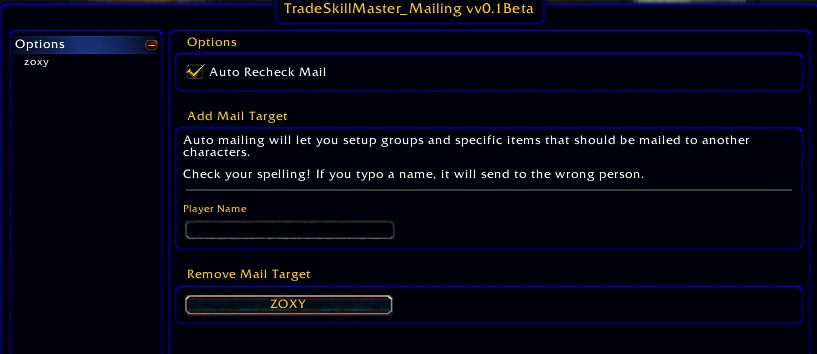
Section 3 Automail Module
Step 1 - Setting Up Auto mailing:
Click the mail Icon on the Right had side of the mail TSM Page.
Then where it says Player name write in the name of the Character ( make sure its Spelt Correctly) that you want to be receiving the mail.
Then Over in the Options Select the Character you want to Setup .
Step 2 - Adding the Items:
This is Just like adding items To the AH groups for Selling , If the item is in your bags then you can just click on Add and it will move the item over .
You also can add a item group over to be selected to a character by clicking the Add button .
To Remove a item or Group from the list just click on remove.
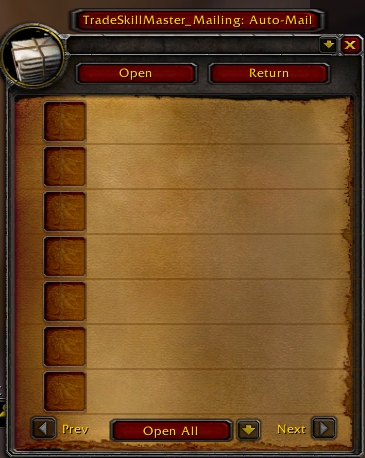
Step 3 Sending:
Once you are ready to send just open the mail box and Click the Red bar at the Top and it will start sending the mails out to your chosen Characters.
AAAND that's it for now. Sorry for the wall of text but it was the only way
Zoxy will be adding a Tips and Tricks section soon but its not out yet, you can keep checking here for it though.
Finally, you can download the addon from Curse.


User Tag List
Results 1 to 15 of 23
-
01-17-2011 #1
 ★ Elder ★

- Reputation
- 1517
- Join Date
- Jun 2007
- Posts
- 2,827
- Thanks G/R
- 20/20
- Trade Feedback
- 0 (0%)
- Mentioned
- 0 Post(s)
- Tagged
- 0 Thread(s)
TradeSkillMaster Guide - Must have Auctioneering Addon
Last edited by Remus3; 05-07-2012 at 10:56 AM.


-
01-17-2011 #2
 Contributor

- Reputation
- 269
- Join Date
- Apr 2007
- Posts
- 397
- Thanks G/R
- 0/3
- Trade Feedback
- 0 (0%)
- Mentioned
- 0 Post(s)
- Tagged
- 0 Thread(s)
Nice guide as always what to except from you?
+rep for well written +lots of pictures/ guide with lots of effort you have put in.
-
01-17-2011 #3
 ★ Elder ★


- Reputation
- 1192
- Join Date
- Feb 2007
- Posts
- 7,129
- Thanks G/R
- 1/3
- Trade Feedback
- 0 (0%)
- Mentioned
- 0 Post(s)
- Tagged
- 0 Thread(s)


Dam nice guide
 Very well made as well
  If you need me you have my skype, if you don't have my skype then you don't need me.
-
01-17-2011 #4
★ Elder ★
- Reputation
- 1517
- Join Date
- Jun 2007
- Posts
- 2,827
- Thanks G/R
- 20/20
- Trade Feedback
- 0 (0%)
- Mentioned
- 0 Post(s)
- Tagged
- 0 Thread(s)
Originally Posted by Sarick
I didn't actually write the guide myself
I'm just combined all Zoxy's separate posts and re-formatted the guide a bit and added some color.
-
01-18-2011 #5
Member
- Reputation
- 1
- Join Date
- Aug 2007
- Posts
- 17
- Thanks G/R
- 0/0
- Trade Feedback
- 0 (0%)
- Mentioned
- 0 Post(s)
- Tagged
- 0 Thread(s)
Thanks shamen for compiling this. I have recently downloaded this addon when I got the Email from Marko and was trying to figure out the ins and outs of the addon, this will help a lot for that
+rep
-
01-18-2011 #6
★ Elder ★
- Reputation
- 1517
- Join Date
- Jun 2007
- Posts
- 2,827
- Thanks G/R
- 20/20
- Trade Feedback
- 0 (0%)
- Mentioned
- 0 Post(s)
- Tagged
- 0 Thread(s)
It's definitely a very complex addon, especially if you haven't used addons like ZeroAuctions, APM, ScrollMaster, Auctionator, QA, etc. However once mastered it becomes an incredibly powerful tool. Takes a while to setup but luckily with this step by step guide its as simple as following the pictures.Originally Posted by Vertigosa
-
01-18-2011 #7
Member

- Reputation
- 1
- Join Date
- Jan 2011
- Posts
- 3
- Thanks G/R
- 0/0
- Trade Feedback
- 0 (0%)
- Mentioned
- 0 Post(s)
- Tagged
- 0 Thread(s)
Very nice +1
-
01-18-2011 #8
Member
- Reputation
- 11
- Join Date
- Aug 2008
- Posts
- 112
- Thanks G/R
- 0/0
- Trade Feedback
- 0 (0%)
- Mentioned
- 0 Post(s)
- Tagged
- 0 Thread(s)
so for this to be effective, would you have to leave your computer on while tis scans the AH?
-
01-18-2011 #9
★ Elder ★
- Reputation
- 1517
- Join Date
- Jun 2007
- Posts
- 2,827
- Thanks G/R
- 20/20
- Trade Feedback
- 0 (0%)
- Mentioned
- 0 Post(s)
- Tagged
- 0 Thread(s)
I doesn't really make much of a difference.Originally Posted by Neutrolizer
-
02-18-2011 #10
Private
- Reputation
- 1
- Join Date
- Feb 2010
- Posts
- 3
- Thanks G/R
- 0/0
- Trade Feedback
- 0 (0%)
- Mentioned
- 0 Post(s)
- Tagged
- 0 Thread(s)
i cant seem to find the uhh actual button names for Post Cancel etc.. to use in conjunction with /click
Will Paypal a TIP to the correct answer.
Theres: function Post:StartScan() but /run Post:StartScan() isnt working either.Last edited by reecieboy; 02-18-2011 at 11:38 PM.
-
02-19-2011 #11
★ Elder ★
- Reputation
- 1517
- Join Date
- Jun 2007
- Posts
- 2,827
- Thanks G/R
- 20/20
- Trade Feedback
- 0 (0%)
- Mentioned
- 0 Post(s)
- Tagged
- 0 Thread(s)
Put this in one macro and you can use it for both functions then.Originally Posted by reecieboy
Code:/click TSMAucCancelButton /click TSMAucPostButton
-
02-20-2011 #12
Established Member

- Reputation
- 181
- Join Date
- Jun 2007
- Posts
- 350
- Thanks G/R
- 3/6
- Trade Feedback
- 0 (0%)
- Mentioned
- 0 Post(s)
- Tagged
- 0 Thread(s)
This simply clicks the post button. Does not start the auction scanning. See the problem?Originally Posted by Unholyshaman
If indeed the answer above is the one that satisfies your problem, then im going to lol. Why? Theres a option ingame to "Create a macro for pressing the cancel or post button on each auction", and another option to bind this to mousewheel. all of this inside the addon.
-
03-01-2011 #13
Active Member
- Reputation
- 32
- Join Date
- Sep 2009
- Posts
- 102
- Thanks G/R
- 55/15
- Trade Feedback
- 0 (0%)
- Mentioned
- 0 Post(s)
- Tagged
- 0 Thread(s)
found a solution?Originally Posted by bluesius

-
03-02-2011 #14
Member
- Reputation
- 1
- Join Date
- Sep 2007
- Posts
- 23
- Thanks G/R
- 0/0
- Trade Feedback
- 0 (0%)
- Mentioned
- 0 Post(s)
- Tagged
- 0 Thread(s)
Did you also reformat the pdf posted at 20kleveling.com because its the same identical guide.Originally Posted by Unholyshaman
-
03-02-2011 #15
★ Elder ★
- Reputation
- 1517
- Join Date
- Jun 2007
- Posts
- 2,827
- Thanks G/R
- 20/20
- Trade Feedback
- 0 (0%)
- Mentioned
- 0 Post(s)
- Tagged
- 0 Thread(s)
I'm not sure that I understand what you mean. What about the 20kleveling guide? What is it identical to? What did I format in it?Originally Posted by a1rw4lk


 Reply With Quote
Similar Threads
-
Must have Fire Fox Addons thread.
By Cyka in forum Community ChatReplies: 25Last Post: 06-16-2010, 03:37 AM -
[Addon] Roleplaying addon, must have!
By Trollblod in forum WoW UI, Macros and Talent SpecsReplies: 4Last Post: 04-18-2010, 10:21 AM -
[Guide] Must Have Addons
By wow4Supplier in forum World of Warcraft GuidesReplies: 5Last Post: 04-29-2009, 05:21 AM -
Funniest addon in the world, MUST HAVE
By sorvad in forum WoW UI, Macros and Talent SpecsReplies: 5Last Post: 01-31-2008, 01:04 AM
-
OwnedCore Forums
casino news World of Warcraft Pokemon GO MMO Overwatch RTS Casino reviews www.planet-casino.com lucky 8 lucky8 no deposit codes bc game bc game lucky8 -
casino
Casino Gambling Online casinos Casino en ligne bc game bc game bc game no deposit bonus codes roobet Top 10 Casinos Casino reviews Bitcoin casino Paypal Casino Lucky8 1xbit heycasino 52 rogue...US EU acc. Hot Spot shield CD key site? (help)mmomailer RAF Account Giveaway Frozen TBC Eu account Scammed US Account with Level 70 Druid Give Away -
CoreCoins
CoreCoins CoreCoins FAQ Shout-Out Banner Ads -
My OwnedCore
My Profile Notifications Settings Buy CoreCoins About Us


Privacy Policy | Cookie Policy | Terms | Contact Us
Available Payment Methods:-


