![[Guide] How to compile TrinityCore, Start to Finish](https://www.ownedcore.com/forums/images/styles/OwnedCoreFX/addimg/menu4.svg)
This guide is currently outdated - Check back soon!
TrinityCore – Start to Finish
Table of Contents:
1. Programs you’ll need
2. Obtaining the source using HG
3. Compiling the core
4. Obtaining and configuring your database
5. Setting up your configs and extracting extra data
5.5 Extracting Vmaps
1. Programs you’ll need:
Setting up any server, including TrinityCore requires a few extra programs.
I’ve done my best to compile them into a simple list;
Mysql: MySQL :: Select a Mirror to Start Downloading - mysql-essential-5.1.44-win32.msi
Hit “No thanks, Just take me to the downloads!”
TortoiseHG: http://bitbucket.org/tortoisehg/stab...3-hg-1.4.3.exe
Microsoft Visual C++ Express: Microsoft Express Downloads
3rd link from the top, on the left.
Navicat: Navicat Lite - Free software downloads and software reviews - CNET Download.com
Notepad++: Browse Notepad++ Files on SourceForge.net
Optional, if you plan on editing your core or want a clean view of your configs. I’d recommend it but if you’re low on HD space don’t bother.
Map/Vmaps Extractor Binaries
http://code.google.com/p/trinitycore...20Maptools.zip
If you don't plan on compiling these yourself.
TrinityCore Development Libraries
http://code.google.com/p/trinitycore...enssl_libs.zip
Open the archive, open "lib", then you'll see 4 folders;
win32_debug
win32_release
x64_debug
x64_release
open win32_release
you'll see some dlls and some Libs, take all of the libs and place them in C:/program files(x86)/Visual Studio 9.0/VC/lib/
now restart your PC
YOU NEED TO DO THIS PART OR TRINITYCORE WILL NOT COMPILE!
2. Obtaining the source using HG
Make sure TortoiseHG has been installed correctly and that you have restarted if prompted.
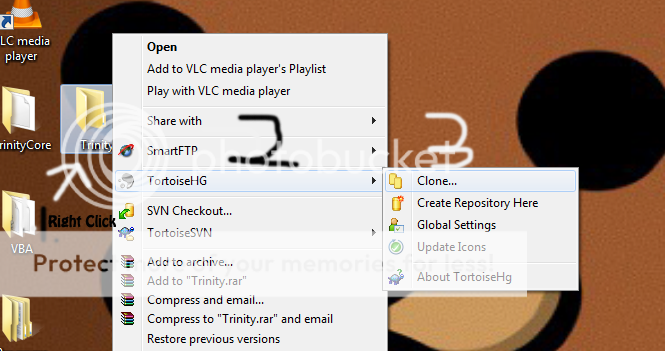
Create a folder on your desktop; this will be your source folder. It’s where you will compile and edit your core. Follow this picture:
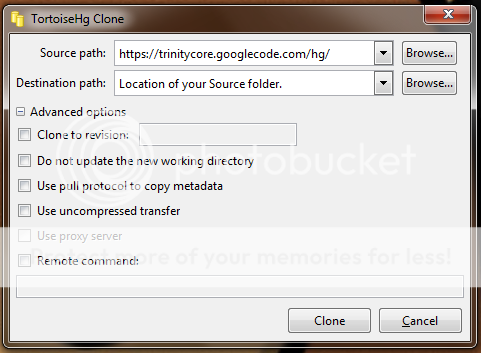
A Window will pop up, prompting for a few fields.
Fill in “Source Path” as I did,
“Destination Path” is the location of your source folder.
Let the program run for a while, it could take up to 10 minutes depending on your Internet Speed.
Once you see this, it’s safe to exit out of TortoiseHG
Now we’re on to section 3!
3. Compiling the core
Open up your source folder. Then go to /SOURCE/WIN/
Open “TrinityCore&Script VC90.sln” with VC++
You should see something like this:
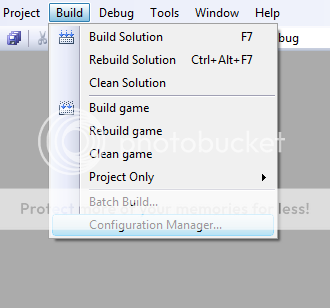
Now go to the “Build” Tab then select “Configuration Manager”
Change “Active Solution Configuration” from “Debug” to “Release”
Now let the compiler do its thing.
When it’s done you should get this:
You’re halfway there!
4. Obtaining and configuring your database
TDB Link: https://trinitydb.googlecode.com/hg/full_db/
The newest version is the file with the highest number (dur)
(it’s NOT in the archive folder)
Now put these aside for a bit, We’re going to set up MySQL
MySQL:
Run the installer for MySQL that you downloaded at the beginning of the guide. (If you passed it by, it’s at the top of the page :P)
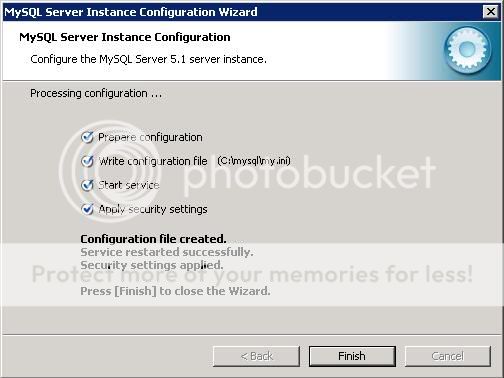
Once MySQL is installed, it will ask you if you want to configure the server. Select Yes.
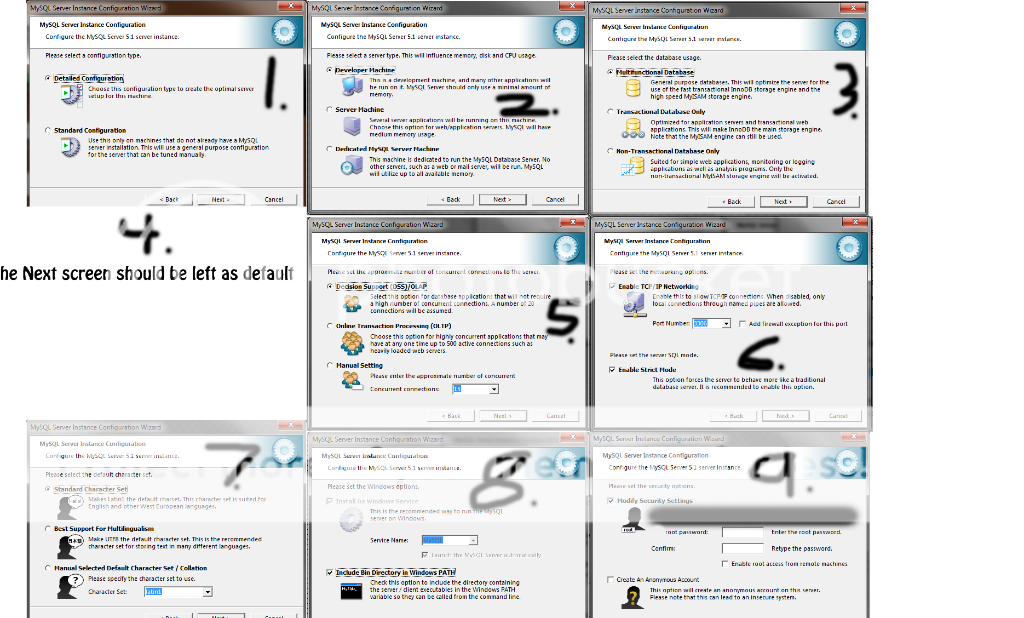
Follow this picture to configure MySQL:
After 9. Hit next, then on the 10th screen hit “Execute”
You should get the all clear.
Once you hit Finish, you’ve set up MySQL.
I hope you still have those databases!
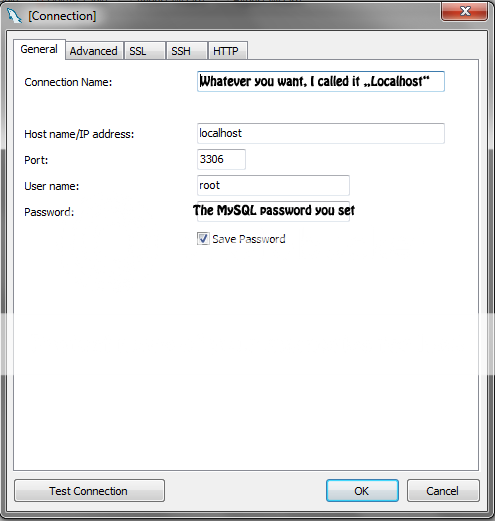
Now open up Navicat.
Up at the top, under “Connections” Select “MySQL”
You’ll get a window with “maor stuff” to fill out.
Fill out the window like this:
Once you’re in.
Create 3 new databases, “World” “Characters” “Auth”
Now, find your TDB rar file
Extract it to anywhere. (You need Winrar (dur))
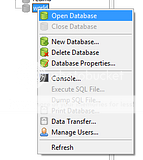
Now right click “world” select “Open Database”
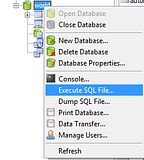
Then “execute batch file”
Now navigate to find your TDB sql file
Navicat will now execute your database (this could take a good 20 minutes)
if this step takes a long time for you to finish, you can use this way
Once that’s finished, open “Characters” “execute batch file” navigate to
“SOURCE FOLDER/sql/base/characters.sql” let that execute, then open “auth” and execute “SOURCE FOLDER/sql/base/auth.sql”
Running the Updates
In the “SOURCE\sql\updates\” folder are all of the updates you need to apply. Don’t worry about all of those files, because you only need to execute the ones that are a higher number than your CTDB or TDB database. Say your CTDB database is TDB_rev32_0.0.4_7441.sql
The 7441 is the revision number it was made for. So you only need to execute the updates that are PAST 7441 (7442+, dur) You DONOT need to execute the character or realmd updates. Just the ones beginning with “world_” and a revision number past “7441”
Once you’ve installed all of the necessary updates. All that’s left is your configs!
Go into your “SOURCE/bin/win32_release/” folder. The 2 files we’re looking for are called “worldserver.conf.dist” and “authserver.conf.dist”
You’re going to want to remove the .dist extension so that they both files become “worldserver.conf” and “authserver.conf” respectively.
Now open worldserver.conf with WORDPAD, WORD, or Notepad++. Notepad will not work with TrinityCore config files.
Look for these 3 lines:
Change them to:Code:LoginDatabaseInfo = "127.0.0.1;3306;trinity;trinity;auth" WorldDatabaseInfo = "127.0.0.1;3306;trinity;trinity;world" CharacterDatabaseInfo = "127.0.0.1;3306;trinity;trinity;characters"
Where YOURMYSQLPASS is your MySQL password you set while configuring your MySQL server.Code:LoginDatabaseInfo = "127.0.0.1;3306;root;YOURMYSQLPASS;auth" WorldDatabaseInfo = "127.0.0.1;3306;root;YOURMYSQLPASS;world" CharacterDatabaseInfo = "127.0.0.1;3306;root;YOURMYSQLPASS;characters"
Now open authserver.conf with WORD, WORDPAD, or Notepad++
Find the line:
Replace it withCode:LoginDatabaseInfo = "127.0.0.1;3306;trinity;trinity;auth"
Where YOURMYSQLPASS is your MySQL password you set while configuring your MySQL server.Code:LoginDatabaseInfo = "127.0.0.1;3306;root;YOURMYSQLPASS;auth"
That’s all that’s necessary to do to get your server running!
I highly recommend that you read ALL of these config files. What I’ve shown you is just the bare minimum. To really understand your server, and to customize it a lot more you NEED to read both config files completely.
5. Extracting extra data
The last small step you need to do is go to where you downloaded "maptools.zip" (at the top of the guide, if you missed it :P)
now select everything in the zip file you downloaded and place them in your world of warcraft folder.
First run mapextractor.exe
(Vista and 7 users need to run this as admin)
This will extract your maps and DBCs.
It will do this, for quite a while (10-20 min)
When mapextractor.exe closes, that means it has finished extracting all of its data.
Now Drag and Drop your “maps” and “dbc” folders from your WoW directory to your “SOURCE/bin/win32_release/” folder.
5.5. Vmaps
Now run makevmaps3_simple.bat
it will run for quite a while, (about a half an hour)
once it has closed, it means it's done.
drag the vmaps folder from your WoW directory to SOURCE/bin/win32_release/
you can safely delete the "buildings" folder in your WoW directory, it's not needed.
That's All! You should be able to start worlserver.exe and authserver.exe with no problems!
If you have any questions, send me a PM or reply to this thread!
Try to give me a specific error so I can get your problem solved faster!

![[Guide] How to compile TrinityCore, Start to Finish](https://www.ownedcore.com/forums/./ocpbanners/1/2/9/8/0/2/2/01d9781faec8bfe3abf9095ac9e57d1e.jpg)
![[Guide] How to compile TrinityCore, Start to Finish](https://www.ownedcore.com/assets/mm/images/wits.png "TradeSafe Middleman")
![[Guide] How to compile TrinityCore, Start to Finish](https://www.ownedcore.com/forums/images/styles/OwnedCoreFX/addimg/wicc.png "CoreCoins")

User Tag List
Results 1 to 15 of 185
-
03-13-2010 #1
 Contributor


- Reputation
- 130
- Join Date
- Dec 2008
- Posts
- 475
- Thanks G/R
- 3/4
- Trade Feedback
- 0 (0%)
- Mentioned
- 0 Post(s)
- Tagged
- 0 Thread(s)
[Guide] How to compile TrinityCore, Start to Finish
Last edited by myran2; 08-07-2010 at 02:31 PM. Reason: notice
![[Guide] How to compile TrinityCore, Start to Finish](https://www.ownedcore.com/images/ba/g/b2.gif)
-
03-13-2010 #2
Contributor
- Reputation
- 130
- Join Date
- Dec 2008
- Posts
- 475
- Thanks G/R
- 3/4
- Trade Feedback
- 0 (0%)
- Mentioned
- 0 Post(s)
- Tagged
- 0 Thread(s)
How to make your newly compiled server public:
Now that you have your new shiny server, you might be wondering how you can get your server public for some real fun.
Step 1: Setting up a DNS
Go to http://www.no-ip.com
If you already have an account (You’ve set up a server before) log in.
If not, you’re going to have to register here: http://www.no-ip.com/newUser.php
Once you’re registered log in you’ll be greeted with this screen;

Now you’ll be shown another page Fill it out like I have;

YOUREALMLIST would be the name of your server.
That’s all for your DNS
Step 2: Modifying the database.
Open up your Database Connection.
Open your ‘auth’ database.
Now open the ‘realmlist’ table

Once you’ve opened the ‘realmlist’ table you’ll get a window that looks like this:

This is also a good time to show you what each column does.
Id: Used if you have more than 1 realm the lower the number, the closer to the top it is on the in-game realmlist.
Name: The name of the realm in the in-game realmlist
Address: The realmlist of the server. (What people set their realmlist in order to connect.)
Port: Used if you have more than 1 realm (Each realm needs their own forwarded port)
Icon: Reflects what you changed in the configs (doesn’t do anything if changed here)
Color: Reflects what you changed in the configs (doesn’t do anything if changed here)
Timezone: Reflects what you changed in the configs (doesn’t do anything if changed here)
Allowedsecuritylevel: What GM rank you need to connect to the server
Population: Not sure about this one, I know it handles "High, Low, etc" but I don't know the values for it.
Gamebuild: Handles what client version is allowed to connect to the server. (11723 == 3.3.3a) This won’t affect anything if a new patch comes out but the core doesn’t have support for it!
Once you’re done modifying the realmlist column to your liking, exit out of navicat.
On to step 3!
Step 3: Port Forwarding
This part is actually extremely easy, if you know your router password and how to obtain your router’s IP
Here are a few default router IPs you can try:
192.168.0.1
192.168.2.1
192.168.1.1
192.168.123.254
10.1.10.1
If none of those work, you probably set your router to use a different IP, so you should know it.
Once you’ve found your router IP, you’ll need to figure out the login.
The password is almost always defaulted to “password” “password1” or “highspeed”
The last one is only for Comcast
The user is almost always “admin” or “cusadmin”
Once again, the last one is for Comcast
If none of these work, you can call the manufacturer of the router for the default user and pass of your router model or ask whoever set up your router for the credentials they set up.
If you’ve gotten in successfully, then find the section related to ports “Port forwarding/Triggering” or just “Port forwarding”
You’ll need to add 3 new ports “8085” "[B]3306[B]", and “3724”. If you’re interested in setting up a website too, then open port “80”
That’s all you’ll need to do with your router. I apologize for the lack of specification in this section, but this step really is different for everyone.
Now that you’ve stumbled through that last step
You should be all set up!
Account Management
If you don't decide to make your server public, or you'd rather test things out before you go public. You'll need to make an account. Adding an account in the database doesn't work, so you'll have to make one in the console!
1. Start both your authserver and worldserver.
2. Open your worldserver window
Make sure it has started up (the last line isYou'll also notice you can type in your worldserver but not in your realmserver.Code:Trinity process priority class set to HIGH
3. Now, type this statement into worldserver;
This creates a normal player account, no GM powers, no expansions.Code:account create ACCOUNTNAME PASSWORD
If you want to make someone a GM, you can use this piece of code;
Where gmlevel is the account's new GM rank (1-3) for all of you wondering, yes 4 is the highest rank and it is NOT to be used in-game (reserved for the trinity console).Code:account set gmlevel ACCOUNTNAME GMLEVEL -1
-1 is stands for any realm. if you put -1 when doing this, the account would have a gm level of GMLEVEL on every realm.
You can also specify realmIDs, (1, 2 etc...)
If you want to raise someone's expansion, you can use this;
ADDON is the expansion levelCode:account set addon ACCOUNTNAME ADDON
0: Pre-BC
1: BC
2:WOTLKLast edited by myran2; 07-20-2010 at 08:45 AM. Reason: Added a little something extra.
-
03-18-2010 #3
 Member
- Reputation
- 1
- Join Date
- May 2008
- Posts
- 22
- Thanks G/R
- 0/0
- Trade Feedback
- 0 (0%)
- Mentioned
- 0 Post(s)
- Tagged
- 0 Thread(s)
Thanks for this nice tut
-
03-18-2010 #4
Contributor
- Reputation
- 130
- Join Date
- Dec 2008
- Posts
- 475
- Thanks G/R
- 3/4
- Trade Feedback
- 0 (0%)
- Mentioned
- 0 Post(s)
- Tagged
- 0 Thread(s)
Thanks for the feed back

-
03-21-2010 #5
Member
- Reputation
- 4
- Join Date
- Nov 2008
- Posts
- 77
- Thanks G/R
- 0/0
- Trade Feedback
- 0 (0%)
- Mentioned
- 0 Post(s)
- Tagged
- 0 Thread(s)
Thanks alot & Bump :wave:
-
03-23-2010 #6
Member

- Reputation
- 1
- Join Date
- Mar 2008
- Posts
- 88
- Thanks G/R
- 0/0
- Trade Feedback
- 0 (0%)
- Mentioned
- 0 Post(s)
- Tagged
- 0 Thread(s)
awsome thumbs up
-
05-08-2010 #7
Banned
- Reputation
- 6
- Join Date
- Nov 2008
- Posts
- 156
- Thanks G/R
- 0/0
- Trade Feedback
- 0 (0%)
- Mentioned
- 0 Post(s)
- Tagged
- 0 Thread(s)
Good job mr dudesome
-
05-09-2010 #8
Contributor
- Reputation
- 130
- Join Date
- Dec 2008
- Posts
- 475
- Thanks G/R
- 3/4
- Trade Feedback
- 0 (0%)
- Mentioned
- 0 Post(s)
- Tagged
- 0 Thread(s)
Thanks
is there anything else you would like me to add?
-
05-14-2010 #9
Member
- Reputation
- 1
- Join Date
- Apr 2008
- Posts
- 1
- Thanks G/R
- 0/0
- Trade Feedback
- 0 (0%)
- Mentioned
- 0 Post(s)
- Tagged
- 0 Thread(s)
Can you add guide how to install some custom stuff like PlayerBots (http://www.trinitycore.org/forum/bots-t7865.html). Guides in there are very confusing or I just probably suck at it.
-
06-08-2010 #10
Contributor
- Reputation
- 130
- Join Date
- Dec 2008
- Posts
- 475
- Thanks G/R
- 3/4
- Trade Feedback
- 0 (0%)
- Mentioned
- 0 Post(s)
- Tagged
- 0 Thread(s)
Bump. Added a guide for going public.
Next is a guide on how to add core patches

-
06-08-2010 #11
 Member
- Reputation
- 14
- Join Date
- Jun 2007
- Posts
- 226
- Thanks G/R
- 0/0
- Trade Feedback
- 0 (0%)
- Mentioned
- 0 Post(s)
- Tagged
- 0 Thread(s)
Nice Guide
Thanks for the guide, made it pretty easy to set-up

+Rep
Only thing I would consider "missing" (and this is with every guide I could find & even the TC wiki!) is instructions on how to make an account WITHOUT making a web page. NO one explains that & if you've never used the command prompt to type this stuff in, how are you gonna know that is the way it has to be done?
So, for anyone who doesn't want to make a web page & is only making the server for their own use, start up TrinityRealm.exe & TrinityCore.exe. When TrinityCore.exe is done loading, click in the command prompt box for it & type in:
Obviously where it says username & password you would type the username you want & password you want.Code:.account create username password
The reason you must do this instead of just typing the info in to the 'account' table thru Navicat (or SQLyog or whatever) like you would on an ascent based server, is because the password is SHA1 encrypted. You can see what that does to your password if you look in the 'account' table after you create the account.
Hope this helps
.
.
.
-
06-09-2010 #12
Contributor
- Reputation
- 130
- Join Date
- Dec 2008
- Posts
- 475
- Thanks G/R
- 3/4
- Trade Feedback
- 0 (0%)
- Mentioned
- 0 Post(s)
- Tagged
- 0 Thread(s)
Yeah, I knew about that as well :P
I was considering putting that in somewhere at the bottom of how to compile.
I suppose I can add that and how to make the account GM as well
-
06-09-2010 #13
Member
- Reputation
- 14
- Join Date
- Jun 2007
- Posts
- 226
- Thanks G/R
- 0/0
- Trade Feedback
- 0 (0%)
- Mentioned
- 0 Post(s)
- Tagged
- 0 Thread(s)
I am really amazed it (the SHA1 encrypt/account thing) hasn't come up before. I literally looked at 7 different forums & countless threads, including on the TC forums, & found nothing....I FINALLY found an obscure thread on ACwhateveritis, saw a code for Mangos & thought "oh duh I can type in the command window" and tried various combonations until it worked!
All I can assume is people just gave up & went with Ascent based....maybe THAT'S the reason the ascent based EMUs are so much more popular even though, from what I have seen so far, TC is far superior
Now, setting the account for GM, THAT was easy
Totally separate issue, do you know if they exist, & if so, where I can get a list of cheat codes? things like invincibility or fly mode, etc.? I can't find anything like that in the commands DB.Last edited by psychobandit; 06-09-2010 at 06:53 PM.
-
06-09-2010 #14
Contributor
- Reputation
- 130
- Join Date
- Dec 2008
- Posts
- 475
- Thanks G/R
- 3/4
- Trade Feedback
- 0 (0%)
- Mentioned
- 0 Post(s)
- Tagged
- 0 Thread(s)
I don't know many of the default ones anymore, my command system is modified a lot.
.gm visible off makes you invisible though :P
.explorecheat opens all maps
.taxicheat opens all flightpaths
pretty much all I know
My commands are like ascent :P
-
06-10-2010 #15
Member
- Reputation
- 3
- Join Date
- Jul 2009
- Posts
- 49
- Thanks G/R
- 0/0
- Trade Feedback
- 0 (0%)
- Mentioned
- 0 Post(s)
- Tagged
- 0 Thread(s)
Nevermind...
Last edited by reloque; 06-10-2010 at 08:15 AM.


 Reply With Quote
Similar Threads
-
[Guide]How To Compile Ascent
By SectorSeven in forum WoW EMU Guides & TutorialsReplies: 144Last Post: 12-19-2008, 02:37 PM -
[Guide] How to compile your own DLL
By Cursed in forum WoW EMU Guides & TutorialsReplies: 58Last Post: 06-19-2008, 09:38 AM -
[Guide] How to compile scripts!
By Aldaus in forum WoW EMU Guides & TutorialsReplies: 9Last Post: 01-19-2008, 05:41 AM -
Guide: How to Compile Ascent yourself! [With photos]
By Skaren in forum WoW EMU Guides & TutorialsReplies: 33Last Post: 01-08-2008, 08:18 PM -
[Guide] How to: Change the starting stats of a new character
By Cursed in forum WoW EMU Guides & TutorialsReplies: 7Last Post: 12-30-2007, 10:11 PM
-
OwnedCore Forums
casino news World of Warcraft Pokemon GO MMO Overwatch RTS Casino reviews bc game bc game bc game bc game bc game bc game bc game bc game bc game bc game bc game bc game bc game bc game bc game bc game bc game bc game bc game bc game bc game bc game bc game bc game bc game bc game bc game bc game bc game bc game bc game bc game bc game bc game bc game bc game bc game bc game bc game bc game bc game bc game bc game bc game bc game bc game bc game bc game bc game bc game bc game -
casino
Casino Gambling Online casinos Casino en ligne bc game bc game bc game bc game bc game bc game bc game bc game bc game bc game bc game no deposit bonus codes roobet Top 10 Casinos Casino reviews Bitcoin casino Paypal Casino Lucky8 1xbit heycasino ✅Betano Bookmaker - ✅Nitro Casino - Best ✅Slotwolf Casino Bonus ✅Cloudbet Casino and ✅Best Slots on January ✅Leovegas Casino Provider : Netent ✅ThorCasino Casino - No deposit Bonus codes -
CoreCoins
CoreCoins CoreCoins FAQ Shout-Out Banner Ads -
My OwnedCore
My Profile Notifications Settings Buy CoreCoins About Us


Privacy Policy | Cookie Policy | Terms | Contact Us
Available Payment Methods:-
![[Guide] How to compile TrinityCore, Start to Finish](https://www.ownedcore.com/images/paybutton/paypal.png)
![[Guide] How to compile TrinityCore, Start to Finish](https://www.ownedcore.com/images/paybutton/skrill.png)
![[Guide] How to compile TrinityCore, Start to Finish](https://www.ownedcore.com/images/paybutton/payop.png)
-
Casino
Bitstarz | Lucky Dreams Casino | Casino Reviews | Casino deposit offers | Lucky31 | Oshi Casino | BitCasino | NeedForSpin | USA CASINO | No deposit bonus | How to Play BlackJack Online | Casino | Dublinbet | Jackpotcity | Cresus Casino | Casobet | Bovada casino | Mystake Casino | MrGreen | Welcome Bonuses | Rollino Casino | Casino Bonus | ZenCasino | Betflip Casino | BuzzLuck | InstantPay | Lucky8 | Crypto Casino