![[RIPPED] Sig Guide Using Ripples](https://www.ownedcore.com/forums/images/styles/OwnedCoreFX/addimg/menu4.svg)
THIS IS NOT MY GUIDE BUT IT HELPED ME WITH MY SIGS SO IM SHARING
Welcome, in this tutorial you will learn how to make a nice looking signature using smudging and some filters.
Start of by creating a new photoshop document (ctrl+N) 380px by 130 px and fill the first layer with 434343:
Now you will need to find a nice looking render, try to search one of high quality and with some nice action and flow in it, I picked the following unreal 3 render. Open it inside your photoshop document. (if the render is .png remmeber to first save it to your computer, then open it in photoshop, and then copy and paste it to your signature, else you will loose transparancy).
Duplicate your render, hide one of the two layers and call it "render backup". We aren't going to do something with it, its just to make sure we will have a backup of our render in case we might need it later. Take the other layer (dont resize!) and place it in a corner. Then make it black and white (aka desaturate it) by pressing CTRL+SHIFT+U.
Then go to filter -> disort -> ocean riple. Use a ripple size of 8 and a magnitude of something like 4, press ok and your signature will now look something like this:
Remmeber the layer with your render on it which we saved? Duplicate it (right click > duplicate) once and resize it and place it on your signature. Take out your Erasor tool (E) and select a soft brush of around 100px and slightly erase the outlines of your render to blend it in. Call this layer: "main render"
Now we are going to create the cool looking background so pay attention!
Duplicate (right click > duplicate) your "main render" layer 2 times, place them under your "main render" layer and hide the first for now.
With the other one selected go to filter -> disort -> ocean riple and again use something like a size of 8 with a magnitude of 4, experiment with these settings to get a different result.
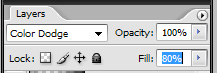
Drag this layer to the left of your render and turn the blending mode on Color dodge with a fill of around 80% (this is done to get rid of the colors that are to harsh).
Now your signature should look something like this:
Now un-hide the other render layer which we just made by duplicating, since we are going to smudge it.
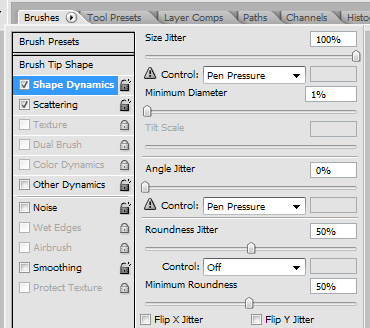
Select your smudge tool () and then load the maple leaf kinda brush (if you cant view it reset your brushes, its part of the photoshop default brushes) and use the following settings:
Set the strenght to something around 50%
and heavily smudge this layer. Once finished duplicate this render and move it around, your signature will now look like this:
I hid my render on this picture so I could easily see what I was doing while brushing, this is how it looks with the "main render" layer un-hid.
Time for adjustment layers
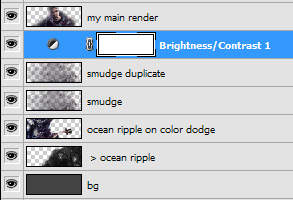
That was all, your background is now done, we will now only need to adjust the colors to make it look good (dont worry if it looks horrible now, thats part of the idea), first I added a brightness and contrast layer (layer -> new adjustment layer -> brightness and contrast)with +20 contrast / +2 brightness between my render and the brushing layer to make it look better:
Notice how the colors are a bit cold and boring? Thats when a gradient maps (layer -> new adjustment layer -> gradient map) comes in handy, I added this one on top of all my layers to give everything some nice colors
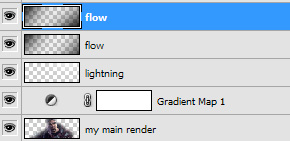
Flow and lightning
Notice how the right side of his head is brighter compared to the left side of his head? That must be because the light source is on the right. Add your own light source by taking out your brush tool and on a new layer brush once with a soft round brush, 300px and color white to get something like this: (lower the opacity of the layer if its way to bright)
Now create a new layer and this time select black as your brush color, brush on the sides of your signature, to make them darker and keep the middle unharmed. This will get you some flow like this (I duplicated this layer ones because one layer wasnt enough):
Now create a new layer (CTRL+SHIFT+N) and go to image -> apply image and press ok, after that go to filter -> sharpen -> sharpen. I also added an orange photo filter (layer -> new adjustment layer -> photo filter) in this step, this is optional and ofcoure use a color that matches the rest of your signatre.
Now tweak your sig by adding more adjustment layers or whatever you like (a C4D render perhaps?) and then add your border and text. You can easily add a nice border by making a new layer and then image -> stroke, with the settings: 2px, inside and a black color.
This was my final result, I hope you learned some new stuff today and remmeber play around with different settings and try out new stuff!

Here is some of my examples
Hope this helps!

![[RIPPED] Sig Guide Using Ripples](https://www.ownedcore.com/forums/./ocpbanners/1/0/6/3/8/1/6/1e102dbc1865060efdd7bf3ae1edf5cc.jpg)
![[RIPPED] Sig Guide Using Ripples](https://www.ownedcore.com/assets/mm/images/wits.png "TradeSafe Middleman")
![[RIPPED] Sig Guide Using Ripples](https://www.ownedcore.com/forums/images/styles/OwnedCoreFX/addimg/wicc.png "CoreCoins")

Shout-Out
User Tag List
Thread: [RIPPED] Sig Guide Using Ripples
Results 1 to 6 of 6
-
11-13-2007 #1
 Contributor

- Reputation
- 211
- Join Date
- Jan 2007
- Posts
- 373
- Thanks G/R
- 0/0
- Trade Feedback
- 0 (0%)
- Mentioned
- 0 Post(s)
- Tagged
- 0 Thread(s)


[RIPPED] Sig Guide Using Ripples

![[RIPPED] Sig Guide Using Ripples](https://www.ownedcore.com/images/ba/g/b2.gif)
-
11-13-2007 #2
Contributor
- Reputation
- 158
- Join Date
- Dec 2006
- Posts
- 627
- Thanks G/R
- 0/0
- Trade Feedback
- 1 (100%)
- Mentioned
- 0 Post(s)
- Tagged
- 0 Thread(s)
Re: [RIPPED] Sig Guide Using Ripples
Looks pretty neat mate.
-
11-13-2007 #3
 !!jeULyJf8ld1

- Reputation
- 538
- Join Date
- Feb 2007
- Posts
- 2,254
- Thanks G/R
- 0/1
- Trade Feedback
- 0 (0%)
- Mentioned
- 0 Post(s)
- Tagged
- 0 Thread(s)

Re: [RIPPED] Sig Guide Using Ripples
A nice tutorial, but you are not the sig God.
19/5/2013
-
11-13-2007 #4
Contributor
- Reputation
- 211
- Join Date
- Jan 2007
- Posts
- 373
- Thanks G/R
- 0/0
- Trade Feedback
- 0 (0%)
- Mentioned
- 0 Post(s)
- Tagged
- 0 Thread(s)
Re: [RIPPED] Sig Guide Using Ripples
it was for a site called DAgraphic i was trying out for the rank of sig god and i god it XD
-
11-14-2007 #5
Member

- Reputation
- 0
- Join Date
- Aug 2007
- Posts
- 50
- Thanks G/R
- 0/0
- Trade Feedback
- 0 (0%)
- Mentioned
- 0 Post(s)
- Tagged
- 0 Thread(s)
Re: [RIPPED] Sig Guide Using Ripples
how do i put my sig up so when i post something it shows
-
11-14-2007 #6
Contributor
- Reputation
- 211
- Join Date
- Jan 2007
- Posts
- 373
- Thanks G/R
- 0/0
- Trade Feedback
- 0 (0%)
- Mentioned
- 0 Post(s)
- Tagged
- 0 Thread(s)
Re: [RIPPED] Sig Guide Using Ripples
click on the insert image button on top of the reply box then put the image url in there


 Reply With Quote
Similar Threads
-
[Guide] Using NoggIt
By [ Prototype ] in forum WoW ME Tools & GuidesReplies: 231Last Post: 10-10-2008, 11:25 PM -
Sig guide
By freshfish in forum Art & Graphic DesignReplies: 1Last Post: 10-31-2007, 01:59 PM -
[Guides] Using NoggIt, Adding Land, and Adding Water
By Demonkunga in forum WoW ME Tools & GuidesReplies: 118Last Post: 10-16-2007, 01:56 PM -
Auction Shopping List/Guide useful!
By Fatality in forum World of Warcraft GuidesReplies: 13Last Post: 04-08-2007, 01:01 PM
-
OwnedCore Forums
casino news World of Warcraft Pokemon GO MMO Overwatch RTS Casino reviews www.planet-casino.com lucky 8 lucky8 no deposit codes bc game bc game lucky8 -
casino
Casino Gambling Online casinos Casino en ligne bc game bc game bc game no deposit bonus codes roobet Top 10 Casinos Casino reviews Bitcoin casino Paypal Casino Lucky8 1xbit heycasino [EU] ~!iMM!~'s Giveaway 70 + Account Giveaways Request) Reward involved! T6/ Troll SPriest- Steam Accounts from Krip! LF one guy to start scam Delete this thread please Website Hosting finding chinese scammers -
CoreCoins
CoreCoins CoreCoins FAQ Shout-Out Banner Ads -
My OwnedCore
My Profile Notifications Settings Buy CoreCoins About Us


Privacy Policy | Cookie Policy | Terms | Contact Us
Available Payment Methods:-
![[RIPPED] Sig Guide Using Ripples](https://www.ownedcore.com/images/paybutton/paypal.png)
![[RIPPED] Sig Guide Using Ripples](https://www.ownedcore.com/images/paybutton/skrill.png)
![[RIPPED] Sig Guide Using Ripples](https://www.ownedcore.com/images/paybutton/payop.png)
-
Casino
shuffle | shuffle | this url | shuffle | shuffle | shuffle | shuffle | shuffle | stake | shuffle | russian | shuffle | stake | stake | shuffle | shuffle | stake | freebet tanpa | Blockchain gambling | this url | shuffle | shuffle | Bitstarz Tournament | stake | shuffle | shuffle | stake | here | shuffle | here | Aviator game casino | shuffle | MRQ Casino | shuffle | casino | shuffle | stake | stake | stake | shuffle | shuffle | this url | stake | Free casino games | shuffle | polish | casino | stake | shuffle | shuffle | here | this | shuffle | this url | Top 5 canadian online casinos 2025 | shuffle | Instant Payout Methods | shuffle | shuffle | shuffle