
Guide of a Hammerdin
Table of Contents
1. About the Build
- 1.1 Introduction (What is a Hammerdin?)
- 1.2 How can this guide help me?
2. The Build
- 2.1 The Skills
- 2.2 The Stats
- 2.3 The Equipment
- 2.4 The Changes
3. Miscellaneous
- 3.1 The Build Variations
1.1 - Introduction (What is a Hammerdin?)
Hello, and welcome to the hammerdin guide. First of all, what is a hammerdin? A hammerdin is simply a paladin who has Blessed Hammer as his main skill. At high levels, with a high level bonus enhancing aura, hammers can do tons of damage.
Why do you want a hammerdin however? Hammers deal holy physical damage. What that means, is that you can damage anything that's not physical immune. However, if the physical immune is undead, then they will still be damaged. Also, all undead receive even MORE damage from the hammers.
Because of this, hammerdins can be used for almost ANY task on Diablo II. They can be used to rush, to MF, to bot, or even to duel. This guide will teach you a build that is best for MF botting (YAMB/d2jsp/kukbot), but with a few item changes can be made to accomplish basically any task you need.
Before we begin this guide, let me go over the colors I will be using.
Cyan will signify different sections of the guide.
Yellow will signify character skills
Orange will signify items
Red will signify formulas/equations
Ready? Let's go!
1.2 - How can this guide help me?
There are many different types of hammerdins out there. Every owner of hammerdin has his own unique view on how the build should be done. However, those who have never created a hammerdin before might not know where to begin.
This is why I am writing this guide. Hopefully you can use this guide as a basic outline for your very own hammerdin. You will probably end up making small variations of the build, but that's totally up to you.
2.1 - The Skills
1 - Smite - Prerequisite
1 - Holy Bolt - Prerequisite
1 - Charge - Prerequisite
1 - Might - Prerequisite
1 - Prayer - Prerequisite
1 - Defiance - Prerequisite
1 - Redemption - Prerequisite
1 - Cleansing - Prerequisite
20 - Blessed Hammers - Our main skill
20 - Blessed Aim - Synergy to Blessed Hammers
20 - Vigor - Synergy to Blessed Hammers, and it allows us to run really really fast, =)
20 - Concentration - This is the aura we will be using to maximize our hammer damage.
Rest - Holy Shield - This will increase our defense, and our chance to block.
I highly recommend you complete the following quest(s) in each difficulty:
Den of Evil - Act I, Quest I - +1 Skill Point
Radament's Lair - Act II, Quest I - +1 Skill Point
The Fallen Angel - Act IV, Quest I - +2 Skill Points
This will give you +4 skill points in each difficulty, resulting in +12 total.
2.2 - The Stats
Strength - This depends on how much strength your boots, Annihilus, and Enigma add. If those items are perfect, you will need only 71 strength. I personally got 75 strength so I have some "wiggle space".
Dexterity - Just enough to have max block AFTER Holy Shield and all the dexterity bonuses from your items. At level 85, you only need 100 dexterity to accomplish this task. As you grow levels, put points into here as needed.
Vitality - Put the rest of your points into vitality.
Energy - Put absolutely no points into this. At early levels, it may seem like your mana is very low and runs out only after a few hammers, but do not allow yourself to put any points here.
I highly recommend you complete the following quest(s) in each difficulty:
The Golden Bird - Act III, Quest I - +20 Life
Lam Esen's Tome - Act III, Quest IV - +5 Stat Points
Prison of Ice - Act V, Quest III - +10 All Resistances
This will give you +20 Life, +5 Stat Points, and +10 All Resistances in each difficulty, resulting in +60 Life, +15 Stat Points, and +30 All Resistances total.
For your mercenary, get one from Nightmare Act II, and make sure it's defensive. The Holy Freeze aura will really come in useful.
2.3 - The Equipment
The following equipment is what you'll be using when you're MF botting. For the equipment you will be using in alternate situations, see The Changes. Let's start at the top and go down, shall we?
Head Wear - Harlequin Crest Shako - The +skill, life, and mana boost are all great. The damage reduction is also useful, as well as the +50% MF bonus. Socket this with a perfect topaz, or if you have extra funds, an Ist Rune.
Amulet - Mara's Kaleidoscope Amulet - There really is no other choice here. You get +skill, +resistances, and a bit to attributes.
Body Armor - Enigma - I put my one in a perfect Archon Plate with 15% enhanced defense. If you can't get an Archon Plate, go with a Dusk Shroud. There is absolutely NO substitution here. You need this armor to gain the all important teleport skill. Not to mention the +skill, +faster run walk, +str, and +MF%.
Weapon1 - Heart of The Oak - The +skill, and the faster cast rate make this an excellent weapon. Depending on the stats of your Annihilus and Mara's, the resistance you need here will vary. I needed a 40 because my Annihilus is low.
Shield1 - Herald of Zakarum - This is the shield that every good paladin should use. The mods it gives are amazing. Trying to describe it would take too long. Just use this. Upgrade it to a Zakarum Shield if you can. Go for one with 175% enhanced defense or higher. Socket this with a perfect diamond, or an Um Rune.
Weapon2 - Call To Arms - We will be using Battle Command and Battle Orders to increase our life, mana, and skill levels. If you can, get a nice high one. A 4bo seems to be best for its price. What you put this into really doesn't matter, but make sure the item is 1-handed, and does not have a dexterity requirement. I went with the usual crowd and got a Flail. Crystal Swords also seem to be a good choice.
Shield2 - Spirit - Put this inside a monarch. This shield will give +2 to all skills, which will increase the level of Battle Command and Battle Orders.
Gloves - Magefist Light Gauntlets - This gives us the faster cast rate we need to reach the all important breakpoint. The faster mana regeneratioon also comes in useful.
Ring1 - Nagelring Ring - Get one with 30% MF if you can.
Ring2 - Nagelring Ring - Try to get another 30% one. Having two of them gives us 60% higher MF!
Belt - Arachnid Mesh Spiderweb Sash - This gives us +skill, and faster cast rate. This is really an obvious choice.
Boots - War Traveler's - The +MF% Is amazing. The obvious choice for an MFer's boots.
Inventory - Annihilus Small Charm - If you can, get one with 15+ attributes, and 15+ resistances. What you need here depends on how close to perfect the rest of your items are.
Inventory - Gheed's Fortune Grand Charm - This charm will increase our MF tons. Even a low one will increase your MF more than 3x 7mfsc's. Not to mention the decreased vendor prices and increased gold find will make sure we can always repair our expensive runewords (Enigma, HOTO) without having fear for running out of gold.
Inventory - Tome of Town Portal - What bot is any good if it can't get back to town? How do you rush someone if you can't put up a portal so they can get back to you?
Inventory - Tome of Identify - This will help us ID items on the spot without having to purchase id scrolls each time.
Inventory - Keys - Keys only really help you if you're botting meph and have it open the uber chest.
Inventory - Small Charm of Good Luck - More commonly known as the 7mfsc, as they increase your MF by 7%. If they have a second mod, even better. If you can get some that also have +res, good for you! Get 15 of these if you'll have Keys, 16 of these otherwise.
Mercenary / Head Wear - Vampire Gaze Grim Helm - Upgrade this, and try and get one with good stats. The life steal and damage reduction are really what we're using this for.
Mercenary / Body Armor - Shafstop Mesh Armor - Upgrade this as well. We're mainly using this for the +life and the damage reduction bonus it gives. Leviathan Kraken Shell is an amazing alternative to this, but can be quite expensive.
Mercenary / Weapon - Insight - I put this in an Ethereal Colossus Voulge. This has high damage, and gives him the meditation aura. As long as he is near, you can teleport and cast hammers almost infinitively.
Socket the armor/helm with a Fal Rune (+10 str) if your mercenary doesn't have enough strength to use the Insight Colossus Voulge. Socket with Um Runes otherwise.
2.4 - The Changes
Here we go, the section that most of you have been waiting for. Let's begin.
For MF Botting:
Keep the same.
For Baal Botting / DClone Hunting / Rushing:
Nagelring Ring -> 10% fcr rings
For Duelling:
Nagelring Ring -> 10% fcr rings
Gheed's Fortune Grand Charm -> Stash
Small Charm of Good Luck -> Stash
Tome of Town Portal -> Stash
Tome of Town Identify -> Stash
Keys -> Stash
Stash -> Lion Branded Grand Charms (10x)
Stash -> Small Charm of Vita (9x)
3.1 - The Variations
Many people will tell you to use a Wizard Spike. The only things a Wizard Spike has over a HOTO, is the resistance bonus and a slightly higher faster cast rate, but the HOTO also gives +3 skills. Even if you use a Wizard Spike and 2x 10% fcr rings, you still won't hit the next fcr breakpoint. As for resistances, consider this.
37 (HOTO) + 25 (Mara's) + 30 (Anya quest) + 68 (HoZ with a perfect diamond) + 15 (Annihilus) - 100 (Hell Penalty) = 75.
With average gear, you still have full resistances in hell. Most of the items you have will be above average anyway. Why sacrifice so much for a wizard spike?
Some people will tell you to use Chance Guards, but those aren't worth it. Switching to them might increase your MF, but it would make it so you don't hit the much needed fcr breakpoint. Also, you lose the nice mana regen bonus.


Shout-Out
User Tag List
Thread: Guide of a Hammerdin
Results 1 to 4 of 4
-
08-09-2008 #1
 Member
- Reputation
- 9
- Join Date
- Jan 2007
- Posts
- 46
- Thanks G/R
- 0/0
- Trade Feedback
- 0 (0%)
- Mentioned
- 0 Post(s)
- Tagged
- 0 Thread(s)
Guide of a Hammerdin

-
08-10-2008 #2
 Member
- Reputation
- 7
- Join Date
- Sep 2007
- Posts
- 11
- Thanks G/R
- 0/0
- Trade Feedback
- 0 (0%)
- Mentioned
- 0 Post(s)
- Tagged
- 0 Thread(s)
Since I'm a leecher people won't pay my comment much thought.
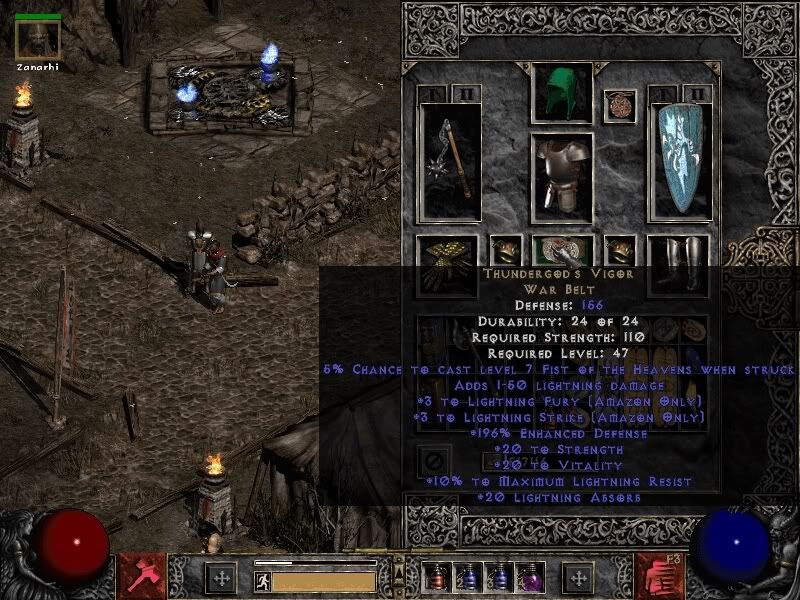
I was a level 91 Hammerdin on the second or third ladder, can't remember it's been a long time. When I dealt with the Souls for Baal runs, I used a Thundergod's Vigor to mitigate their damage. In a full game I would not have to use a potion on souls as their lightning would just heal off the damage. Just my two cents, I have Arachnid Mesh when I need to do anything else. =)
EDIT: UGH, and I forgot to say GOOD GUIDE! /slapself
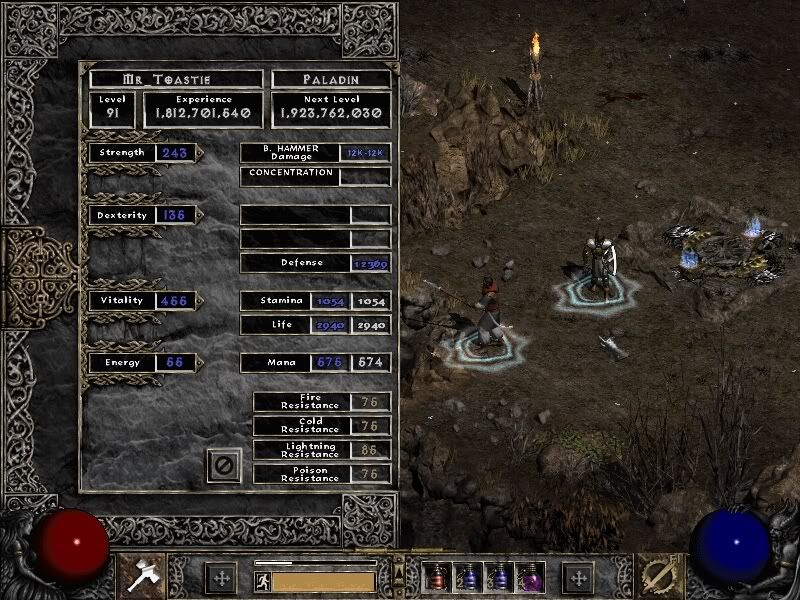
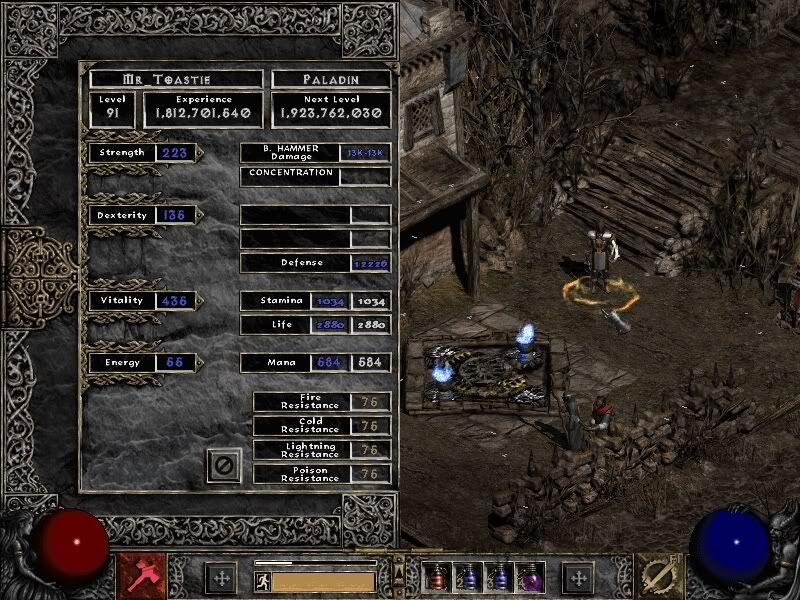
Added some pictures also. First one is Thundergod's Vigor. Second one is my stats with it equipped. Third one is my stats with Arachnid mesh.
Note: My gear, life, armor, vitality and damage aren't perfect, I didn't get that much into min/MAXing and just went with what I could. It was my FIRST character too, be kind. T_T
EDIT #4372943279: I have pics of my other gear on request. =3
Last edited by Toastie; 08-10-2008 at 09:48 PM.
-
08-18-2008 #3
Member
- Reputation
- 9
- Join Date
- Jan 2007
- Posts
- 46
- Thanks G/R
- 0/0
- Trade Feedback
- 0 (0%)
- Mentioned
- 0 Post(s)
- Tagged
- 0 Thread(s)
i will post pictures of my 96 hammerdin in a sec, it runs as a baal bot and mf'ing.
---------------------------------------------

---------------------------------------------
My gear is following:
HOTO 40 FCS / 30 Res
SHARKO Ist
Mara 29 Res
Enigma Archon Plate
Zaka 10MF / 15 Res JEWEL
Wartravelers 50MF
2x Stone of Jordan
Magefist
Arachnid Mesh
Switch:
CTA 2/6/3
SPIRIT 33% FCS
Stash:
TOURCH 19 All Atri / 18 Res
ANNI 14 All Atri / 20 Res / 8% More EXP
GHEED 27MF / 15 Less Vendor Price <-- (CHEAPER REPAIR!)
8x 7MF / 5Res SMALL CHARMS
6x 7MF SMALL CHARMSLast edited by SadPanda; 08-18-2008 at 07:34 AM.
-
09-29-2008 #4
Active Member

- Reputation
- 58
- Join Date
- Aug 2006
- Posts
- 802
- Thanks G/R
- 1/12
- Trade Feedback
- 0 (0%)
- Mentioned
- 0 Post(s)
- Tagged
- 0 Thread(s)
Was a nice guide. Pritty much knew all of the stuff, just nice to see other have the same idea for a hammerdin as yourself
 +rep still

 Reply With Quote
Similar Threads
-
Small Addition to the Hammerdin Guide
By Ashmund in forum Diablo 2Replies: 1Last Post: 07-04-2009, 12:45 PM -
Diablo2 hammerdin guide just skills
By dead4113 in forum Diablo 2Replies: 6Last Post: 09-09-2008, 11:23 AM -
1-60 Horde Leveling Guide w/ Quests
By Matt in forum World of Warcraft GuidesReplies: 23Last Post: 04-17-2007, 07:26 PM -
Blackwing Lair: Ultimate Boss Guide
By Matt in forum World of Warcraft GuidesReplies: 11Last Post: 11-02-2006, 05:18 AM -
8 World of Warcraft Guide Packs (Gold, Profs and Skills)
By Matt in forum World of Warcraft GuidesReplies: 17Last Post: 09-23-2006, 10:53 AM
-
OwnedCore Forums
casino news World of Warcraft Pokemon GO MMO Overwatch RTS Casino reviews bc game bc game bc game bc game bc game bc game bc game bc game bc game bc game bc game bc game bc game bc game bc game bc game bc game bc game bc game bc game bc game bc game bc game bc game bc game bc game bc game bc game bc game bc game bc game bc game bc game bc game bc game bc game bc game bc game bc game bc game bc game bc game bc game bc game bc game bc game bc game bc game bc game bc game bc game -
casino
Casino Gambling Online casinos Casino en ligne bc game bc game bc game bc game bc game bc game bc game bc game bc game bc game bc game no deposit bonus codes roobet Top 10 Casinos Casino reviews Bitcoin casino Paypal Casino Lucky8 1xbit heycasino ✅Platinum Play Casino ⭐ Bitstarz Casino - ✅Gamdom casino - 15% Magical Spin Casino - ⭐ Lucky8 Bonus sans How Do We Choose the Top 5 Casino Slots Live Casinos - Best Live ✅Book of Dead Machine -
CoreCoins
CoreCoins CoreCoins FAQ Shout-Out Banner Ads -
My OwnedCore
My Profile Notifications Settings Buy CoreCoins About Us


Privacy Policy | Cookie Policy | Terms | Contact Us
Available Payment Methods:-


-
Casino
Lucky8 | Mystake Casino | Casino deposit offers | Bc Game | InstantPay | Cresus Casino | PalmSlots Casino | Slot machines | Bovada casino | Welcome Bonuses | Casobet | ZenCasino | Casino | MrGreen | Oshi Casino | Bitstarz | Drake Casino | NeedForSpin | How to Play BlackJack Online | Casino Bonus | Jackpotcity | Rollino Casino | Stake Casino | BitCasino | No deposit bonus | Lucky Dreams Casino | Betflip Casino | Sportsbook | USA CASINO