![[Guide] Toyoka's General Guide to World Building](https://www.ownedcore.com/forums/images/styles/OwnedCoreFX/addimg/menu4.svg)
Forenote: I am aware that there is a similar guide out there made by Fault. This guide here is a more up-to-date and user-friendly version (it does not contain anything from Faulta’s guide by intention, for I have not read his guide, merely skimmed through it to see if mine was too similar – which it is not!).
.;'~[o]: Toyoka's General Guide To World Building :[o]~';.
Welcome to my topic on world building (my first "official" topic)! This guide will cover several essential concepts of world building such as: creating the land you want to start editing, moulding that land to your liking, texturing, and much more (which means it will be a large wall of text, you’ve been warned!)! The thread includes pictures to aid the reader and to ensure full understanding. If for some reason something is unclear, do not hesitate to post in the topic or PM me (Toyoka) about it and I'll do my best to make the guide more understandable!
Table of Contents:
Note: Hold Ctrl+F and type in the code corresponding to the section of your choosing (ie. Typing in { 2b. } will bring you to "Moulding Mishaps"). You must type the FULL code - including the "{ }/[ ]"s - in order to have the best result!. The codes below are insured to be used only for sections (and not seen in the format posted below if they are mentioned otherwise) so you will not have any difficulty getting to your desired section (for example, if you were looking for section { 4b. } it will only be mentioned as so in the table of contents and in the title of the section, while within a section it will be mentioned as "Section 4 B").
~[+]---( Intro )
~[1.]-----( Creating the Landscape )
~[2a.]-----( Moulding the Landscape )
~`{2b.}-------( Moulding Mishaps )
~[3a.]-----( Texturing the Landscape )
~`{3b.}-------( Matching/Contrasting Landscape Textures )
~[4a.]-----( Adding Objects )
~`{4b.}-------( Matching Objects to Theme )
~[5.]-----( Adding Water )
~[6.]-----( Refining Your Work / Extra Details )
~[7.]-----( Compiling and Releasing to the Public )
~[-]---( Outro )
Alright, let’s get started then!
~ [+] Intro
Welcome to my general guide to world building! It is assumed you are here to learn how to do some world building (or just like to read my guide for any reason what-so-ever). Now despite what people may have told you, world building IS something you can pick up and do without any experience! But you cannot build worlds without tools (and practice)! So I have taken the liberty of create a package of all the publicly-available essential tools needed to start world building. It is for the sake of missing files/bad download links that I have put all the files into a package instead of hosting them one-by-one. If you already have certain files, then simply ignore those files and extract the rest into the same folder as your other tools or into a new folder, your choice.
Note: Some of the tools included in the package have alternatives (ie. Noggit and YiasEdit are two different world editors). You can choose to use one or the other, but it is recommended to try out all tools possible to get a good grip on the different techniques possible and the limitations of the different editors, so be sure to try them all out (sometimes it may even be required to use one tool over another at certain times)!
Downloads:
2 Mirrors for each file
~ Just the tools package (Rapidshare) ~
~ Just the tools package (Megaupload) ~
~
~ Tools + guide for offline use (Rapidshare) ~
~ Tools + guide for offline use (Megaupload) ~
*Tip: Any programs that do not work (either in Vista or Win7) may need administrative access so make sure to allow any and all programs in the package to be used as an administrator.
*Thanks Builtokill for the information!
Alright, now that we have our tools, let us start building our world!
~ [1.] Creating the Landscape
So now it's time to create the land we want to build upon. But you can't just simply start up an editor and begin creating stuff (that is, unless you want to edit existing landscape – skip to Section 2 A if that is what you want). First we need something called an .ADT file which is what needs to be edited. An .ADT is a World Terrain file which is basically one 16x16 square area of the world map that you can edit. You can have multiple .ADTs connected to each other for a bigger landscape.
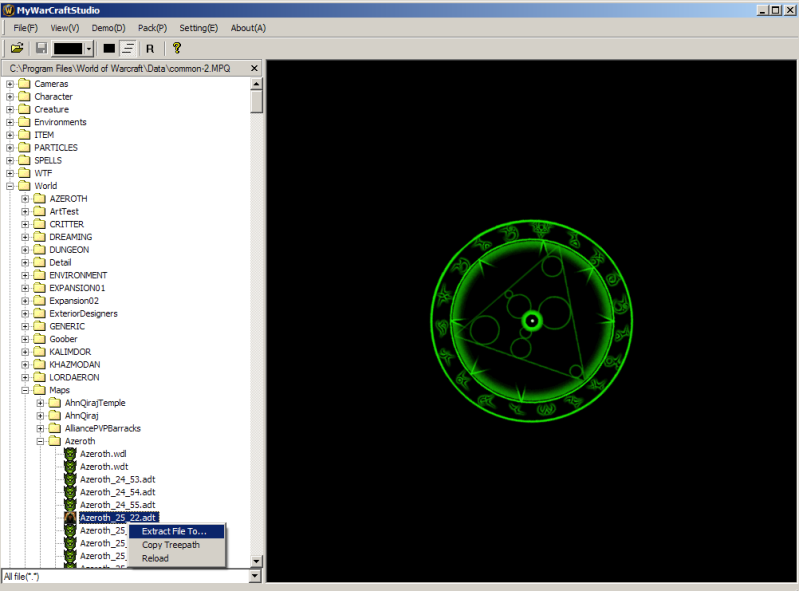
So, how do we go about getting an .ADT file? Easy! First we need to extract one from a file located in your “World of Warcraft/Data” folder with a program called MyWarCraftStudio (will be abbreviated to MWCS from now forth). Now, we can’t just go and extract any .ADT willy-nilly (ok.. we can, but we won’t)! You need to find the right .ADT to suit your needs. If you want a flat piece of terrain so as to start moulding from scratch, find one while looking through the NoggIt or YiasEdit editor and copy down it’s “tile” number (for example let’s say; 25,22). Do not worry if it’s textured (which it probably is), you can change it to whatever texture(s) you want later on.
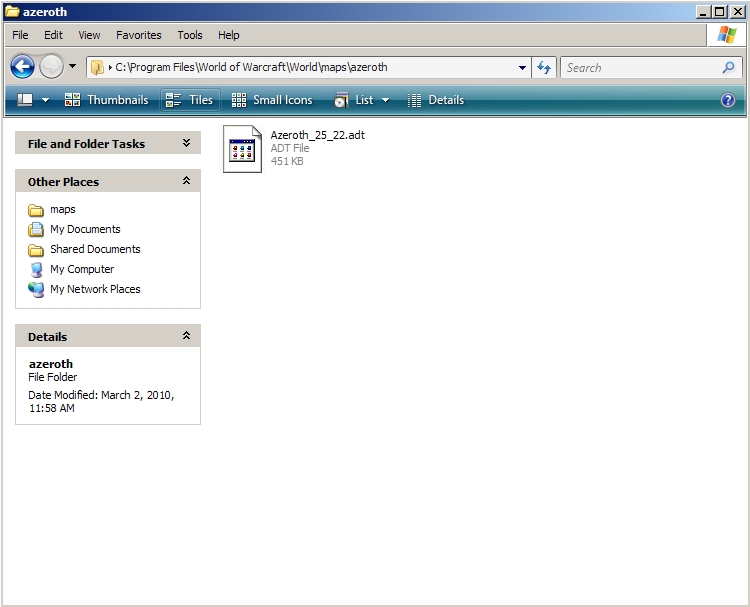
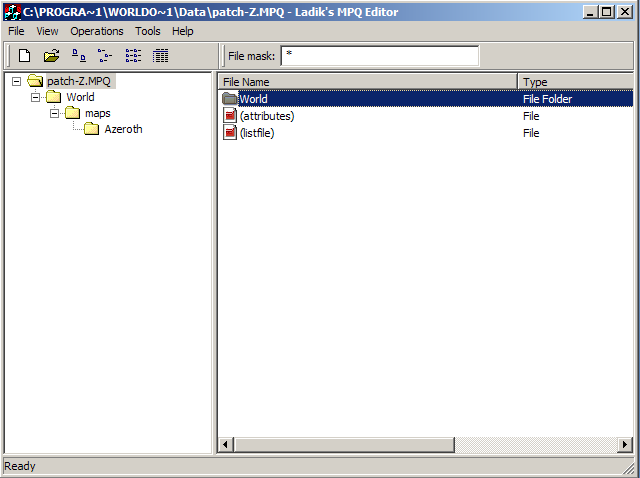
Alright, now that we have an .ADT in mind, open MWCS and then open common-2.MPQ (File -> Open MPQ Archive). Make sure that at the bottom left, “All file(*.*)” is selected, this is very important! Now we need to find that .ADT we wanted, so open the directory (folder) that appears like so: “World -> Maps” and then either find and choose Azeroth or Kalimdor and then locate the .ADT file you wanted. It’s time to extract! Right-click the file, and click on “Extract File To” and then put that file into the following directory: “World of Warcraft\World\maps\azeroth” (replace Azeroth with Kalimdor if you are using a Kalimdor .ADT file). Do not worry if there is no such directory, create it!
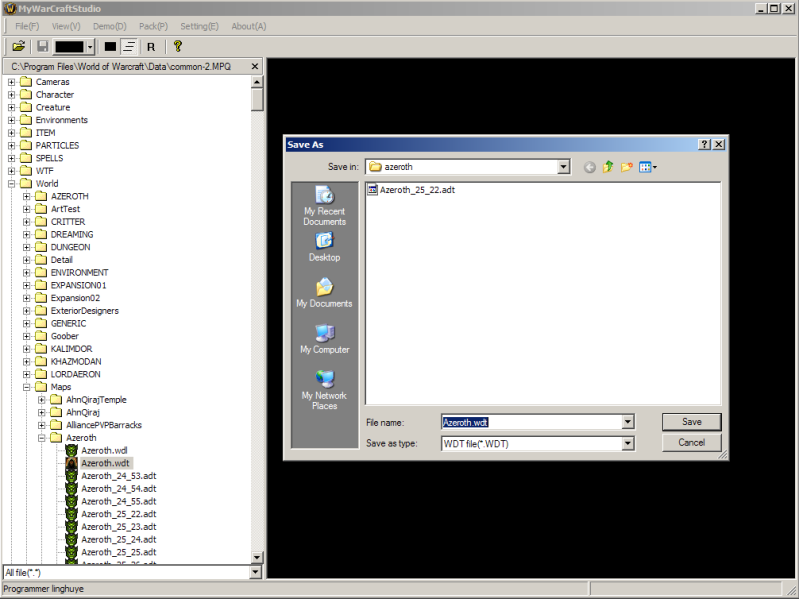
Why is it that we need this, you ask? Why can’t I just put this file anywhere I want, you say? Well the simple answer is that any file you extract from an .MPQ file must be placed in the exact same “treepath” (fancy word for directory of the file) as it was placed in the .MPQ because that is how most world editors are able to read the extracted file for it to be able to be edited (we will be working with .MPQs later on). But wait, we are missing something, aren’t we? Yes, we also need a .WDT file to be able to edit the terrain! Woah, slow down! What is a .WDT file?! Well… a .WDT file is the data file for the .ADTs which allows the .adt to show up in-game and in-editor, and thus, without this the .ADT cannot be edited!
Do the same as what you did with the .ADT file; locate and extract to the same directory. The .WDT file corresponds with the location you are using. So if you are using Azeroth as your location, then extract the Azeroth.wdt file (it should be the second file within the continent’s directory).
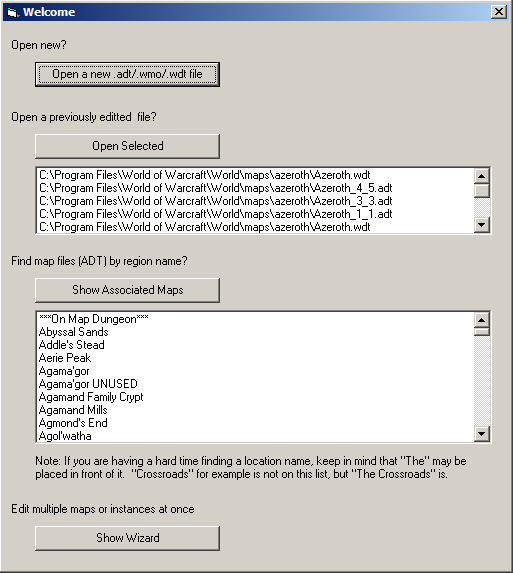
Now you may think we’re done, but you’re wrong! We still have a couple steps to go! Even though we have our .ADT file, we still don’t have a custom area of our own to be able to edit! What we need to do now is have that custom area actually viewable and usable within the editor. Which means; the use of a new tool, WoWMapEditor! Start by opening WoWME.exe within the WoWMapEditor folder and press “Ok” when it prompts you. Now we come to a window like so:
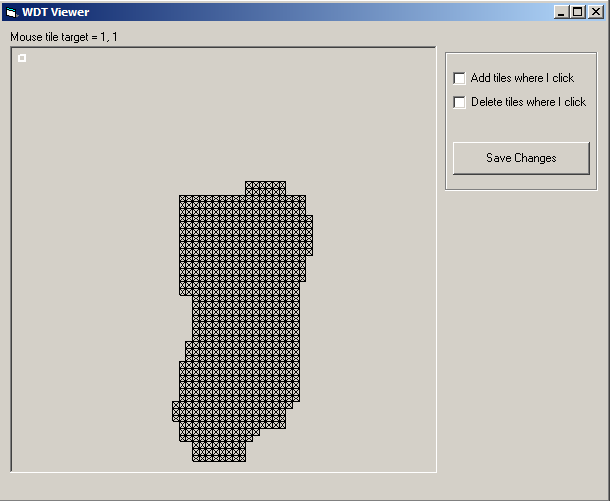
There are a bunch of buttons, but you only need to worry about the one at the very top; “Open a new .adt/.wmo/.wdt file”. Alright, press the button and you shall see that it opens up to the directory containing your .WDT and .ADT files that you extracted earlier (if the directory is different, then locate to the above-mentioned directory). Open the .WDT file and you should see something like this:
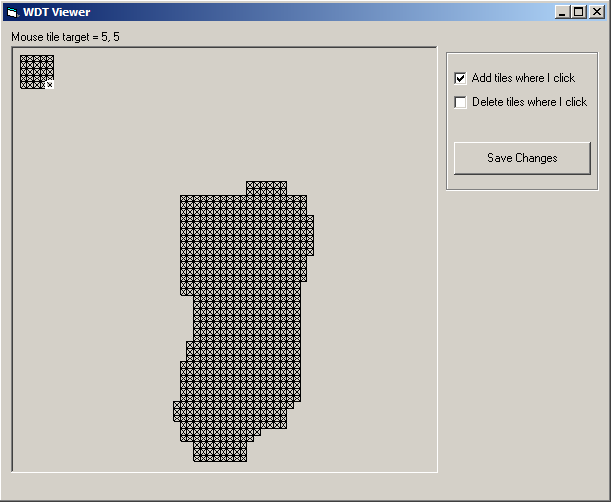
Each of those squares represents one .ADT and when you mouse over them, several numbers appear near the top left; this set of co-ordinates represents the .ADT tile number. Now there are three options on the right, which are pretty much self-explanatory. You probably want to add .ADTs in a secluded place like so, although, the choice is up to you:
Although, it is probably not recommended to put .ADTs too close to the corner (like I have done), depending on whether you mind seeing the cut-off point of your custom land in-game or not. Of course, this depends how large you’re making your area. It is possible to fix this with some tweaking of the .WDT and such but it’s best to do it right the first time!
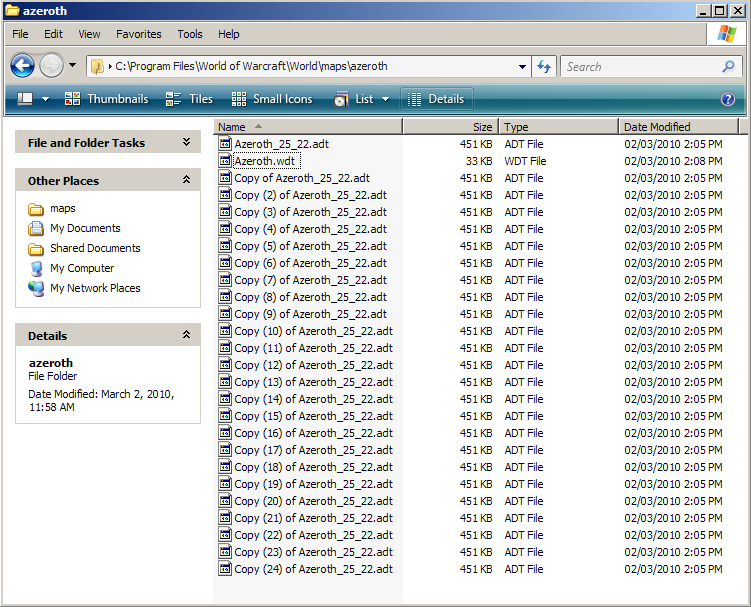
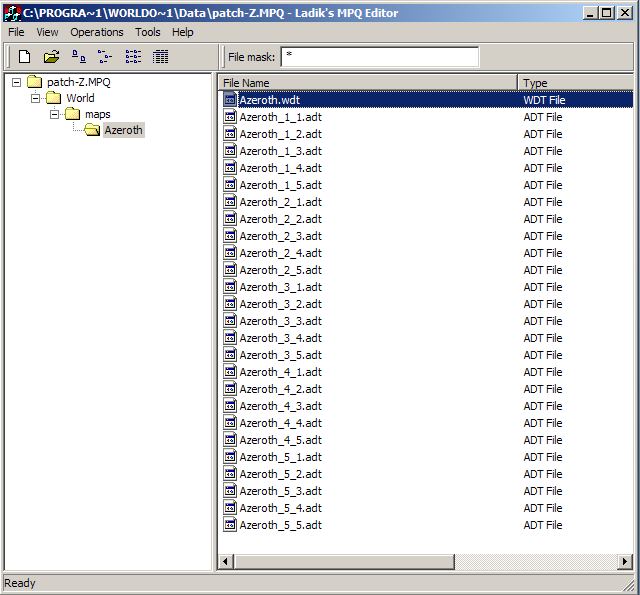
Anyway, once you have added the number of .ADT squares you wanted, keep in mind the co-ordinate numbers of each of those .ADT squares! Save your changes (leave the save path the same, do not change anything) and then it’s time to do some file renaming! Go to that directory where you extracted that .ADT file and copy it as many times as you added squares for the .WDT (minus one because you are also using the original file). So if you added 25 squares, copy the file 24 times so you have 25 files.
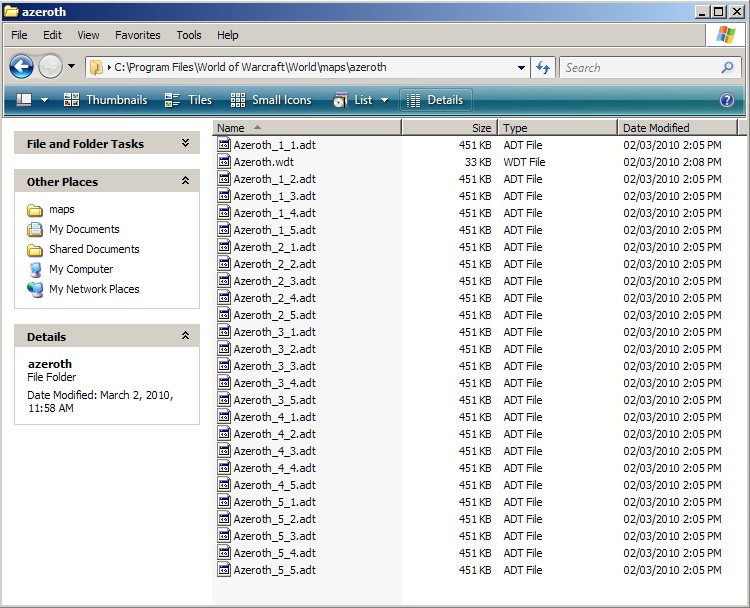
Now, remember those co-ordinates for the .ADT squares you have? Right, it’s time to put them to good use. Rename the files you copied (including the original) to the same co-ordinates as the ones you created within the .WDT. For example, my .ADTs would be renamed to such; Azeroth_1_1.adt, Azeroth_1_2.adt, etc. up to Azeroth_5_5.adt.
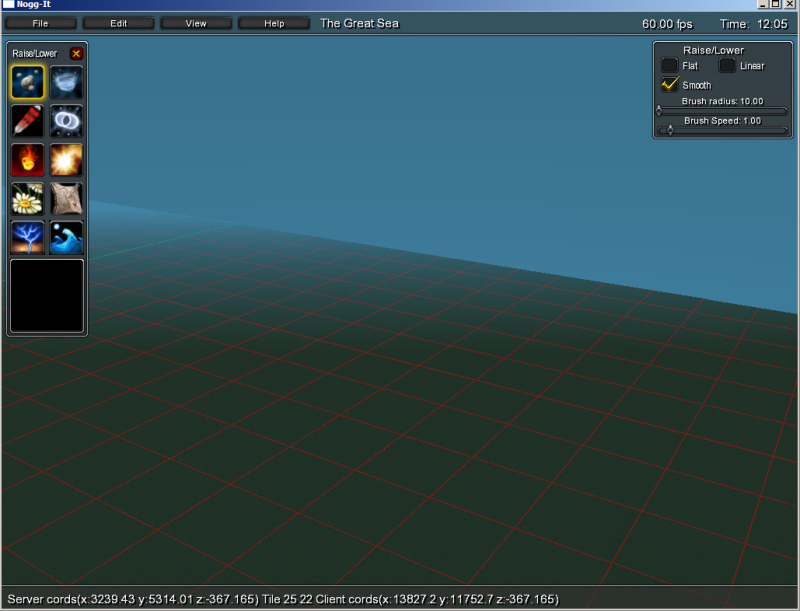
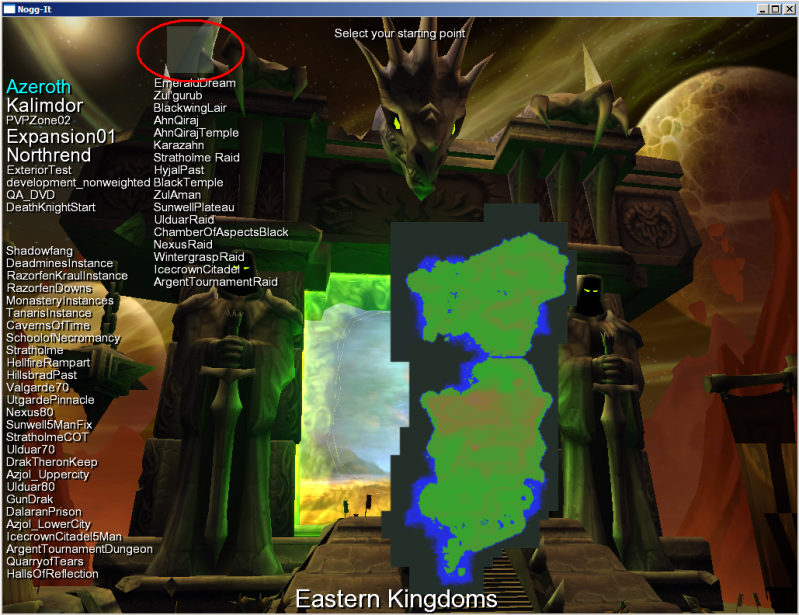
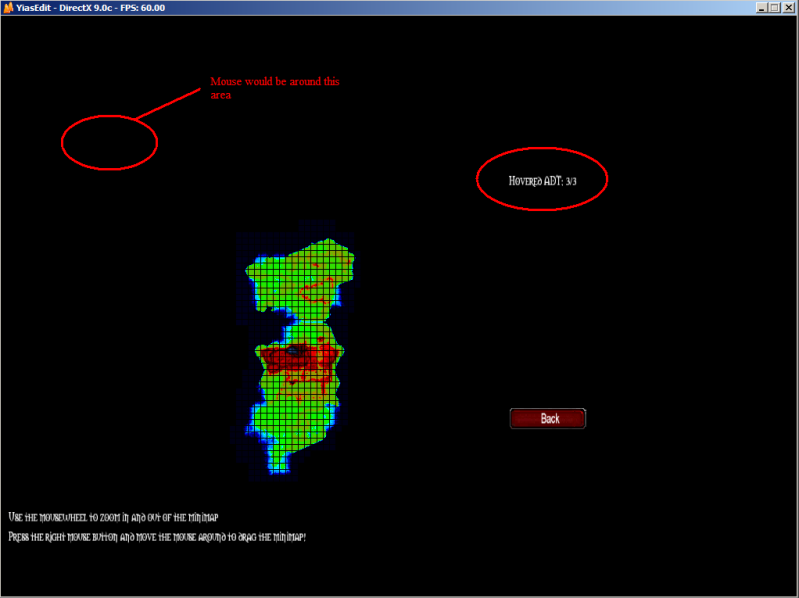
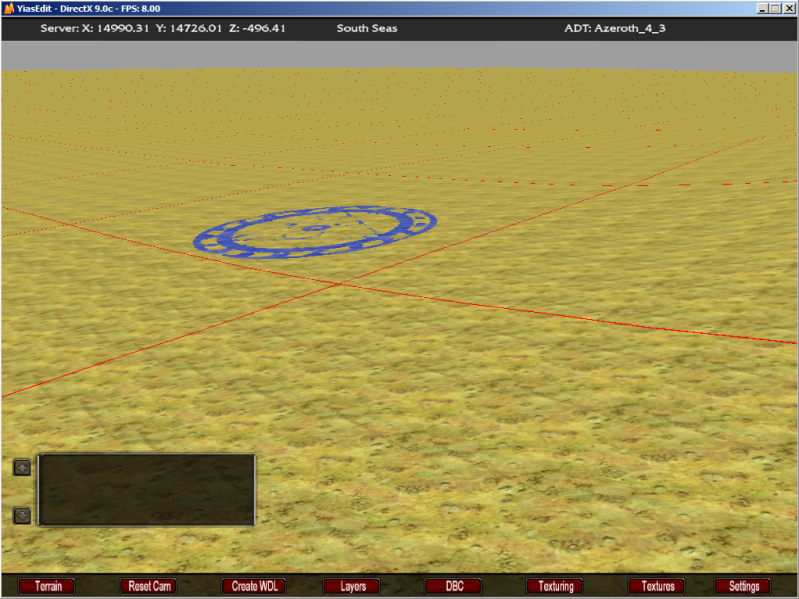
We’re almost done! But we also need to use a new tool to finish the job! This one is called OffsetFix.exe, located in the CryectTools folder of the package. It is used to… well… fix the “offset” (location) of the .ADTs to that of the .WDT’s location so that they appear correctly in the editor and later, in-game. All you have to do is open the directory where you have your .ADTs, and have the folder with OffsetFix.exe opened as well and drag each .ADT over OffsetFix.exe one by one. Now you’re done! Open one of the editors and navigate to the Azeroth map(or Kalimdor, depending on which one you used). You should see a white shape like so in Noggit, where ever you placed your .ADTs within the .WDT (in YiasEdit you just need to copy the “World” folder from the World of Warcraft directory to the save folder in YiasEdit and then open the program and find the right .ADT co-ordinates). Depending on the background of the Noggit editor when it starts up, and where you placed your .ADTs, it may be harder to see:
As seen in Noggit:
Co-ords in YiasEdit:
Congratulations, you have successfully created your own custom landscape!
Now on to Section 2. Thankfully, not such a wall-of-text as Section 1!
~[2a.] Moulding the Landscape
Ah yes, now it’s time to spice up the landscape you created earlier (or any other existing landscape you might wish to edit to your liking)! You will probably find this the most fun part of world building as you can let your imagination go wild. Whichever editor you choose is up to you since both editors have similar functions. At this point in world building, you will spend a lot of time within the editor, and little time using the other programs.
This section is short since most of your moulding will happen within one editor (and you will be using your imagination, not mine
Remember this; the more professional your creation, the better the feedback you will get in the end.
Sometimes mistakes can be turned into great ideas so don’t feel bad if something doesn’t look too realistic or natural! On the other hand, certain mistakes can make your creation look very unprofessional and sometimes even ruin it completely. Which brings us to Section 2 B!
~’[2b.] Moulding Mishaps
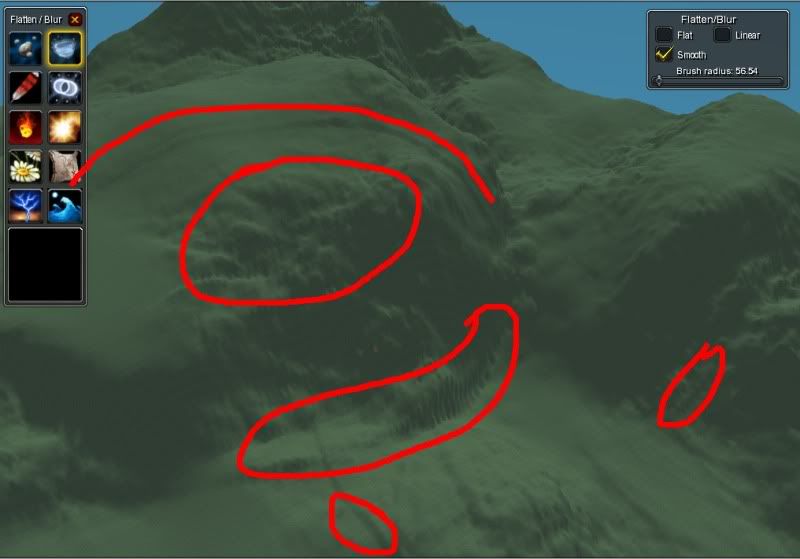
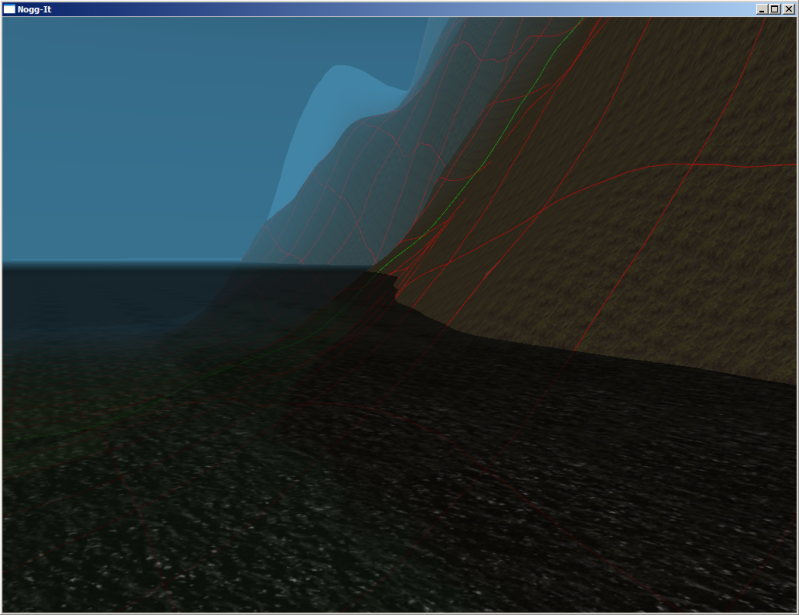
You’re moulding your landscape and then – UH OH – this happens!
There is no need to panic! This can happen often (although, perhaps not at such a size) and is easily fixable within the editor of your choosing. There are several “ghetto” ways of solving this problem so I will teach you some.
Whenever you see a rip like that, it is because at some point you used a brush that is too large, between one .ADT, and another which your camera does not see because of fog. Sometimes it may happen at random or with bad brushwork. An easy way to fix this is to lower your brush size to about half (depending on how big it is, you should keep it at around a radius of 10-20), and change from raise/lower to blur. The blur mode kind-of “sews” the two .ADTs/.ADT chunks back together. Depending on the size/speed/strength of the blur (and how large the rip is) it may take longer to fix. It also gradually flattens any mountains you attempted to create, so use it sparingly (if it requires that you need a small brush and it takes a long time, so be it). There is also another way of fixing this with lesser complications using YiasEdit.
The technique mentioned above is more commonly used in NoggIt, but in YiasEdit, there is an even easier way! Simply take your brush, change to flatten and put it in between (or as long as the brush occupies) the two chunks/.ADTs and click. The rip should automatically sew itself from one chunk/.ADT to the other!
Our second mishap occurs when we are too quick with our moulding or are moving large brushes too quickly and we end up getting spikes (otherwise known as the “zipper” effect) on our terrain. This can also be accompanied by circles which are caused by having a brush on one spot too long, which looks unnatural. Here’s an example:
This one is much easier to fix and it also uses the same technique as the one above; use blur (or flatten)! Depending on how large/serious the spikes, it can flatten your mounds (pun not intended) more than you would like. Also, it may be hard at times to see if the spikes are cleared up or not, so it’s best to turn on height lines. If you see that the height lines are jagged and bumpy, then it’s time to do some blurring!
It is unlikely that there are any more types of mishaps unless you are doing something unorthodox with your landscape!
Now that we’re done with moulding, it’s time to texture! Section 3 A, here we come!
~[3a.] Texturing the Landscape
People usually start out by using several base textures for different parts of their landscape, which they later put detail onto:
Texturing is also commonly used in conjunction with moulding. But then again, that is not always the case. Depending on what you are trying to create, texturing may even be done before moulding! The creation of mountains, for example, could be done with texturing first (to decide where the land will rise and where the dirt will show) and then the moulding process after that. Of course, this is all preference. Everyone has their own way of creating their landscape and that is perfectly fine!
It is also frowned upon to rush your work if you plan on releasing it, so take your time! Unless you are working for a studio and are on a deadline of some sort (even then, it would be unwise to rush), there is no need to rush your work. Some area changes and world builds can even take up to several weeks (even months) to create! They may not even be the best creations but they sure look a lot better than a rushed edit. That is about it for the basics of texturing. There are hundreds of textures in World of Warcraft so mixing and matching them can create limitless potential…! Mmm… yes…. limitlessssss…. potentiaaaalllll…….
[spoiler]
[/spoiler]
*Ahem*… Right, on to our next topic; matching and contrasting landscape textures – Section 3 B.
~’[3b.] Matching/Contrasting Landscape Textures
Texturing is pretty much self-taught, with the exception of contrast and matching textures. It is absolutely important to note that textures look better with a certain theme! If you see a purple texture that looks really cool and a green texture that also looks really cool and you’re doing a remake of – say – Elwynn or something, it wouldn’t really be a wise idea to put the two textures together around blue buildings and such. This is one example of many which can lead to an unprofessional-looking landscape.
This is but a short section explaining the contrasting and matching of textures. As mentioned before, it is REALLY important to stick to a theme. The textures you may find may look epic and awesome but if they don’t fit your idea, don’t bother using them. It’s also a very good idea to take inspiration from the professionals; look at how Blizzard does their texture work. Look at the colors, the tones, the opacity, the feel, and the emotion… all of this makes up a good looking area! Don’t forget, you will also be adding doodads and other objects to your area to make it livelier, so theme is really… really important – stick with it!
[spoiler]
[/spoiler]
Alright, so you want to make – for example – a beautiful, peaceful area. How do we go about doing this? Well... we need to know several things first; what kind of “season” will this area invoke (this is to narrow down the textures to one type of “season” so you don’t end up having multiple texture types in one area, which will kill the theme – a season being; dry, cold, warm, etc.)? And what type of details will be placed (trees and such – you don’t want a dry landscape with lush greenery growing out of it, that just doesn’t look right!)?
Right. So if you’re going for – say – a warm season, you want something that looks like Orgrimmar; dry rocky textures, lots of orange and brown. Or if you’re going for a cooler season like Winterspring, you want lots of white, blue, gray, and maybe some purple. I think you get the point by now since this is pretty straight-forward, so let’s move on to the next section.
~[4a.] Adding Objects
Objects are an essential part of your landscape. They bring life and sentience. Even the most desolate places (such as... Desolace) have some sort of objects in them representing life (or lack thereof). Look outside your window and what do you see? Houses, trees, grass, bushes, cars, etc. By adding objects to your land, you will inform the adventurer who stumbles upon it of what kind of creatures live in that landscape. For example, If you add a little hut beside the shore of a beach, players will expect murlocs. Or if you add a moonwell into a forest, players would expect Night Elves. Again, pretty straight-forward stuff. Now, when you add objects, remember that important rule; stick to the theme! It may be hard to pick out objects for a certain piece of landscape but you must be diligent. It is very easy to give up at this point and that’s not what you’re here for, right?
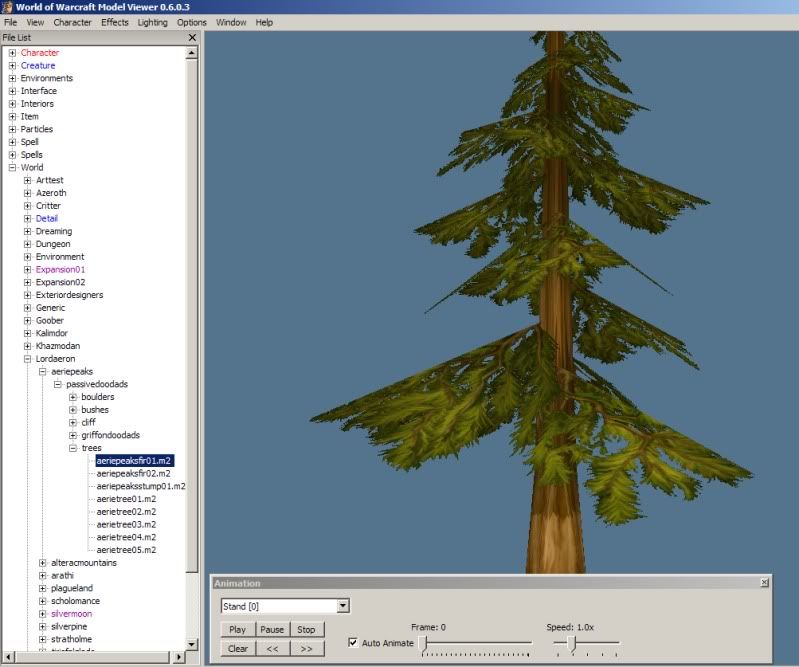
Ok so you want to put in your first object onto your landscape, how do we do this? Well, here goes. First you need to know what object(s) you want. To do so, open up WoWModelViewer(WoWMV) and expand the “World” file (should be the last one on the File List). Now look through any of the files there (Arttest, Azeroth, Expansion01, etc.) and find a model you would like to use.
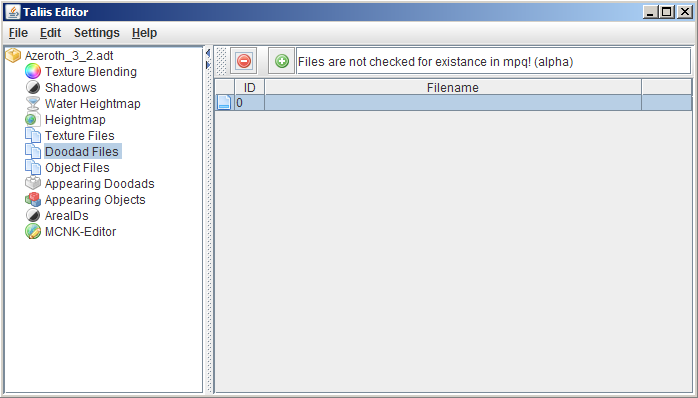
Now that we have a model in mind, write down the treepath of the model. For example, I picked out a model called “aeriepeaksfir01.m2” which is located in “World\Lordaeron\aeriepeaks\passivedoodads\trees” so I copy this location (including the file name with it) and change the file name’s extension from .m2 to .mdx (because that’s how the editor reads it) so it looks like this “World\Lordaeron\aeriepeaks\passivedoodads\trees\aeriepeaksfir01.mdx”. Now take/copy this complete treepath and open up Taliis which is located in the package (if it is the first time you open it, you may need to locate your .MPQ files which are located in your World of Warcraft/Data folder). Also be aware that you need Java installed for it to work. You will see a window like this:
Now we want to add an object to our land so open up the .ADT in which you want your object to be placed in by pressing “File” at the top and then “Open”. A new window should automatically open to where you put your .ADTs. If not, then go to the directory. Open up the .ADT in which you want your object to appear in and you should see it appear in the list. Double-click and a bunch of sub-sections will appear. The one you want is “Doodad Files”. Click on it and you should see something appear like so:
Simply paste/type the treepath of the object you want to add, into the textbox beside the “+” button and the click on the “+” button once. A file should appear below it. Now go to “Appearing Doodads” in the sub-sections and click it. You should see something similar to the previous one except there is no text box. Just press the “+” button and a file will appear with scale, x, y, z co-ordinates, etc. Now you’re done! You’ve added your first object to your landscape! Now save your .ADT.
Note: If the model doesn’t appear it could be one of two things:
- The model/it’s tree path was copied/typed incorrectly
- The locations (x,y,z co-ords) of the model are off. To fix this, just go into the editor of your choice and jot down the exact co-ords that you want the model to be in and then use those co-ordinates
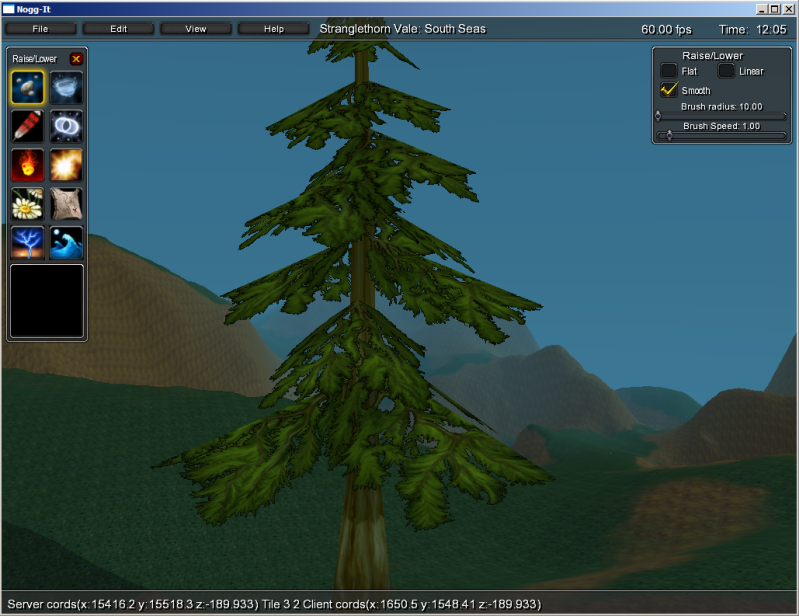
If done correctly, your object should be visible when you check for it in the editor of your choice (like in the above picture). Give yourself a pat on the back, because we’re now finished and going on to the next section!
~’[4b.] Matching Objects to Theme
Repeating what was said earlier; Theme is really important! And that is why you need to stick with it! This section is pretty much self-explanatory because the ‘rule’ has constantly been brought up, and you should never forget it! By now, you should already have chosen objects that complement your textures so for the sake of not wasting any more text, this section ends here.
~[5.] Adding Water
Adding water couldn’t be simpler (ok maybe it could, but not at the moment)! Just open up Taliis within the package provided and choose the .ADT(s) you want to add water to. Next, choose the .ADT(s) within the list and click “Edit” near the top and then go to “Water” and choose the “AllWater” option. A small textbox should open up, so enter the desired water height (z co-ordinate of the water, which you can check within an editor). And that’s about it! Just save your .ADT(s) and you should see the water in-editor (and perhaps in-game as well)!
Note: At the moment, the “AllWater” function is PURELY for aesthetics and should not be used for releases because the water that is created is out-dated (some newer “chunks” were added to water when Wrath of the Lich King came out). There are perhaps tools out there that create usable water but they are most likely not released to the public. If you wish to release something, make sure it’s for patch 2.x.x only, and does not contain any WotLK content. You can try to release something for 3.x.x, but it is not guaranteed to work!
~[6.] Refining Your Work / Extra Details
This may apply to everything you do. For example, while typing up this guide, I skimmed through it a couple times before moving on to the next section. Sometimes what I typed might have been clear or useful at the time, but waiting a day before reading it again gave me a new perspective, and thus I tweaked it until it got better and better.
This can be attributed to world building as well. Don’t just settle on your landscape and call it finished, without looking through it more than once. Sometimes you may have different moods on different days, allowing you to see one perspective but not another. This is a very neat trick and not many people tend to have the resilience to try this out and just release their work as is.
This tactic can help you become your own critique and give you a better sense of how you work and how you can improve yourself. Alan Miller – a pioneering and influential figure in the video game industry – remarked that 90% of the time spent (on creating game content) is on the last 5% of the details, which is very true in many cases. Especially in the case of creating a world or landscape!
~[7.] Compiling and Releasing to the Public
So now you’re finished your landscape and are absolutely sure you want to release it. Now is the time you’ve been waiting for! If you plan on releasing the actual content, again, be sure that it is absolutely 100% done (unless you intend on releasing several versions). If you just plan on releasing screenshots, then by all means do your best to take good shots!
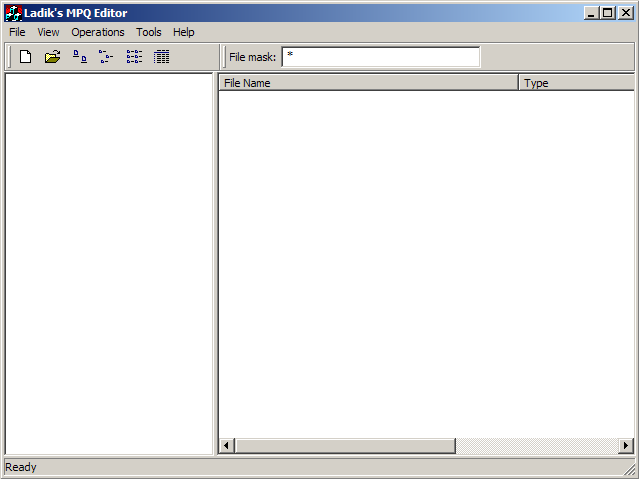
Anyway, in order to have others be able to play on our landscape, we need to create an .MPQ patch file. First step; Open MPQEditor found inside ‘Ladik’s MPQEditor’ folder within the package and a window will pop up like so:
What we’re going to do now is create a new .MPQ archive so go ahead and press on the white paper sheet below the “File” tab. Another window pops up, which asks to specify the .MPQ’s name. Name it patch-‘# or Letter’ (replace ‘# or Letter’ with a number between 0 and 9 or a letter between A and Z – make absolutely sure that there are no other patch files with the name you chose) and then click ‘Next’. Leave the option at ‘Create an empty MPQ archive’ and click ‘Next’ again. Leave the hash table number as it is (the MPQ file’s default hash number can hold your landscape well enough plus much more, so don’t worry about that) and click ‘Next’ once again. Two options come up, click both of them and press ‘Next’ one last time. Then click ‘Finish’.
Now we have ourselves an empty .MPQ file. We need to add the files, but wait; they need to be in the correct treepath in order for the landscape to appear in-game correctly!
Right-click the newly created archive folder within the list and choose ‘New Folder’. We need to recreate the treepath for the files, for them to be read correctly by the game. The end result should look like this:
Now to add the files; right click on the last folder (Azeroth or Kalimdor, depending on which one you’re using for your landscape) and click ‘Add File(s)’. Locate your .ADTs and .WDT and open them all at once by group-selecting them. A window will pop up labelled ‘Rules for adding files to MPQ’ change the compression library near the bottom to “Zlib” and click ok. You’re done! You should see your files within the Azeroth/Kalimdor folder like so:
Now just close the program (don’t worry, your .MPQ file is already created, no need to save or anything) and take the .MPQ file from ‘Ladik’s MPQ Editor’ folder and move it to your ‘World of Warcraft/Data’ directory. Now you can test it in-game! If you have a private server or are a GM on a private server, go to the location where you created your landscape and praise yourself for such an accomplishment. Well done! You’ve successfully moulded, textured, detailed and added your landscape into the World of Warcraft!
Now for releasing; upload your .MPQ onto any website (Rapidshare, for example) and link it! If you’re running your own server, make sure to let your players know that they need to download the .MPQ file as well, before they are allowed access to your awesome new custom area!
~[-] Outro
I hope you enjoyed my guide and learned a thing or two from it (or perhaps more, however knowledgeable you are on the subject of world building) and thank you for your time. If there is anything you feel needs a change, don’t hesitate to message me privately or post it out in the open, in this thread.
Note: This guide is subject to change without notice (otherwise, an “**UPDATE**” post will occur following any features which have been added/changed/removed) and/or as new tools/techniques are created and old ones become obsolete. Comments and constructive criticism is always appreciated! Pictures are used when and where I see fit. If for some reason something is unclear and requires a picture for explanation, such a picture will be added if the request is reasonable. Good luck on your World of Warcraft world building endeavours!
Special thanks goes out to all those who have created their tools for us to use and for those who created their guides for us to learn from. Thank you!
~ Toyoka.

![[Guide] Toyoka's General Guide to World Building](https://www.ownedcore.com/forums/./ocpbanners/1/3/9/6/9/4/8/08b6377e7ee13e5b1d2306cbeed08f8c.png)
![[Guide] Toyoka's General Guide to World Building](https://www.ownedcore.com/assets/mm/images/wits.png "TradeSafe Middleman")
![[Guide] Toyoka's General Guide to World Building](https://www.ownedcore.com/forums/images/styles/OwnedCoreFX/addimg/wicc.png "CoreCoins")

Shout-Out
User Tag List
Results 1 to 15 of 175
-
03-05-2010 #1
 Contributor

- Reputation
- 139
- Join Date
- Nov 2009
- Posts
- 406
- Thanks G/R
- 0/0
- Trade Feedback
- 0 (0%)
- Mentioned
- 0 Post(s)
- Tagged
- 0 Thread(s)
[Guide] Toyoka's General Guide to World Building
Last edited by Xel; 03-29-2013 at 10:59 AM.
~ "When you find it hard doing right in what you do, you've got a problem" ~

![[Guide] Toyoka's General Guide to World Building](https://www.ownedcore.com/images/ba/g/b2.gif)
-
03-08-2010 #2
Contributor
- Reputation
- 139
- Join Date
- Nov 2009
- Posts
- 406
- Thanks G/R
- 0/0
- Trade Feedback
- 0 (0%)
- Mentioned
- 0 Post(s)
- Tagged
- 0 Thread(s)
**UPDATE**
-Fixed some obvious and not-so-obvious errors within the text.
-Added 'Special Thanks'~ "When you find it hard doing right in what you do, you've got a problem" ~
-
03-08-2010 #3
Legendary

- Reputation
- 783
- Join Date
- Mar 2008
- Posts
- 3,377
- Thanks G/R
- 1/2
- Trade Feedback
- 0 (0%)
- Mentioned
- 0 Post(s)
- Tagged
- 0 Thread(s)
Wow. Very nice, a lot of new stuff here (for me at least). Wonderful guide Toyoka!
Freelance Digital Artist
https://reflectionartwork.deviantart.com
You did not desert me
My brothers in arms
-
03-08-2010 #4
Contributor
- Reputation
- 139
- Join Date
- Nov 2009
- Posts
- 406
- Thanks G/R
- 0/0
- Trade Feedback
- 0 (0%)
- Mentioned
- 0 Post(s)
- Tagged
- 0 Thread(s)
Thanks! I hope this guide will help many of those new to model editing and those still learning the ropes.
I may also release some guides on specific elements of world editing/area changing, in the near future!
~ "When you find it hard doing right in what you do, you've got a problem" ~
-
03-08-2010 #5
Master Sergeant
- Reputation
- 20
- Join Date
- Jan 2010
- Posts
- 109
- Thanks G/R
- 0/0
- Trade Feedback
- 0 (0%)
- Mentioned
- 0 Post(s)
- Tagged
- 0 Thread(s)
InstantRep. And I haven't even read half of it.
-
03-08-2010 #6
 Contributor
- Reputation
- 258
- Join Date
- Dec 2007
- Posts
- 1,114
- Thanks G/R
- 0/2
- Trade Feedback
- 0 (0%)
- Mentioned
- 0 Post(s)
- Tagged
- 0 Thread(s)


Finally
 I have been waiting for this mate glad you got it confirmed by the mods!
Of course you receive infinite rep from me
 https://i45.tinypic.com/157df7r.jpg
-
03-08-2010 #7
Contributor
- Reputation
- 139
- Join Date
- Nov 2009
- Posts
- 406
- Thanks G/R
- 0/0
- Trade Feedback
- 0 (0%)
- Mentioned
- 0 Post(s)
- Tagged
- 0 Thread(s)
Heh, thanks guys! I do my best to help others
If anyone has any suggestions to further improve the guide, by all means tell me!~ "When you find it hard doing right in what you do, you've got a problem" ~
-
03-08-2010 #8
Contributor
- Reputation
- 258
- Join Date
- Dec 2007
- Posts
- 1,114
- Thanks G/R
- 0/2
- Trade Feedback
- 0 (0%)
- Mentioned
- 0 Post(s)
- Tagged
- 0 Thread(s)
Well I got a few things you don't have, but I don't want them to end up in the eyes of the public ^^
Other than that I'd say you covered everything to start doing world edits, the rest is mostly an artistic mind and a lot of trial and error.https://i45.tinypic.com/157df7r.jpg
-
03-08-2010 #9
Member
- Reputation
- 1
- Join Date
- Apr 2008
- Posts
- 22
- Thanks G/R
- 0/0
- Trade Feedback
- 0 (0%)
- Mentioned
- 0 Post(s)
- Tagged
- 0 Thread(s)
What is this? EPIX ! Thanks man +rep
-
03-08-2010 #10
Contributor
- Reputation
- 139
- Join Date
- Nov 2009
- Posts
- 406
- Thanks G/R
- 0/0
- Trade Feedback
- 0 (0%)
- Mentioned
- 0 Post(s)
- Tagged
- 0 Thread(s)
Indeed. After all, this is just a general guide to world buildingOriginally Posted by zantas92

Oh and no problem Raddry
~ "When you find it hard doing right in what you do, you've got a problem" ~
-
03-09-2010 #11
Member

- Reputation
- 300
- Join Date
- Jun 2008
- Posts
- 519
- Thanks G/R
- 0/0
- Trade Feedback
- 0 (0%)
- Mentioned
- 0 Post(s)
- Tagged
- 0 Thread(s)
One Comment: Taliis can create *.ADTs from scratch, so you do not need to use Offsetfix.exe and you'll have a clear adt.
-
03-09-2010 #12
Contributor
- Reputation
- 139
- Join Date
- Nov 2009
- Posts
- 406
- Thanks G/R
- 0/0
- Trade Feedback
- 0 (0%)
- Mentioned
- 0 Post(s)
- Tagged
- 0 Thread(s)
Ah, thanks for the heads up!
I'll update the guide later today
~ "When you find it hard doing right in what you do, you've got a problem" ~
-
03-09-2010 #13
Contributor
- Reputation
- 258
- Join Date
- Dec 2007
- Posts
- 1,114
- Thanks G/R
- 0/2
- Trade Feedback
- 0 (0%)
- Mentioned
- 0 Post(s)
- Tagged
- 0 Thread(s)
How does Taliis create adts that're placed with coordinates corresponding with the other already made adts.
https://i45.tinypic.com/157df7r.jpg
-
03-09-2010 #14
Active Member

- Reputation
- 28
- Join Date
- May 2008
- Posts
- 113
- Thanks G/R
- 0/0
- Trade Feedback
- 0 (0%)
- Mentioned
- 0 Post(s)
- Tagged
- 0 Thread(s)
Excellent work! I tossed you a couple of rep.
Perhaps yu could add a section that deals with editing dbc files to remove the 'fatigue' from areas that were previously in the ocean?
Thanks!
-iotech
-
03-09-2010 #15
Contributor
- Reputation
- 258
- Join Date
- Dec 2007
- Posts
- 1,114
- Thanks G/R
- 0/2
- Trade Feedback
- 0 (0%)
- Mentioned
- 0 Post(s)
- Tagged
- 0 Thread(s)
You can remove fatigue??
https://i45.tinypic.com/157df7r.jpg


 Reply With Quote
Similar Threads
-
[Guide][Video] Extreme World Building Basics
By Herbalism in forum WoW ME Tools & GuidesReplies: 5Last Post: 11-18-2010, 03:04 PM -
Superizm's [General] Achievement Guide to World of Warcraft!
By superizm in forum World of Warcraft GuidesReplies: 19Last Post: 04-08-2009, 04:53 PM -
[GUIDE] World Building and Area Changing!!!
By Fault in forum WoW ME Tools & GuidesReplies: 59Last Post: 09-12-2008, 09:17 AM -
A Noobs Guide to Adding Buildings
By mredman in forum WoW EMU Guides & TutorialsReplies: 6Last Post: 09-09-2007, 12:43 PM -
Newbie Guide To World of Warcraft
By Snor11 in forum World of Warcraft GuidesReplies: 4Last Post: 11-02-2006, 03:31 AM
-
OwnedCore Forums
casino news World of Warcraft Pokemon GO MMO Overwatch RTS Casino reviews bc game bc game bc game bc game bc game bc game bc game bc game bc game bc game bc game bc game bc game bc game bc game bc game bc game bc game bc game bc game bc game bc game bc game bc game bc game bc game bc game bc game bc game bc game bc game bc game bc game bc game bc game bc game bc game bc game bc game bc game bc game bc game bc game bc game bc game bc game bc game bc game bc game bc game -
casino
Casino Gambling Online casinos Casino en ligne bc game bc game bc game bc game bc game bc game bc game bc game bc game bc game bc game no deposit bonus codes roobet Casino reviews Bitcoin casino Paypal Casino Lucky8 1xbit heycasino ✅Bovada Casino - 3000$ BetPlay.io Casino - Best BetFury Bonus Sans Cresus Casino Bonus - Casino Bitcoin in the ✅Madnix Casino - Best Online Casino ✅Lucky8 Casino Bonus - ⭐ Pixbet Bookmaker - -
CoreCoins
CoreCoins CoreCoins FAQ Shout-Out Banner Ads -
My OwnedCore
My Profile Notifications Settings Buy CoreCoins About Us


Privacy Policy | Cookie Policy | Terms | Contact Us
Available Payment Methods:-
![[Guide] Toyoka's General Guide to World Building](https://www.ownedcore.com/images/paybutton/paypal.png)
![[Guide] Toyoka's General Guide to World Building](https://www.ownedcore.com/images/paybutton/skrill.png)
![[Guide] Toyoka's General Guide to World Building](https://www.ownedcore.com/images/paybutton/payop.png)
-
Casino
MrGreen | Stake Casino | Lucky8 | Casino Reviews | Casino Bonus | Millionz | ZenCasino | Casino | Cresus Casino | Slot machines | Rollino Casino | Bc Game | Bovada casino | Bonus code | Crypto Casino | Bitstarz | PalmSlots Casino | InstantPay | Betflip Casino | NeedForSpin | Casobet | No deposit bonus | Sportsbook | Dublinbet | USA CASINO | Oshi Casino | Mystake Casino | How to Play BlackJack Online | BuzzLuck