![[Guide]Skinning Techniques with Photoshop](https://www.ownedcore.com/forums/images/styles/OwnedCoreFX/addimg/menu4.svg)
Hello all!
I know I'm a noob on the site, and I've just started skinning on WoW, but don't let that turn you away. I've had plenty of skinning experience with other games, such as Halo and WoW is not much different.
This guide will help teach you how to make better skins using simple tools on Photoshop. I'll be using CS3 but the instructions should not vary much with each version.
What this guide will not teach you is exporting and importing textures into WoW. There are plenty of tutorials that teach you this. This one taught me, so I'd recommend it: Linky
Programs You Will Need
-Photoshop
-WoW Model Viewer (So you dont have to go ingame to see it)
-BLP Converter
-MyWarcraft Studio
Introduction to the Tools
First I'll introduce you to the various tools we will be using in Photoshop.
The Polygonal Lasso Toolis probably the one tool you will use the most. It is unequivocally important when it comes to changing one part of the texture and not the rest.
To use the lasso tool, simply click on the outline of the section of the texture you wish to select,and then continually click on points around the section until you close it off to complete the selection.
When you select something, it should look like this:
The Clone Stamp Toollets us copy and blend a piece of a picture to our texture using brushes. To use it, Alt+Click an area on the Stock Image and then brush on the texture. By adjusting the opacity and etc. we can blend the cloned stuff in.
New Adjustment Layers have many uses, but the most notable and the one we will be using will be the Hue and Saturation layer which allows us to change a color.
Changing Colors
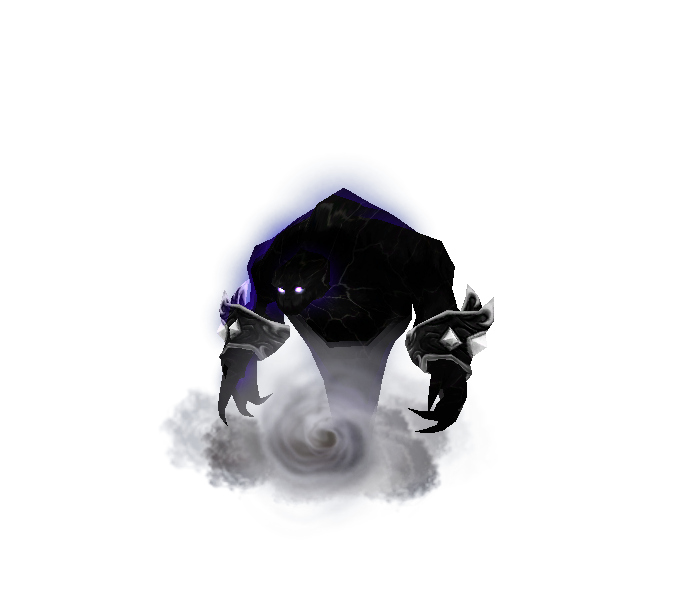
Now at this point, after we have made the previous selection, we can either decide to edit the Voidwalker's body or its cuffs. Lets start with the body.
Press Ctrl+C and then Ctrl+V to copy the cuff to a new layer. Now we can edit the layer behind it without affecting it. When retexturing, I highly recommend not to use brushes of any sort. Instead, use stock images or adjustment layers to get the effect you want.
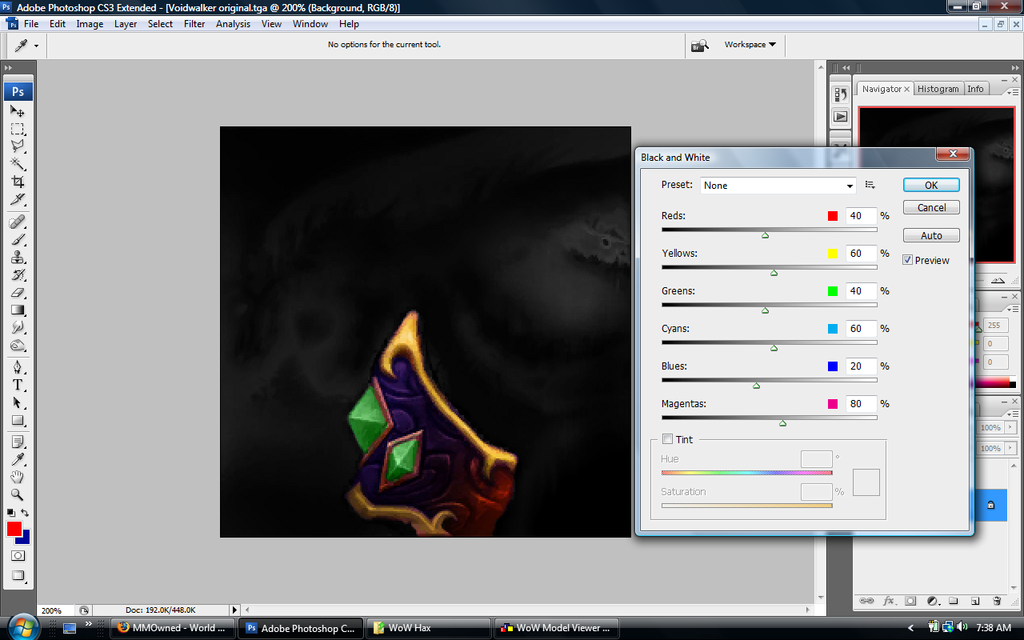
Right now I'll show you how to change the VW's color. Select the bottom layer and then click Image>Adjustments>Black&White. Play with the settings until you get the contrast you want. I kept the default settings and it looks like this.
You may notice a blue outline around the cuff, dont worry we will fix this later.
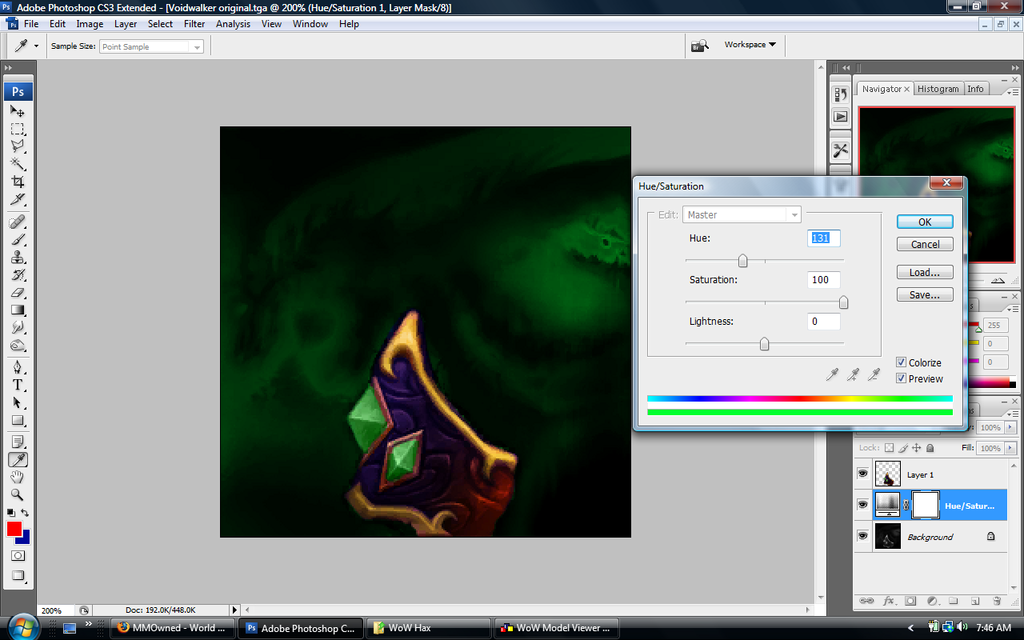
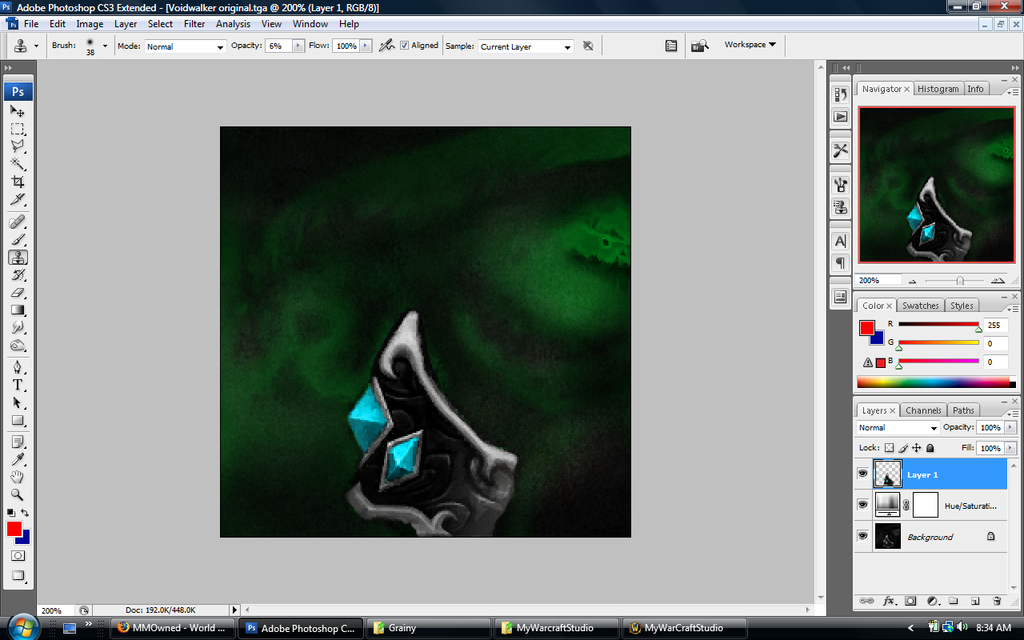
Now for the good stuff. Click Layer>New Adjustment Layer>Hue and Saturation. Make sure the Colorize selection in the bottom right is checked. Mess with the Hue and Saturation till you get the color you want. I wouldn't recommend messing with the brightness as it tends to look bad. We can adjust the brightness and contrast later. Heres what i got:
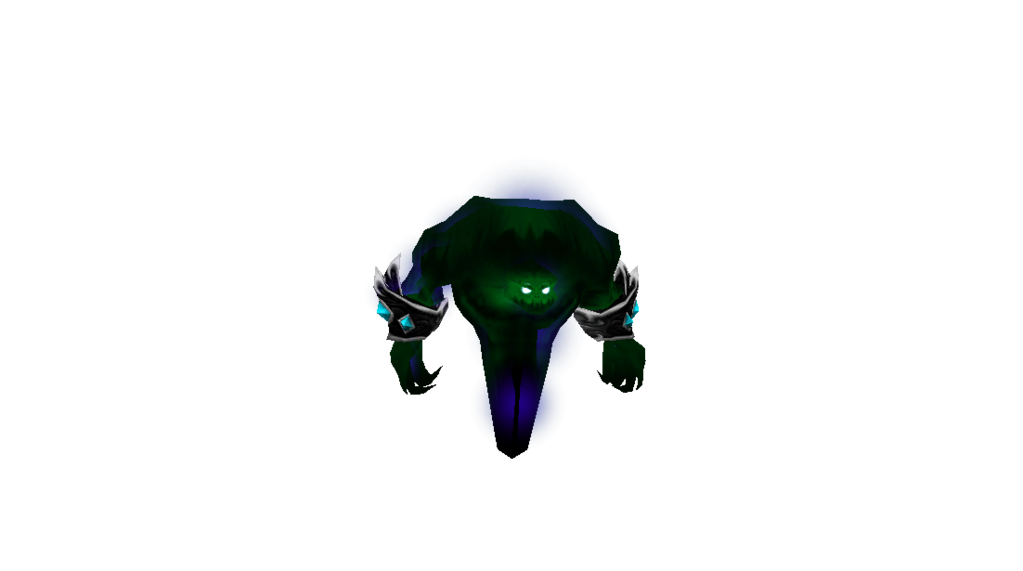
Now we can edit the cuff to look however we want. First use the magic wand to select the transparent space on the top layer, then inverse the selection so you have the cuff selected. Use the techniques we used for the body to recolor it, but instead of using a new adjustment layer, you must use Image>Adjustments>Hue&Saturation so we dont overlap the colors.
Heres mine:
Save it and check it out
The blue light stays there because of an effect not caused by a skin.
Cloning Textures
A technique I used to use alot during my modding days was to clone stuff from stock textures onto my skins.
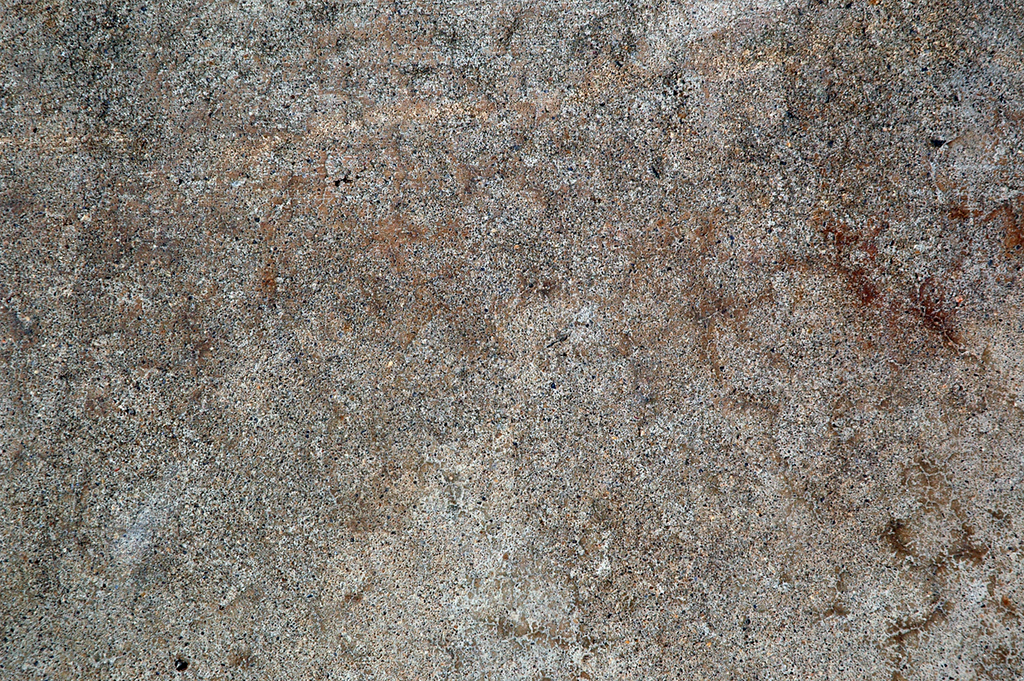
The first step is to find a good stock image to use, google is your best bet. Ill be using this texture to give it a grungy, staticy feel:
Now that we have done that we can start cloning it to the skin. Click the Clone Stamp Tool, and use a decent sized soft brush. Alt-Click anywhere (normally in the center) on the stock texture and then brush it onto the VW. Adjust the opacity to a comfortable setting which should be a very very low number. Avoid hitting edges when using the clone tool, as it causes a seam. Readjust the copying point on the stock texture everytime you start brushing in a new space on the VW. Remember, this is just to give a small grainy feel.
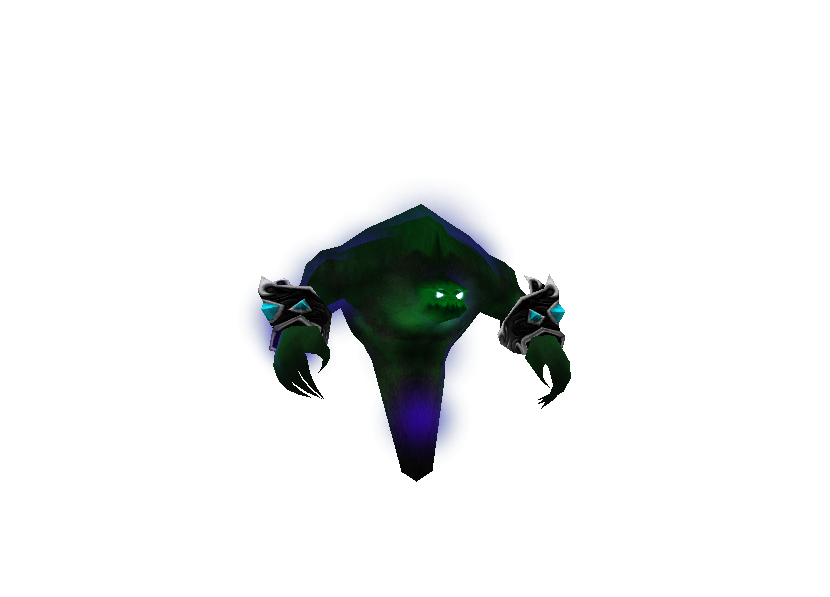
Generally its best to stack stock textures with extremely low opacity, but for the sake of time I'll only do one. This is what it looks like ingame.
I dont particularly like the way this one turned out, but dont let that discourage you. Try out different textures and even use the techniques used in the first part to change their colors. Play with it and have fun.
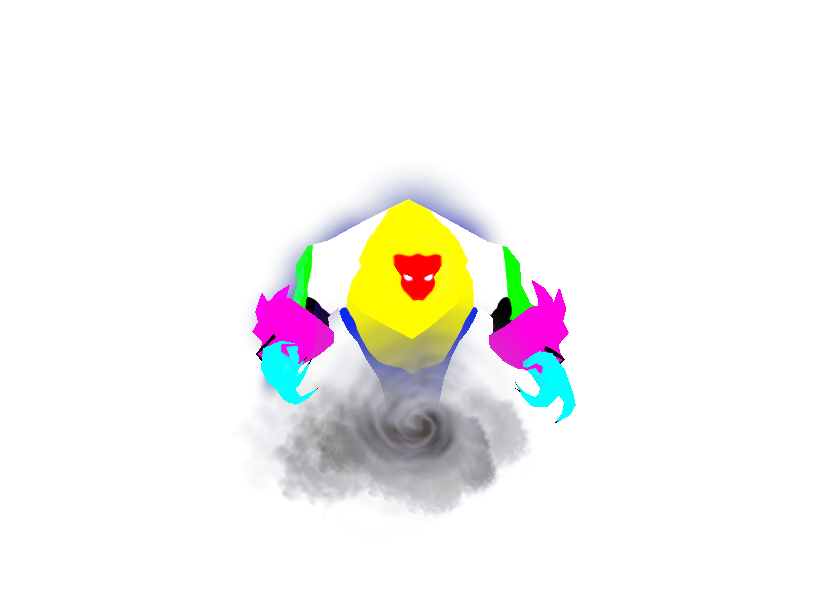
Identifying Parts of the Texture
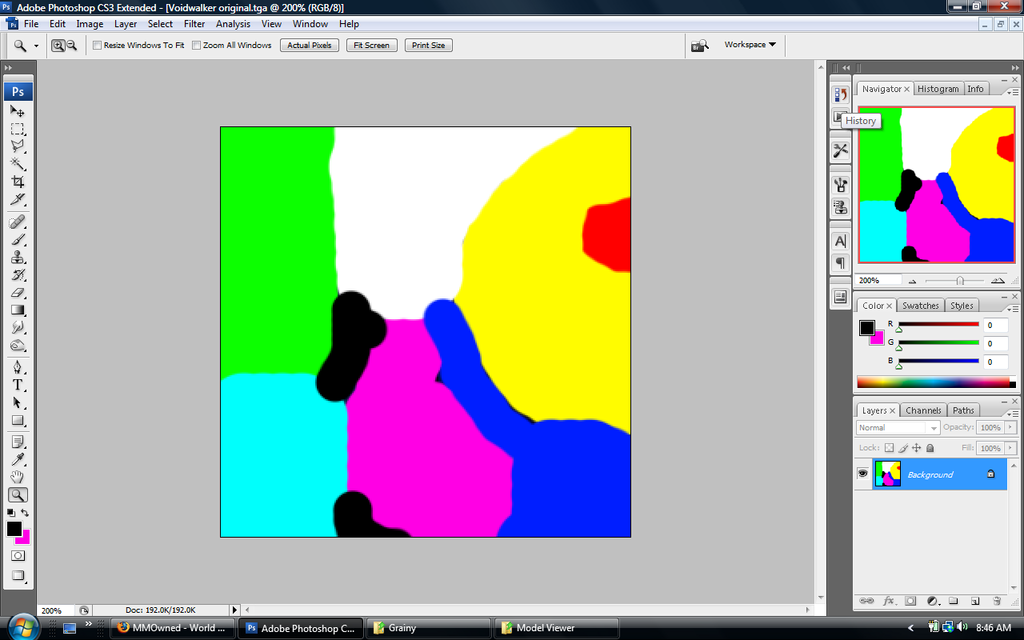
Sometimes its hard to identify what each part of the texture applies to. When this is the case there is an easy way to find out. Apply different colors throughout the texture and apply it to the model. Compare with the original texture and you have your answer. For Example:
I know its hard to tell, but this is the VW's skin lol. When applied to the model it looks like this.
Its funny looking, i know but when compared to the original skin, its quite easy to see what part applies where.
This concludes the first part of my guide. I'll most likely be adding on later, so be sure to check for updates.
Have fun skinning

![[Guide]Skinning Techniques with Photoshop](https://www.ownedcore.com/forums/../images/ba/9/top-1.gif)
![[Guide]Skinning Techniques with Photoshop](https://www.ownedcore.com/assets/mm/images/wits.png "TradeSafe Middleman")
![[Guide]Skinning Techniques with Photoshop](https://www.ownedcore.com/forums/images/styles/OwnedCoreFX/addimg/wicc.png "CoreCoins")

Shout-Out
User Tag List
Results 1 to 13 of 13
-
05-09-2008 #1
 Member
- Reputation
- 13
- Join Date
- May 2008
- Posts
- 10
- Thanks G/R
- 0/0
- Trade Feedback
- 0 (0%)
- Mentioned
- 0 Post(s)
- Tagged
- 0 Thread(s)
[Guide]Skinning Techniques with Photoshop
![[Guide]Skinning Techniques with Photoshop](https://www.ownedcore.com/images/ba/g/b2.gif)
-
05-09-2008 #2
Banned

- Reputation
- 124
- Join Date
- Jun 2006
- Posts
- 2,376
- Thanks G/R
- 0/0
- Trade Feedback
- 0 (0%)
- Mentioned
- 0 Post(s)
- Tagged
- 0 Thread(s)
Very nice guide Salaran

-
05-09-2008 #3
Member
- Reputation
- 11
- Join Date
- May 2008
- Posts
- 159
- Thanks G/R
- 0/0
- Trade Feedback
- 0 (0%)
- Mentioned
- 0 Post(s)
- Tagged
- 0 Thread(s)
Wicked guide, mate. Will use if I ever start to get into reskinning.
-
05-10-2008 #4
Member
- Reputation
- 13
- Join Date
- May 2008
- Posts
- 10
- Thanks G/R
- 0/0
- Trade Feedback
- 0 (0%)
- Mentioned
- 0 Post(s)
- Tagged
- 0 Thread(s)
Thanks guys =P
-
05-14-2008 #5
Banned
- Reputation
- 6
- Join Date
- Apr 2008
- Posts
- 101
- Thanks G/R
- 0/0
- Trade Feedback
- 0 (0%)
- Mentioned
- 0 Post(s)
- Tagged
- 0 Thread(s)
Thanks for this Great guide just what i whas looking for +Rep
-
05-21-2008 #6
Member
- Reputation
- 10
- Join Date
- Apr 2007
- Posts
- 39
- Thanks G/R
- 0/0
- Trade Feedback
- 0 (0%)
- Mentioned
- 0 Post(s)
- Tagged
- 0 Thread(s)

very useful guide, +Rep

-
05-22-2008 #7
Member
- Reputation
- 1
- Join Date
- Jan 2008
- Posts
- 7
- Thanks G/R
- 0/0
- Trade Feedback
- 0 (0%)
- Mentioned
- 0 Post(s)
- Tagged
- 0 Thread(s)
nice guide
vry usefull
-
06-01-2008 #8
Member
- Reputation
- 6
- Join Date
- Jun 2008
- Posts
- 24
- Thanks G/R
- 0/0
- Trade Feedback
- 0 (0%)
- Mentioned
- 0 Post(s)
- Tagged
- 0 Thread(s)

Brilliant
Brilliant...
I gave it a whirl and made myself a new voidy skin...
I need to change the smoke gfx around a little, but I am happy with his progress so far.
He has runes on his head and his shoulders, he has a stiched mouth and earholes. I retextured his armbands a little and I recoloured the whole thing...
been at it for about 3 hrs I guess. here are some pics of my progress.
http://i306.photobucket.com/albums/n...ten/voidy1.jpg
http://i306.photobucket.com/albums/n...ten/voidy2.jpg
http://i306.photobucket.com/albums/n...ten/voidy3.jpg
http://i306.photobucket.com/albums/n...ten/voidy4.jpg
If anybody would like a copy, I can supply the PNG file upon request
-En
-
06-09-2008 #9
Member
- Reputation
- 13
- Join Date
- May 2008
- Posts
- 10
- Thanks G/R
- 0/0
- Trade Feedback
- 0 (0%)
- Mentioned
- 0 Post(s)
- Tagged
- 0 Thread(s)
Awesome job enliten!
Im glad someone actually put this guide to good use
Edit: heres another skin i made using this technique.
Last edited by Salaran; 06-09-2008 at 01:05 PM.
-
06-10-2008 #10
Member
- Reputation
- 1
- Join Date
- Apr 2008
- Posts
- 12
- Thanks G/R
- 0/0
- Trade Feedback
- 0 (0%)
- Mentioned
- 0 Post(s)
- Tagged
- 0 Thread(s)
Intense! lol
-
06-13-2008 #11
Member
- Reputation
- 6
- Join Date
- Jun 2008
- Posts
- 24
- Thanks G/R
- 0/0
- Trade Feedback
- 0 (0%)
- Mentioned
- 0 Post(s)
- Tagged
- 0 Thread(s)
I love that last one...
I'm having alot of trouble editing the smoke though, everytime i change it nothing happens...
any advice?
-en
-
06-14-2008 #12
Active Member

- Reputation
- 17
- Join Date
- Feb 2007
- Posts
- 87
- Thanks G/R
- 0/0
- Trade Feedback
- 0 (0%)
- Mentioned
- 0 Post(s)
- Tagged
- 0 Thread(s)
Where do i save the file?
I modified Fire1, Fire1A and Fire1A2 to a green thing and well, i saved it in \Data\SPELLS
I tried adding them to an mpq archive 'patch-9' in a folder called Spells
-
06-17-2008 #13
Member
- Reputation
- 6
- Join Date
- Jun 2008
- Posts
- 24
- Thanks G/R
- 0/0
- Trade Feedback
- 0 (0%)
- Mentioned
- 0 Post(s)
- Tagged
- 0 Thread(s)
Ok, I have a pseudo reason why the smoke wasn't working
It turns out that the smoke textures in the creature\voidwalker dir are actually the pvp / tier gear smoke...
i noticed this when i saw red smoke coming off a fellow warlock... so unless you want your epix looking retarded don't edit these files.
does anybody have any idea where the VW smoke textures are actually located?
-EnLast edited by enliten; 06-17-2008 at 04:17 AM.


 Reply With Quote
Similar Threads
-
[GUIDE] Model/Skin Editing With WPE, Scarry & Funny
By andrzej in forum WoW EMU Exploits & BugsReplies: 6Last Post: 09-14-2008, 01:27 PM -
Need help with photoshop
By Holysymbol in forum Art & Graphic DesignReplies: 1Last Post: 08-12-2007, 02:55 PM -
Help with Photoshop
By wicked jt in forum Art & Graphic DesignReplies: 5Last Post: 06-19-2007, 03:04 PM -
Anyone good with Photoshop? /cry
By Moonlight in forum Community ChatReplies: 1Last Post: 05-29-2007, 10:17 PM -
My First Try With Photoshop...
By Negue2 in forum World of Warcraft GeneralReplies: 4Last Post: 10-08-2006, 11:46 AM
-
OwnedCore Forums
casino news World of Warcraft Pokemon GO MMO Overwatch RTS Casino reviews bc game bc game bc game bc game bc game bc game bc game bc game bc game bc game bc game bc game bc game bc game bc game bc game bc game bc game bc game bc game bc game bc game bc game bc game bc game bc game bc game bc game bc game bc game bc game bc game bc game bc game bc game bc game bc game bc game bc game bc game bc game bc game bc game bc game bc game bc game bc game bc game bc game bc game bc game -
casino
Casino Gambling Online casinos Casino en ligne bc game bc game bc game bc game bc game bc game bc game bc game bc game bc game bc game no deposit bonus codes roobet Top 10 Casinos Casino reviews Bitcoin casino Paypal Casino Lucky8 1xbit heycasino 1Xbit Casino France - Lucky31 Bonus Sans Stake No deposit Bonus ✅Rise Of Olympus Slots ✅Blackjack en ligne - ✅Gamdom casino - 15% ⭐Bet365 Casino - Best ✅1xbit Casino - Royal Panda Casino - -
CoreCoins
CoreCoins CoreCoins FAQ Shout-Out Banner Ads -
My OwnedCore
My Profile Notifications Settings Buy CoreCoins About Us


Privacy Policy | Cookie Policy | Terms | Contact Us
Available Payment Methods:-
![[Guide]Skinning Techniques with Photoshop](https://www.ownedcore.com/images/paybutton/paypal.png)
![[Guide]Skinning Techniques with Photoshop](https://www.ownedcore.com/images/paybutton/skrill.png)
![[Guide]Skinning Techniques with Photoshop](https://www.ownedcore.com/images/paybutton/payop.png)
-
Casino
Lucky31 | Rollino Casino | Lucky8 | Casino | Crypto Casino | ZenCasino | Casino Reviews | Casino Bonus | PalmSlots Casino | Bitstarz | BuzzLuck | Mystake Casino | Bc Game | BitCasino | Stake Casino | Sportsbook | Casino deposit offers | Oshi Casino | Welcome Bonuses | Bonus code | How to Play BlackJack Online | Betflip Casino | Bovada casino | Cresus Casino | NeedForSpin | Millionz | USA CASINO | Casobet