
Intro:
Hello everyone, I am making this guide for users who are using 64bit OS's in the wow botting community. As of now, Innerspace is known to run on 64 bit OS, therefore openbot and wowbot work and glider does as well.... kinda. It has been a long standing request by members of the glider community to have an official version of glider capable to run in a 64-bit environment, here are the facts:
- Glider can "technically" run in a 64bit OS, the downside is that it does so without the use of it's shadow driver
- Merc and Hamut have said repeatedly that using /nodriver on a 64bit OS post May 20th banwave is a security risk
Background:
There is a way around this. How you might ask? Virtual Machines. Virtual Machines are as they sound, emulated computers inside your host operating system. While Virtual Machine software such as VMWare, Hyper-V, Xen, etc.. populate many distributions of operating systems from Windows to Linux, there are only two solutions capable of supporting our needs of hardware accelerated virtual machines
VMWare Fusion for MAC and Moka5 for Windows, which happens to be free and this is what we will be using for this tutorial.
What you will need to start your VM:
*I am assuming you are running a 64bit OS if you read this*
*This guide is being used on Vista Ultimate 64bit, more OS to come*
- Windows XP Full Installing Disk *i have a feeling you can find this*
- Moka5 Runtime
- Moka5 Tools
- VMWare Tools ISO Image
------------------------------------------------------------------------------------------------------>
Installing the Software:
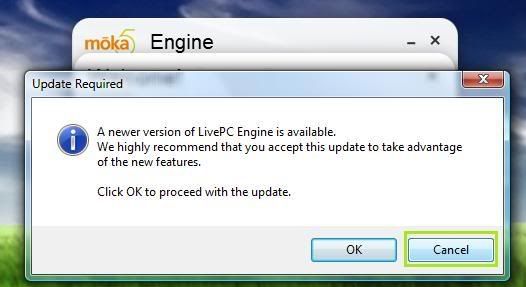
- First, install the Moka5 Engine. Follow the prompts and when finished, DO NOT LET IT UPGRADE TO NEW VERSION *Note* If you have a newer VMWare Workstation Installation or newer version of VMWare player, this most likely will not work without uninstalling the newer versions.
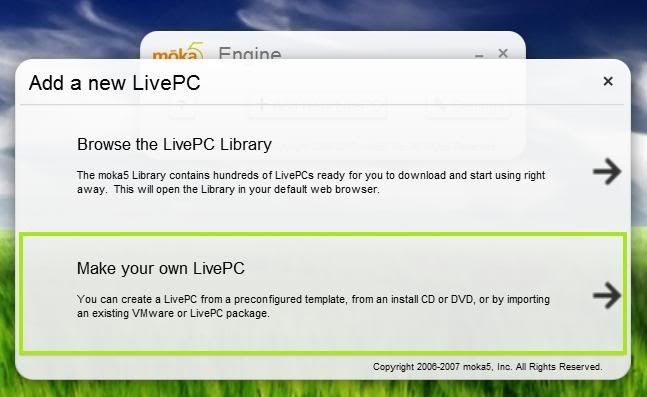
*Note: Delete the VM that comes with it by clicking the down arrow next to the wrench and click delete. *
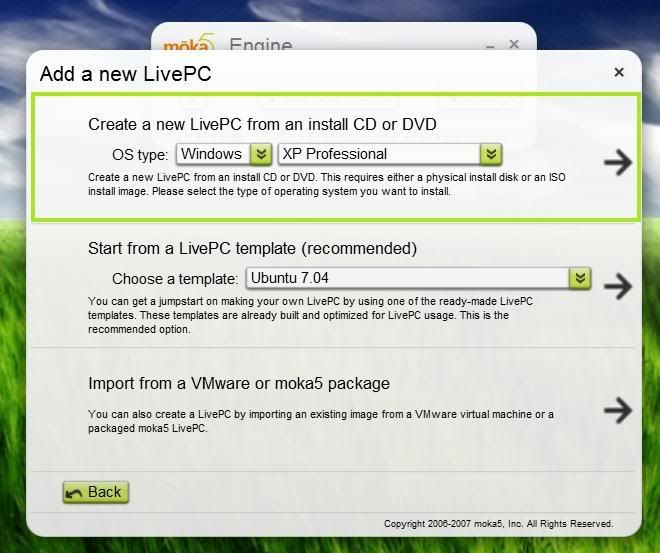
Setting up your XP VM:
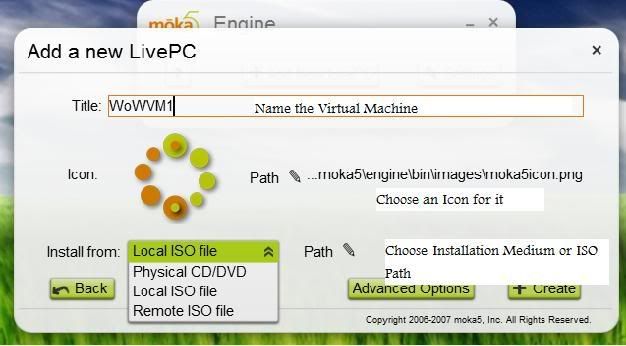
Now click the advanced settings button.
- Under General Tab, type in 512mb of RAM for the VM to use
- In the Advanced Tab, check, mouse auto grab.
- Note that Moka already chooses to make a 20g space, which is just right for Windows XP+WoW+Bot
- Press the Create Button!
- It will now go back to the main dialog, Press the Play Button.
- You now need to install Windows XP to the new Virtual Hard Drive. If you are not accustomed to installing Windows XP and just like to bot, Here is a good guide.
Wait a few min and you should get------------------------------------------------------------------------------------------------------>
Setting things up inside the VM:
*It is VERY IMPORTANT YOU DO THESE IN ORDER*
- Go to the Moka5 Main Dialog and press the stop button
- Click Yes to stop it
- Click the wrench with the down arrow next to the vm and go to configure
- Go to the Storage Tab
- The third device down should be your install CD Setting or ISO file you used to install windows xp, change the path to the VMWare Tools ISO image you downloaded
- Click OK
- Start your Virtual Windows XP Back up!
- In your virtual XP in My Computer, VMWare Tools should show it is in your cd drive. Install it
- Do a Complete Install
- RESTART THE VM, otherwise it wont work ^^
- Copy and Paste the Link for the Moka5 Tools from earlier in the post, and paste it into the browser inside your VM, yes that works! Firefox users, rightclick and copy link location, IE users.. You need help, go to Firefox web browser | Faster, more secure, & customizable
- After downloading and installing Moka5 tools, you will get a prompt for Windows XP to "replace with correct drivers" or something along those lines... CLICK CANCEL OR YOU MESSED UP EVERYTHING YOU DID SO FAR!
- Restart your VM Immediately.
- When you login, it will sit at a black screen for a bit, just give it some time.
You have now successively setup a Virtual Machine running a 32bit OS for gliding / botting in a 64bit OS.
Part two of the guide will go over what you need to install and some tricks on getting the most out of your VM as well as some FAQ.
Enjoy!
-Ryan


Shout-Out
User Tag List
Results 1 to 15 of 76
-
07-05-2008 #1
 Member
- Reputation
- 9
- Join Date
- May 2008
- Posts
- 16
- Thanks G/R
- 0/0
- Trade Feedback
- 0 (0%)
- Mentioned
- 0 Post(s)
- Tagged
- 0 Thread(s)
HowTo: Run Glider on 64bit OS via Virtual Machine

-
07-05-2008 #2
Member
- Reputation
- 9
- Join Date
- May 2008
- Posts
- 16
- Thanks G/R
- 0/0
- Trade Feedback
- 0 (0%)
- Mentioned
- 0 Post(s)
- Tagged
- 0 Thread(s)
What you need to install in your new VM
- .Net Framework 2.0 or .Net 3.5 for Ppather
- Gliders newest release
- WoW Folder Copied over
- VirtuaWin *More on this below
*Note: You can download all these files to your main pc and then just cut and paste them into your virtual machines folders *
*
As stated above, download the things you need and just copy and paste them into your virtual machines folders, or you could even download them from the virtual machine windows xp.
Tips on Increasing Performance of Virtual Machine:
right click My Computer, go to properties then the advanced tab, under performance click settings, click button for adjust settings for best performance. click ok.
go to system restore tab, turn off system restore option, exit menu.
click start, go to run and type services.msc *For all service names I mention, turn them off by right clicking the service, go to properties, click stop service then the disable option in the menu:
Themes
Security Center
Windows Firewall
Alerter
Automatic Updates
Error Reporting Service
Indexing service
Well I hope you liked my little tutorial on virtual machines. Keep in mind you can also make a zip or rar of your VM's to use as development platforms for botting or a clean slate OS ready to go for any project.
If I helped you, please post a reply in the thread and let me know anything you might want to know
cheers!Last edited by yoyoman765; 07-06-2008 at 06:26 PM.
-
07-06-2008 #3
Contributor


- Reputation
- 169
- Join Date
- Apr 2007
- Posts
- 488
- Thanks G/R
- 0/0
- Trade Feedback
- 0 (0%)
- Mentioned
- 0 Post(s)
- Tagged
- 0 Thread(s)

that.. is awesome. my stupid 64bit vista has way too many issues with bots, so this should help.. hopefully.
+rep x2 thanks for sharing!
-
07-06-2008 #4
Member
- Reputation
- 2
- Join Date
- Mar 2008
- Posts
- 17
- Thanks G/R
- 0/0
- Trade Feedback
- 0 (0%)
- Mentioned
- 0 Post(s)
- Tagged
- 0 Thread(s)
Maybe it has changed, but last time i checked VM's only supported upto directX 8 and had a poor to none 3D gfx support.. And I haven't been able to even run wow on a VM, even with some change to ini-files workaround to force 3D support
Last edited by cartwright; 07-06-2008 at 03:51 AM.
-
07-06-2008 #5
Contributor
- Reputation
- 101
- Join Date
- Sep 2007
- Posts
- 169
- Thanks G/R
- 0/0
- Trade Feedback
- 0 (0%)
- Mentioned
- 0 Post(s)
- Tagged
- 0 Thread(s)
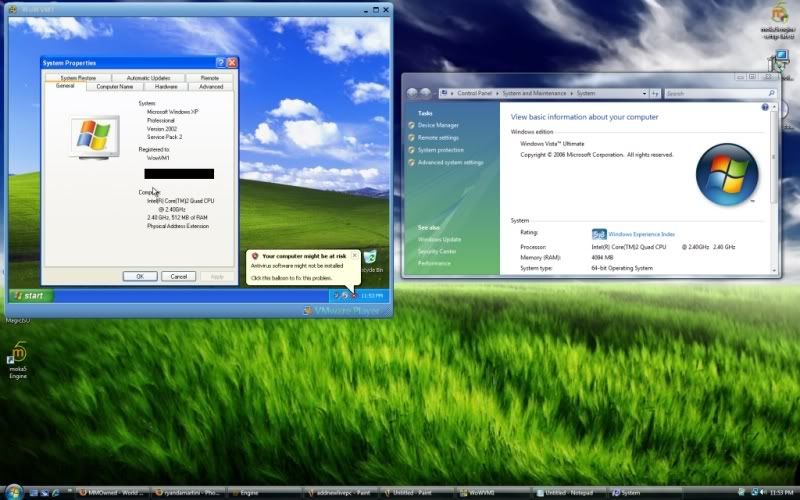
i´m not sure if it works... i had the same idea yesterday and tried Microsoft Virtual PC 2007. There it doesn´t work cause it hasn´t any Grafikchip. Only one with 6mb ram and it can´t show 3D games. so plx post an video where youre starting World of Warcraft in the VMWare or many Screenshots which can prove it...
then i´ll rep you^^
-
07-06-2008 #6
Contributor
- Reputation
- 101
- Join Date
- Sep 2007
- Posts
- 169
- Thanks G/R
- 0/0
- Trade Feedback
- 0 (0%)
- Mentioned
- 0 Post(s)
- Tagged
- 0 Thread(s)
a picture where it shows your grafikchip in the device manager should proove it anyway easier
-
07-06-2008 #7
Member

- Reputation
- 1
- Join Date
- Nov 2007
- Posts
- 11
- Thanks G/R
- 0/0
- Trade Feedback
- 0 (0%)
- Mentioned
- 0 Post(s)
- Tagged
- 0 Thread(s)
tnx ;>:wave:
-
07-06-2008 #8
Member
- Reputation
- 9
- Join Date
- May 2008
- Posts
- 16
- Thanks G/R
- 0/0
- Trade Feedback
- 0 (0%)
- Mentioned
- 0 Post(s)
- Tagged
- 0 Thread(s)
Np, hope you like it. Note if you want to install using your wow dvd's, just follow the steps to install the VMWare tools, but choose your physical CD ROM drive on the listOriginally Posted by Cryt My favorite way is to just network the VM to the main pc and copy the folder over
The Moka5 tools allows the Virtual Machine to connect straight to your graphics cardOriginally Posted by cartwright
Thats why this is unique from other VM's as I stated in the Background section.
alright, ill see if I can get a small vid up today.Originally Posted by BlackPhynix
-
07-06-2008 #9
Member
- Reputation
- 22
- Join Date
- Sep 2007
- Posts
- 215
- Thanks G/R
- 0/0
- Trade Feedback
- 0 (0%)
- Mentioned
- 0 Post(s)
- Tagged
- 0 Thread(s)
thanks ima try it..
Looks like you put alot of work into making this guide. +rep
-
07-08-2008 #10
Banned
- Reputation
- 181
- Join Date
- Feb 2008
- Posts
- 624
- Thanks G/R
- 0/0
- Trade Feedback
- 0 (0%)
- Mentioned
- 0 Post(s)
- Tagged
- 0 Thread(s)
i've always been able to run innerspace on my vista 64 bit. thats nothing new, and for glider instead of doing a vm, you can do /nodriver at the end of the short cut or whatever, but this stops you from being able to do other things while doing it.
-
07-08-2008 #11
Site Donator
- Reputation
- 91
- Join Date
- Jan 2008
- Posts
- 225
- Thanks G/R
- 0/0
- Trade Feedback
- 0 (0%)
- Mentioned
- 0 Post(s)
- Tagged
- 0 Thread(s)
Finally, a good solution for dual boxing zoloFighter!! Thanks! +rep!
hmm, I can't find rep button...Last edited by Flying Piggy; 10-30-2008 at 10:18 PM.
-
07-09-2008 #12
Member
- Reputation
- 9
- Join Date
- May 2008
- Posts
- 16
- Thanks G/R
- 0/0
- Trade Feedback
- 0 (0%)
- Mentioned
- 0 Post(s)
- Tagged
- 0 Thread(s)
thanks for your comments everyone and the rep
Im further testing the newer versions of the software, its just immensely time consuming installing os, loading drivers, isntalling wow and installing os for VM's over and over again I hope to have some good pics up for you all very soon of my latest stuff.
-
07-09-2008 #13
Member
- Reputation
- 9
- Join Date
- Feb 2008
- Posts
- 55
- Thanks G/R
- 0/0
- Trade Feedback
- 0 (0%)
- Mentioned
- 0 Post(s)
- Tagged
- 0 Thread(s)
Very nice guide you can tell he took his time +Rep For you!
-
07-09-2008 #14
Member
- Reputation
- 1
- Join Date
- Jul 2008
- Posts
- 1
- Thanks G/R
- 0/0
- Trade Feedback
- 0 (0%)
- Mentioned
- 0 Post(s)
- Tagged
- 0 Thread(s)
Any ideas why I keep getting the error of the Product key is locked when I open the bot, yesterday it was just working fine !!! Please, help , by the way i'm new here so thanks to everyone for every support !!! =D
-
07-11-2008 #15
Member
- Reputation
- 9
- Join Date
- May 2008
- Posts
- 16
- Thanks G/R
- 0/0
- Trade Feedback
- 0 (0%)
- Mentioned
- 0 Post(s)
- Tagged
- 0 Thread(s)
Originally Posted by yoshidream
try a fresh install of glider. Ive never personally had this error before.


Similar Threads
-
Run Glider, etc. in Guest Mode
By asbest0s in forum World of Warcraft GuidesReplies: 9Last Post: 10-22-2008, 04:10 PM -
how to run glider if you are on a 64 bit system.
By foulwind in forum World of Warcraft GuidesReplies: 8Last Post: 05-14-2008, 04:17 PM -
[Glider] Running Glider while dead
By banger in forum World of Warcraft Bots and ProgramsReplies: 9Last Post: 01-24-2008, 04:29 AM -
[COMPLETE GUIDE] Running Glider While Dead
By Stephen Colbert in forum Community ChatReplies: 1Last Post: 01-22-2008, 11:11 PM -
HOWTO: Run WoW in Linux
By Weslord in forum World of Warcraft GuidesReplies: 15Last Post: 01-04-2008, 03:32 PM
-
OwnedCore Forums
casino news World of Warcraft Pokemon GO MMO Overwatch RTS Casino reviews bc game bc game bc game bc game bc game bc game bc game bc game bc game bc game bc game bc game bc game bc game bc game bc game bc game bc game bc game bc game bc game bc game bc game bc game bc game bc game bc game bc game bc game bc game bc game bc game bc game bc game bc game bc game bc game bc game bc game bc game bc game bc game bc game bc game bc game bc game bc game bc game bc game bc game -
casino
Casino Gambling Online casinos Casino en ligne Jackpot City no deposit bonus codes roobet Casino reviews Bitcoin casino Paypal Casino Lucky8 1xbit heycasino ✅ Flexepin voucher : A 21 Casino Casino - Best Stake.com Casino Welcome Booming Games Expands ⭐ Top Live Casino ✅Euro Palace Casino Casino en ligne sans SportyBet Bookmaker - ✅Betano Bookmaker - -
CoreCoins
CoreCoins CoreCoins FAQ Shout-Out Banner Ads -
My OwnedCore
My Profile Notifications Settings Buy CoreCoins About Us


Privacy Policy | Cookie Policy | Terms | Contact Us
Available Payment Methods:-


-
Casino
Lucky Dreams Casino | Casino | ZenCasino | Rollino Casino | Crypto Casino | Bovada casino | Welcome Bonuses | InstantPay | Lucky8 | Betflip Casino | Casino Bonus | No deposit bonus | Slot machines | PalmSlots Casino | NeedForSpin | Casino Reviews | Jackpotcity | Sportsbook | Stake Casino | BitCasino | USA CASINO | Casobet | Millionz | MrGreen | Mystake Casino | Drake Casino | Dublinbet | Lucky31