![[輪][Guide] ~s¦nX's Step to Step Guide on Quake Model Editing!](https://www.ownedcore.com/forums/images/styles/OwnedCoreFX/addimg/menu4.svg)
|> THE FOLLOWING GUIDE REVOLVES AROUND THE GAME QUAKE<|
~輪代表
Most of this guide was taken from the following exarc:
http://www.cc.gatech.edu/classes/AY2...odediting.html
Hey There. Although this guide focuses on the game Quake, the entire concept is purely relative to all 3d games - such as World of Warcraft. The filing structure is anything but differant (although Quake used .mdl rather than .mdx + .m2), everything else applies. This regards Geosets, 3d structure, animation layout, and pretty much everything else that you could relate between two 3d-based MMORPGs for PC.
If you're interested in model editing Quake, this is the thread for you - or rather, even if you are a mere primary learner for WoW Model Editing, this is also the guide for you, as whilst stated vaguely above, 80% of this is pure WoW Model Editing Symnetry.
Moreover, if anyone has any questions or requests relative to WoW Model Editing, please DO NOT HESITATE to PM me or add me on MSN - i take all questions and have also classed myself as a WoW Model Editor for around 3 years, regardless of the fact that i was studying Model Editing for approximatly 5 years beforehand in 3d format.
About the Guide:
The guide covers basic knowledge on model editing, therefore, it would help if the reader had some knowledge on the concept, and therefore to understand the various acceleration techniques (simplification, compression, occlusion, space partition) for processing, rendering, animating, or transmitting shapes and basic Computational Geometry results and techniques for dealing efficiently with very large models. Typical problems in Modeling include:
Interactive design and editing of curves, surfaces, and solids
Construction of a valid (water-tight, oriented) triangle mesh from a large polygon soup
Smoothing, sharpening, refining, resampling, and simplifing triangle meshes
Compression, progressive transmission, and streaming of large triangle meshes
Level-of-Detail, occlusion culling, streamable meshes, and other acceleration techniques for very large meshes
Shape analysis, segmentation, matching, comparison, mapping and morphing
Hardware-assist for collision detection and Booleans
All the above can be achieved via a piece of software named 3dsMax.
To Start With: (Intro)
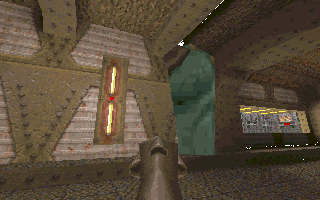
Quake's 3D models set a standard in 3D shooters. This is the era of 3D which means little or no more 2D sprites, as games before were all 2D. Welcome to the era of 3D,
which you'll find most all new games are becoming, and with the ability to create totally new entities, you'll see how these 3D games are changing for the better! The
purpose of this guide is not a tutorial on how to create models with a certain program, but an overview on several ways to create them. If you're looking for tutorials
on a certain program, well trueSpace, Lightwave, and 3D Studio 4 and MAX, check out the rest of MMOwned for Modeling Guides for more Modelling and Skinning Tips. A
small tutorial on using BCad to create models can be found on TiC's Quake Editing Pages. There is also an excellent tutorial included with qME.
Preparing
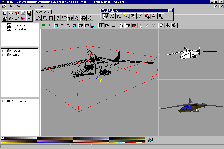
There are several ways to create a model for Quake. You can either use a 3D modelling program and compile it into a .mdl with id's Utilities or MeDLe, which are
probably the best ways, or with qME from scratch. qME is an excellent program and can do about everything you want. It can be used to examine, edit, or create totally
new models from scratch. It can also be used to import and export some useful files and import Bitmaps for skin and has a 2D and 3D paint feature. The only bad part is
that the demo version cannot save a model with more than 20 frames, which most Quake models succeed.
QME Formerly known as QuakeME
MeDLe is a Command Line Interface(CLI) program like id's Modelgen and Texmake, but it has many more features. It can accept Raw Data(.raw) and 3D Studio Ascii(.asc)
files for frames and export POVRay(.pov), AutoCAD(.dxf), Raw Data(.raw), 3D Studio Ascii(.asc), Quake Map(.map), VRML(.wrl), and 3D Studio(.3ds) files. It can import
and export skins as Windows Bitmap(.bmp) and Non-interlaced Compuserve GIF 87a(.gif) files, and can do many more things with models via an easy scripting language.
MeDLe even includes a built-in model viewer so you can preview your work!
id's Modelgen accepts 3D Studio(.3ds), Lightwave(.lwo), and Alias(.tri) files for the frames and Texmake generates Bitmap(.bmp) and Deluxe Paint(.lbm) files for the
skin/s. The graphic files created can only be opened with some programs and converters and thus will make them useless unless you have one of the few programs or
converters. To save yourself much time and trouble, I reccommend that you just use MeDLe for putting the skins on the models. The files created by Texmake must be used
with Modelgen for a default skin, so don't delete them, even if you think your model is 100% complete.
You can also use Steven Crowley's Compilation of Modelgen and Texmake accept Raw Data(.raw) files for frames and ZSoft Paintbrush(.pcx) files for the skins. You may
also need a conversion utility if your 3D program cannot export to any file types supported by these programs or just for convience, such as Crossroads. I must warn
you though, that occassionally some conversions aren't 100% perfect, so it's best to find a good program that can export to one of these file types.Now, you should be
ready to begin since you know what you're getting into. You may find a list of all the current available 3D Software Packages at 3D Ark. Keep in mind that many are
expensive and only for serious 3D Artists, but like most things, the more expensive, the better.
Information on the Structure of Models
It is important to know the basics of the model structures and model editing and creating before you start so that you won't waste time doing the wrong things. Before
beggining to create a new model, I recommend that you examine some of id's by extracting them from either two of the .pak files with AdQuedit, and get the Manuel too.
Quake's models have a .mdl extension and consist of a certin number of frames and a skins/s, that cover the model.
You must have knowledge of using your 3D Program of choice before beggining any modelling. Experiment with it and try to make some freehand models that look a little
impressive. Consider modelling like sculpting. Most models start with an object, cube, sphere, cone, etc., which is sculpted by moving the vertices points and by
stretching and bending it with your modelling program. Models can use several objects also. Each object seperate in the model will be kept apart from each other on the
skin so that they may be drawn on seperately. Quake's models, are simple and consist only of up to 500 polgons, triangles with three points, so you need to triangulate
the model while you are creating it to keep it in the correct format. You must also only use single-sided polygons, not double-sided, and have the side of the polygon
be facing outward, never inward, because Quake's engine will cause a hole in the model or make it appear clear or see-through in sections when it renders it. This is
also known as flipped polygons and can ruin a model because more than likely it can't be repaired. As you start to finish, check to make sure that there are no wild
vertices, duplicate vertices, flipped polygons, objects made too skinny, or any other anomalies.
If you are thinking about using an advanced model you found somewhere that looks almost real when rendered, then more than likely it won't work. In fact qME is the
only program that will load a frame with over 2000 polygons, but still don't do it. Quake uses simpler models to cut down on the texture mapping rendering and lag on
the engine. The model will more than likely crash the game or lag it to death, especially if run on a server. Please remeber these rules when creating models and never
break them, because as I mentioned before, if you suddenly find you've got too many polygons or any other serious errors, then more than likely its too late unless you
can somehow miraculously fix the problem. The polygon reduction features and error fising tools of some 3D programs usually leaves something in the model screwed up.
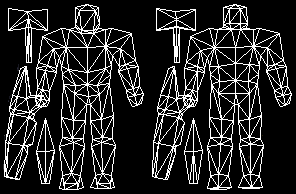
Scale of The Models
Just as models of cars, trains, etc. have scales to go by, so does Quake. Keep the model scaled right or else it won't appear as you wanted. This can easily done by
changing the scale number with your MeDLe or Modelgen script or with qME. To get an idea of the scale use qME to extract frames from models and then opening them in
your 3D Program, or just use qME to extract frames from various sizes of Quake's models to get an idea of the scale. Remember to keep your script and all frames until
you get the scale to your liking.
The Armor, Way of Scale!
Compiling The Model
(If you're using only QME to create a new model, skip this section)
To compile your model, you can use either MeDLe or Modelgen. Both use scripts in order to do this. I'll give you an example script for MeDLe first. MeDLe's scripts
have a .med extension and contain many more useful features than my below example contains, so read the docs for more info on them. MeDLe will also create a default
skin for your model like qME, so there is no seperate program to generate a skin from your base frame. Here is an example MeDLe script which will create a simple model
as well as an italizied description:
new_mdl frog.asc (creates a new model from a base frame)
insert frog1.asc 1 (inserts frame 1)
insert frog2.asc 2 (inserts frame 2)
insert frog3.asc 3 (inserts frame 3)
insert frog4.asc 4 (inserts frame 4)
insert frog.gif 1 (inserts skin 1)
set flags 1 (sets the model flags, see flag section)
set flags 8 (sets the model flags, see flag section)
save_mdl frog.mdl (saves the model file)
Modelgen uses a QuakeC(.qc) script to generate a model. Before you can compile your model with Modelgen, you will need to run Texmake on your base frame in order to
get a default skin for it to use. Read the next section for more info on skins. Modelgen contains more script commands than those in this example, so read the docs for
more info on them. Here is an example of a script to create a simple model as well as an italizied description:
$modelname frog (specifies the file that will be generated)
$cd (specifies where the file will be created)
$flags 1 (specifies the flag setting/s for the model, see flag section)
$flags 8 (specifies the flag setting/s for the model, see flag section)
$origin 0 0 0 (specifies the x y z coordinates for the model)
$scale 1 (specifies the scale of the model)
$base frog (specifies the base frame of the model)
$skin frog (specifies the skin file used for the model)
$frame frog1 frog2 frog3 frog4 (specifies the frames which will make up the model)
You can change this script as much as you want and run it anytime you want incase you want to add more frames, a new skin, etc.., so don't ever get rid of it even if
you think your model is 100% complete because you may just decide you want to make some changes. As always, I have taken the liberty of creating an example for you to
download of a simple model I used to show how easy it is to generate a model for use in Quake, as well as the script I used for Modelgen.
Skinning The Model
qME will create a default skin while you are working on your model so you won't need to worry about that if it is all you are using. MeDLe will also create a default
skin which you can extract and import via scripting, as a .bmp or .gif file. Remember from above that the graphic files created by Texmake can only be opened with some
programs and converters, so to save yourself much time and trouble, you can write a simple script for MeDLe for placing your skin on the model, such as this:
load_mdl player.mdl (loads model to put skin on)
insert player.bmp 1 (inserts either a .bmp or .gif skin, 1 is the base frame)
If you are using .raw frames with Stephen Crowley's Compiliations, then his Texmake can be used to get a .pcx skin which most any program can open with no problems and
his Modelgen can use, but the model will have to be rebuilt, so it is best just to use MeDLe.
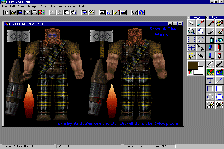
A Blank Player Skin
When starting to edit a new blank skin for a model, you will need to be aware of a few simple steps which will make the process easier. First, thoroughly examine the
model in qME and observe which areas of the skin you will want to add certain colors, shading, etc.. It is also a good idea to examine those which id made to see real
quality work. To help color and shade the skin I suggest using your graphic's programs flood fill tool to fill each polygon with the color you ant it to be and start
shading and adding details to it. You may want to preview the skin on the model with qME even after slight changes to get an idea of what and what not you need to do.
It is best to work with the Quake Palette and not RGB. You may use RGB though for filters and other effects, but be careful not to work too hard on something that may
not look good when reduced back to the Quake Palette. Another thing you need to know about skins is that the back side of the skin is mirrored, meaning that if you
want something like the word death on the back of the monster's skin, then you have to paint it backwords. This goes for every detail you want done like this too. You
can use most graphics programs flip features to do this easily. Skins can take a lot of time to complete, but the longer you spend working to make it look better, then
more than likely better it will be and appreciated.
Once your skin is complete you can save it as a .bmp or .pcx file which qME can use to import onto a model, or you can simply save it as a .bmp or .gif and put it on
the model with MeDLe with the simple script above. Remember that you can also use Steven Crowley's Modelgen, with a script above but it will have to rebuild the model
each time, so it is easier to just use the MeDLe script.
Editing a Skin in Paint Shop Pro
If you are simply editing an already completed skin, you will pretty much know what you are doing. Meaning that by the shape of it, you should be able to imagine how
much you can change it. Also, if you have modified a skin for a model that you wish others to download then just upload the skin with instructions on how to use it,
not the whole model because it wastes precious FTP space and bandwidth. Anything that is supposed to be only in the registered version should not be uploaded because
it is hurts companies. Or if you have a modified skin you wish to use on models in a project of your own, it is wise to add a installation batch file that uses Quakex
1.1 to extract the needed files out of the Registered .pak file/s and then uses a MedDLe script to skin the model.
Quakex 1.1's commands can be easily learned in its Text File and can be added to your Zip File. The rest, moving the files to proper directories, can also be handled
in the Batch File. You may want to put MedDLe in your zip file as well without all of its files. You only need to have the Mdl.cfg, Mdl.exe, Mdl.fnt, Mdl.map, and
Mdl.pal files to use MeDLe. Cwsdpmi.exe is only needed if you plan to use MedDLe in Real DOS, but it might be wise to include that too. If you have any questions about
Batch Files then send them to me with an explanation of what you're trying to do and I'll see what I can do. This may seem stupid, seeing that you could just simply
upload the models with the new skins already on them, but you're not supposed to upload anything in the registered version of Quake, and that would take up useful FTP
space, upload time for you, and download time for others.
Animating The Model
Once your base frame and skins are complete you can begin the animation of the model. Animation is perhaps the hardest part after creating the base frame. This is why
many films and games have seperate modellers and animators working. As always I seriously suggest looking at id's models to see how they did things such as frames such
as for walking, dying, etc.., which will also be referenced in the QuakeC. I believe that the limit on frames for use with MeDLe and Modelgen is 255, although I'm not
sure if this is the limit for the Quake Engine.
Flag Settings/Special Effects
Flags are what cause gibs, roatations, rockets, etc. Special effects can also be implemented on models such as with fireballs and blood trails from projectiles that to
liven them up. Simply turn on the flags in QME's Model Property Editor, or use scripts with MeDLe or Modelgen to set the model flags. See the above section on
compiling for more info on this.
Below is a complete list of the flags:
Flag Number Flag Name Description
1 ROCKET Long Smoke Trail
2 GRENADE Short Smoke Trail
4 GIB Long Gib Trail
8 ROTATE Rotate
16 TRACER Yellow and Brown Trail
32 ZOMBGIB Short Gib Trail
64 TRACER2 Medium Green Trail
128 TRACER3 Short Purple Trail
Completing the Model
Once your model is complete to your liking you will be done if you are simply replacing a model in the game. However, if it is a new entity you are making, then this
will probably the most complicated part if you don't know any QuakeC. I'll explain some here, but if you don't know how to compile the source code for HexenC or need
more info on it, then search on Quakenet. You need to write a .hc file if you've created a new monster or class, or modify or add to some code if it is a new item
or scenery. I cannot fully explain to you how to write the code for you, so I reccomend looking at the source of something that looks like what you want to do, just
make sure to give credit to whoever's file it is, including id. My example has a simple example on how to throw in a piece of new scenery or something similiar by
adding it into the misc.hc file. Like any program code source you can recompile QuakeC if you have all the the source code.
Writing and compiling QuakeC can be very difficult, so be sure to pay close attention to any error messages so that you might correct the problem. Don't get
discouaraged because this can be a very difficult and lengthly process. Ask someone who has created something similiar to what you want if they might be able to help.
Once again, this can take a long time so patience is definetely required. Once you get the progs.dat file successfully compiled, then you should be ready to test the
model in the game. Create yourself a test map or use the one in my example and add the new entity, such as misc_spark, monster_pig, etc.. Place the proper files in the
Mods Directory, run the game to see what you have so far. Positioning the model may take several trys until you get it right and you might
even get some errors that will have to be fixed in the source code. Like I said, don't settle for something ok, if it is not what you wanted. Keep trying and
eventually you will succeed.
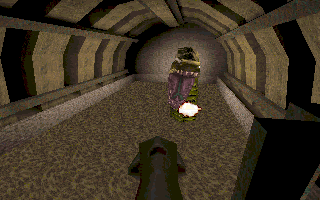
An Excellent New Quake Model By Bubbah
All respected names, products, etc. are copyright of their respected owners.
All content of this site, html code, and most graphics, ©MMOwned - Matt Founder & Ket + HeRoG (Current Owners).

![[輪][Guide] ~s¦nX's Step to Step Guide on Quake Model Editing!](https://www.ownedcore.com/forums/./ocpbanners/1/2/9/8/0/2/2/01d9781faec8bfe3abf9095ac9e57d1e.jpg)
![[輪][Guide] ~s¦nX's Step to Step Guide on Quake Model Editing!](https://www.ownedcore.com/assets/mm/images/wits.png "TradeSafe Middleman")
![[輪][Guide] ~s¦nX's Step to Step Guide on Quake Model Editing!](https://www.ownedcore.com/forums/images/styles/OwnedCoreFX/addimg/wicc.png "CoreCoins")

Shout-Out
User Tag List
Results 1 to 7 of 7
-
09-30-2009 #1
 Contributor

- Reputation
- 283
- Join Date
- Jan 2009
- Posts
- 746
- Thanks G/R
- 0/0
- Trade Feedback
- 0 (0%)
- Mentioned
- 0 Post(s)
- Tagged
- 0 Thread(s)
[輪][Guide] ~s¦nX's Step to Step Guide on Quake Model Editing!
Last edited by ~sInX; 10-13-2009 at 01:23 AM.
![[輪][Guide] ~s¦nX's Step to Step Guide on Quake Model Editing!](https://www.ownedcore.com/images/ba/g/b2.gif)
-
10-03-2009 #2
 Retired Noggit Developer


- Reputation
- 755
- Join Date
- Nov 2006
- Posts
- 2,759
- Thanks G/R
- 0/3
- Trade Feedback
- 0 (0%)
- Mentioned
- 0 Post(s)
- Tagged
- 0 Thread(s)


Uhm .. And .. What the **** has this to do with WoW? Oo

-
10-03-2009 #3
Contributor
- Reputation
- 283
- Join Date
- Jan 2009
- Posts
- 746
- Thanks G/R
- 0/0
- Trade Feedback
- 0 (0%)
- Mentioned
- 0 Post(s)
- Tagged
- 0 Thread(s)
Haha - there is no genuine resemblance, apart from 3d structure. I was contemplating posting this for some time - i spoke to several admins and mods about it, and we came to the conclusion that there should be forums allowing threads relative to other games rather than WoW. Until then, i was given permission to post this, as i'm sure a lot of people play Quake (i personally never really played it, only learnt the visual structure), this could be of use to them. Along with those who are interested in editing in general

Last edited by ~sInX; 10-03-2009 at 04:38 AM.
-
10-12-2009 #4
 Retired Super Moderator
- Reputation
- 730
- Join Date
- Aug 2006
- Posts
- 2,413
- Thanks G/R
- 0/0
- Trade Feedback
- 0 (0%)
- Mentioned
- 0 Post(s)
- Tagged
- 0 Thread(s)
Moved to gaming chat, becase well, it has nothing to do with WoW ;-)


Created by MyFitnessPal.com - Free Calorie Counter
"If I and everyone else could contribute to MMOwned like you do it would be a terrific place." Don't PM me with request, only Questions
-
10-13-2009 #5
Contributor
- Reputation
- 283
- Join Date
- Jan 2009
- Posts
- 746
- Thanks G/R
- 0/0
- Trade Feedback
- 0 (0%)
- Mentioned
- 0 Post(s)
- Tagged
- 0 Thread(s)
Nice Nice
 Thanks Fault.
Last edited by ~sInX; 10-13-2009 at 04:24 PM.
-
07-19-2012 #6
 Private
- Reputation
- 1
- Join Date
- Jul 2012
- Posts
- 6
- Thanks G/R
- 0/0
- Trade Feedback
- 0 (0%)
- Mentioned
- 0 Post(s)
- Tagged
- 0 Thread(s)
Thanks for the guide, but i don't see nothing with this yellow

-
07-19-2012 #7
Banned
- Reputation
- 24
- Join Date
- Jul 2012
- Posts
- 68
- Thanks G/R
- 0/0
- Trade Feedback
- 0 (0%)
- Mentioned
- 0 Post(s)
- Tagged
- 0 Thread(s)
u made those characters ?


 Reply With Quote
Similar Threads
-
[Guide] Basic Simple Guide to MyWarcraftStudio Model Editing.
By -Lex in forum WoW ME Tools & GuidesReplies: 183Last Post: 01-22-2010, 11:13 AM -
[Model Editing] Steb by step guide to Aion model editing!
By Parog in forum Aion Exploits|HacksReplies: 4Last Post: 01-19-2010, 08:58 AM -
[輪][Guide] ~s¦nX's Step to Step Guide on Quake Model Editing!
By ~sInX in forum WoW ME Tools & GuidesReplies: 2Last Post: 10-03-2009, 04:35 AM -
[Guide] How To Model Edit in 2.3
By Varu in forum WoW ME Tools & GuidesReplies: 9Last Post: 10-18-2007, 07:07 AM -
[Guide] How To Model Edit in 2.3
By Varu in forum World of Warcraft Model EditingReplies: 6Last Post: 10-16-2007, 11:26 PM
-
OwnedCore Forums
casino news World of Warcraft Pokemon GO MMO Overwatch RTS Casino reviews bc game bc game bc game bc game bc game bc game bc game bc game bc game bc game bc game bc game bc game bc game bc game bc game bc game bc game bc game bc game bc game bc game bc game bc game bc game bc game bc game bc game bc game bc game bc game bc game bc game bc game bc game bc game bc game bc game bc game bc game bc game bc game bc game bc game bc game bc game bc game bc game bc game bc game -
casino
Casino Gambling Online casinos Casino en ligne Jackpot City no deposit bonus codes roobet Casino reviews Bitcoin casino Paypal Casino Lucky8 1xbit heycasino ⭐ Lucky8 Bonus sans Casinos en ligne avec ✅Euro Palace Casino Top 10 Bitcoin Online ⭐ FatBoss Casino - FreshBet Casino - Bonus Best Casino Free Spins - Casino en ligne sans Casobet Casino - 120% -
CoreCoins
CoreCoins CoreCoins FAQ Shout-Out Banner Ads -
My OwnedCore
My Profile Notifications Settings Buy CoreCoins About Us


Privacy Policy | Cookie Policy | Terms | Contact Us
Available Payment Methods:-
![[輪][Guide] ~s¦nX's Step to Step Guide on Quake Model Editing!](https://www.ownedcore.com/images/paybutton/paypal.png)
![[輪][Guide] ~s¦nX's Step to Step Guide on Quake Model Editing!](https://www.ownedcore.com/images/paybutton/skrill.png)
![[輪][Guide] ~s¦nX's Step to Step Guide on Quake Model Editing!](https://www.ownedcore.com/images/paybutton/payop.png)
-
Casino
Oshi Casino | Betflip Casino | How to Play BlackJack Online | Casino | Bovada casino | USA CASINO | Slot machines | Crypto Casino | Drake Casino | Dublinbet | Bc Game | MrGreen | InstantPay | BuzzLuck | Welcome Bonuses | Casobet | PalmSlots Casino | Sportsbook | Stake Casino | No deposit bonus | ZenCasino | Lucky8 | Mystake Casino | Millionz | Bitstarz | Lucky Dreams Casino | Cresus Casino | BitCasino