
CREDITS TO A90 OF GIMPTALK. I DID NOT MAKE THIS TUT.
First of all, open up a brand new document. Any size, but I'll be using 360X90. Firstly, duplicate the Background layer, and delete the original (this will let you move the Background layer).
Check your colours are set like this:
Black - FG
White - BG
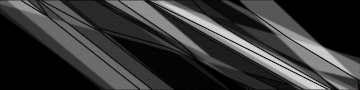
Then get out your Gradient tool. set the mode to Difference, and begin stroking Gradients on the layer. Don't overdo it, as it will ruin the flow. You should have something like this:
Then go to Filters>Edge-Detect>Edge. Use these settings:
Algorithm:Sobel
Amount: 1.0
Smear Checked
Then make a new layer,, and move it below the 'Render' layer. Set you FG and BG colours to the colours you want your Abstract to be, a light colour and a slightly darker colour. Then pull out your Gradient tool, set the mode on Normal, then stroke a gradient across the New Layer. Make the lighter colour come from where you want the lighting. Then set your 'Render' layer to Overlay.
Edit>Copy Visible, then Edit>Paste into a new layer. Go to Layer>Colours>Colour Balance, and play with the settings. Here's what I used:
Cyan -8 Red
Magenta -6 Green
Yellow +100 Blue
Leave the layer mode on Normal.
Time to add lighting!!!!! Make a new layer. set your Fg colur to white, and then pull out your Gradient tool. Use these settings:
Mode: Normal
Gradient: FG To Transparent
Type: Radial
Then add a Radial gradient where you want the lighting. Then set this layer to Soft Light.
Now add text, and a border. How I've done my text and border are below, but feel free to use your own ways.
Text: Type out your Main Text in White Arial 14pts. Then set the layer mode to Overlay. Make a 9X9 rectangular selection on a new layer, and fill with white. Set that layers mode to Overlay as well. Type your Sub-Text next to it in White Arial 11pts. Set that layer's mode to Overlay.
Border: Add a new layer, and go to Select>All. Then go to select>Shrink, and Shrink by 2 pixels. Then go to Select>Invert. fill the selection with White, and set the layer mode to Overlay. Then go to Script Fu>Decor>Add Border.Set both the numbers to 1, and the colour to black.
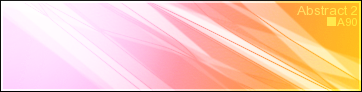
And there, you're done. ^-^


User Tag List
Thread: Abstract GIMP Tut
Results 1 to 3 of 3
-
11-19-2007 #1
 Member
- Reputation
- 6
- Join Date
- Jul 2007
- Posts
- 99
- Thanks G/R
- 0/0
- Trade Feedback
- 0 (0%)
- Mentioned
- 0 Post(s)
- Tagged
- 0 Thread(s)


Abstract GIMP Tut
Gfx


-
11-19-2007 #2
Banned
- Reputation
- 360
- Join Date
- Nov 2007
- Posts
- 762
- Thanks G/R
- 0/0
- Trade Feedback
- 0 (0%)
- Mentioned
- 0 Post(s)
- Tagged
- 0 Thread(s)
Re: Abstract GIMP Tut
Nice... ill try this +Rep for sharing this
-
11-20-2007 #3
Contributor

- Reputation
- 196
- Join Date
- Mar 2007
- Posts
- 960
- Thanks G/R
- 0/0
- Trade Feedback
- 0 (0%)
- Mentioned
- 0 Post(s)
- Tagged
- 0 Thread(s)
Re: Abstract GIMP Tut
Rad, i tried to do it, but i couldn't seem to find "edge detect" =S. Well, the outcome looks sick. Thanks for the share
 . (I'd give rep but I can't
  )
)


 Reply With Quote
Similar Threads
-
[TUT] Animated Banner with GIMP
By gangstagreen in forum Art & Graphic DesignReplies: 4Last Post: 03-14-2009, 06:47 AM -
Velocitys sig tut [GIMP]
By velocity in forum Art & Graphic DesignReplies: 5Last Post: 09-19-2007, 04:42 PM -
My second tut...
By dumbledrew in forum Community ChatReplies: 2Last Post: 12-29-2006, 01:38 PM -
Zomg; My tut!!!!!
By dumbledrew in forum Community ChatReplies: 5Last Post: 12-28-2006, 09:58 AM -
Gimped Thread!
By janzi9 in forum Community ChatReplies: 5Last Post: 05-24-2006, 11:36 PM
-
OwnedCore Forums
casino news World of Warcraft Pokemon GO MMO Overwatch RTS Casino reviews www.planet-casino.com lucky 8 lucky8 no deposit codes bc game bc game lucky8 -
casino
Casino Gambling Online casinos Casino en ligne bc game bc game bc game no deposit bonus codes roobet Top 10 Casinos Casino reviews Bitcoin casino Paypal Casino Lucky8 1xbit heycasino Laundering Scammed US Account Giveaway Giving Away Frozen US wotlk us cd key Free Frozen lvl 23 US Is there anyway to view Help needed. Help someones please help Battle.net scam -
CoreCoins
CoreCoins CoreCoins FAQ Shout-Out Banner Ads -
My OwnedCore
My Profile Notifications Settings Buy CoreCoins About Us


Privacy Policy | Cookie Policy | Terms | Contact Us
Available Payment Methods:-


-
Casino
amazon | amazon | amazon | amazon | amazon | amazon | amazon | amazon | amazon | amazon | amazon | amazon | freebet tanpa | amazon | amazon | amazon | amazon | amazon | amazon | amazon | amazon | amazon | amazon | amazon | amazon | amazon | amazon | amazon | amazon | amazon | amazon | amazon | amazon | amazon | amazon | amazon | amazon | amazon | amazon | amazon | amazon | amazon | amazon | amazon | amazon | amazon | amazon | amazon | amazon | amazon | amazon | amazon | mystake | amazon | amazon | amazon | amazon | amazon | amazon | amazon