
Part I: Starting off with the GIMP.
So you're starting off with GIMP and you don't know what to do. Well, normally people download the program first. Download GIMP at GIMP - The GNU Image Manipulation Program
to get started. After the download is complete launch the program. First you must learn some basic vocabulary you will hear.
Render: The image you are entering into your signature. Often wanted to be made into a transparent image or used in a blend[see below]. Renders are also known as cutouts but have the professional name of "render".
Blends: Putting to images together without contrast[see below] and in harmony together. Often includes texts and a mixture of brushes[see below]
Contrast: Contrasting images/colors are colors that don't clash with each other or colors that do not look well together.
Brushes: Images created by other people. These can be downloaded and installed into GIMP[see in Part IX Section I]
Dichotomy- division into two mutually exclusive, opposed, or contradictory groups [dictionary.com] I'll use this word often as the tutorial goes on.
vivid - strong, distinct, or clearly perceptible[dictionary.com] I will use this word often as well when describing a good graphic.
canvas - What the graphic you are about to create can be founded on.
Part II: Touching The Basics
This part of the tutorial will name the most important tools you can use in creating your signature.
Undo - Undos the last step(s) you did. Press CTRL+Z for easy access to this command. This always comes in handy when you make a horrible mistake and you don't know how to manually remove it. Also comes in handy for minor situations.
Filters - Probably the most important part of GIMP. This helps support all the steps in creating effects for your signatures.
Layers - The next most important part of GIMP. Press CTRL+L to open this very important dialogue box as it will be used a lot in my future tutorials, which I will be spending more time on to give a vivid[see above] description of all the tools and how they can be used.
Part III: Creating A Signature [Easy] Created By Me
[SPOILER]1)
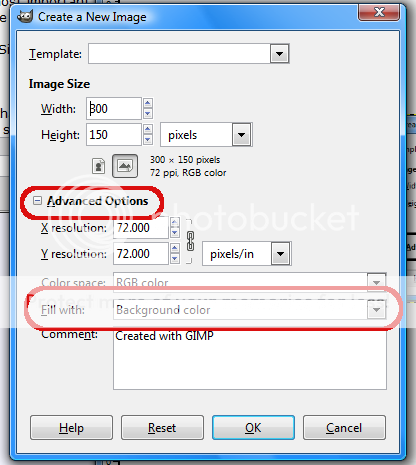
Create a signature that is of the dimensions 300x150 pixels. But don't click "OK" quite yet there is another part to doing this
You should see text saying "Advanced Options" click the plus button [see below for an image] and find the dropdown box containing the words "Background color" change this to "Transparency"[also seen below]. Select two gradients that do not look bad together[also below].
2)
Now it's time for some text. Since this is a beginner's tutorial, guess what. It's going to be easy, yet good looking. On your canvas go to File>Create>Logo>Glossy. This is not suggested for buttons, as the outcome comes out horribly. Enter the settings. The suggested font size is 50 to start out, and the font is your choice. Start off with entering your name, which I am going to do as well[see below]. Now press "OK".
Getting to File>Create
Getting the settings:
3)
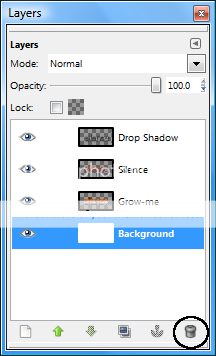
Press CTRL+L to open the Layers. Delete the bottom layer named "Background" by highlighting it and clicking on the trashcan[see below]. Go to Edit>Copy Visible[see below] and open up the canvas we started with.
Layers Box:
Copy Visible:
4) Paste the text into your canvas that you made before and press CTRL+H. You are able to add brushes or effects, but this tutorial doesn't explain how. Go to File>Save and save it as ____.png for it to be transparent[/SPOILER]
Part IV: Downloading Fonts Credit To Sapphire. [Easy]
[SPOILER]I've seen lots of people needing help with this, so I'll just make a tutorial here to help everyone.*
If you have windows here's how to do it:
1. Download the font [from any website, I don't know if it's allowed to give a link to the one I use.], make sure you know where you saved it too.
[I made a folder in my documents called Fonts; it's easier to organize&remember]2. Open the folder that you saved it to.
3. Double click the font name.
4. Click "extract all files"
5. Pick a folder to extract it to.
[I extract it to Users/Owner/.gimp-2.4/fonts]6. After you click extract, a window should pop up. You should see the font name. Leave that window open.
7. Go to the start button.
8. Click "Computer" or "My Computer"
9. Click "Local Disk (C: )
10. Click "Windows"
11. Click "Fonts" You should see a bunch of fonts; these are all the fonts your computer has available to use.
12. Go back to the folder where you saved the downloaded font. [After extracting it.]
13. Find the font you want, then find the one that says "TrueType Font File" next to it.
14. Click, hold, and drag that file into the file with all your computer's fonts.
15. Open gimp**; it should be there!
*This is how I do it for gimp; I don't know if it'll show up in photoshop or not, but I would think it would.
**It also shows up in Microsoft Word, so you can use it on there too! [:
[/SPOILER]
Part V: Beams Around A Render. Created by Wonder [Easy]
[SPOILER]Okay so. I've learned how to make glow beams in an easy waythat ill share with you all.
Bare with me because i can't get pictures of what im exactly doing.
Step 1:
Place your Render into Gimp/
I'll be using:
Step 2:
Create a new layer that you'll be working on.
Step 3:
Now.. Click the brush tool and make sure your brush is a circle Brush. Depending on your picture, Determine the size of your brush. Choose a color for the brush other than white( I've found if you use white you can't change the color later)
Step 4: Now click the path tool and create lines(making sure to click and drag to add roundness).
Step 5:
Once you are done making your path, click Stroke Path. Click Stroke with Paint Tool and then click Stroke.
Step 6: Now click the eraser tool and erase any of the line you don't want showing. This is to look like the beam is going around your person.
Step 7: Now Duplicate the layer twice. then Filters>Blur>Guassian Blur the original layer of lines at 5. Then for the 2nd Layer of lines(the middle layer) Guassian Blur that at 20. The 3rd layer of lines(top layer) should be Guassian Blured at 40.
Step 8: Now you want to merge down the three layers into 1 layer. Do not merge completely onto your render.
Step 9:Now to change the color of your beam.
Go to colors>colorize. When you change the lightness, Change it to somewehre between 40-90 Dpending on how much color you want your beam to have. I changed my red beam to:
HUE: 165
SATURATION: 57
and LIGHTNESS:55
to change it to this blueish beam. Those will vary depending on the color you want. Click OK and your finished! Merge the beam layer down onto the render and save =D
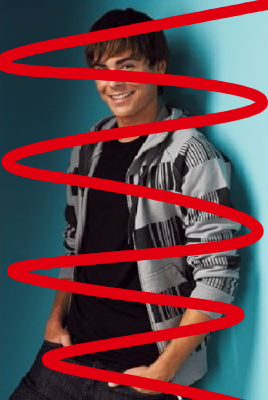
You're final picture should look something like this:
[/SPOILER]
If you've read up to hear you should have the jist of using GIMP. Still, though, you won't need any special brushes. I will create a tutorial on that for the Harder tutorials.
Part VI: Creating An Actual Signature. Created By Me [Intermediate]
[SPOILER]This Tutorial Requires:
-Basic Knowledge of GIMP [Not in anyway advanced]
-GIMP
-If you want to freestyle, some brushes that look good.
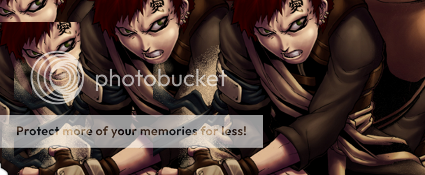
This is my second tutorial ever. It will teach you how to make an image like this one:
Steps:
Step I:
Create a new canvas (surprising!). I made mine 500x200
Step II:
Put in your renders (people) by copying them and pasting them into the image. Move them around to wherever they look good.
Step III:
Choose the smudge tool and the brush that most fits what shape you want to smudge in, I used Circle (11). Smudge in the area where the pictures overlap, the pictures must have similar backgrounds in order for this to work. If not, choose new pictures or learn to render images.
Step IV:
Press CTRL+L and create a new layer by going to Layers>New Layers. Set the layer to Overlay in the Layer Box that just appeared from pressing CTRL+L. Pick the Gradient tool from the toolbox, and and choose light colors (white, light blue). Mess around with the gradient until you think it looks good.
Step V:
We are going to create an affect now.. but how is this possible, it looks almost complete already? Select the Rectangle tool and make a rectangle anywhere that's empty [not suggested to be on your person's face :hehe:]
Find another image of the person [preferrably matching] and click Edit> Paste Into after copying that image.
Step VI:
Now for the text.. select the shape tool and check the polygonal box. Fool around with it to figure it out, and undo everything you did while fooling around with it by pressing CTRL+Z. Now that you get the general idea of what it does make a shape similar to the one at the end of this step, and duplicate it but the other way around. Click "Select From Path" and fill it with whichever color you like Put text [possibly the first and last name of the person you are making a signature for], and you should get something like this:
Step VII:
Now for a border. The most simple step. Go to Select>None and then click on the bordered named Background. Hit Select>All. Finally, Edit>Stroke Selection and set it to 1pixel. You're done!
[/SPOILER]
Part VII: Another Brushless Signature Created By Me[Intermediate]
[SPOILER]
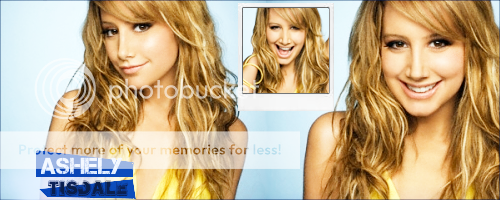
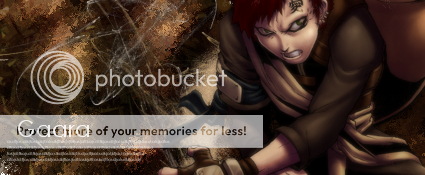
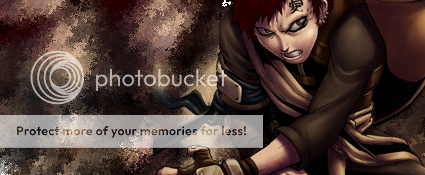
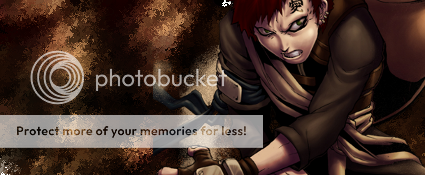
This tutorial will teach you how to make an image similar to this:
The flow of the signature, in my opinion, looks pretty good. That's probably not the case to others, perhaps. Let's get started!
Since I've already created the Scarlett one without recording my process I'll start from scratch. We'll use this image.
Step 1:
Open a new canvas. Preferably 360x150. It should be blank with a white background. On this canvas copy and paste the image given to you above. After this is done click Layers> Scale Layer and scale the width down until it's at 310 pixels. This should get it enough so the top of the render's head will fit in and give it a decent look.
Step 2:
Now, we must blend the rest in as best as we can. Since it's a long and grieving process to do it the right way, we're going to choose a shortcut. Select the color picker tool from your toolbox and choose the color separating the white from the gray in the left. Fill the white in with the Fill tool.
Step 3:
Now for a nice sepia tone. Create a new layer [Layer> New Layer], and choose a Orange color in your pallet. For the Foreground color choose a lighter orange. Choose the gradient tool in your tool box, and make sure it's linear. Create the gradient by dragging your mouse from the right to the left. At this part, it's your choice what you'd like to do. Press CTRL+L or find your layer editor, and change the new layer you've created to either Overlay or Multiply. I've chosen Multiply. You can edit the colors and the way the gradient is as much as you'd like.
Step 4:
This part is the part where you can be creative. Choose a font and the place you'd like for it to be. Type in "Scarlett". For the last name use another font, preferably a cursive one. Type "Johansson" in this box. Now you have added text!
Step 5:
Step 5 is completely optional. I choose to do it. This step is also kind of fun, in my opinion. Select a font, any font. Make it from size 3-5. Near the name, for example the bottom and the side type in a bunch of random letters. [How did design get to be so easy!?]. These letters actually create a nice looking addition to the signature, and you may want to look at my outcome to see where you should add this text.
Step 6:
This step is probably the most complicated. It's hard to explain. First, select the rectangle selection tool in the toolbox. Select the part of the render's body, preferably the eyes first. Press Ctrl+X and then Ctrl+Z. That copies the render and then puts it back in place. A simple technique I like to use. Now press Shift+Ctrl+A, and when your finished press Ctrl+V and the part of the body you chose should be on the image. Drag this part to the left, looking at my example if you don't understand. Repeat this three times.
Step 7:
Again, this is your creativity. Create a new layer [Layer>New Layer] and set it to Overlay. Put your brush to Black and start decorating. This is very essential as you don't want a bland signature.
Step 8
Hopefully by now your thinking "Hey, I did a pretty good job!" because your finished. I hope you enjoy this, and it can be done with any render. [/SPOILER]
Part VIII: Simple Animations [Intermediate]
Animations, they're normally known to be quite difficult, but not in this case. Animations with GIMP can actually be quite simple. Here is a guide created by the great Thimble!
[SPOILER][/SPOILER]
I made this tutorial a little while ago. I posted it on another forums site, but I want to post it on here too (:
Have you ever wanted to make an animated text that looks likeWell, hopefully, if you follow my instructions carefully, you will be able to make something like that!
*NOTE- I use GIMP 2.0. I can't guarantee that this tutorial will work exactly with any other gimp program or other graphic program. Feel free to try though, and let me know if it works!*
OK, let's get started!
PRE-TUTORIAL
Before you complete this tutorial, please download Gimp, Here.
Also, download the font 04b_24 Here. (Any pixel font may be used, but I like this one and I think it looks the best.)
STEP ONE[/spoiler]
[spoiler]After you download Gimp, go to your desktop.
This icon should be there:Double click it.
Once your Gimp toolbar comes up, click File>New.
^This^window should come up. You can change width&height to whatever you want, but animated texts are generally small.
Then click on Advanced Options. From the Fill With drop down menu, select Transparency. Then click OK at the bottom of the window.
STEP TWO
[spoiler]Now your image should be open, and look like this,
[your image will look different depending on the size you made it.]
Now, I labeled some parts of this window.
1-This is where the title of your file is. After you save it, the file name will appear.
2-How many layers your file has. This may sound confusing to beginners, but you will understand it later on in the tutorial.
3-How many pixels your file is. [numberxnumber]
4-This is what your image looks like. [Transparencies have the gray checkered background]
5-This bar is a reference to show how many pixels your file is. Also, if you click this bar, Gimp will switch into 'move tool'. This means that you can move your file around by dragging&dropping it.
Ok, go to the Gimp tool bar.
Click on the magnifying glass. Now click your file. Magnify it to 550%.
[/spoiler]
STEP THREE
[spoiler]Now, go back to the Gimp tool bar. Click on the 'A'.
Now the middle/bottom of the toolbar should look like this:
Make sure that the font is set on 04b24, the size is 8, and the color is white. (You will have to change these from the standard settings, but it is really easy.)
Now you need to click on your file where you want the text. A box should come up where you can type what you want your text to say.
your file should look somewhat like ^that^.[/spoiler]
STEP FOUR
[spoiler]Now we will add an outline to your text.
On the Gimp tool bar (while you are still in the 'A' section) click on 'Path From Text'
Next, go back you your text file. Click on Select>From Path, as below.
Now click Select>Grow. A window should pop up like below.
Change the 'Grow Selection' to 1 pixel. Then click OK.
Now go to Layer>Merge Down. Click on the 'Fill Bucket' tool. Change the color to black, and then fill the background of your text. It should look like this.
[/spoiler]
STEP FIVE
[spoiler]Yay! Now we're ready to start animating!
Click on the 'Bucket Fill' tool. Change the color to whatever color you want to use to animate. I will be using hot pink.
Fill in the first letter of your text.
Now, go to Layer>Duplicate Layer.
Next, fill in the second letter of your text.
Repeat the filling letters, while duplicating the layer after every single one.
[/spoiler]
STEP SIX
[spoiler]Now, once you have finished animating, you need to save your animated text. Click on File>Save As. When the window pops up, name your file '[insert whatever name you want].gif'
YOU MUST PUT .GIF!
Now you need to upload your file on a site like photobucket or tinypic.
You should come out with this:
[/spoiler]
Now that you know the basics of animating text, you can experiment on your own to make it animate whatever way you want it to!
Please post your outcomes, and any questions that you have for me!
-Thimble
NEW! Anime Signature[Advanced Tutorial]
[SPOILER][/SPOILER][/SPOILER]
Outcome:
By now I think you've learned all that you need to know.. right? Well, if you've used all of the above tutorials you should know everything in this tutorial.
[SPOILER]
Step I: Create a new canvas with the size of your choice. I made mine 425x175 pixels.
Step II: Make a new layer. Copy and Paste a render you've found and format it to your liking, now anchor it into the new transparent layer you've made.
Step III: Make a new layer and name it 'Background'. Press Ctrl+L and switch it so it is below the Render you made. You should still have your render in your clipboard. Paste it in and move it over and over until it takes up the entire background.
Step IV:
Now we are going to make this look like a background. Click Filters>Noise>Pick and use these settings:
If you like it like that then ignore this. If not, then listen. Click Filters>Blue>Gaussian Blue and use these settings:

Now Filter>Noise>Pick again with the same settings.
Step V:
Make a new layer and put it in between "Background" and "Render". Now fill it with a dark or light color depending on how you want it. I chose dark. Set this layer to "Overlay" in the CTRL+L menu by clicking on the layer and clicking the dropdown box.
Step VI: You can be lazy and skip this step, but I am not. Find a C4D [look up C4D on Google Images and find one that will look good with your signature] and I'll tell you the rest. Oh my gosh, wow, I'm making this a C4D signature tutorial too :]. Okay, so paste the C4D you are using into the signature as a new layer. In the CTRL+L box click the layer then click the dropdown box and change it to Overlay. Move it around to your liking and mess with the opacity of the layer.
Step VIII:
Now we will be messing with the render to make it look better. Duplicate the render layer [SHFT+CTRL+D] and Filters>Gaussian Blur it with those settings I gave you before.. This will sharpen the render to make it bled better with the background. Mess with the opacity to your liking.
Step IX: Add text. I'm not really going to go into detail about what/how to do this so just rough it out :]. You can always use the text tutorials above.
That leaves you with the finished product :]/
Bonus: Guide To Transparency:[EXTREMELY Easy]
[SPOILER]Create a signature that is of the dimensions 300x150 pixels. But don't click "OK" quite yet there is another part to doing this
You should see text saying "Advanced Options" click the plus button [see below for an image] and find the dropdown box containing the words "Background color" change this to "Transparency"[also seen below].
[/SPOILER]


Shout-Out
User Tag List
Results 1 to 11 of 11
-
10-23-2010 #1
 Private
- Reputation
- 15
- Join Date
- May 2010
- Posts
- 14
- Thanks G/R
- 0/0
- Trade Feedback
- 0 (0%)
- Mentioned
- 0 Post(s)
- Tagged
- 0 Thread(s)
Graphics Creation - A Beginner's Guide

-
10-24-2010 #2
Banned
- Reputation
- 229
- Join Date
- Jun 2008
- Posts
- 990
- Thanks G/R
- 0/0
- Trade Feedback
- 0 (0%)
- Mentioned
- 0 Post(s)
- Tagged
- 0 Thread(s)


Meh.. I think most people use Photoshop. Gj.
-
10-24-2010 #3
 Member
- Reputation
- 9
- Join Date
- Jul 2009
- Posts
- 171
- Thanks G/R
- 0/0
- Trade Feedback
- 2 (100%)
- Mentioned
- 0 Post(s)
- Tagged
- 0 Thread(s)
Yeah I don't use GIMP, I'm new to Photoshop so I'd benefit from that
 .
.
-
10-24-2010 #4
Legendary

- Reputation
- 783
- Join Date
- Mar 2008
- Posts
- 3,377
- Thanks G/R
- 1/2
- Trade Feedback
- 0 (0%)
- Mentioned
- 0 Post(s)
- Tagged
- 0 Thread(s)
Most things covered here are general within design and not limited to a certain program. I agree however, a Photoshop tutorial will reach a wider audience but no harm in having a tutorial for the minority.Originally Posted by Erase
Freelance Digital Artist
https://reflectionartwork.deviantart.com
You did not desert me
My brothers in arms
-
10-25-2010 #5
Private
- Reputation
- 15
- Join Date
- May 2010
- Posts
- 14
- Thanks G/R
- 0/0
- Trade Feedback
- 0 (0%)
- Mentioned
- 0 Post(s)
- Tagged
- 0 Thread(s)
I mean, it's pretty easy to convert to Photoshop.. they're not much different.
-
10-26-2010 #6
Contributor

- Reputation
- 82
- Join Date
- Oct 2009
- Posts
- 337
- Thanks G/R
- 0/0
- Trade Feedback
- 0 (0%)
- Mentioned
- 1 Post(s)
- Tagged
- 0 Thread(s)
Nice tutorial, you can easily see you putted effort in it, when i finally can make myself start learning PS i will definately look at this! ^^ Bookmarked!


-
10-26-2010 #7
Contributor
- Reputation
- 91
- Join Date
- Feb 2008
- Posts
- 1,103
- Thanks G/R
- 0/1
- Trade Feedback
- 0 (0%)
- Mentioned
- 0 Post(s)
- Tagged
- 0 Thread(s)
It was written with GIMP being the recommended program to use. However I am sure it could be done just the same in PS.Originally Posted by Vyre
Detailed guide mate! Death to all but Metal.
-
10-26-2010 #8
Contributor
- Reputation
- 82
- Join Date
- Oct 2009
- Posts
- 337
- Thanks G/R
- 0/0
- Trade Feedback
- 0 (0%)
- Mentioned
- 1 Post(s)
- Tagged
- 0 Thread(s)
Yup i know,but this definately doesn't look that hard to do in PS with a small effort, so i don't mind that ;]Originally Posted by alj03
-
11-13-2010 #9
Private
- Reputation
- 15
- Join Date
- May 2010
- Posts
- 14
- Thanks G/R
- 0/0
- Trade Feedback
- 0 (0%)
- Mentioned
- 0 Post(s)
- Tagged
- 0 Thread(s)
Oh, thanks for the feedback.
-
11-13-2010 #10
 Master Sergeant
- Reputation
- 19
- Join Date
- Aug 2010
- Posts
- 106
- Thanks G/R
- 0/0
- Trade Feedback
- 0 (0%)
- Mentioned
- 0 Post(s)
- Tagged
- 0 Thread(s)
Yeah, some beginners use gimp but hardly.
thanks for the contribution
 +AzTRO
-
11-16-2010 #11
Contributor
- Reputation
- 121
- Join Date
- Aug 2008
- Posts
- 605
- Thanks G/R
- 0/0
- Trade Feedback
- 0 (0%)
- Mentioned
- 0 Post(s)
- Tagged
- 0 Thread(s)
Yeah, I actually started off using Gimp as well so this would have been useful to me way back when. Nice post, thanks for contributing.
I WAS DRILL ROLLED BY GZ. AND I LOVED IT.


 Reply With Quote
Similar Threads
-
A Beginner's Guide to Warhammer Lore
By alg in forum MMO Exploits|HacksReplies: 1Last Post: 08-22-2022, 03:39 AM -
Beginners LUA Guide From Nub to Expert [updating]
By mager1794 in forum WoW EMU Guides & TutorialsReplies: 0Last Post: 06-19-2008, 03:17 AM -
Beginners MC Guide
By Amedis in forum World of Warcraft GuidesReplies: 7Last Post: 01-05-2007, 11:44 PM
-
OwnedCore Forums
casino news World of Warcraft Pokemon GO MMO Overwatch RTS Casino reviews www.planet-casino.com lucky 8 lucky8 no deposit codes bc game bc game lucky8 -
casino
Casino Gambling Online casinos Casino en ligne bc game bc game bc game no deposit bonus codes roobet Top 10 Casinos Casino reviews Bitcoin casino Paypal Casino Lucky8 1xbit heycasino Help with scammed money Free Accounts ^.^ A lot of free gamecards Need help will pay Selling scammed accounts Where Can I... EU Wotlk Account 60 rogue (pvp) - HAS Need somebody -
CoreCoins
CoreCoins CoreCoins FAQ Shout-Out Banner Ads -
My OwnedCore
My Profile Notifications Settings Buy CoreCoins About Us


Privacy Policy | Cookie Policy | Terms | Contact Us
Available Payment Methods:-


-
Casino
vave | amazon | casino | casino | casino | amazon | casino | vave | amazon | amazon | amazon | casino | mystake | vave | amazon | amazon | casino | amazon | amazon | casino | casino | amazon | amazon | amazon | amazon | amazon | amazon | mystake | amazon | Aviator game casino | vave | amazon | mystake | amazon | casino | mystake | casino | amazon | casino | amazon | amazon | casino | vave | amazon | amazon | amazon | casino | casino | casino | casino | vave | amazon | amazon | casino | casino | amazon | amazon | amazon | casino | vave