![[Skybox] Reflection's Guide to Skybox Swaps](https://www.ownedcore.com/forums/images/styles/OwnedCoreFX/addimg/menu4.svg)
Hello everyone. I’ve seen quite a few requests for skybox swaps or how to do it. So I decided to share the method to do it!
Yes I am aware that schlumpf has a similar guide but it’s quite old and not as beginner-friendly.
You need a few programs:
MyWarcraftStudio: Filebeam - Beam up that File Scottie!
Lightmapper: MEGAUPLOAD - The leading online storage and file delivery service (credits to ~sInX)
DBC Editor: Filebeam - Beam up that File Scottie!
The first thing you need to do is to find the id of the sky you want to change and the id of the sky you’re going to change TO.
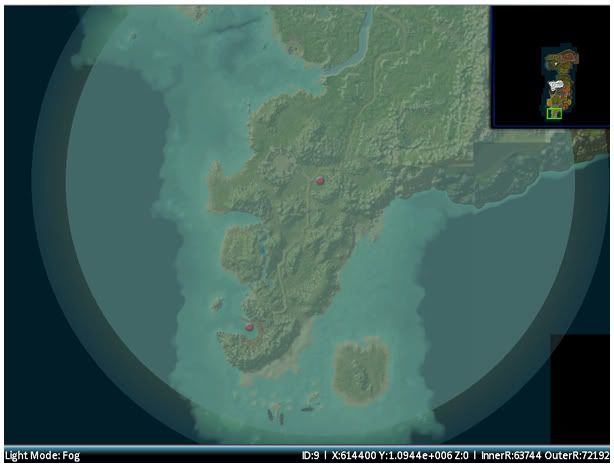
To find the ID of the skies we need the program LightMapper
For this tutorial I’m going to change the sky of Stranglethorn Vale to the sky in Hellfire Peninsula.
Open Lightmapper and select the place where your sky is. Mine is in Azeroth (Eastern Kingdoms). Let it load and then navigate to the zone that you want to swap. Hover over one of the red buttons and a large circle should appear. The bigger the circle, the bigger area the swap will change.
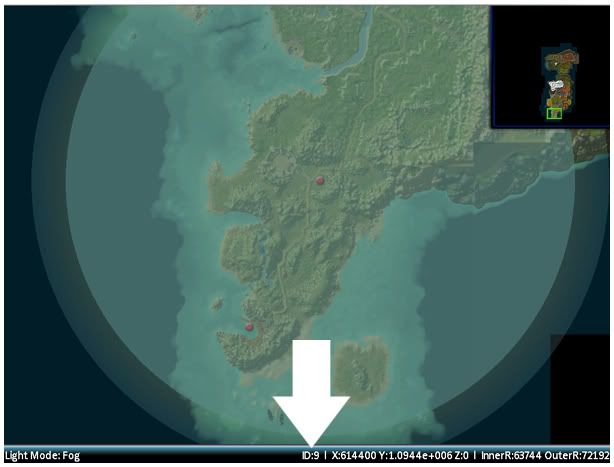
At the bottom of the screen is the ID. Write it down.
Now just browse to the other area and write down the ID.
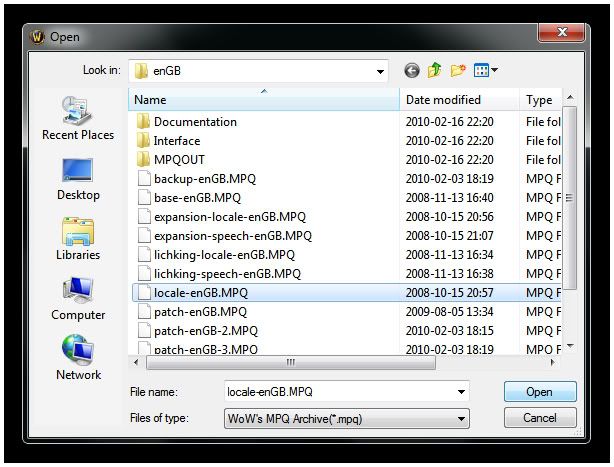
Now what you want to do is to extract the DBC file Light.dbc from your wow data files.
Open MyWarcraftStudio and then open locale-enGB/US which is located in WOWDir\Data\enGB/US
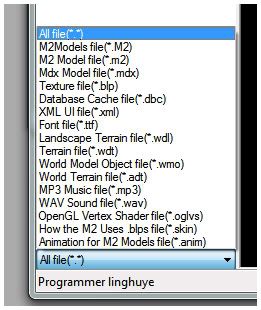
Make sure the file type is set to “All file (*.*)” at the bottom of MyWarcraftStudio.
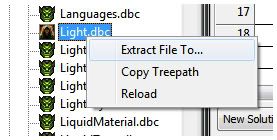
Open the folder DBFilesClient and scroll down to Light.dbc. Right click and extract it to wherever.
Close MyWarcraftStudio. We don’t need it more at the moment.
Open the DBC Editor which you downloaded earlier. IF you didn’t, go do it already.
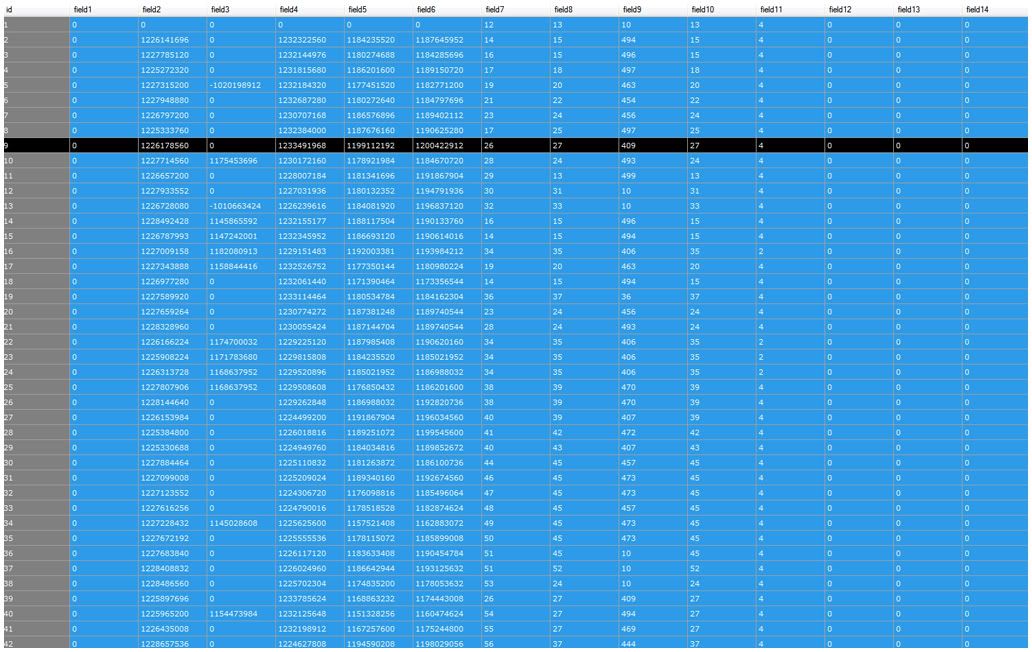
Open Light.dbc and a bunch of numbers should pop up. Fear not! I’ll guide you to where you need to edit.
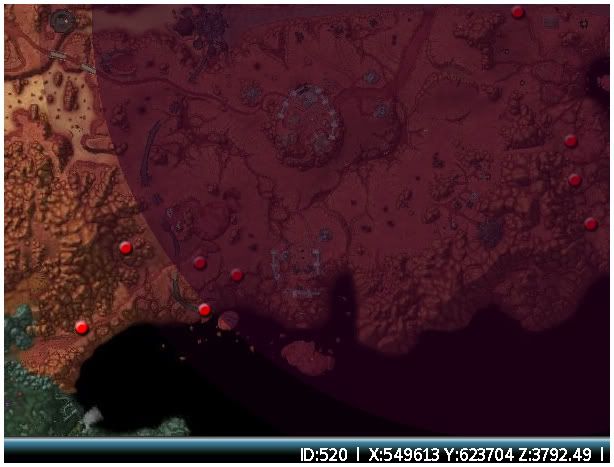
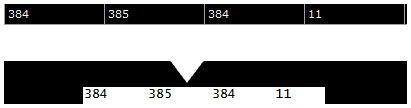
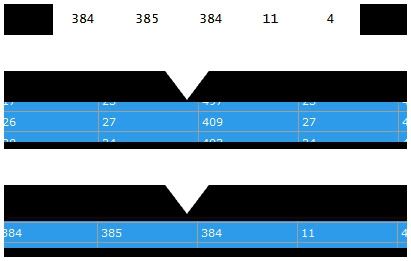
The first column is the ID of all the skyboxes. Did you write down the IDs from lightmapper? I sure hope you did. Browse to the ID of the sky that you want to change TO. In my case it’s ID 520, Hellfire Peninsula. The only fields you need to worry about are #7, #8, #9, #10 and #11. Write these down as we will need them later.
Scroll to the ID of the skybox you want to change, in my case ID#9, Stranglethorn Vale.
Here’s where you need to insert the numbers from the other sky that you just copied.
Save and close DBC Editor. Congratulations! You’ve successfully swapped a sky. But we’re not quite done yet, because you need to see the effects in-game as well.
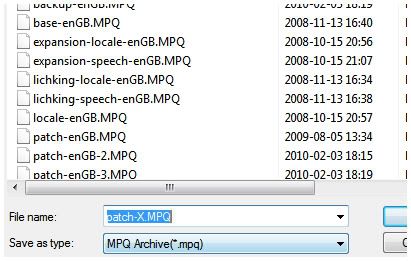
So go ahead and open up MyWarcraftStudio again and create a new MPQ archive. It’s under the Pack(P) tab. Name it patch-X.MPQ. X can be any number or letter which is not used i.e. 4-9 or a-z.
Make sure patch is not capitalized but MPQ is.
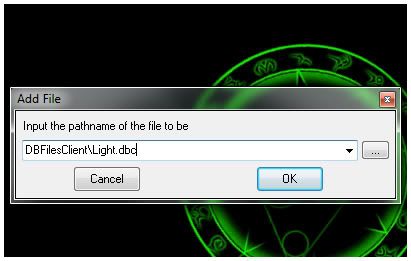
Go to Pack(P) again and add a new file. Click the “…” sign and browse to the edited Light.dbc
DO NOT click OK yet! We need to add the correct path to the file. Remember where we extracted the dbc file from? From DBFilesClient. So we need add this here as well. It should now say:
DBFilesClient\Light.dbc
Pay attention to the capitalized letters! It’s vital.
Save the archive and then close MyWarcraftStudio. Move the patch file to WOWDIR\Data and then you’re all setYou can now view it in-game!
I hope you liked this guide.
Thanks zantas92 for helping me out

![[Skybox] Reflection's Guide to Skybox Swaps](https://www.ownedcore.com/forums/./ocpbanners/1/3/9/6/9/4/8/08b6377e7ee13e5b1d2306cbeed08f8c.png)
![[Skybox] Reflection's Guide to Skybox Swaps](https://www.ownedcore.com/assets/mm/images/wits.png "TradeSafe Middleman")
![[Skybox] Reflection's Guide to Skybox Swaps](https://www.ownedcore.com/forums/images/styles/OwnedCoreFX/addimg/wicc.png "CoreCoins")

Shout-Out
User Tag List
Results 1 to 15 of 37
-
04-06-2010 #1
 Legendary

- Reputation
- 783
- Join Date
- Mar 2008
- Posts
- 3,377
- Thanks G/R
- 1/2
- Trade Feedback
- 0 (0%)
- Mentioned
- 0 Post(s)
- Tagged
- 0 Thread(s)
[Skybox] Reflection's Guide to Skybox Swaps
Freelance Digital Artist
https://reflectionartwork.deviantart.com
You did not desert me
My brothers in arms
![[Skybox] Reflection's Guide to Skybox Swaps](https://www.ownedcore.com/images/ba/g/b2.gif)
-
04-08-2010 #2
Contributor

- Reputation
- 139
- Join Date
- Nov 2009
- Posts
- 406
- Thanks G/R
- 0/0
- Trade Feedback
- 0 (0%)
- Mentioned
- 0 Post(s)
- Tagged
- 0 Thread(s)
Sweet! Finally an up-to-date guide on swapping skyboxes, thanks Reflection! +Rep
 ~ "When you find it hard doing right in what you do, you've got a problem" ~

-
04-08-2010 #3
Active Member

- Reputation
- 182
- Join Date
- Apr 2009
- Posts
- 304
- Thanks G/R
- 0/0
- Trade Feedback
- 0 (0%)
- Mentioned
- 0 Post(s)
- Tagged
- 0 Thread(s)
Awesome guide, but... omg
i changed the Darrowshire and Terrordale skybox but the plagueland skybox remains still... : /
the Eastern plagueland skies should be
43
47
55
any confirmation?Last edited by sirfranc; 04-08-2010 at 11:33 AM.
You like my work? you love my edits? you love RPing?
Come to my RP server then, is still in closed alpha, but azeroth needs YOU.
NO! i won't give my edits to anyone for any other server!!! and my patches (from 1.5) will be encrypted and will require my server, otherwise the game will crash. cya leechers
-
04-08-2010 #4
 Contributor
- Reputation
- 258
- Join Date
- Dec 2007
- Posts
- 1,114
- Thanks G/R
- 0/2
- Trade Feedback
- 0 (0%)
- Mentioned
- 0 Post(s)
- Tagged
- 0 Thread(s)


Finally it's here =D Hope this solves the problem for many people.
Maybe you can add how you make a secluded skybox somewhere in Azeroth. https://i45.tinypic.com/157df7r.jpg
-
04-08-2010 #5
 Contributor
- Reputation
- 147
- Join Date
- Aug 2007
- Posts
- 873
- Thanks G/R
- 0/1
- Trade Feedback
- 0 (0%)
- Mentioned
- 0 Post(s)
- Tagged
- 0 Thread(s)
In my experience Skybox SWAPPING is much easier then adding a new one.

Dragon[Sky] can get into our signatures, AND our pants.
-
04-08-2010 #6
★ Elder ★


- Reputation
- 1179
- Join Date
- Jul 2008
- Posts
- 2,906
- Thanks G/R
- 94/51
- Trade Feedback
- 0 (0%)
- Mentioned
- 0 Post(s)
- Tagged
- 0 Thread(s)
This can also be done with Glitchy's old MES which has a "click for profit" function for
this.
Anyways, nice job Reflection!
-
04-09-2010 #7
Legendary
- Reputation
- 783
- Join Date
- Mar 2008
- Posts
- 3,377
- Thanks G/R
- 1/2
- Trade Feedback
- 0 (0%)
- Mentioned
- 0 Post(s)
- Tagged
- 0 Thread(s)
The MES doesn't work for 3.x. (at least not for skyboxes.) This does.Originally Posted by Xel
Freelance Digital Artist
https://reflectionartwork.deviantart.com
You did not desert me
My brothers in arms
-
04-09-2010 #8
Active Member
- Reputation
- 182
- Join Date
- Apr 2009
- Posts
- 304
- Thanks G/R
- 0/0
- Trade Feedback
- 0 (0%)
- Mentioned
- 0 Post(s)
- Tagged
- 0 Thread(s)
i have a problem in Lightmapper, the lower bar is cut in half, i can't resize the window and even in that state if i rollover a skybox nothink appears written... is a problem of vista?
You like my work? you love my edits? you love RPing?
Come to my RP server then, is still in closed alpha, but azeroth needs YOU.
NO! i won't give my edits to anyone for any other server!!! and my patches (from 1.5) will be encrypted and will require my server, otherwise the game will crash. cya leechers
-
04-09-2010 #9
★ Elder ★
- Reputation
- 1179
- Join Date
- Jul 2008
- Posts
- 2,906
- Thanks G/R
- 94/51
- Trade Feedback
- 0 (0%)
- Mentioned
- 0 Post(s)
- Tagged
- 0 Thread(s)
Re: Glitchy's old MES
Actually it does. Yeah, after saving there's an error which closes the programOriginally Posted by Reflection
but still.. the MPQ gets correctly saved to the location you choose.
I'm not trying to say this guide is useless or anything, no.
Instead it's well written and serves a more in-depth look into
skyboxes. Good job Reflection!
-
04-09-2010 #10
Active Member
- Reputation
- 182
- Join Date
- Apr 2009
- Posts
- 304
- Thanks G/R
- 0/0
- Trade Feedback
- 0 (0%)
- Mentioned
- 0 Post(s)
- Tagged
- 0 Thread(s)
oddly enough the Glitchy MES is not saving anything to me : /Originally Posted by Xel
You like my work? you love my edits? you love RPing?
Come to my RP server then, is still in closed alpha, but azeroth needs YOU.
NO! i won't give my edits to anyone for any other server!!! and my patches (from 1.5) will be encrypted and will require my server, otherwise the game will crash. cya leechers
-
04-09-2010 #11
Legendary
- Reputation
- 783
- Join Date
- Mar 2008
- Posts
- 3,377
- Thanks G/R
- 1/2
- Trade Feedback
- 0 (0%)
- Mentioned
- 0 Post(s)
- Tagged
- 0 Thread(s)
Oh I thought it didn't work at all. Well worth a shot then!Originally Posted by Xel
Thanks guys Glad you like it!
Freelance Digital Artist
https://reflectionartwork.deviantart.com
You did not desert me
My brothers in arms
-
04-09-2010 #12
Contributor
- Reputation
- 258
- Join Date
- Dec 2007
- Posts
- 1,114
- Thanks G/R
- 0/2
- Trade Feedback
- 0 (0%)
- Mentioned
- 0 Post(s)
- Tagged
- 0 Thread(s)
Glitchy MES skybox swaping is not as certain as just editing lines in the DBC files.
https://i45.tinypic.com/157df7r.jpg
-
04-09-2010 #13
Sergeant
- Reputation
- 39
- Join Date
- Feb 2010
- Posts
- 66
- Thanks G/R
- 0/0
- Trade Feedback
- 0 (0%)
- Mentioned
- 0 Post(s)
- Tagged
- 0 Thread(s)
Wow, this is really nice! Thanks, certainly going to use this!

-
04-11-2010 #14
Contributor
- Reputation
- 91
- Join Date
- Feb 2008
- Posts
- 1,103
- Thanks G/R
- 0/1
- Trade Feedback
- 0 (0%)
- Mentioned
- 0 Post(s)
- Tagged
- 0 Thread(s)
Going to Favorite this for later use.
Thank you! Death to all but Metal.
-
04-11-2010 #15
Member
- Reputation
- 19
- Join Date
- Sep 2008
- Posts
- 8
- Thanks G/R
- 0/0
- Trade Feedback
- 0 (0%)
- Mentioned
- 0 Post(s)
- Tagged
- 0 Thread(s)

Brilliant guide helped me change the skybox with very easy to read instructions, bookmarked for future reference and recommendation

 Reply With Quote
Similar Threads
-
Skybox swap
By rasmus285 in forum WoW ME Questions and RequestsReplies: 13Last Post: 03-04-2010, 09:34 AM -
[Request] Short guide to mount swapping
By silentshot in forum WoW ME Questions and RequestsReplies: 0Last Post: 05-17-2009, 10:50 PM -
(Request) Guide:manual Spell swap 3.1.1
By fatrabit in forum WoW ME Questions and RequestsReplies: 1Last Post: 05-03-2009, 10:09 PM -
[Request]HELP ME SKYBOX SWAP
By obox in forum WoW ME Questions and RequestsReplies: 3Last Post: 03-08-2009, 04:57 AM -
[Guide] Advanced Enchant Swapping using DBC
By Khalan in forum WoW ME Tools & GuidesReplies: 16Last Post: 08-07-2008, 03:36 AM
-
OwnedCore Forums
casino news World of Warcraft Pokemon GO MMO Overwatch RTS Casino reviews bc game bc game bc game bc game bc game bc game bc game bc game bc game bc game bc game bc game bc game bc game bc game bc game bc game bc game bc game bc game bc game bc game bc game bc game bc game bc game bc game bc game bc game bc game bc game bc game bc game bc game bc game bc game bc game bc game bc game bc game bc game bc game bc game bc game bc game bc game bc game bc game bc game bc game -
casino
Casino Gambling Online casinos Casino en ligne Jackpot City stake stake stake stake stake stake stake stake stake stake stake stake stake stake stake stake no deposit bonus codes roobet Casino reviews Bitcoin casino Paypal Casino Lucky8 1xbit heycasino Betsson Bookmaker - Top ✅Jackpotcity Casino Casinos en ligne avec Neon54 Casino - Bonus, ✅Crocoslots Casino ✅Play Frank Casino - ⭐ Bitstarz Casino - ✅Betfred Bookmaker GoldenBet Casino- 100% -
CoreCoins
CoreCoins CoreCoins FAQ Shout-Out Banner Ads -
My OwnedCore
My Profile Notifications Settings Buy CoreCoins About Us


Privacy Policy | Cookie Policy | Terms | Contact Us
Available Payment Methods:-
![[Skybox] Reflection's Guide to Skybox Swaps](https://www.ownedcore.com/images/paybutton/paypal.png)
![[Skybox] Reflection's Guide to Skybox Swaps](https://www.ownedcore.com/images/paybutton/skrill.png)
![[Skybox] Reflection's Guide to Skybox Swaps](https://www.ownedcore.com/images/paybutton/payop.png)
-
Casino
Casobet | Bovada casino | Casino Reviews | Sportsbook | BitCasino | Casino deposit offers | Cresus Casino | Drake Casino | Millionz | BuzzLuck | NeedForSpin | Bc Game | MrGreen | Welcome Bonuses | Betflip Casino | Crypto Casino | Rollino Casino | Jackpotcity | USA CASINO | How to Play BlackJack Online | Oshi Casino | Bitstarz | Lucky Dreams Casino | InstantPay | Bonus code | Slot machines | Mystake Casino | Casino Bonus