![[Guide] Model Editing: For Dummies - Weapons and Shields](https://www.ownedcore.com/forums/images/styles/OwnedCoreFX/addimg/menu4.svg)
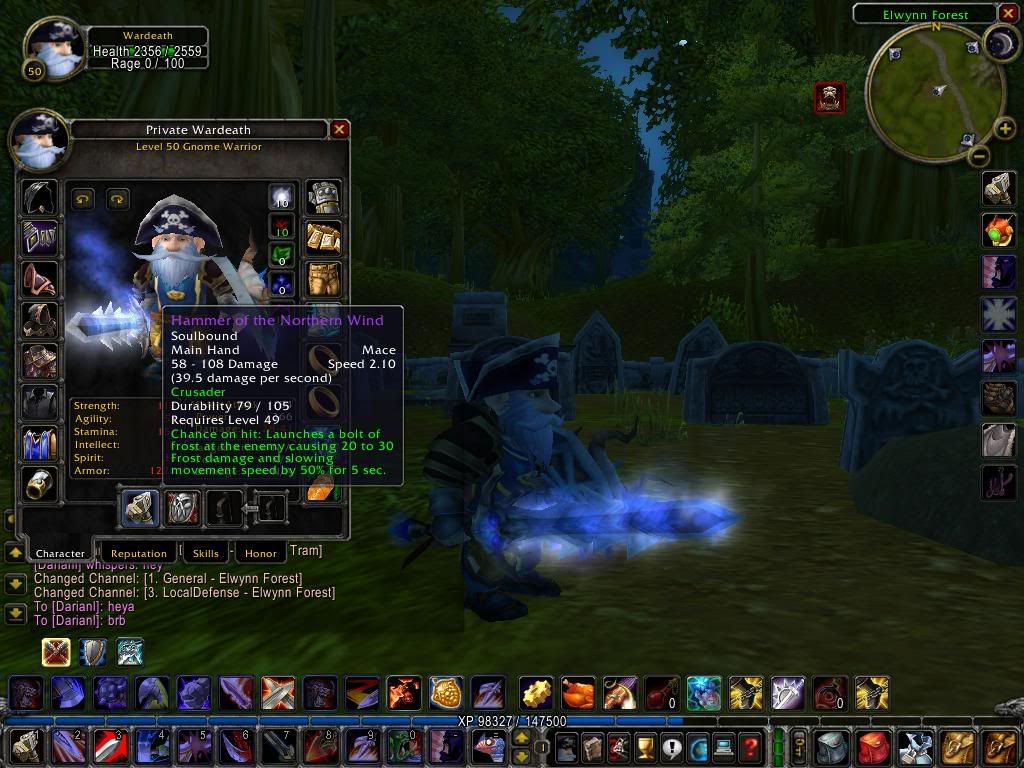
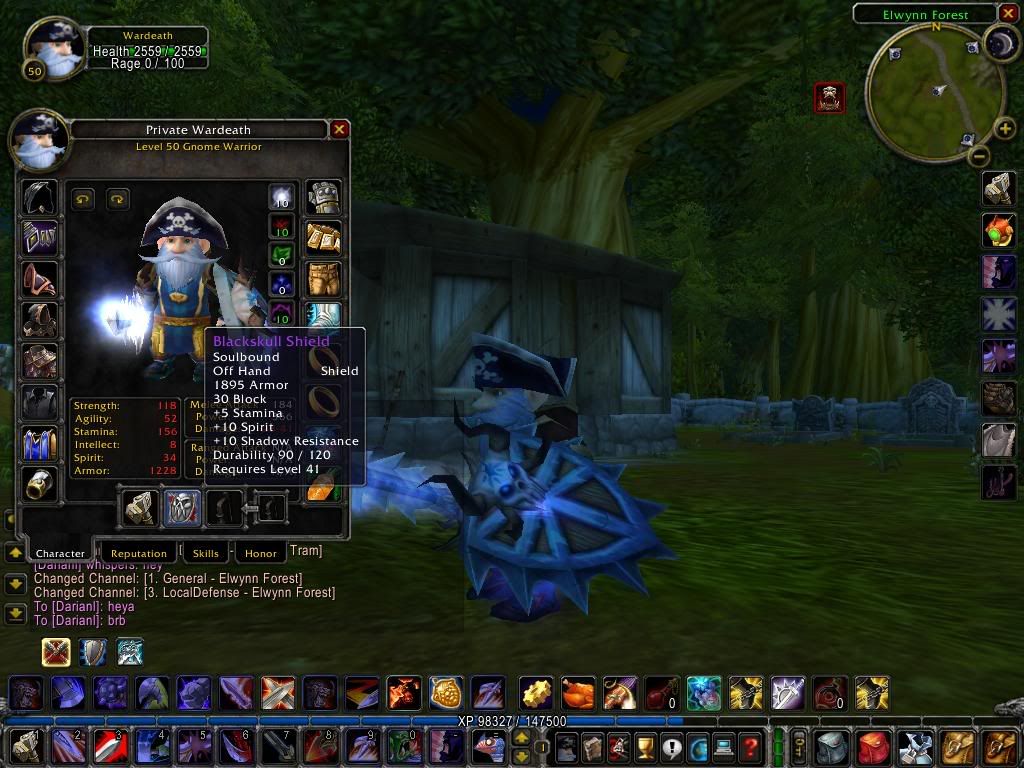
Welcome, to Krazzee's (Updated for TBC) Model Editing for Dummies: Weapons and Shields!!! I am here to instruct you on how to change the look of your weapons and shields, I shall be changing my Hammer of the Northern Winds and Blackskull shield into a Naxxramas 1-H sword and Shield (I forgot the name) Sorry if the guide is a bit long, but i wanted to make it super easy for everyone
Links you will need:
WoW Model Viewer
http://www.wowmodelviewer.org/index....fileinfo&id=24
MyWarcraftStudio (Sexiest thing on planet Earth)
http://www.cnitblog.com/Files/linghu..._0.10.6337.rar
Or
http://linghuye.googlepages.com/MyWa..._0.10.6337.rar
(Use WoW Model Viewer to find the blp and m2 Goblin Workshop is out of date now.)
http://www.goblinworkshop.com
____________________________________________________________
The Guide:
1) download WoW Model Viewer and My Warcraft Studio (links are above)
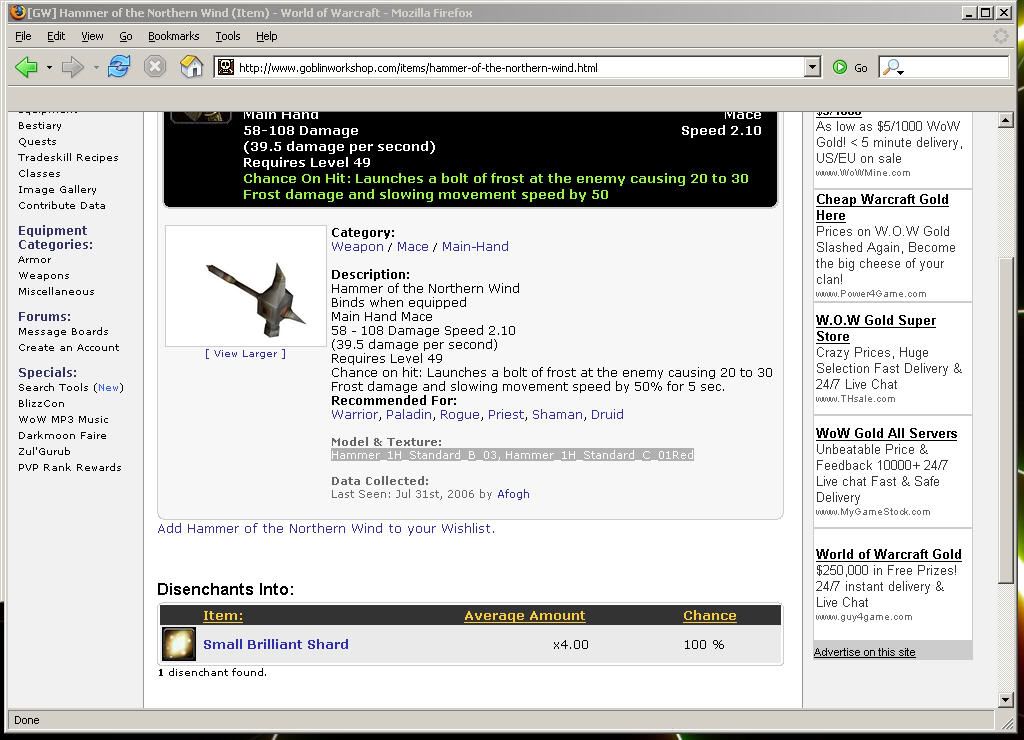
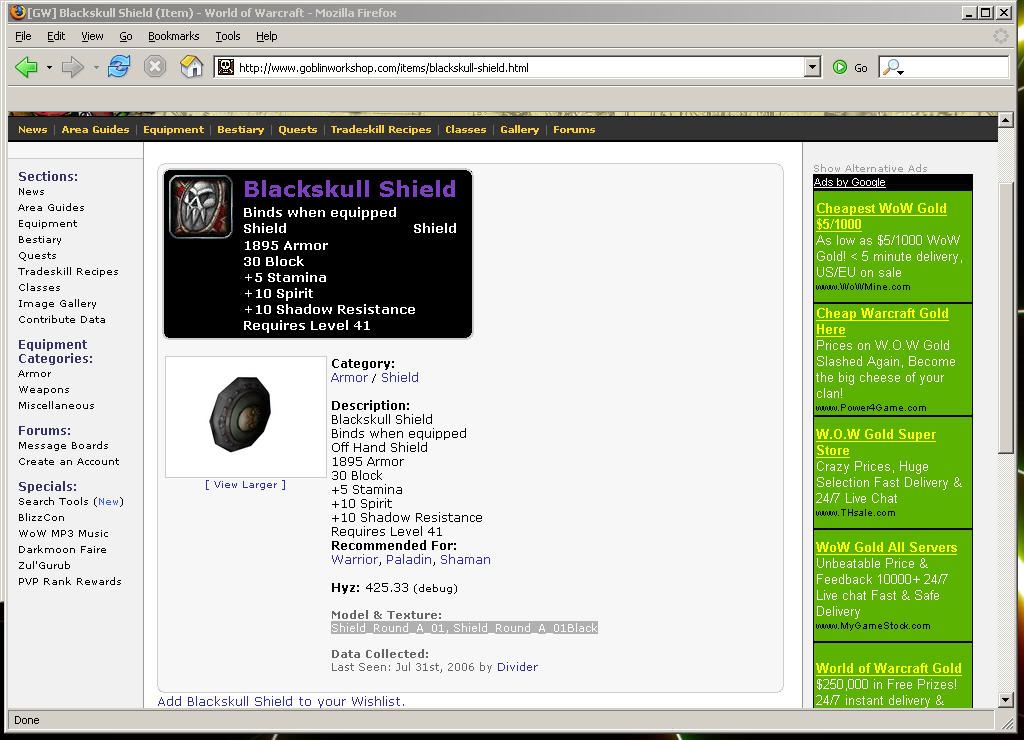
2) go to http://www.goblinworkshop.com the reason is it gives you the texture and model codes for your weps, so we can rename the ones you want to the ones you have (it's how we fool the system, all will be revealed later.)
3) type in the name of your weapon/shield (i'm starting with my weapon, hammer of the northern winds.) then scroll down till you find it. click on it (NOTE: some weps dont have the model and textures listed, if they dont tell me, i'll get it for you) look for the model codes and texture codes i highlighted them in gray for you.
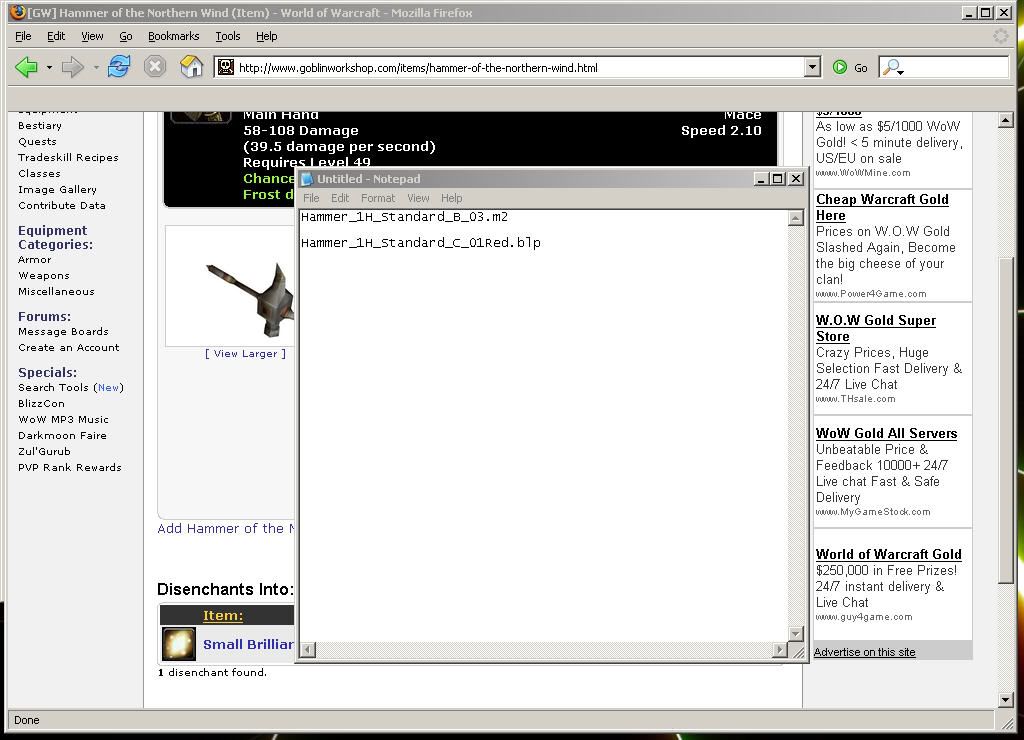
4) Next open up notepad, wordpad etc.... then type in the first of the code, which is the model code so it should be ******.m2, then copy the second code, which is a texture code so it should be *****.blp (NOTE: you have to add the .m2 and .blp the m2 file is always first on goblin workshop, and the blp is always second)
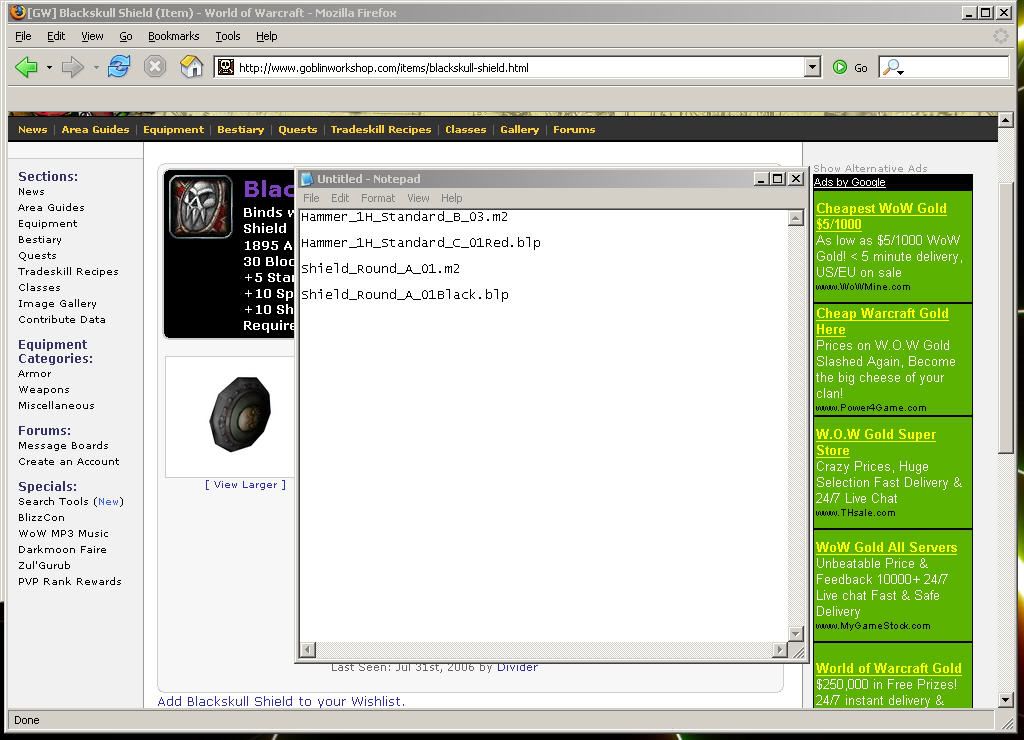
5) (NOTE: skip this step if you are not going to do a shield) do the same as you did for your weapon, and look for your shield. look for the model code and texture code.
6) Then just as before type it into the notepad along with the weapon codes.
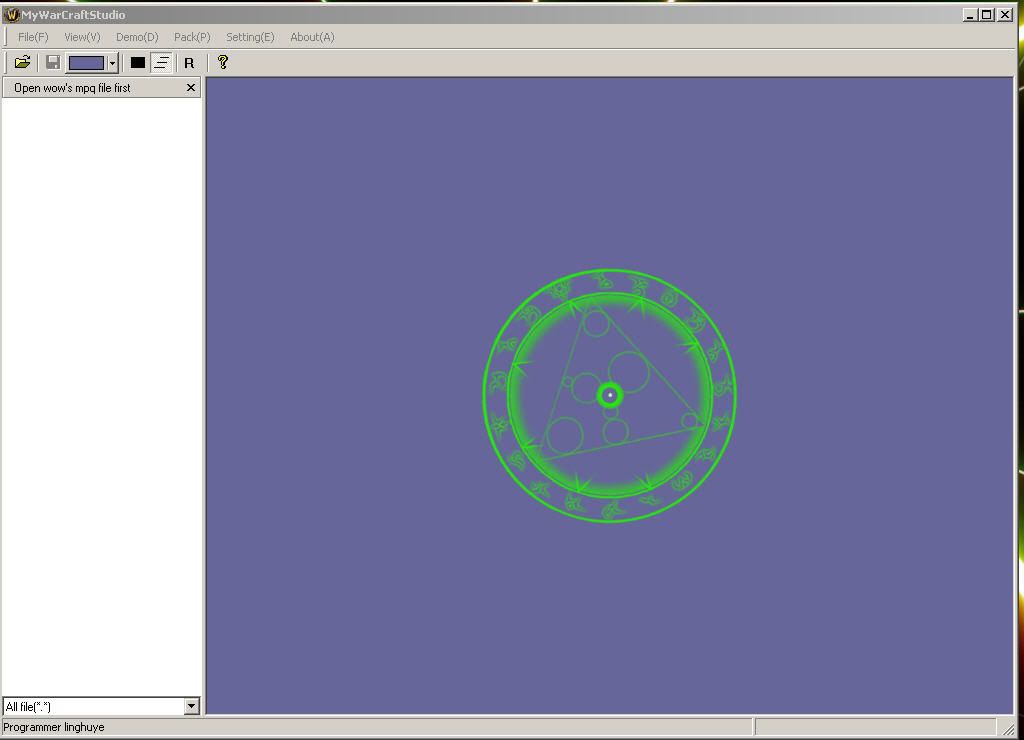
7) now open mywarcraftstudio
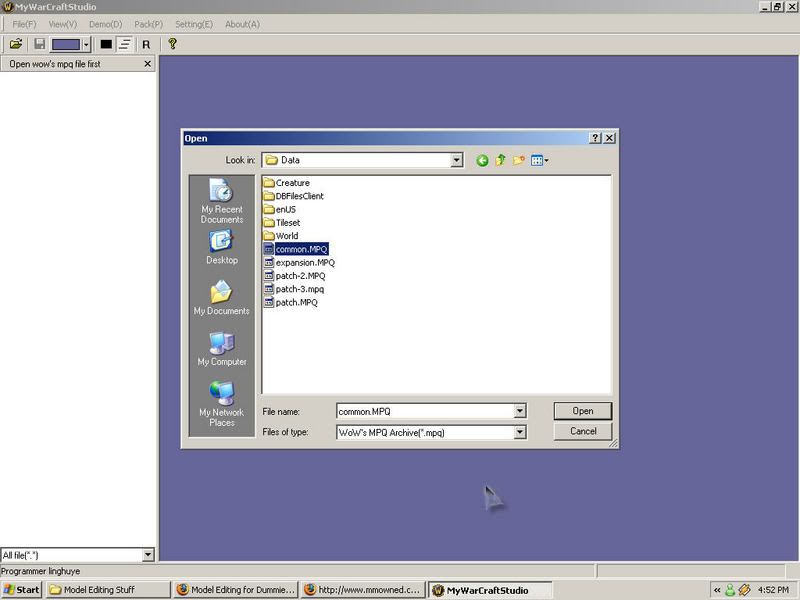
Now click on the folder in the top left corner of the screen, and click on patch.MPQ (Note if patch.MPQ does not have what you want go to common.mpq for the normal files, and the ones like Patch.mpq, Patch-2.mpq, and Expansion.mpq, for the new stuff.
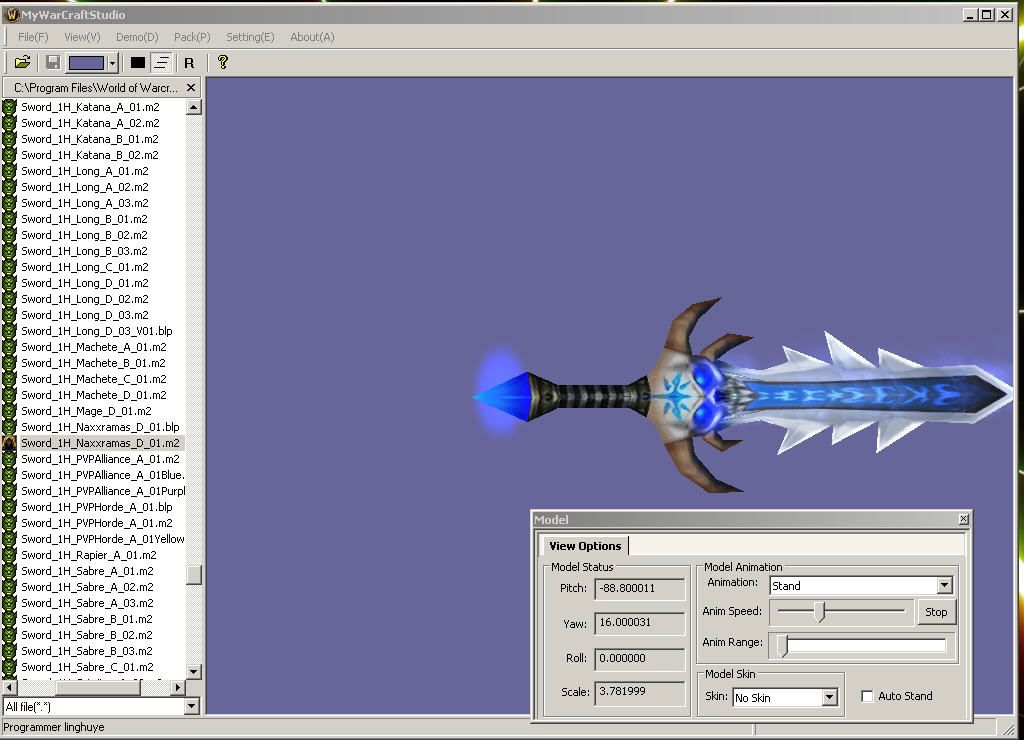
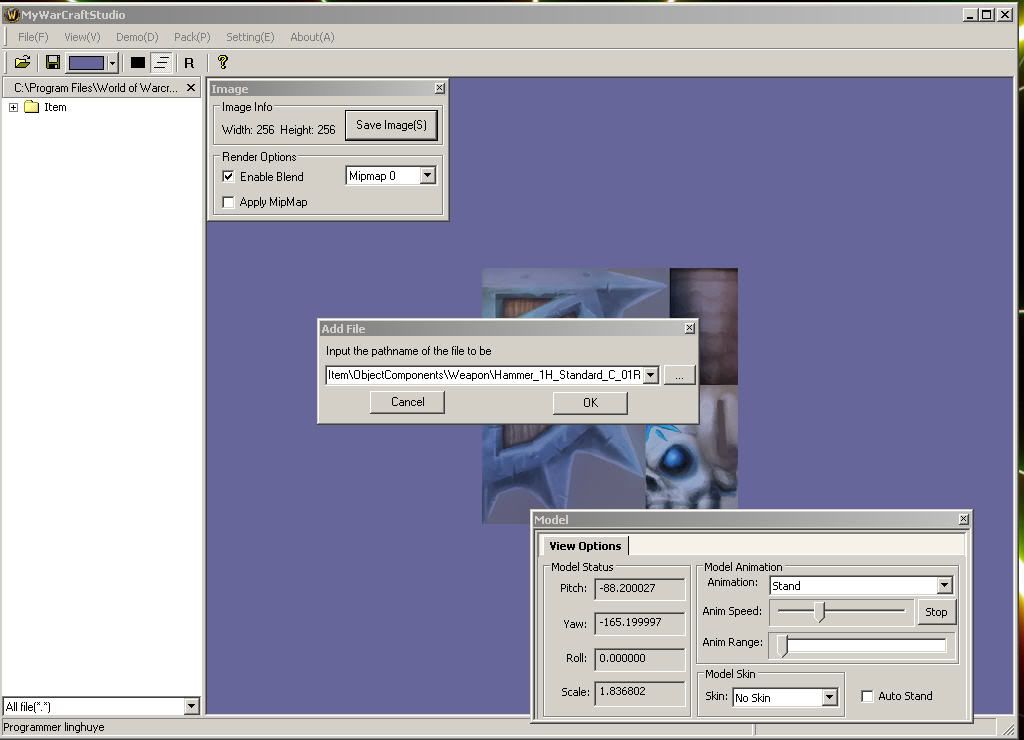
8 1/2!!!) this step is helpful, what you do is open warcraftmodelviewer, then go to items, then weapons or shields, then go down the list till you find the one you want, look at the name, remember that name, then continue to step 9.
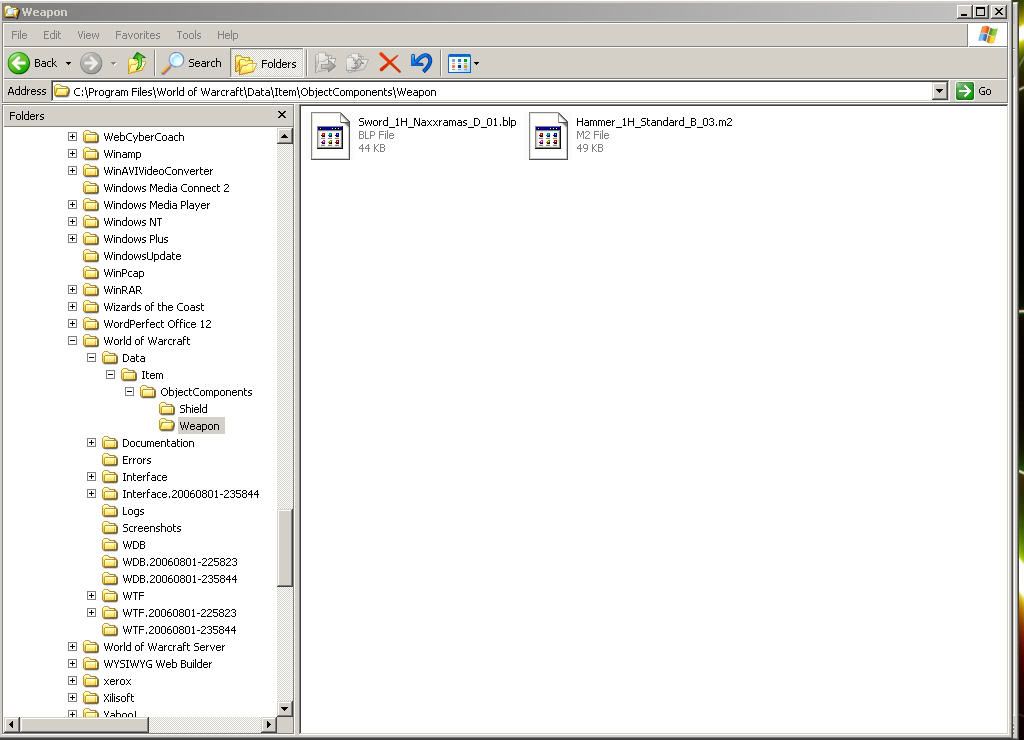
9) Now go down to Item, then ObjectComponents, then Weapon or Shield, then go down and find the code of the weapon you want, in this case the .m2 and .blp for my wep are right next ot each other
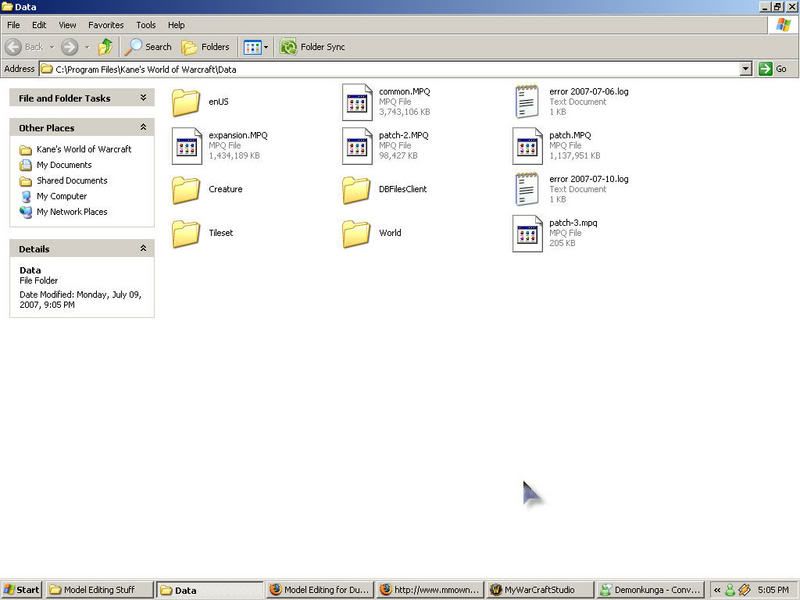
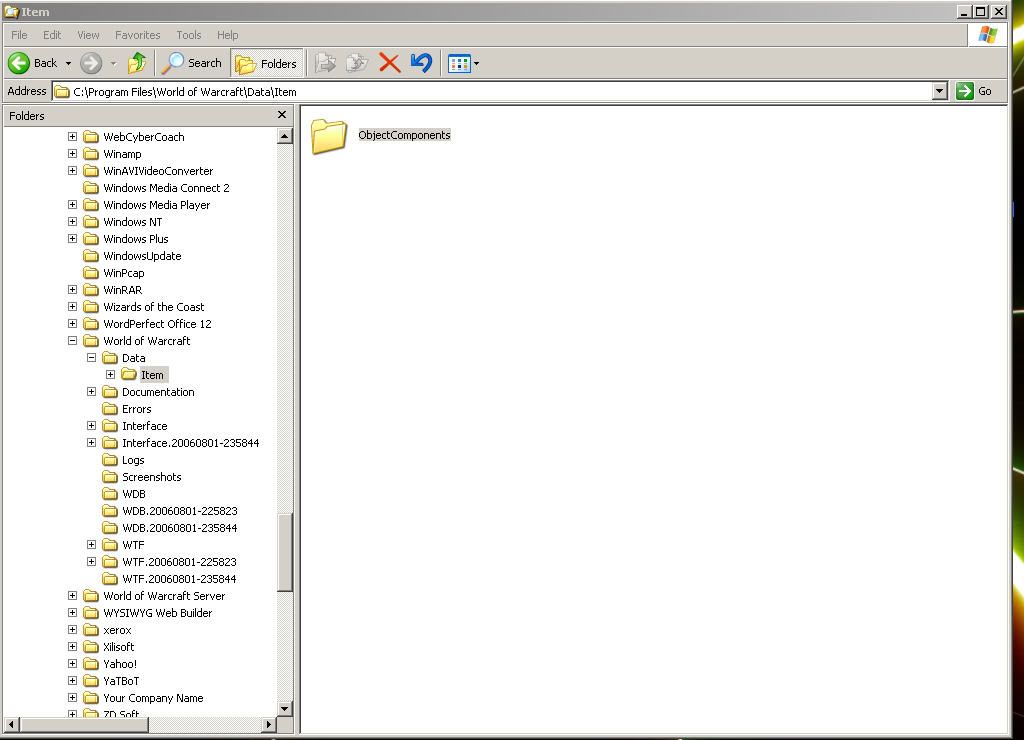
10) Now go to your C:\Program Files\World of Warcraft\Data it should look somewhat like the pic below.
11) Now inside your C:\Program Files\World of Warcraft\Data make a folder called Item. (NOTE: it is case sensitive so type it exactly as i do.)
12) Now inside the Item folder you just made make a folder called ObjectComponents (NOTE: it is case sensitive so type it exactly as i do.)
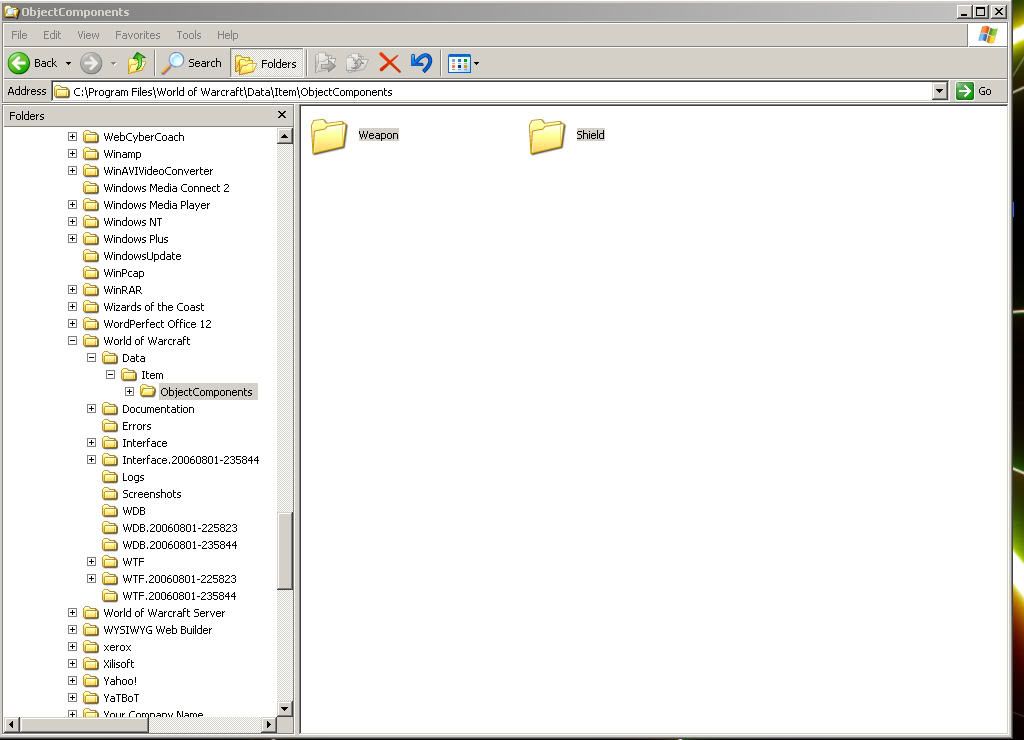
13) Now inside that folder make 2 more folders called Weapon and Shield. (NOTE: it is case sensitive so type it exactly as i do.)
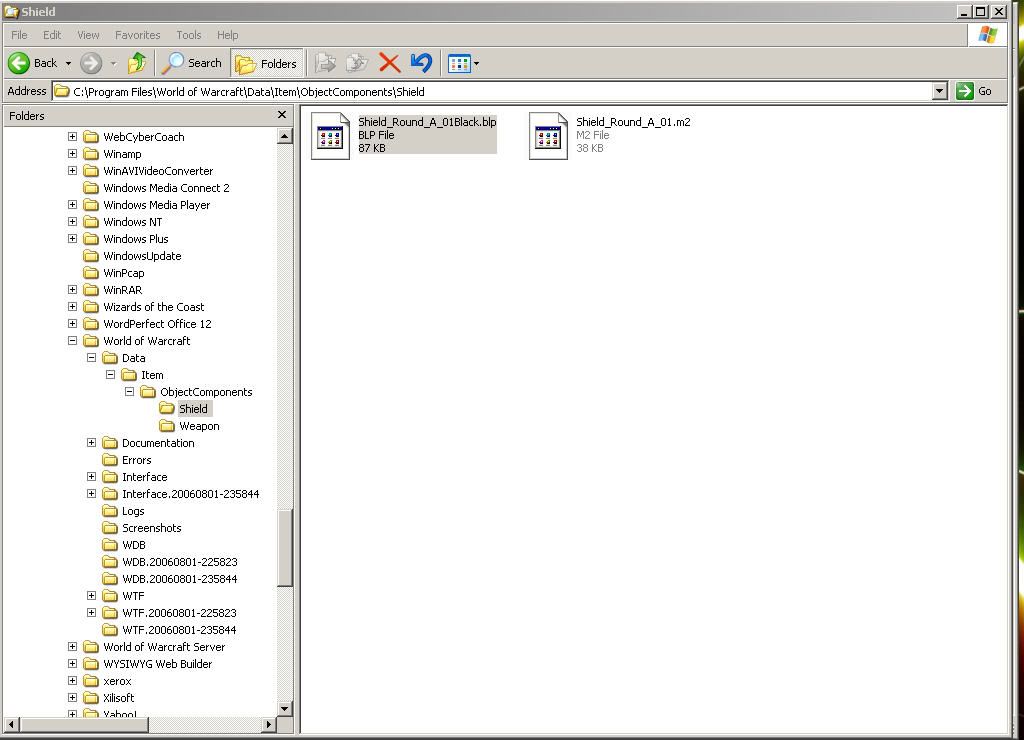
14) Now go into your Weapon folder, it should look empty exactly like below.
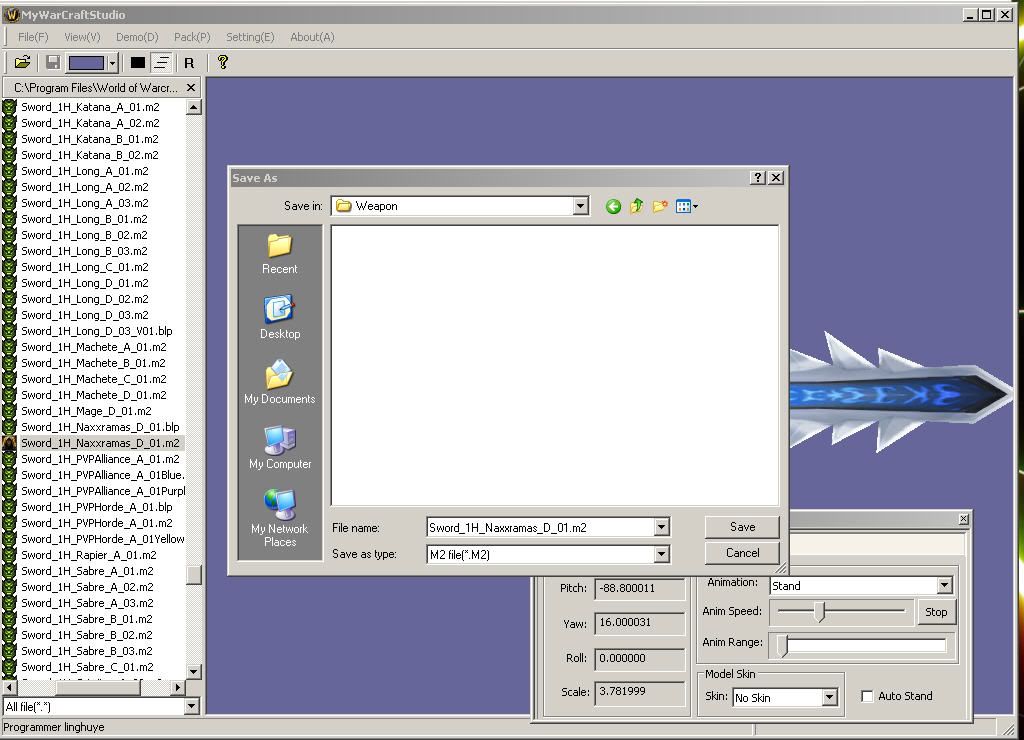
15) Now right click on the .m2 and click extract, then go to your weapon folder, and extract the .m2 there.
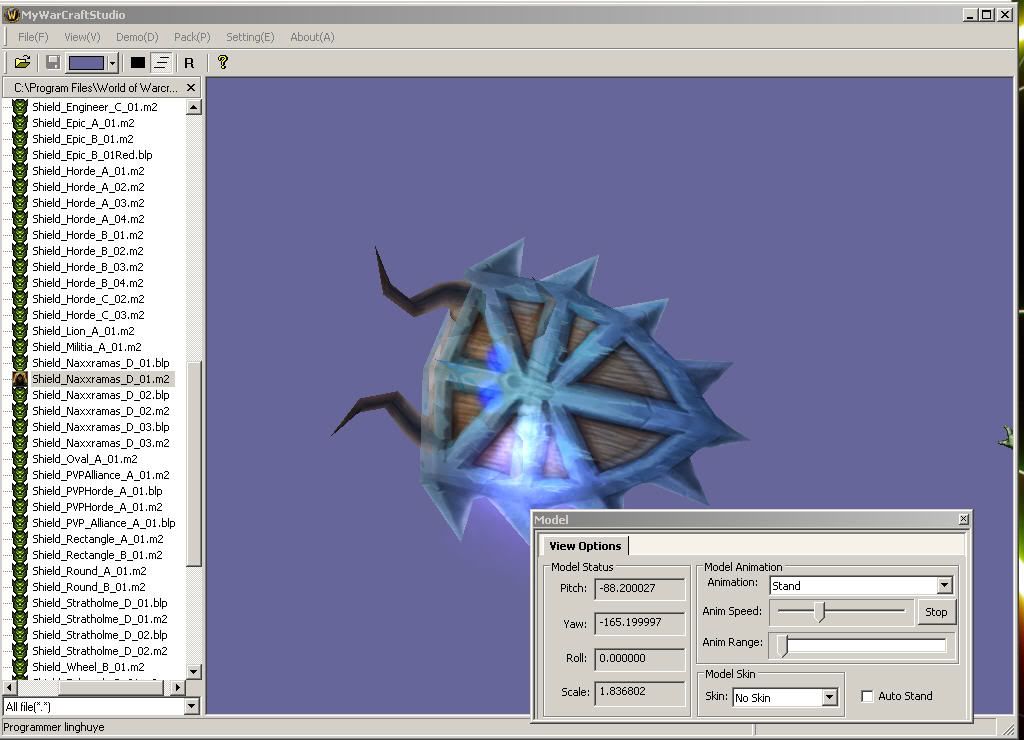
16) now do the same with the .blp, (NOTE: skip the next 3 steps if you are not doing a shield) now go to shield in the patch.MPQ or Model.MPQ or Texture.MPQ, whichever one has your .m2 and .blp files. then find the shield you want.
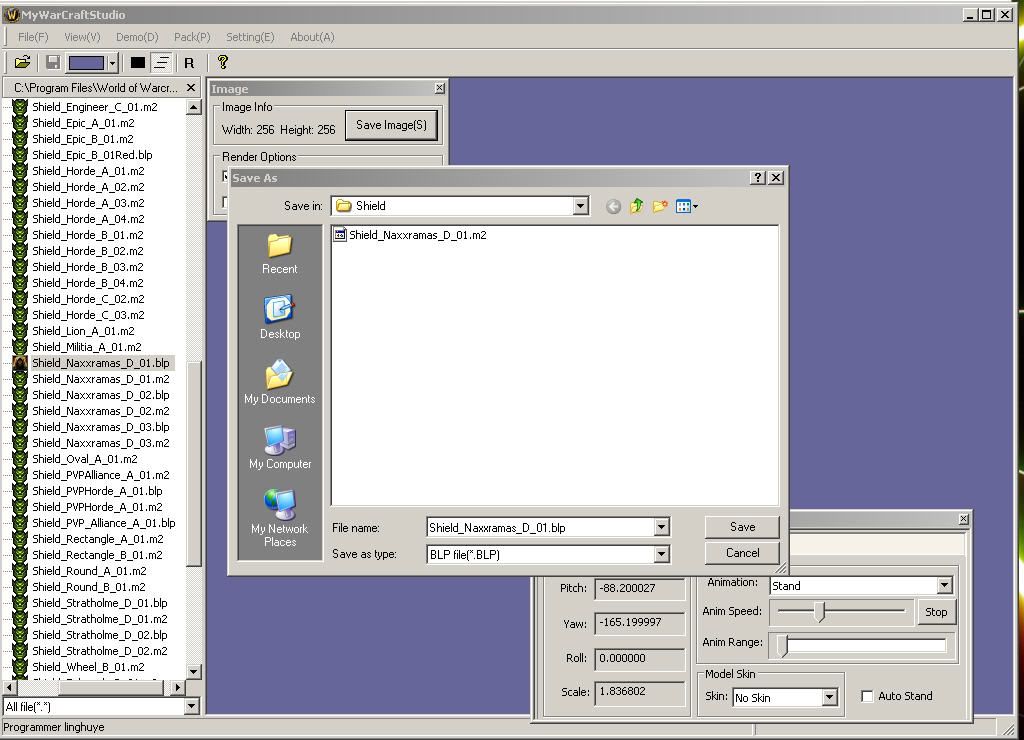
17) Now extract the .m2 to the folder Shield that you made.
1
19) Now rename the .m2 to the name of the .m2 for the wep you took from goblin workshop.
20) Now rename the .blp to the .blp you got of the wep you are using that you got from goblin workshop. when done it should look like below. 2 newly named .m2's and .blp
21) (NOTE: skip the next 2 steps if you are not editing a shield. now go to the shield folder you made, and rename the .m2 to the .m2 of the shield you have taht you got from goblin workshop.
22) now rename the .blp in the shield folder to the .blp of the shield you have that you got from goblin workshop. when done the folder should look like below. two brand new shield .m2's and .blps.
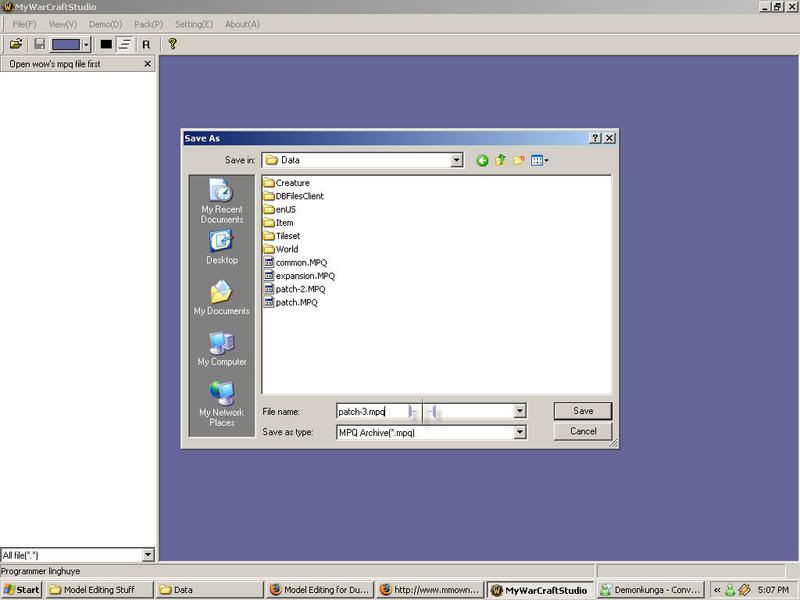
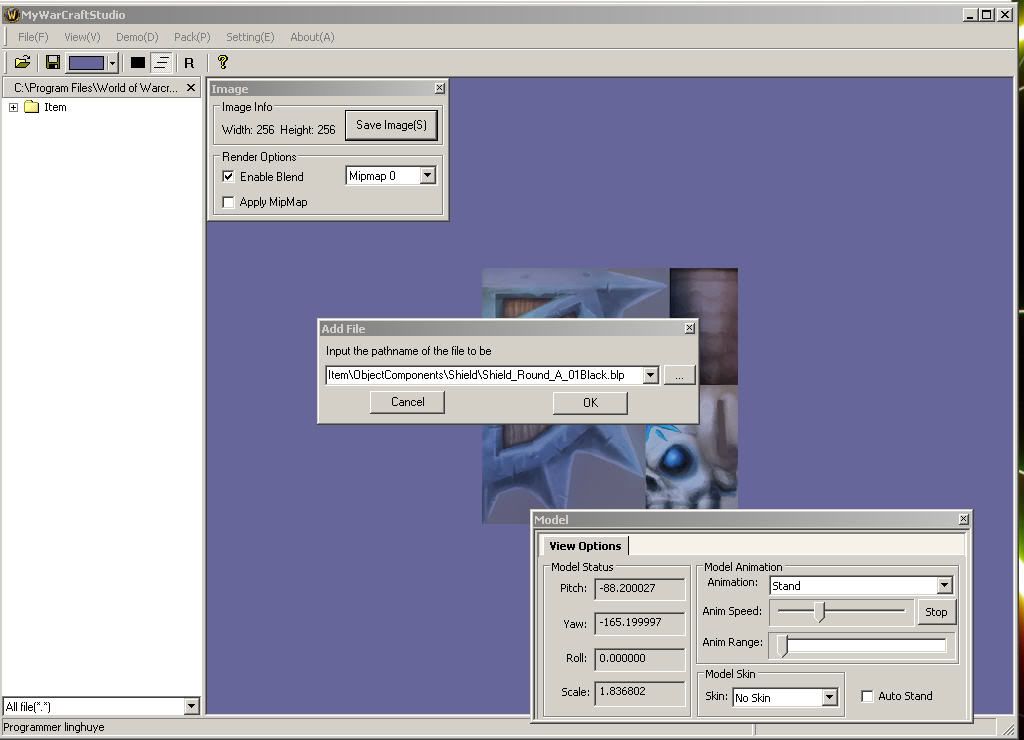
23) now go to MyWarcraftStudio, and click on Pack(P) then Create MPQ archive. now a window should pop up. go to your c:\Program Files\World of Warcraft\Data and call it patch-3.MPQ, hit open. (BTW, patch 3-9 work, as do Patch-A-Z)
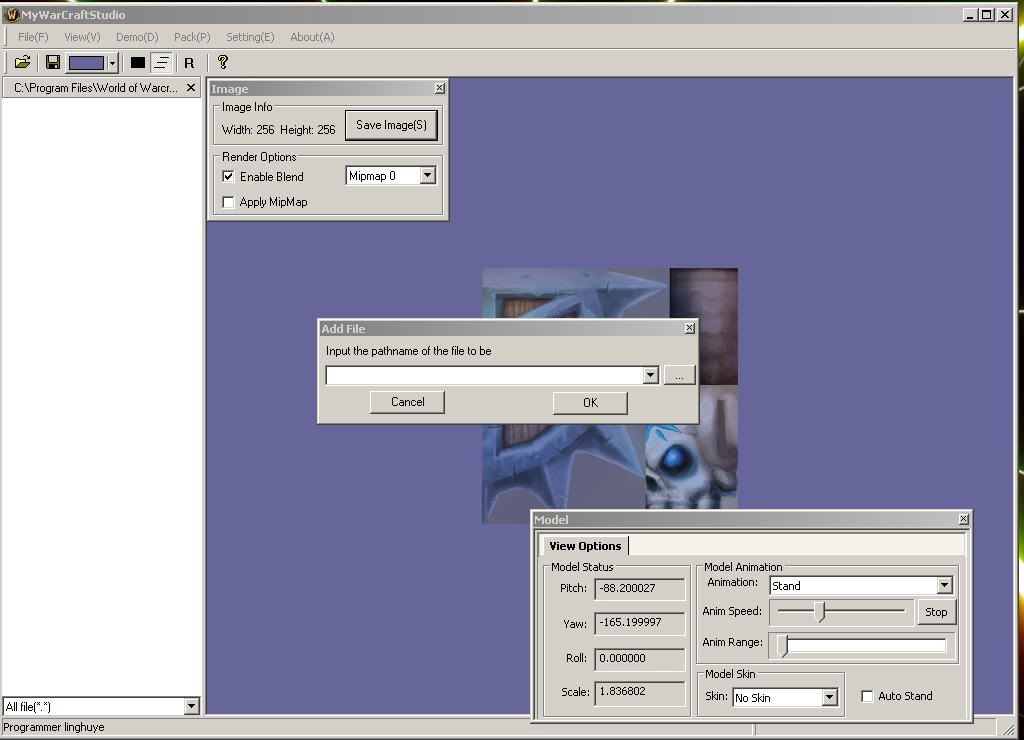
24) Now click on add file to archive. a window should pop up like below. hit the ... to browse folders.
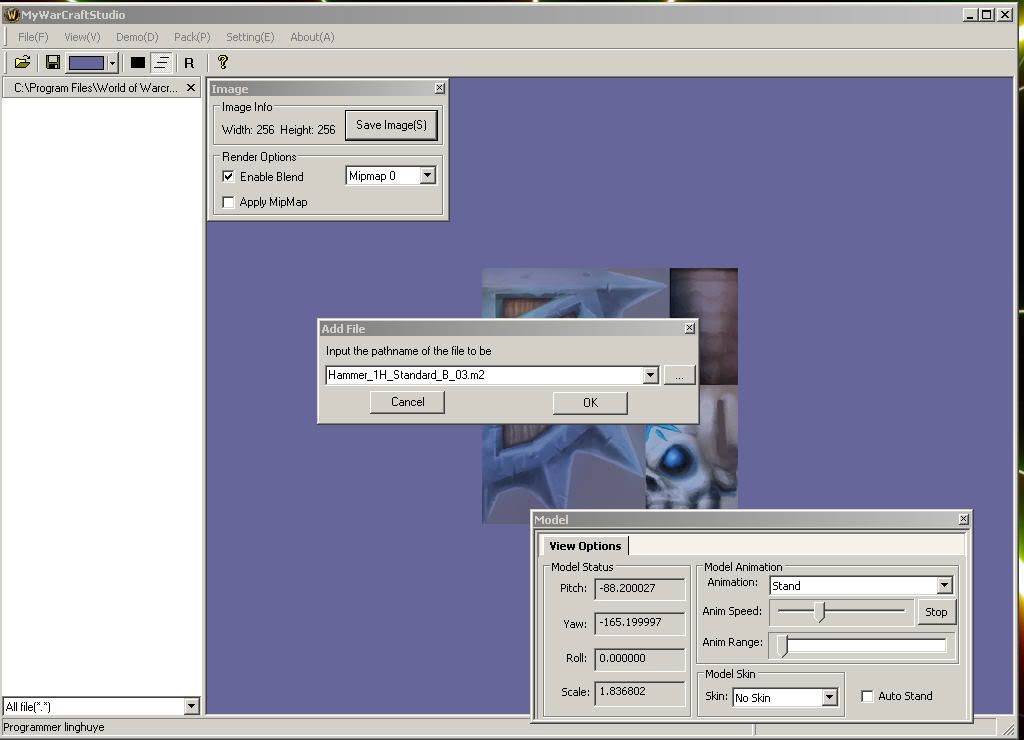
25) now go to your weapon folder, and double click the m2, the name of the m2 should pop up into the bar like so.
26) now click at the beginning of the ******.m2 and type Item\ObjectComponents\Weapon. like below. then hit ok.
27) Now click on add file to archive again. a window should pop up like below. hit the ... to browse folders.
2
29) (NOTE: skip these next 6 steps if you are not doing a shield)Now click on add file to archive again. a window should pop up like below. hit the ... to browse folders.
30) now go to the folder you made called Shield, and double click the .m2, the name of the .m2 should pop up into the bar like below.
31) now click behind it and type Item\ObjectComponents\Shield like below.
32) Now click on add file to archive. a window should pop up like below. hit the ... to browse folders.
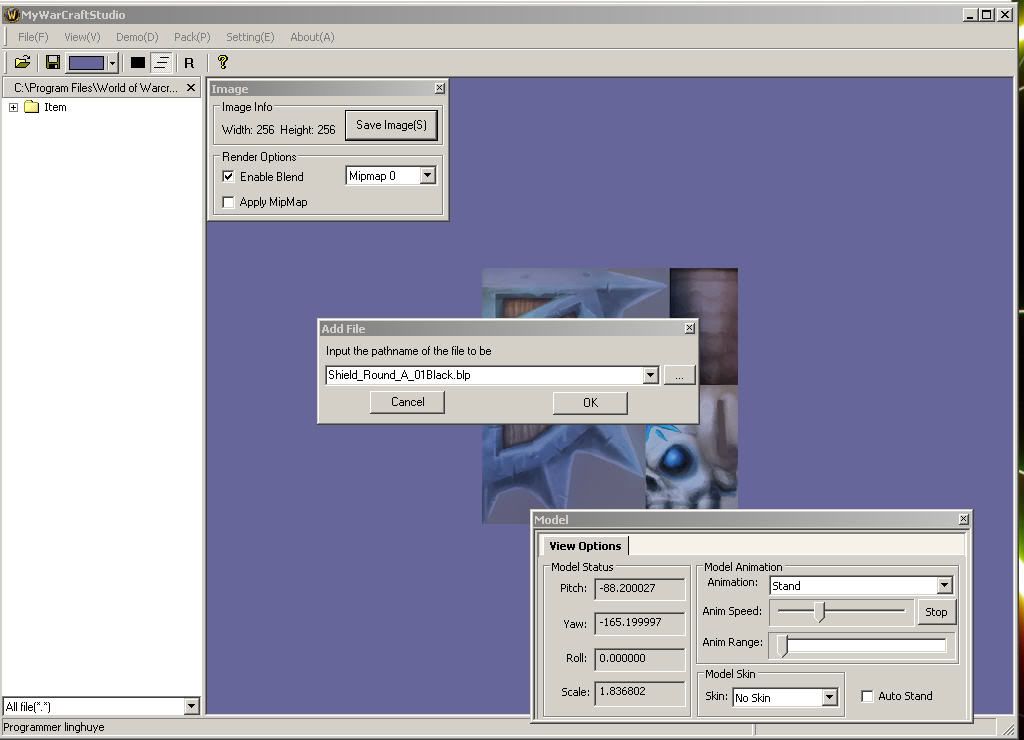
33) now in your Shield folder double click the .blp it should pop up into the bar like below.
34) Now click behind it and type Item\ObjectComponents\Shield.
35) Now exit out of all your folders and model viewers and studios, and run WoW and be amazed at the models of your new weps and shields!!
To summarize how to do it, in a nutshell you:
1) open my warcraft studio, go to http://www.goblinworkshop.com then type in the weapon/shield you have, find it, find the codes on the thing, if the codes are not there, use warcraftmodelviewer till you find yours. now copy the code into a word editor, notepad etc..... the first one is the .m2, so call it ****.m2 the second one is always a .blp, so call it ******.blp.
2)now go into mywarcraft studio and click on common.MPQ.
3) now in your world of warcraft data folder make a folder called Item, then in that make one called ObjectComponents, then in that make one called Weapon or Shield, depending on what you want.
4) now extract the .m2 and .blp file of the thing you want your wep/shield to look like into your Shield or Weapon folder, now rename the .m2 and .blp to the .m2 and .blp you got off of goblin workshop.
5) now click on create a new MPQ archive, put it in your data folder, then call it patch-3.MPQ then hit open.
6) now hit add file to archive..., then click the ... to browse, now go to your Weapon or Shield folder, and double click on the .m2, then it should pop up in the bar, behind it, type either Item\ObjectComponents\Weapon or Item\ObjectComponents\Shield depending on what one you are doing. Repeat for the .blp.
7) now exit out of all folders and windows, run WoW and voila!

![[Guide] Model Editing: For Dummies - Weapons and Shields](https://www.ownedcore.com/forums/./ocpbanners/1/3/9/6/9/4/8/08b6377e7ee13e5b1d2306cbeed08f8c.png)
![[Guide] Model Editing: For Dummies - Weapons and Shields](https://www.ownedcore.com/assets/mm/images/wits.png "TradeSafe Middleman")
![[Guide] Model Editing: For Dummies - Weapons and Shields](https://www.ownedcore.com/forums/images/styles/OwnedCoreFX/addimg/wicc.png "CoreCoins")

Shout-Out
User Tag List
Results 1 to 15 of 294
-
08-03-2006 #1
 Banned
- Reputation
- 574
- Join Date
- Jun 2006
- Posts
- 1,333
- Thanks G/R
- 0/0
- Trade Feedback
- 0 (0%)
- Mentioned
- 0 Post(s)
- Tagged
- 0 Thread(s)


[Guide] Model Editing: For Dummies - Weapons and Shields
Last edited by Krazzee; 07-23-2007 at 04:36 PM.
![[Guide] Model Editing: For Dummies - Weapons and Shields](https://www.ownedcore.com/images/ba/g/b2.gif)
-
08-03-2006 #2
Legendary


- Reputation
- 633
- Join Date
- Feb 2006
- Posts
- 2,996
- Thanks G/R
- 2/20
- Trade Feedback
- 0 (0%)
- Mentioned
- 0 Post(s)
- Tagged
- 0 Thread(s)
excellent guide +REP
-
08-03-2006 #3
Member
- Reputation
- 1
- Join Date
- Aug 2006
- Posts
- 5
- Thanks G/R
- 0/0
- Trade Feedback
- 0 (0%)
- Mentioned
- 0 Post(s)
- Tagged
- 0 Thread(s)
Well badly some of the items dont have models&textures on goblinworkshop.. Like Zandalar Illusionist's shoulders and Bloodcaller Tier1, Tier2
-
08-03-2006 #4
Active Member

- Reputation
- 69
- Join Date
- Aug 2006
- Posts
- 323
- Thanks G/R
- 0/0
- Trade Feedback
- 0 (0%)
- Mentioned
- 0 Post(s)
- Tagged
- 0 Thread(s)
nice guide!
+rep[IMGL]https://img229.imageshack.us/img229/9712/fatbushae3.jpg[/IMGL]
-
08-03-2006 #5
Member
- Reputation
- 7
- Join Date
- Aug 2006
- Posts
- 25
- Thanks G/R
- 0/0
- Trade Feedback
- 0 (0%)
- Mentioned
- 0 Post(s)
- Tagged
- 0 Thread(s)
great guide +rep
but for some reason when i try to open patch.mpq with my wowstudio it dosnt do anything.. u can open the texture and model files but not the patch. any1 know why or how to solve it?
-
08-03-2006 #6
Member
- Reputation
- 1
- Join Date
- Jul 2006
- Posts
- 28
- Thanks G/R
- 0/0
- Trade Feedback
- 0 (0%)
- Mentioned
- 0 Post(s)
- Tagged
- 0 Thread(s)
Now this makes me curious
 I guess its also possible to make my tier 1 armor look like tier 3?
-
08-03-2006 #7
Member
- Reputation
- 1
- Join Date
- May 2006
- Posts
- 22
- Thanks G/R
- 0/0
- Trade Feedback
- 0 (0%)
- Mentioned
- 0 Post(s)
- Tagged
- 0 Thread(s)
You weren't kidding when you said there were alot of pictures!
-
08-03-2006 #8
Banned
- Reputation
- 574
- Join Date
- Jun 2006
- Posts
- 1,333
- Thanks G/R
- 0/0
- Trade Feedback
- 0 (0%)
- Mentioned
- 0 Post(s)
- Tagged
- 0 Thread(s)
well, i will soon make a guide on how to do armor, furblog form, mounts etc.... and Saph, i've actually never encountered that problem, but i'd try downgrading, then upgrading to latest patch, then trying again.
-
08-03-2006 #9
Active Member
- Reputation
- 29
- Join Date
- Jul 2006
- Posts
- 31
- Thanks G/R
- 0/1
- Trade Feedback
- 0 (0%)
- Mentioned
- 0 Post(s)
- Tagged
- 0 Thread(s)
Cool now only you could post how to change a campfire into a tent
-
08-03-2006 #10
Banned
- Reputation
- 169
- Join Date
- Mar 2006
- Posts
- 378
- Thanks G/R
- 0/1
- Trade Feedback
- 0 (0%)
- Mentioned
- 0 Post(s)
- Tagged
- 0 Thread(s)
Hey definitly if u can plz do the instance thing that matt posted about, but u could make it like emrald dream or old hillsbrad pr hyjal dragon instance or somehting
-
08-03-2006 #11
Member
- Reputation
- -3
- Join Date
- Apr 2006
- Posts
- 12
- Thanks G/R
- 0/0
- Trade Feedback
- 0 (0%)
- Mentioned
- 0 Post(s)
- Tagged
- 0 Thread(s)
Fixed my other problem, but I have another one =(
My wowstudio wont open patch.mpq. Can someone AIM me there patch.mpq? My AIM is wh0 wh4
EDIT: nvm, got it to work by opening the wowtest ones instead, seems alot more in there. thanks for the guide!Last edited by poop; 08-03-2006 at 06:02 PM. Reason: Auto-merged Doublepost
-
08-03-2006 #12
Banned
- Reputation
- 169
- Join Date
- Mar 2006
- Posts
- 378
- Thanks G/R
- 0/1
- Trade Feedback
- 0 (0%)
- Mentioned
- 0 Post(s)
- Tagged
- 0 Thread(s)
Yea patch.MPQ wont open in the WoW studio
-
08-03-2006 #13
Member
- Reputation
- 1
- Join Date
- Jul 2006
- Posts
- 72
- Thanks G/R
- 0/0
- Trade Feedback
- 0 (0%)
- Mentioned
- 0 Post(s)
- Tagged
- 0 Thread(s)
very nice guild, guess this is so everyone stops asking u to do for em. long tho,lol +rep
MORE DOTS MORE DOTS MORE DOTS
ok stop dots
-
08-03-2006 #14
Member
- Reputation
- 1
- Join Date
- Aug 2006
- Posts
- 68
- Thanks G/R
- 0/0
- Trade Feedback
- 0 (0%)
- Mentioned
- 0 Post(s)
- Tagged
- 0 Thread(s)
i love this guide i gave my priest a corrupted ashbringer lol.
-
08-03-2006 #15
Member
- Reputation
- 1
- Join Date
- Jul 2006
- Posts
- 8
- Thanks G/R
- 0/0
- Trade Feedback
- 0 (0%)
- Mentioned
- 0 Post(s)
- Tagged
- 0 Thread(s)
Does this work with the latest patches?
The test realm and Live realms?also plus rep buddy


 Reply With Quote
Similar Threads
-
[Model Edit] Cooler Starting Wep and Shield
By Henkez in forum World of Warcraft Model EditingReplies: 3Last Post: 03-03-2008, 11:14 PM -
[Guide] Model Editing: For Dummies
By Krazzee in forum WoW ME Tools & GuidesReplies: 240Last Post: 02-04-2008, 04:14 PM -
[GUIDE] yet another How-To model edit for dummies (with abuse) :D
By Snuggles in forum World of Warcraft Model EditingReplies: 35Last Post: 05-31-2007, 10:29 AM -
Model Editing For Dummies: Furbolg Form
By Krazzee in forum World of Warcraft Model EditingReplies: 2Last Post: 12-10-2006, 05:32 AM -
[Guide] Model Editing: For Dummies
By Krazzee in forum World of Warcraft GuidesReplies: 11Last Post: 08-02-2006, 09:14 AM
-
OwnedCore Forums
casino news World of Warcraft Pokemon GO MMO Overwatch RTS Casino reviews bc game bc game bc game bc game bc game bc game bc game bc game bc game bc game bc game bc game bc game bc game bc game bc game bc game bc game bc game bc game bc game bc game bc game bc game bc game bc game bc game bc game bc game bc game bc game bc game bc game bc game bc game bc game bc game bc game bc game bc game bc game bc game bc game bc game bc game bc game bc game bc game bc game bc game -
casino
Casino Gambling Online casinos Casino en ligne Jackpot City stake stake stake stake stake stake stake stake stake stake stake stake stake stake stake stake no deposit bonus codes roobet Casino reviews Bitcoin casino Paypal Casino Lucky8 1xbit heycasino ✅Machance Casino - Wanted Dead or alive - Top 10 Bitcoin Online Provider : Netent ✅Jackpotcity Casino GoldenBet Casino- 100% ✅MrQ Casino Bonus - Book of dead Slot Review ⭐ ThorCasino - 100% Up -
CoreCoins
CoreCoins CoreCoins FAQ Shout-Out Banner Ads -
My OwnedCore
My Profile Notifications Settings Buy CoreCoins About Us


Privacy Policy | Cookie Policy | Terms | Contact Us
Available Payment Methods:-
![[Guide] Model Editing: For Dummies - Weapons and Shields](https://www.ownedcore.com/images/paybutton/paypal.png)
![[Guide] Model Editing: For Dummies - Weapons and Shields](https://www.ownedcore.com/images/paybutton/skrill.png)
![[Guide] Model Editing: For Dummies - Weapons and Shields](https://www.ownedcore.com/images/paybutton/payop.png)
-
Casino
Jackpotcity | Slot machines | No deposit bonus | BuzzLuck | ZenCasino | Crypto Casino | Millionz | Stake Casino | Casino Reviews | Betflip Casino | Drake Casino | Cresus Casino | Rollino Casino | InstantPay | Mystake Casino | MrGreen | Dublinbet | Bitstarz | Casino deposit offers | Welcome Bonuses | PalmSlots Casino | BitCasino | Casino Bonus | Oshi Casino | Lucky Dreams Casino | NeedForSpin | Casino | How to Play BlackJack Online