
Making your Server Public
This tutorial will show you how to make your Antrix server public WITHOUT HAMACHI! Fully tested and 100% working.
Part One:
1. Visit DynDNS.Com and Create an account.
2. Log in and click "Services" on the menu.
3. Under DNS Services there will be an option called Dynamic DNS. Click it.
4. Click on "Create Host."
5. Fill out the required fields, don't forget to check the box "Enable Wildcard."
6. Click "Add Host" and your done with this portion of the guide.
Part Two:
1. Open C:\Windows\System32\Drivers\Etc\Hosts.file
2. At the end of the File add the following.
Code:
127.0.0.1 (Dynamic DNS)(Internal IP) (Dynamic DNS)(External IP) (Dynamic DNS)
Dynamic DNS = The DNS you just created at DynDNS.Com
Internal IP = Your ip of the computer you are on, This can be found by going to start, then run. Typing in cmd, once the Windows command Prompt opens type in "ipconfig". You will get a readout the one you are looking for is "Ip Address" it normally starts with 192.
External IP = You outbound ip assigned by your ISP. You can find this by visiting WhatIsMyIP.com - 88.198.57.239.
Part Three:
1. Open your Realms.conf file in the Antrix folder.
2. Change at the bottom of your realms.conf to look like this.
Code:
RealmCount = 2Realm1.Name = "YOUR REALM NAME"Realm1.Address = "YOUR EXTERNAL IP:8129"Realm1.Icon = "PVP"Realm1.Colour = 1Realm1.Population = 0Realm1.TimeZone = 1Realm2.Name = "YOUR REALM NAME;Local"Realm2.Address = "YOUR INTERNAL IP:8129"Realm2.Icon = "PVP"Realm2.Colour = 1Realm2.Population = 0Realm2.TimeZone = 1
3. Save and exit. You are now done with this part of the guide.
Part Four:
1. Connect to your router. This can normally be done by typing in 192.168.0.1. If your not sure what it is, then go to Start- Run- Type cmd- Type ipconfig. You should see the ip address like above, change the last sequence in it to a 1 and it should work. If you are still having issues consult your routers website on how to login to your router.
2. Now, It's time to forward the ports. Go into your port forwarding section under your router and forward;
3724 - 3724
80 - 80
3306 - 3306
8129 - 8129
8093 -8093
6112 - 6112
6881-6999
3036 - 3036
8050 -8050
3. If you have a Firewall disable it if you don't know how to set exceptions with it.
Part Five:
This next part is for how you connect.
1. Go into your World of Warcraft game directory.
2. Open realmlist.WTF in Notepad.
3. Replace everything in it with "set realmlist 127.0.0.1"
Note: I suggest you make a copy of the realmlist before changing the info so you can still connect to the Live WoW servers.
Part Six:
Getting a friend to connect.
1. Follow the above steps, except when in realmlist. WTF have them change it to "set realmlist (Dynamic DNS or your External IP)"
If everything is done correctly you should have a public server with out Hamachi, and you and your friends can have all the fun you want.
Protecting your server
Hello everyone,
This guide was made by WoWlegend, he made it because someone hacked him through his server
Public Server General Risks
So you have created a public server, and your first few customers are flocking in. You do not know these people, but at this stage, your just happy having them here, that is what blinds you from this point i would like to make.
Those people have an established connection to your computer. They are allowed through the router, and now you are close to being completely vunerable to attack, if one was a hacker. You may be thinking to yourself, "oh crap im screwed" , this shouldnt be the case, because some handy tools can help keep your players, your server, and most importantly, YOU safe from harm.
Password Inspection and Changing
If you are using antrix or MaNGOS, make your MySQL password something no one would guess, including numbers and letters, and atleast 9 characters long. That should ensure temporary safety to brute force attacks. Also, you should change the password often. (once a week) This also goes for your username and password on your router and Computer.
Firewall and Antivirus
These two things will be your primary tools to defending your computer. You are foolish to be without both of them. But only some are recommendable for this occasion.
Firewalls are your last resort before a hacker can get into your computer and corrupt and change your data. Make sure you have one with limitation options preferably options that allow you to block an IP and protect open ports.
Some recommended Firewalls are:
ZoneAlarm - ZoneAlarm by Check Point - Award winning PC Protection, Antivirus, Firewall, Anti-Spyware, Identity Protection, and much more.
Norton Personal Firewall - Symantec Corp.
McAfee Firewall - McAfee - Antivirus Software and Intrusion Prevention Solutions
An Antivirus is your clean up tool. If your hacker gets in and implants his programs to do his bidding, this is your only way to clean up what he has dumped on your harddrive.
Some recommended Anti-virus's are:
Norton Internet security - Symantec Corp.
AVG - AVG Anti-Virus and Internet Security - Welcome
Nod32 - Antivirus Software - Eliminate Spyware and Adware with NOD32 Antivirus from ESET
Kaspersky - Kaspersky Lab: Antivirus software
These are great for picking up known viruses, i suggest using more than one.
With these tools you should be well armed for battle against a hacker. But if you want a little more protection, i suggest looking into a router.
Router Protection - The Ultimate Firewall
A router is a supreme solution to keeping your computer safe from malicious attacks. The main reason they are near bulletproof. Nothing can get through without ports being open.
On routers their are a few default ports that are always open. for example port 80 for internet browsing. but if you want people to connect to your computer. Lets say play on your private server, you will have to open more ports (3 to be exact) for them to be able to connect. This leaves those ports vunerable for attack. but thats 3 ports out of 99999. So the hacker would have to know what hes hacking before he could get inside (or he would do a port scan which is what piggy told me earlier).
So there, this limits the hackers possibilities to virtually none if he wasnt attacking your private server. But in this thread we will pretend he is, and at this point in the game. You would be hijacked. So lets continue to find out what we can do to keep those people out.
How To Respond To an Attack, and What You Should Do.
So lets say this hacker got through, made it into your mySQL database, banned all your GMs, made himself one, and enlisted a few more to help his cause. You would be just about ready to give up, rolling on the floor sucking your thumb knowing your computers going down slowly. Dont panic, this is what you can do to protect yourself.
Using Antivirus and Firewall protection, as well as the command prompt. We can find the person connected to your computer's IP, Block it from your computer, delete his virus he probably left to get back in, and in the end save your computer!
Here is the battle plan.
The Battle Plan - A Defensive Alternative
So the hacker because GM on your server and probably banned you and took away your powers. Dont fear, you won't forget, you have GUI control over the mySQL database. when you see him enter your realm. quickly make a GM account. get on the server, and before he kicks and bans you, do a .playerinfo. at the bottom of the blue message, it will display his IP. write it down, this part is vital.
With that IP in hand you are now ready to launch your defensive manuaver. Bring up your firewall, and pray it can block IP's. if it can, put in his IP, if it requires a network LAN IP, open up command prompt (start > Run >CMD) and type in ipconfig, your lan IP will be the Ip address shown, then either wait for him to DC from your server, or kill the connection with a .killbyaccount command. now he will be barred from your system without any means of getting back in. His IP is blocked (Be careful, this only works with STATIC IPs).
The hacker, however, could of deployed a few viruses for him to gain entry again. (examples include backdoor.trojan or a RAT program). use a few antiVirus's to scan for them. use more than one however, most antivirus's dont pick up everything.
When your done the clean up. You are now safe from the hacker. For now. And I guarantee he will try to attack again, just remain smart, remember the battle plan. and know how to use your tools effectively to get that low life back out of your computer.
Note: your computer is never going to be 100% safe. so make a public server at your own expense. Thank you for reading my guide, I hope it has given you an Idea on how to protect yourself.
If you see an error in the guide please point it out and I will fix it the best I can (please dont flame)
FAQ and reader concerns and personal issues
This is a section to help readers with there personal experiences and concerns. I will try to give the best answer I can so i can keep the ******* members safe.
Q: Will Blizzard ban me?
A: Probably, if they ever find out, but I highly doubt they will while doing legal things.
Q: Can you teach me how to make a private server plz?
A: No, this guide merely points out the risk of running one, and how to protect yourself.
Becareful and have fun on your servers!
Running a fun and great server
In this thread, you will learn how to run your server so that your server will be well populated, popular, and stay that way! With these helpful tips and when permission is granted from the owners, links, you'll be running your server like a pro in no time!
Okay, to start off, you want to make sure your server is ready to accept new members! You'd be best to AVOID Hamachi, but if you need to use Hamachi, I'd recommend opening multiple Servers in it, as you can only have 16 people per Hamachi server. Also, you'll want to get a Server Website up, including Forums and Character creation.Having people E-Mail you / PM you / Message you on Hamachi for an account is a rather poor way to do it, for people are impatient, and you can lose a lot of members this way, and you won't always be around to create the accounts, and a lot can be missed this way. Forums are great for keeping members of your server updated on going-ons, etc. and can help make your server a little better to play on, for having Forums allows interactivity even for those who aren't on WoW at the time. Forums also provide the ability to post links for entertainment / helpful downloads, and etc. (WARNING! : There are people who will post inappropriate content on the forums sometimes, such as porn, advertisements, and heavy cussing, so please be cautious about your forums)
Also, when advertising, be sure to make it VERY CLEAR what your Realmlist is, nobody likes to have to look around for the Realmlist! With your advertising, and conversations, try to type to your best, use good English, grammar, puncutation, capitalization, etc. Good typing is more pleasing to the eye than 'lyke come join my server it is teh epix lolz' and can, beleive it or not, convince picky players like me that your server may be worth trying out.
Well, that basically covers Out-Of-Game content. Now we head into your magnificent server, and start leveling! Many and most players enjoy high XP rates, but there are players that like a Blizzard-Like server to play on, so think about which group you want to appeal to, and make it clear in all advertisements about what your Experience and Drop rates are. (Hint: It usually helps to have the Gold Drop rate higher than XP rates, because if you level to fast, you wont have money to afford anything you need!)
Transportation! Private servers are fun, but often comes a time where you realise you need to get somewhere, but that involves a long walk, and wouldn't you know it? Your gear is to weak to stand up to those level 5 spiders on the journey, and there's a giant hulking mountain in your way. No fun. So if you're a server that has a strict 'GM's Will Not Port You' policy, you better supply a way to get around, or you will lose a lot of players. Portals are a great instant transportation, and make life easier for everybody. Most servers come with portals to each main city in the main cities, but those are to very limited places, which doesn't help for those far-off, iscolated places. So if you're GMs won't port players, you need to get to work yourself. Make a few portals of your own, it will keep everybody happy. If you have the time, a very good idea is to make at least one portal to a safe spot in every zone, and have one main place to put all the portals, and have a portal to that place in every main city. For example, create a portal to an empty area or island (Wall it off if you want to) and have all the portals you created there, Alliance Main-City portals on one side, Horde Main-City portals on the other side, then all the portals you made yourself in between. It does take awhile to do, but it makes your server that much better.
Custom Areas! (Almost) every server has Kalimdor, Eastern Kingdoms, and Outlands. But what about all those empty places you find in Azeroth? They leave a lot of space for you to build your own little area! You can make buildings out of Amadi Crates, Camp Tables, and Darkmoon Faire Fences easily! Add a few NPCs, and you've got a snazzy little spot you can bring players to, or have it as a GM hideout!
Custom Vendors! So, your server has a great XP rate, everybody is at the max level, and has plenty of gold. But where's the vendors? Without custom vendors, you WILL lose a lot of players. Gear vendors, Weapon vendors, Mount vendors, etc. are great to use, and will attract people. Set a place to put your vendors to, you can have them in one Main City per faction, or a different place. I play on Iced Earth WoW, and they had the idea to create 'Malls' where each faction had a set place outside of the main cities where they could buy almost anything they needed (Dancing Troll Village in Darkshore for the Horde, and the Dwarven Farm on Dun'Morogh Mountain, on the Wetlands border for Alliance) with portals to them, and that keeps people happy. Be sure to have guards at the vendors though, there's always players that have a good laugh at killing the opposing faction's vendors, or even their own faction.
Very important is your server's GMs! Are your GMs going around killing players, ignoring help requests, and being a nuisance in general? Monitor your GMs every now and then in your console, and I'd recommend turning on the log which records what GM Commands they use, to make sure they are keeping players happy. Your sever WILL lose players if the GMs ignore help requests (Unless it's for a port, and your server doesn't offer GM Ports) and kills the players.
RULES! Every server needs rules, without them, you can and will lose players. Set down some rules, and make sure they are followed! Sure, if you join a server and a GM makes you Max level with the best items, it's great. But after awhile you realise 'Hey... I have everything I could get... What do I do now?' and get bored. It's also no fun when players are breaking rules, hacking, and etc. because there ARE players who like to follow rules, and will get annoyed by rule breakers or lack of rules, seeing as it supplies other players with an advantage.
Custom Items! I strongly encourage you to create your own custom items! Starting gear, low level gear, high level gear, and Max Level gear! The gear for lower levels allows the player to level up faster, and enjoy your server even more, and will attract more players! Level 1 mounts are rather popular to. Custom items in general attract players to your server to see how it feels to have gear with that extra little umph, and a sword on their back that does more damage than their pathetic weapons they had on their old server.
Weapon Creation
Weapon Creator - WoW Vendetta: Wage Your War
& for armor
Armor Creator - WoW Vendetta: Wage Your War
for models
Thottbot World of Warcraft:
Its really easy to make weapons, Hope you like it
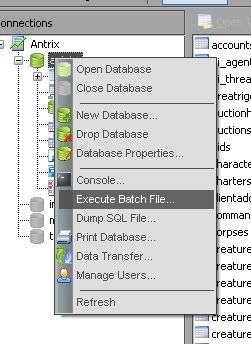
Once you have finished making it then Dling it open up Navicat, turn on antrix then right click it
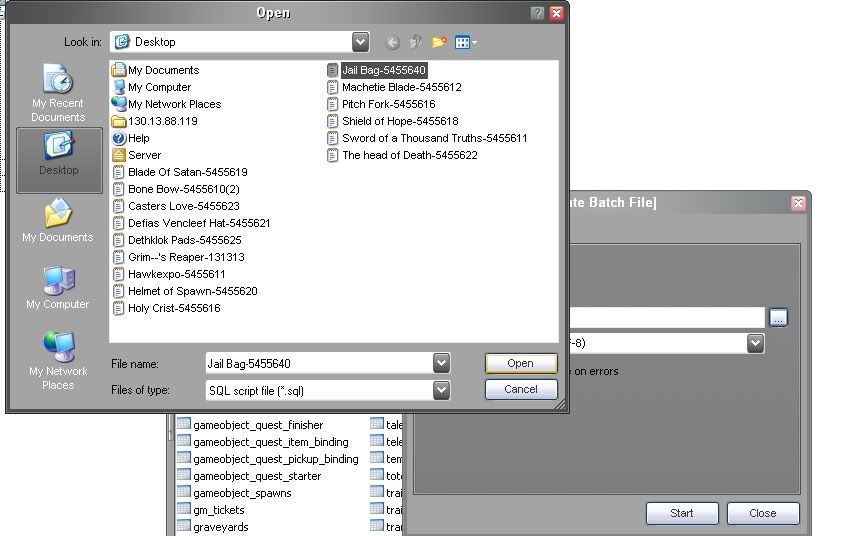
Once you have done this it should bring up a box on the middle right there should be a box with three dots, then clikc the item you are gonna import then clikc the open button
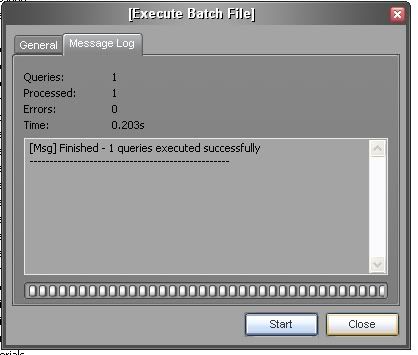
once you do that just press start and it should show like this
If it says anything with a bunch of crap then your weapon has something on it that you can't do
Creating Portals
--) Copywrited to Gastricpenguin (-- <--Which means it is NOT mine..
How to create a Portal (Antrix)
Making Gameobject Stay Forever
This is a guide explaining how to effectively create a custom portal in an antrix server.
MUST READ!
There is a draw back to creating portals in antrix servers. In mangos servers, portals used areatriggers to port players to the desired areas, but in antrix servers, portals overwrite teleport spells and assign them to game objects. Thus forth, if you run out of teleport spells , then you cannot create anymore portals. In this guide, we will be overwriting the spell ID 11409 ( Teleport to Booty Bay )
: Step 1 : Creating the Teleport Spell.
>In this step, we will be updating a row in the DB<
Open up navicat and connect to your database.
Next, open up the table ' teleport_coords '
and here are the tables you will see
ID
These are the ID's of each teleport spell. Press CTRL + F and search for 11409 .
NAME
Here, you will see the name " Teleport to Booty Bay ", you can change this name to anything you want. In this guide, i will change it to "Tele to SW walls"
MAPID
Here is where you will need to enter the map ID that your portal will tele you to.
You can use .gps to figure out your coordinates. In this guide, i will use the map " 0 "
X
This is the X coordinate ( North and South ) I will use " -8918 "
Y
This is the Y coordinate (East and West ). I will use " 540 "
Z
This is the Z coordinate ( Or height ) I will use " 118 "
If you are unsure about this one, make sure you always round up a number or two, so that you dont port under the ground.
TOTRIGGER
This can be left at " 0 "
: Step 2 : Creating the Game Object
>In this step, we shall create the portal<
Open up the table Gameobject_names
You will see these fields:
ENTRY
This can be any number you choose, just make sure it hasnt been used already! In this guide, i will use " 18855 "
TYPE
This is the type of game object it will be. Since we want a portal, put " 22 " in this field.
DISPLAYID
This is the display / model of the gameobject. You can take your pick from here:
4393 = Darnassus
4396 = Stormwind
4394 = Ironforge
4398 = Undercity
4395 = Orgrimmar
4397 = Thunder Bluff
6956 = Silvermoon
6955 = Exodar
Since my portal will put you ontop of the stormwind walls, i will use " 4396 " for stormwind.
Sound0
This field is important! This must be the same number as the ID you used to create your Teleport spell. If you recall from the top of this guide, we edited the spell " 11409 ". So that is the number i will put there.
Sound2 to Unknown14
These fields remain at default " 0 "
: Step 3 : Spawning the game object.>Duh <
Here is the fun part, start up your server and log in on a gm account.
Now find an area you wish to place the portal, and use the command:
.gobject spawn 11409
11409 can be replaced with the ID you chose to create your GameObject with.
DO NOT MOVE ONCE YOU'VE SPAWNED THE PORTAL. This is vital for step 4
: Step 4 : Getting the object to stay forever.
>This step will ensure that the portal never fades<
>> THIS CAN BE APPLIED TO ANY OBJECT!<<
Assuming that you did not move when you spawned the game object, you should be on the same coordinate plane as the game object. What does that mean? Well, its simple. When you spawned the gameobject, it was assigned to a point on a coordinate plane ( X,Y,Z,O ), and since you didnt move, you are still on the same point as it. At this point, i want you to do a .gps to find out what coordinates you are on. now make sure you KEEP those points! If you know them, now you can move
Open up navicat, and open the table ' Gameobject_spawns '
And you will see these fields:
ID
This is a reserved space for your gameobject. Do not mistake this for your gameobject's entry ID! This is completely seperate. If you go to the end of the list, it gets pretty high. A free ID would be " 257655 " So that is what i will use.
ENTRY
This is the entry of the gameobject we created. Assuming you followed the guide, i would put " 18855 "
MAP
Here is where we use the Coords from the earlier .GPS command. The next 4 fields are up to you, it just places your gameobject on the map when you restart the server. Since im putting this portal near the tree in the trade district (SW) i will put " 0 "
X
This is the X coordinate that your gameobject will be placed on. I will use " -8824.19 "
Y
This is the Y coordinate that your gameobject will be placed on. I will use " 631.063 "
Z
This is the Z coordinate that your gameobject will be placed on. I will use " 94.0699 "
FACING
This is the direction your Gameobject will be facing. Please note that if you leave it at default ( '0' ), then it will be facing directly north. I will use " 3.79975 "
O1
This is an option field, but is not needed, so leave it at 0
O2
This is another option field, but is not needed, so leave it at 0
O3
Make sure this is set at 1
O4
Make sure this is set at 0
STATE
This is what type of state your gameobject will be in once its spawned. Since we want it at its normal state, put down " 1 ".
FLAGS
This is just another option you can assign to your game object, just leave this at 0.
FACTION
This is what faction will be able to see and use the portal. leaving it at " 0 " will allow all factions to use it.
SCALE
The size of your GO, i will use " 1 "
StateNPClink
If its linked to a quest or NPC, this field will be needed. But since it is not, leave this field at " 0 "
And there you go, once you restart your server, the gameobject will be placed on the coordinates you have chosen in the gameobject_spawns.
Credit goes to me for creating this guide
Making your own Vendors
Hello, there was a request on how to make your own vendors, so I decided I would write a little guide to help everybody out. First off, I would like to point out that this guide is for ANTRIX - NAVICAT and ONLY for Antrix - Navicat servers (I haven't used SQLyog before, so I don't know about it)
Okay, open your Navicat and go into 'mysql' Then go into 'Creature_name'. Click the '+' to make a new entry, add in an un-used Entry number, Name, Subname, Set 'Flags1' to 0, 'Type' to 7, set the DisplayID to whatever you want (You can go through the pages and find an NPC with the DisplayID you want, then right it down in Notepad) then put whatever you want in the other categories, doesn't matter.
Click the Checkmark to save, close that window, and open 'Creatures_proto' and make the Entry number the same as the 'Creature_name' Entry number you used, put whatever level you want, and set the faction to 35 (Faction 35 makes the NPC Friendly to both Horde and Alliance) make the Health and Mana whatever you want them to be, same with the scale, but set the NPCFlags to 7. The rest is up to you. (Also, be sure that 'Auras' (Should say (MEMO) ) says 0, If you have SQLyog - Thanks, Fenryr)
Go into your WoW folder, delete the 'Cache' folder, start up your server again, log in, and use .npc spawn for your new NPC, and check to see if it is a vendor (If not, please post here and I'll fix it, I'm not on my computer that has the server on it) but you shouldn't be able to open the Vendor Page, only have the object to buy from your new vendor. Find the ID of the item you want to add to your vendor, and type .npc vendoradditem ##### While targetting your vendor, then try opening the vendor page, and voila! You can add any other items, and I know there's a way to do it in Navicat, but I can't exactly check right now >.>
Hope this helps! If not, please post where you met your error and I'll try to fix it ASAP!
Creating a Website
Ok im sure loads of you want to have an account creation page. With pics, downloads the whole lot to help us noobs out there. (uploadin on other sites also)
I would advise to get this http://www.*******.com/forums/how-cr...ght=beta+mysql
Step 1
Ok first's thing first download the account creation site folder: http://www.megaupload.com/?d=800JC17V or Send big files the easy way with sendspace. Files too large for email attachments? No problem!
Note:You don’t need a repack for this
Then un zip it and place it on your desktop or where u want.
Step 2
Go into diskw, then diskw again then go into the WWW folder.
1) In there click on config. (open it with notepad)
Change the user, pass and the database to your SQL stuff and realm database. Save it and close that.
2) Click on realmlist.wtf and open it with notepad again. CHange it to set realmlist (your ham ip or your computer ip / can be a thing like yourserver.ath.cx) Save that then close it.
Step 3
Start your server up as u would do normaly, go into diskw and click on Start.
Then place your ham ip / comp ip or the yourserver.ath.cx in your web browser. And your done.
Any problems post a reply.
P.S: it should look like this:
All the guides used in this thread:
WoWLegend's "The Risks of Hosting a Public Server, and How You Can Protect Yourself [GUIDE]"
Hawkexpo's "[Creating Weapons] The Super Easy Way!"
Gastricpenguin's "[GUIDE] Creating Portals + Keeping em Forever!"
2dgreengiant's "TBC Server account creation site (No repack required)"
Errage's "Making Your Own Vendors - Navicat"
"Beginner Gear for your Server"
Errage's "http://www.*******.com/forums/how-to...un-server.html"
Also could i plz get this stickied?? plz plz?
[IMG]http://www.************/forum/avatars/blackwolf1579.gif?type=sigpic&dateline=1188859376[/IMG]
Last edited by BlackWolf1579 : 08-21-2007 at 06:40 AM.


Shout-Out
User Tag List
Thread: How To Make Your Server Public
Results 1 to 9 of 9
-
12-17-2007 #1
 Member
- Reputation
- 28
- Join Date
- Dec 2007
- Posts
- 95
- Thanks G/R
- 0/0
- Trade Feedback
- 0 (0%)
- Mentioned
- 0 Post(s)
- Tagged
- 0 Thread(s)
How To Make Your Server Public

-
12-17-2007 #2
Member
- Reputation
- 4
- Join Date
- Dec 2007
- Posts
- 18
- Thanks G/R
- 0/0
- Trade Feedback
- 0 (0%)
- Mentioned
- 0 Post(s)
- Tagged
- 0 Thread(s)
This seems like serveral other merged "how to's" posts.
Nice any ways
-
01-09-2008 #3
Member
- Reputation
- 1
- Join Date
- Jan 2008
- Posts
- 12
- Thanks G/R
- 0/0
- Trade Feedback
- 0 (0%)
- Mentioned
- 0 Post(s)
- Tagged
- 0 Thread(s)
lol i was looking for acc creation page setup with DNS IP and was jsut looking and was about to exit cuz so many..it was at bottom lol thnx man
-
01-09-2008 #4
Member
- Reputation
- 1
- Join Date
- Jan 2008
- Posts
- 12
- Thanks G/R
- 0/0
- Trade Feedback
- 0 (0%)
- Mentioned
- 0 Post(s)
- Tagged
- 0 Thread(s)
can someone make how to make server public with DNS more clear..cuz he said to add 1 at end..wtf does that mean ..it gets really confusing
-
01-09-2008 #5
Member
- Reputation
- 28
- Join Date
- Dec 2007
- Posts
- 95
- Thanks G/R
- 0/0
- Trade Feedback
- 0 (0%)
- Mentioned
- 0 Post(s)
- Tagged
- 0 Thread(s)
Read The Guidde
-
01-12-2008 #6
Member
- Reputation
- 2
- Join Date
- Jan 2008
- Posts
- 55
- Thanks G/R
- 0/0
- Trade Feedback
- 0 (0%)
- Mentioned
- 0 Post(s)
- Tagged
- 0 Thread(s)
very nice guide

-
01-13-2008 #7
Member
- Reputation
- 1
- Join Date
- Jan 2008
- Posts
- 14
- Thanks G/R
- 0/0
- Trade Feedback
- 0 (0%)
- Mentioned
- 0 Post(s)
- Tagged
- 0 Thread(s)
great work
-
03-28-2018 #8
Member
- Reputation
- 1
- Join Date
- Mar 2018
- Posts
- 1
- Thanks G/R
- 0/0
- Trade Feedback
- 0 (0%)
- Mentioned
- 0 Post(s)
- Tagged
- 0 Thread(s)
Awesome work! I followed all the steps as given And finally, I got success. Mcafee Support I was looking for it on the internet and I have seen this. Great Work!
-
03-29-2018 #9
 Active Member


- Reputation
- 37
- Join Date
- Mar 2012
- Posts
- 70
- Thanks G/R
- 20/7
- Trade Feedback
- 2 (100%)
- Mentioned
- 0 Post(s)
- Tagged
- 0 Thread(s)
Great job, it only took you what.. 11 yearsOriginally Posted by dannyglover1


 Reply With Quote
Similar Threads
-
How To make your Server Public [Hamachi AND Non-Hamachi]
By JulianX in forum WoW EMU Guides & TutorialsReplies: 509Last Post: 12-02-2010, 03:41 PM -
[Wireless/Guild] How to make your server public wirelessy
By C.C. in forum WoW EMU Guides & TutorialsReplies: 38Last Post: 03-18-2008, 06:29 AM -
How to make your server Public
By dabaddest in forum WoW EMU Guides & TutorialsReplies: 0Last Post: 01-09-2008, 04:32 AM -
How to make your server public
By Skuxta in forum WoW EMU Guides & TutorialsReplies: 5Last Post: 12-17-2007, 08:44 PM -
How To Make Your Server Public With Out Hamachi Problem Solved
By bomber1392 in forum WoW EMU Guides & TutorialsReplies: 7Last Post: 12-12-2007, 03:35 AM
-
OwnedCore Forums
casino news World of Warcraft Pokemon GO MMO Overwatch RTS Casino reviews bc game bc game bc game bc game bc game bc game bc game bc game bc game bc game bc game bc game bc game bc game bc game bc game bc game bc game bc game bc game bc game bc game bc game bc game bc game bc game bc game bc game bc game bc game bc game bc game bc game bc game bc game bc game bc game bc game bc game bc game bc game bc game bc game bc game bc game bc game bc game bc game bc game bc game -
casino
Casino Gambling Online casinos Casino en ligne Jackpot City stake stake stake stake stake stake stake stake stake stake stake stake stake stake stake stake no deposit bonus codes roobet Casino reviews Bitcoin casino Paypal Casino Lucky8 1xbit heycasino Flexepin Casino Vouchers Honey Rush 100 Slot - Neteller Casino ✅ Best Bitcoin Casino Casobet Casino - 120% No deposit Bonus codes ✅Betano Bookmaker - ✅Bc Game no Deposit ⭐ BC GAME - Up to 1 -
CoreCoins
CoreCoins CoreCoins FAQ Shout-Out Banner Ads -
My OwnedCore
My Profile Notifications Settings Buy CoreCoins About Us


Privacy Policy | Cookie Policy | Terms | Contact Us
Available Payment Methods:-


-
Casino
ZenCasino | PalmSlots Casino | How to Play BlackJack Online | Mystake Casino | Bitstarz | Dublinbet | Bonus code | Rollino Casino | Betflip Casino | Casino Bonus | Jackpotcity | InstantPay | BitCasino | Lucky8 | Slot machines | Welcome Bonuses | Lucky Dreams Casino | Cresus Casino | NeedForSpin | Crypto Casino | BuzzLuck | Casino | USA CASINO | Casino Reviews | Casino deposit offers | No deposit bonus | Sportsbook | MrGreen