![[Guide]Exporting Creatures Armor](images/styles/OwnedCoreFX/addimg/menu4.svg)
This is for you Pullejfun
First what you need:
3dsMax M2 Import Script
MyWarcraftstudio
Autodesk 3ds max 8(or higher)
Adobe Photoshop
BLP Converter
Ultimate Unwrap 3D
NOTE: Before you do this tutorial make sure that you have read and understood Glitchy's Complete Guide To Custom Models
because i will leave out the whole Cryects Tools part.
Step 1:
Extract your model,lets take Brutallus for that. We want to extract his chest and use it as a shield. So you extract it with mywarcraftstudio Brutallus and the texture part where you can spot the shield texture on.Little hint its Brutallus2.blp
Save the image via Save Image (S) and name it into BrutShield.tga
Step 2:
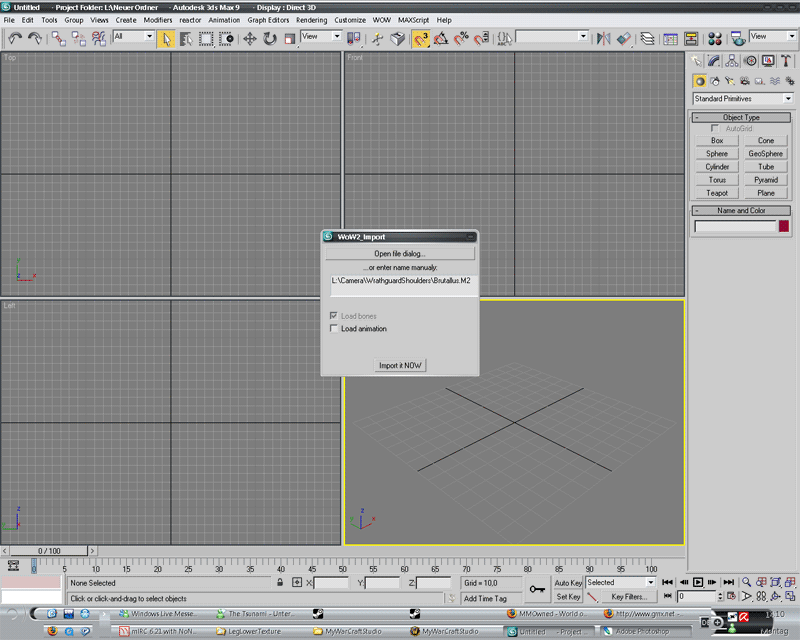
Import your model into 3dsMax
Install your import script as shown on the link where you can download it.
Now open up the import dialog and move yourself to the location where the brutallus.m2 is.
Your options should look like this:
We don't need no animations this would just make it more complicated
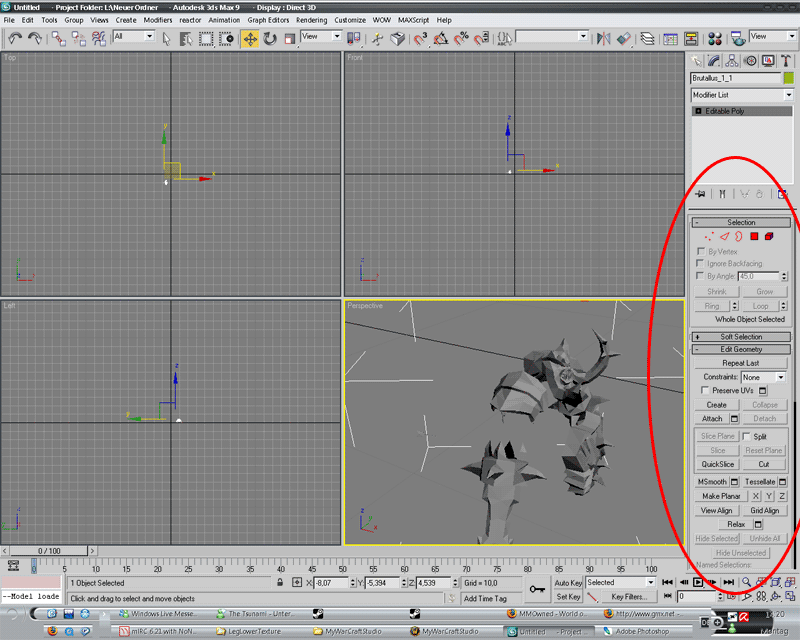
Now on the hard part of the tutorial. Brutallus is divided into 2 Geosets,one body set and one Armor set (most of the creatures with armor handle it like that) select the Bodyset and delete it,now you have full view of the armor.
Now right click on the armor set and go: Convert to-> Convert to editable poly. then move the armor away and just to clean up a bit delete the green bone dummies.
Step 3:
Extracting the desired part from the model.
If you came till here you seem to be atleast good at reading ^^.
Through Converting the Armorset to poly there should have popped up a sidemenu at the right site:
Now if you are not blind you see this little menu up there with the red sqaure etc. now click on the 3 little red dots.
In the 3d render now on every edge should show up a little blue point. In your Perspective Render field move your Camera with the arrow keys so that only you most likely only got the shield left on screen. Now just select all the Vertices (You can hold Left Mouse pressed and draw a square to easy select all at once.
When you selected everything of the shield move it away a bit and deselect it. Now still in the Vertice mode select all vertices from the model excepting the shield vertices.
Congrats you just extracted the breastplate from Brutallus.
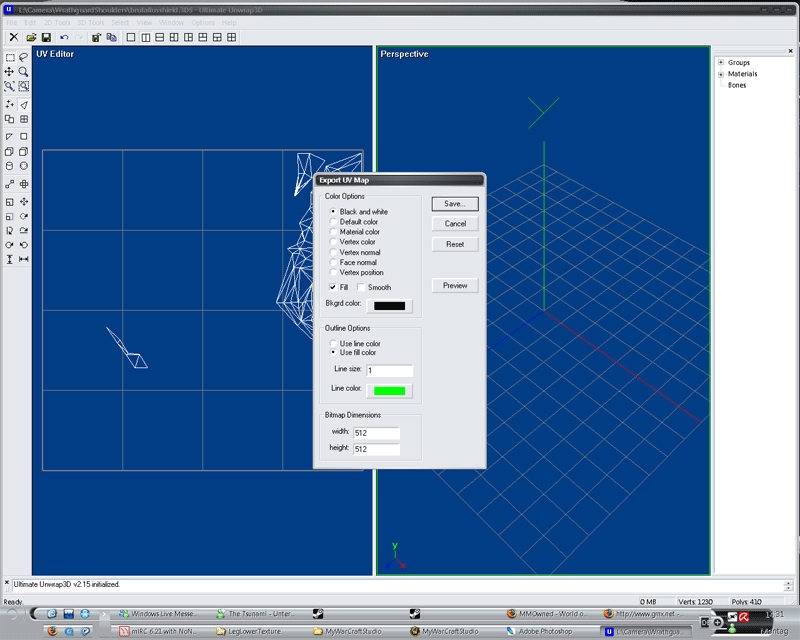
Export the shield as a .3ds and when the program asks you wheter it should preserve max's texture coordinates or sth like that just check the box and hit ok. THIS IS IMPORTANT
Now you open the .3ds in Ultimate Unwrap 3D,but not like in Glitchy tutorial, the UV Map is already done. Just click File-Export-UV Map and make sure that your options are like this:
Step 4:
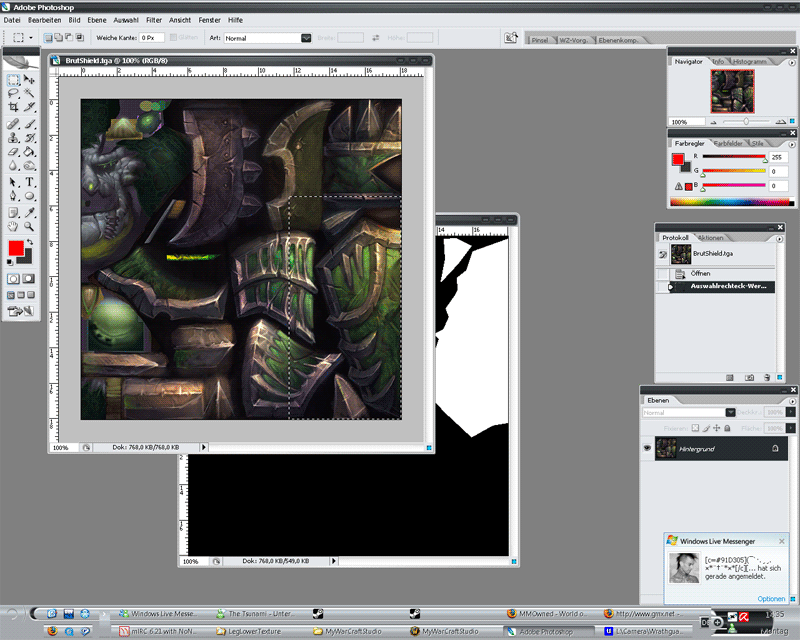
Making the texture match
Open both, the texture and the UV Map from Ultimate Unwrap 3D. Now select a raw shape from the shield like this:
Copy+Paste that image into your UV Map. Now make it match anyway...(For the dummies) Hit Ctrl+t and choose : Rotate 180° and Mirror Horizontall (Dunno the english word exactly)
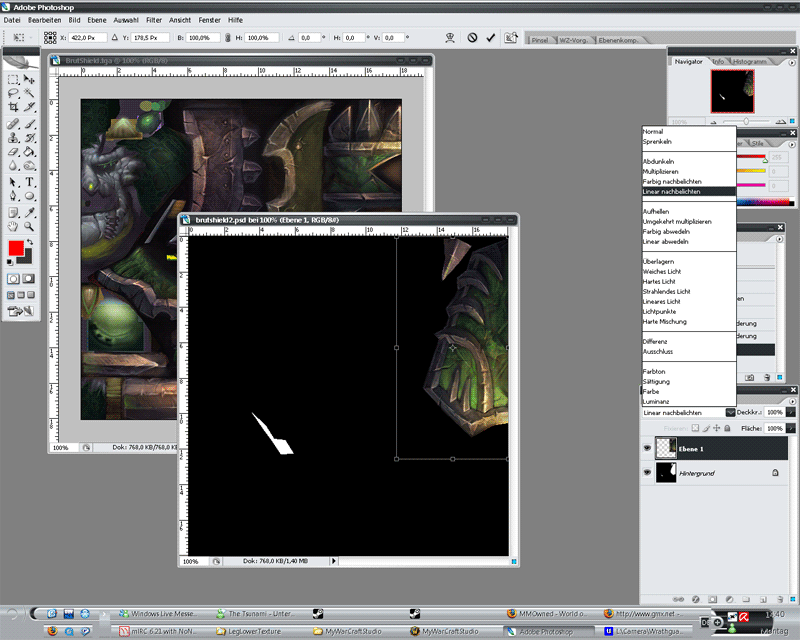
Now Move it over the white covered area and change the blending mode like this:
Should be Color Burn in english.
Now just fine tune the position of the shield so that it 100% fits to the white background.
Now theres this little bit standin out , just color this for example: black or if you are advanced in photoshop use the copy stamp to copy some of the green pattern of the shield. Save the new texture as a .png and convert it to .blp . The rest of how to get it ingame etc. stands in Glitchy's Guide.
Greetz Xayo
PS: I hope that this helped someone and if someone actually made that shield post screens plz...i was actually to lazy to finish it and just quit it now ^^.

![[Guide]Exporting Creatures Armor](./ocpbanners/1/2/9/8/0/2/2/01d9781faec8bfe3abf9095ac9e57d1e.jpg)
![[Guide]Exporting Creatures Armor](https://www.ownedcore.com/assets/mm/images/wits.png "TradeSafe Middleman")
![[Guide]Exporting Creatures Armor](https://www.ownedcore.com/forums/images/styles/OwnedCoreFX/addimg/wicc.png "CoreCoins")

Shout-Out
User Tag List
Thread: [Guide]Exporting Creatures Armor
Results 1 to 15 of 15
-
01-14-2008 #1
 Contributor

- Reputation
- 214
- Join Date
- Sep 2007
- Posts
- 434
- Thanks G/R
- 0/0
- Trade Feedback
- 0 (0%)
- Mentioned
- 0 Post(s)
- Tagged
- 0 Thread(s)
[Guide]Exporting Creatures Armor
![[Guide]Exporting Creatures Armor](https://www.ownedcore.com/images/ba/g/b2.gif)
-
01-14-2008 #2
Contributor
- Reputation
- 110
- Join Date
- Oct 2007
- Posts
- 146
- Thanks G/R
- 0/0
- Trade Feedback
- 0 (0%)
- Mentioned
- 0 Post(s)
- Tagged
- 0 Thread(s)
Very nice +2rep
-
01-14-2008 #3
 Contributor
- Reputation
- 212
- Join Date
- Jun 2007
- Posts
- 1,765
- Thanks G/R
- 0/0
- Trade Feedback
- 0 (0%)
- Mentioned
- 0 Post(s)
- Tagged
- 0 Thread(s)

tysm Xayo +4rep
-
01-14-2008 #4
 キタ━━━(゜∀゜)━━━!!!!!


- Reputation
- 451
- Join Date
- Jul 2006
- Posts
- 1,537
- Thanks G/R
- 0/2
- Trade Feedback
- 0 (0%)
- Mentioned
- 0 Post(s)
- Tagged
- 0 Thread(s)
Great work I love it
-
01-14-2008 #5
Contributor
- Reputation
- 212
- Join Date
- Jun 2007
- Posts
- 1,765
- Thanks G/R
- 0/0
- Trade Feedback
- 0 (0%)
- Mentioned
- 0 Post(s)
- Tagged
- 0 Thread(s)
oh just found an error. on the photoshop part its not color burn, linear burn
-
01-15-2008 #6
Contributor
- Reputation
- 214
- Join Date
- Sep 2007
- Posts
- 434
- Thanks G/R
- 0/0
- Trade Feedback
- 0 (0%)
- Mentioned
- 0 Post(s)
- Tagged
- 0 Thread(s)
i think both kinda works
-
01-15-2008 #7
Contributor
- Reputation
- 212
- Join Date
- Jun 2007
- Posts
- 1,765
- Thanks G/R
- 0/0
- Trade Feedback
- 0 (0%)
- Mentioned
- 0 Post(s)
- Tagged
- 0 Thread(s)
actually no if its color burn then you dont see anthing but white. and also can you give a suggestion or pic of where we should put the shoulders or items in 3ds max?
-
01-15-2008 #8
Contributor
- Reputation
- 214
- Join Date
- Sep 2007
- Posts
- 434
- Thanks G/R
- 0/0
- Trade Feedback
- 0 (0%)
- Mentioned
- 0 Post(s)
- Tagged
- 0 Thread(s)
teh positioning is included in glitchy's guide and as i said before:
-
01-15-2008 #9
Contributor
- Reputation
- 212
- Join Date
- Jun 2007
- Posts
- 1,765
- Thanks G/R
- 0/0
- Trade Feedback
- 0 (0%)
- Mentioned
- 0 Post(s)
- Tagged
- 0 Thread(s)
yes exept its not detailed.
-
01-16-2008 #10
Member
- Reputation
- 263
- Join Date
- Oct 2007
- Posts
- 828
- Thanks G/R
- 0/0
- Trade Feedback
- 0 (0%)
- Mentioned
- 0 Post(s)
- Tagged
- 0 Thread(s)

This is nice : > Havn't noticed it 'til now :O
+rep definitely

-
01-18-2008 #11
Active Member

- Reputation
- 50
- Join Date
- Feb 2007
- Posts
- 195
- Thanks G/R
- 0/0
- Trade Feedback
- 0 (0%)
- Mentioned
- 0 Post(s)
- Tagged
- 0 Thread(s)
Awsome guide! Thanks. I have a problem with mine. it is invisable in game and crashes modelviiewer. does someone know where i might have gone wrong?
Thanks again for the guide. Love it!
-
02-26-2008 #12
get in da van, i got epix
- Reputation
- 494
- Join Date
- Mar 2007
- Posts
- 888
- Thanks G/R
- 0/0
- Trade Feedback
- 1 (100%)
- Mentioned
- 0 Post(s)
- Tagged
- 0 Thread(s)
this is one awesome guide!! thx for postin. +6rep
/AFK shower
-
09-04-2012 #13
 Corporal
- Reputation
- 1
- Join Date
- Sep 2012
- Posts
- 22
- Thanks G/R
- 0/0
- Trade Feedback
- 0 (0%)
- Mentioned
- 0 Post(s)
- Tagged
- 0 Thread(s)
i need UU3D where do i get it without buying no cracks?
-
09-04-2012 #14
Corporal
- Reputation
- 1
- Join Date
- Sep 2012
- Posts
- 22
- Thanks G/R
- 0/0
- Trade Feedback
- 0 (0%)
- Mentioned
- 0 Post(s)
- Tagged
- 0 Thread(s)
can someone make a updated turorial? and another program that does same thing as UU3D. if video would be better i give +REP
-
09-07-2012 #15
Sergeant Major
- Reputation
- 79
- Join Date
- Feb 2011
- Posts
- 157
- Thanks G/R
- 0/0
- Trade Feedback
- 0 (0%)
- Mentioned
- 0 Post(s)
- Tagged
- 0 Thread(s)
Nice guide for beginners. I guide no use of it now. But I am sure that the people who are new to modding will. + Rep

 Reply With Quote
Similar Threads
-
[guide]Customs weps/ armor/ bags/ amo (Ascent*
By bombhell in forum WoW EMU Guides & TutorialsReplies: 8Last Post: 03-02-2008, 09:10 PM -
New Displayids! [weapons Creatures Armor]
By Dragonscale in forum World of Warcraft Emulator ServersReplies: 0Last Post: 12-22-2007, 11:21 PM -
[Guide] Changing weapon / armor texture
By Lundby in forum WoW ME Tools & GuidesReplies: 20Last Post: 09-30-2007, 06:04 PM -
[Guide] Getting creatures to move.
By Gastricpenguin in forum WoW EMU Guides & TutorialsReplies: 14Last Post: 09-15-2007, 05:47 AM -
[GUIDE] Pet->Creature
By Dark_Angel in forum World of Warcraft Model EditingReplies: 0Last Post: 07-31-2007, 03:05 PM
-
OwnedCore Forums
casino news World of Warcraft Pokemon GO MMO Overwatch RTS Casino reviews bc game bc game bc game bc game bc game bc game bc game bc game bc game bc game bc game bc game bc game bc game bc game bc game bc game bc game bc game bc game bc game bc game bc game bc game bc game bc game bc game bc game bc game bc game bc game bc game bc game bc game bc game bc game bc game bc game bc game bc game bc game bc game bc game bc game bc game bc game bc game bc game bc game bc game -
casino
Casino Gambling Online casinos Casino en ligne Jackpot City no deposit bonus codes roobet Casino reviews Bitcoin casino Paypal Casino Lucky8 1xbit heycasino ✅Platinum Play Casino Booming Games Expands ✅ King Billy Casino - ✅Rizk Casino - 100% ✅7Bit Casino - Reviews ✅Book of Dead Machine MR Green Casino No ✅Rise Of Olympus Slots Neon54 Casino - Bonus, -
CoreCoins
CoreCoins CoreCoins FAQ Shout-Out Banner Ads -
My OwnedCore
My Profile Notifications Settings Buy CoreCoins About Us


Privacy Policy | Cookie Policy | Terms | Contact Us
Available Payment Methods:-
![[Guide]Exporting Creatures Armor](https://www.ownedcore.com/images/paybutton/paypal.png)
![[Guide]Exporting Creatures Armor](https://www.ownedcore.com/images/paybutton/skrill.png)
![[Guide]Exporting Creatures Armor](https://www.ownedcore.com/images/paybutton/payop.png)
-
Casino
Stake Casino | Crypto Casino | How to Play BlackJack Online | Bc Game | Casino Bonus | Welcome Bonuses | Lucky31 | NeedForSpin | BitCasino | Betflip Casino | Bonus code | ZenCasino | No deposit bonus | Casino | Mystake Casino | Jackpotcity | Rollino Casino | Oshi Casino | Cresus Casino | Casobet | MrGreen | Drake Casino | USA CASINO | Bovada casino | PalmSlots Casino | Dublinbet | BuzzLuck | InstantPay