![[Guide] How to fix a Model](images/styles/OwnedCoreFX/addimg/menu4.svg)
So, sick of everything showing up as pure white? Of course you are. This guide will show you how to fix them.
The program you will need (other than MyWarCraftStudio and WoW Model Viewer):
Send big files the easy way. Files too large for email attachments? No problem!
IMPORTANT!
When you see something in single quotes, 'like this', I mean you need to press those keys. Please do not post questions about what the quotes mean.
First, find the model in WoWModelViewer that you want to fix. I am using a spore creature, which I found out of curiosity. Treepath in MyWarCraftStudio: CREATURE\SporeCreature\SporeCreature.m2
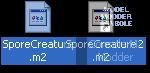
After you have found one you want to fix, find it in MyWarCraftStudio, and extract the model and texture (m2 and blp, respectively) Then drag the model over the program that I uploaded.
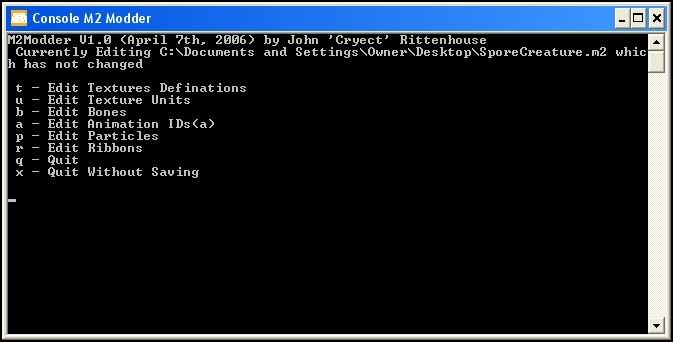
A prompt will pop up, it should look like this:
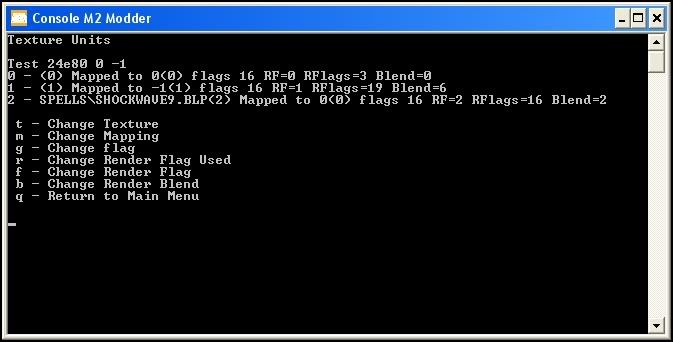
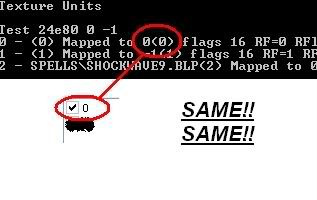
First, you want to make sure that the texture will go where it is supposed to, so hit the letter 'u' and then hit 'Enter'. When it asks you to pick a number, choose 0. It should look somewhat like this:
Now, this may be confusing. You need to open up WoW Model Viewer if you haven't already opened it, find the model you want to change and view it. Then go to the View menu, and select 'Show model control'. The window should look like this:
See the check marks? You need those because the numbers correspond to the "Mapped to #<#>" The number before <#> is the one you need to make sure is the same as the check mark. Click the check marks until the white shape goes away. Then note the number that made the white shape disappear. For example, the model I am showing you will disappear if I uncheck the '0' box. So we need to map the texture to 0 on this model.
Follow the instructions on the screen and change the mapped texture to 0 (for this model). Then exit (again, follow the instructions) back to the main screen:
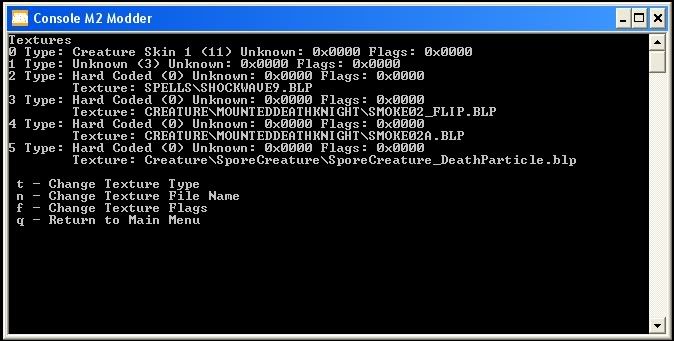
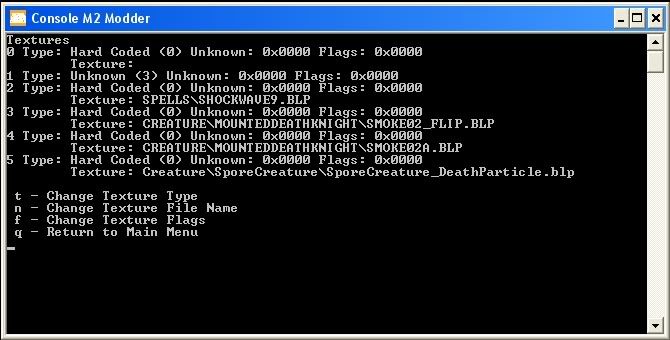
Hit the key 't' then 'Enter' and you should come to this screen:
Since, as you can see, the texture is not hard coded, WoW Model Viewer cannot handle it. So, we need to hit the 't' key and then 'Enter' (again...) In this example, we want to change the first texture, 0, to hardcoded. So, after you type 't', type '0'. A list of possible texture types will pop up, pick Hard Coded. Since you have what you want, type '-1' and then 'Enter'. The end result should look something like this:
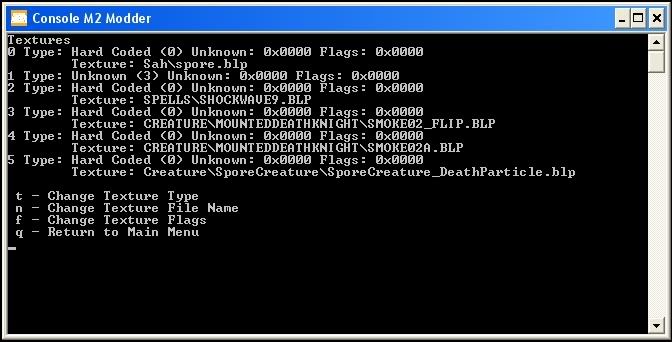
Okay, so you changed it to hardcoded. This is where that texture comes in. Hit 'n' and 'Enter', then type the number of the hardcoded texture you want to change. You can name the treepath of the file you want, but only up to 15 characters, including the .blp. In this tutorial, we will be changing it to "Sah\spore.blp". Type in the treepath, and hit 'Enter'. Then type '-1' to stop editing textures. It should now look like:
Now, you need to type 'q' and 'Enter' twice, which will save the m2 with all the changes you have made.
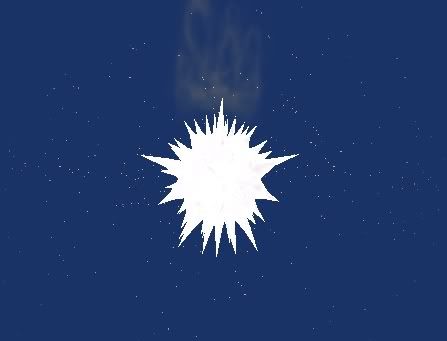
Congratulations, you have made a fixed model! Here is what the spore creature will look like when it is fixed.
When you want to use a fixed model in game, you need to have the texture where you defined it. For example, I need to have that texture in "Sah\spore.blp" or else the creature will still be pure white. If you need any help, post it here, and I will try to help you. Enjoy!
Sahdrani

![[Guide] How to fix a Model](./ocpbanners/1/3/9/6/9/4/8/08b6377e7ee13e5b1d2306cbeed08f8c.png)
![[Guide] How to fix a Model](https://www.ownedcore.com/assets/mm/images/wits.png "TradeSafe Middleman")
![[Guide] How to fix a Model](https://www.ownedcore.com/forums/images/styles/OwnedCoreFX/addimg/wicc.png "CoreCoins")

Shout-Out
User Tag List
Thread: [Guide] How to fix a Model
Results 1 to 7 of 7
-
09-20-2007 #1
 Member
- Reputation
- 45
- Join Date
- May 2007
- Posts
- 510
- Thanks G/R
- 0/0
- Trade Feedback
- 0 (0%)
- Mentioned
- 0 Post(s)
- Tagged
- 0 Thread(s)
[Guide] How to fix a Model
Last edited by Sahdrani; 10-06-2007 at 03:59 PM.


Scared yet?
![[Guide] How to fix a Model](https://www.ownedcore.com/images/ba/g/b2.gif)
-
09-20-2007 #2
Member
- Reputation
- 46
- Join Date
- May 2007
- Posts
- 68
- Thanks G/R
- 0/0
- Trade Feedback
- 0 (0%)
- Mentioned
- 0 Post(s)
- Tagged
- 0 Thread(s)
Re: How to fix a Model
+rep
now if only i could figure out how to get animations to work right i'd be in business
-
09-21-2007 #3
Banned

- Reputation
- 124
- Join Date
- Jun 2006
- Posts
- 2,376
- Thanks G/R
- 0/0
- Trade Feedback
- 0 (0%)
- Mentioned
- 0 Post(s)
- Tagged
- 0 Thread(s)
Re: How to fix a Model
Great guide

-
09-21-2007 #4
 Retired Noggit Developer


- Reputation
- 755
- Join Date
- Nov 2006
- Posts
- 2,759
- Thanks G/R
- 0/3
- Trade Feedback
- 0 (0%)
- Mentioned
- 0 Post(s)
- Tagged
- 0 Thread(s)


Re: How to fix a Model
schlumpf - to: shoulders and their textures. - 3 Weeks Ago
including a guide too. on that thing. not that long and without pictures... but it has been made before :P
-
10-05-2007 #5
Member
- Reputation
- 62
- Join Date
- Jul 2007
- Posts
- 125
- Thanks G/R
- 0/0
- Trade Feedback
- 0 (0%)
- Mentioned
- 0 Post(s)
- Tagged
- 0 Thread(s)
Re: [Guide] How to fix a Model
Ta for the guide Sahdrani, but any chance for a re-upload on the M2Modder please.
Link is now broken.
:wave:
-
10-05-2007 #6
Retired Noggit Developer
- Reputation
- 755
- Join Date
- Nov 2006
- Posts
- 2,759
- Thanks G/R
- 0/3
- Trade Feedback
- 0 (0%)
- Mentioned
- 0 Post(s)
- Tagged
- 0 Thread(s)
Re: [Guide] How to fix a Model
Questions & Answers:
- Q: The link for the M2Modder is broken!
- A: Google -> curse -> NoggIt | World of Warcraft @ Curse.com
Additional Threads:
- to: shoulders and their textures. (by schlumpf)
including a guide too. on that thing. not that long and without pictures...
-
10-07-2007 #7
Member
- Reputation
- 62
- Join Date
- Jul 2007
- Posts
- 125
- Thanks G/R
- 0/0
- Trade Feedback
- 0 (0%)
- Mentioned
- 0 Post(s)
- Tagged
- 0 Thread(s)
Re: [Guide] How to fix a Model
ILY Sahdrani. +rep. Now that I can add my own textures I can get into making more detailed models now =]

^ my almighty sphere is no longer pure white!


 Reply With Quote
Similar Threads
-
[MINI GUIDE] How to fix trainers
By erebos in forum WoW EMU Guides & TutorialsReplies: 15Last Post: 08-13-2008, 11:52 AM -
[Guide] how to put WotLK models in to BC
By thaukas in forum WoW ME Tools & GuidesReplies: 0Last Post: 08-08-2008, 12:33 PM -
[Guide] How to: Fix the white hair of a Tauren
By Mudkip in forum WoW ME Tools & GuidesReplies: 43Last Post: 06-01-2008, 09:17 AM -
[Guide] How to: apply a model edit into game
By Chickensoup in forum WoW ME Tools & GuidesReplies: 23Last Post: 03-22-2008, 01:04 PM -
How i fix this Model editing of mounts
By raptornl in forum World of Warcraft GeneralReplies: 0Last Post: 01-26-2007, 01:00 PM
-
OwnedCore Forums
casino news World of Warcraft Pokemon GO MMO Overwatch RTS Casino reviews bc game bc game bc game bc game bc game bc game bc game bc game bc game bc game bc game bc game bc game bc game bc game bc game bc game bc game bc game bc game bc game bc game bc game bc game bc game bc game bc game bc game bc game bc game bc game bc game bc game bc game bc game bc game bc game bc game bc game bc game bc game bc game bc game bc game bc game bc game bc game bc game bc game bc game -
casino
Casino Gambling Online casinos Casino en ligne Jackpot City stake stake stake stake stake stake stake stake stake stake stake stake stake stake stake stake no deposit bonus codes roobet Casino reviews Bitcoin casino Paypal Casino Lucky8 1xbit heycasino ⭐ Dublinbet Casino - ✅Sweet Bonanza Slots - Dublinbet Bonus Sans Paysafecard Casino Neteller Casino ⭐Betway Casino - Best ✅Limitless Casino - ⭐ Top Live Casino ✅Slotwolf Casino Bonus -
CoreCoins
CoreCoins CoreCoins FAQ Shout-Out Banner Ads -
My OwnedCore
My Profile Notifications Settings Buy CoreCoins About Us


Privacy Policy | Cookie Policy | Terms | Contact Us
Available Payment Methods:-
![[Guide] How to fix a Model](https://www.ownedcore.com/images/paybutton/paypal.png)
![[Guide] How to fix a Model](https://www.ownedcore.com/images/paybutton/skrill.png)
![[Guide] How to fix a Model](https://www.ownedcore.com/images/paybutton/payop.png)
-
Casino
ZenCasino | PalmSlots Casino | BuzzLuck | How to Play BlackJack Online | Cresus Casino | Casino Bonus | Oshi Casino | Drake Casino | NeedForSpin | MrGreen | Welcome Bonuses | Bonus code | Lucky Dreams Casino | Sportsbook | Rollino Casino | Casobet | No deposit bonus | Crypto Casino | Millionz | Bitstarz | Stake Casino | Lucky31 | Jackpotcity | Bovada casino | Casino deposit offers | Casino | InstantPay | Mystake Casino