![[Guide] 3.0.3 WOTLK Mangos Server](images/styles/OwnedCoreFX/addimg/menu4.svg)
This is a step by step guide to setting up your very own MaNGOS Private Server. This version is designed to work with WOTLK release version 3.0.3. All necesary files are included in this download (you will need Winrar to open the file).
Download
Extract "MaNGOS Installation pack.rar" to your favorite directory :wave: (Note: if you are running Windows Vista it is advisable not to place your MaNGOS file in the Program Files directory. Instead, consider placing it within your personal file.)
MySQL
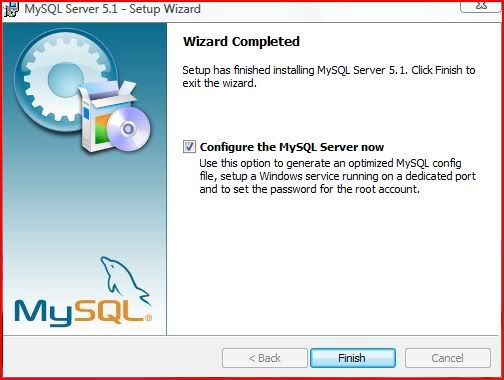
Inside the tools folder you will find all the programs you will need to run your server. First, we will install MySQL. Choose a typical installation and click install. When installation is complete, make sure the option to configure MySQL is checked and click finish.
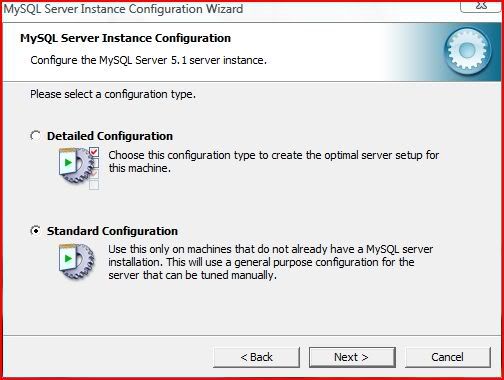
In the configuration window click next and select "Standard Configuration".
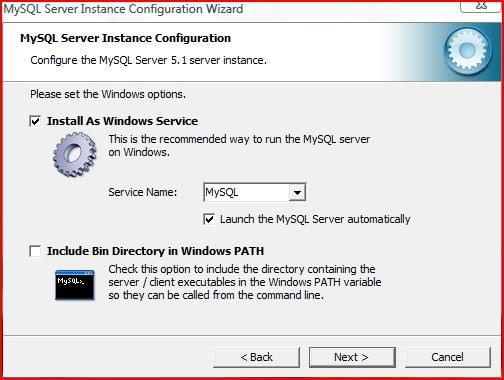
Make sure "Install As Windows Service" is checked as well as the option to launch MySQL automatically.
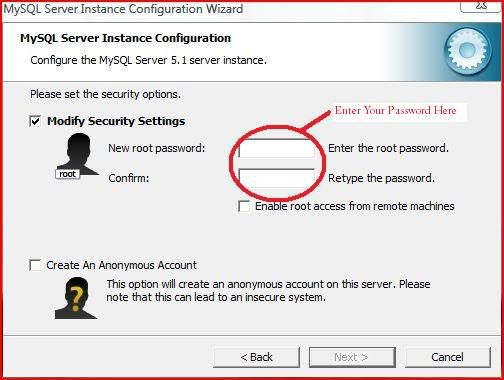
In the next screen you will set your password for root access to your MySQL database. Make sure you set a password that you will remember. If you happen to forget your password, you will not be able to finish setting up your server.
Click next and then execute. Now on to your database administration software. Here you have a choice. Both SQLyog and Navicat are excellent tools for managing your databases. Navicat is a highly polished frontend with easy to use features, but after 30 days, you must purchase a license to continue using it. SQLyog is just as capable at managing your databases, but is a bit more complicated to use. It does however come in a free flavor. Both are included in the download, but i will only cover Navicat in this tutorial.
Navicat
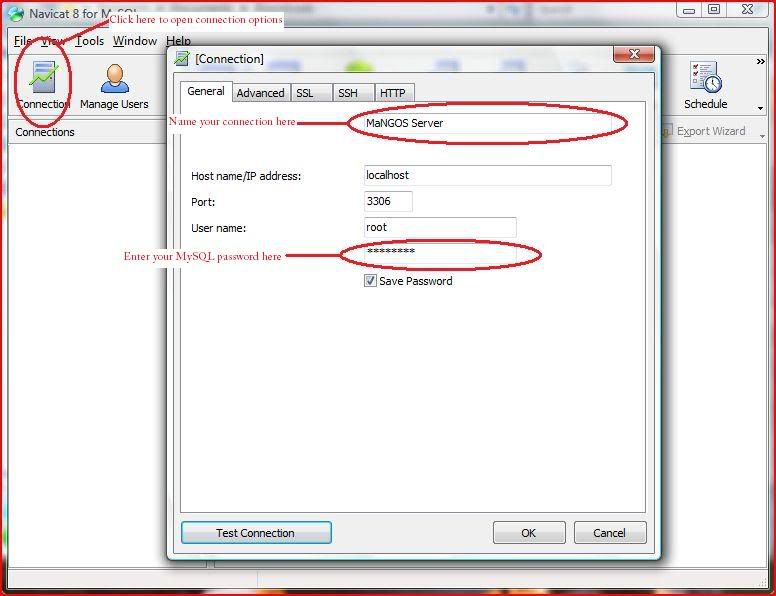
Go into the tools folder and open Navicat8. There is nothing really special to the installation process, just continue clicking next and install and then finish. Open Navicat and click "Trial"(unless of course you are ready to purchase the program!). Next click "Connection" in the upper left hand corner of the window. Name your connection and enter your MySQL password, then click OK.(Do not worry about the other tabs)
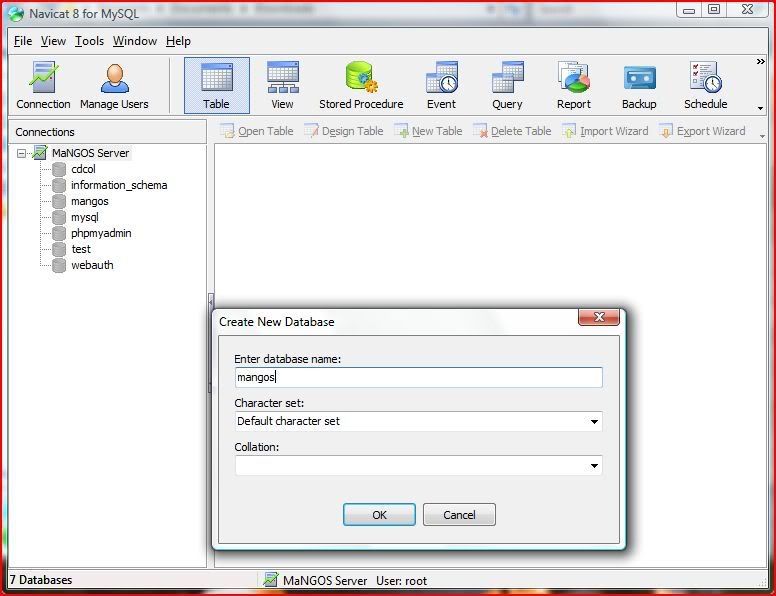
Now you will need to set up your databases. Double click your connection listed in the left hand pane to open the connection. Now right click the connection and select "New Connection" in the drop down menu. Name your first database "mangos" and click OK. Create 3 more databases named "realmd", "Characters", and "scriptdev2".
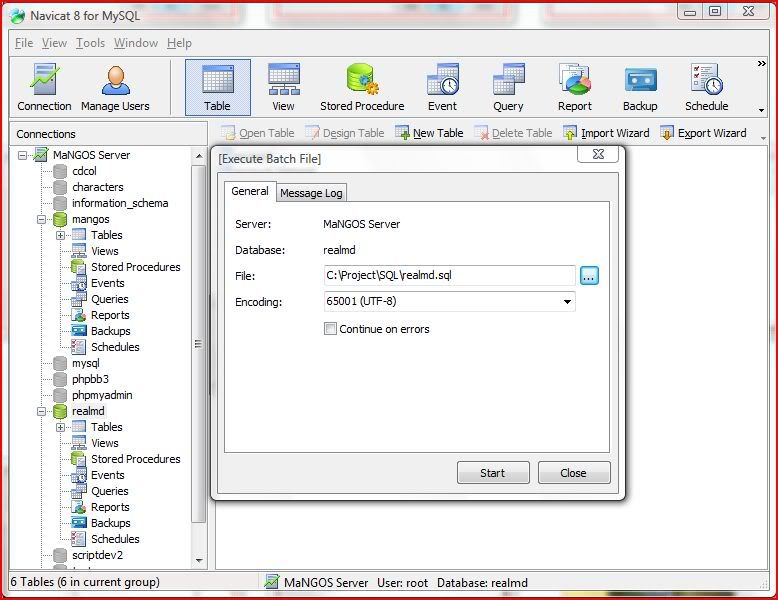
Now you will need to execute your batch files into your databases. Double click each of your new databases to open them. Right click on realmd and select "Execute Batch File...". In the execute batch file window, click the box to select a file. Navigate to your SQL folder that is included in the download and select "realmd.sql". Click start and wait for it to complete. Repeat the process for scriptdev2, characters and mangos databases using each of their respective .sql files. ( :wave: NOTE: The mangos.sql will take anywhere between 10 minutes and an hour to complete depending on ayour processor speed! Just be patient! It will finish.)
VMAPS
Now for the time consuming part! First for this to work, you must move your World of Warcraft folder into the C:\ directory (e.g. C:\World of Warcraft). You will now be making your vmaps files. to do this is very simple and strait forward. Open your "vmaps Builder" folder. Once again you have a choice here. You can either run "make vmaps" and wait arround for a couple of prompts, or you can run "makevmaps_SIMPLE" and wait for it to finish. I recommend SIMPLE for obvious reasons. ( :wave: NOTE: Plan on taking a nice long break at this point. Go ahead and watch a movie and then come back, because this can take up to 2 hours!)When it finally finishes, you will have two folders in your vmaps Builder directory. Disregard the "Buildings" folder and move the "vmaps" folder into your MaNGOS directory.
MAPS
Open your "Map Extractor" file and transfer "ad.exe" to your World of Warcraft directory. Inside your World of Warcraft directory create a new folder called "maps". Run "ad.exe" and take yourself another break. (Don't worry, your'e almost done!) When it finishes, place the newly filled "maps" folder in your MaNGOS directory.
Finishing It All Up
You now need to set your World of Warcraft client to connect to your server. This is quite simple to do. Open your Realmlist folder and transfer "realmlist.wtf" to World of Warcraft/Data/enUS directory, overwriting the old one (make a copy first!).
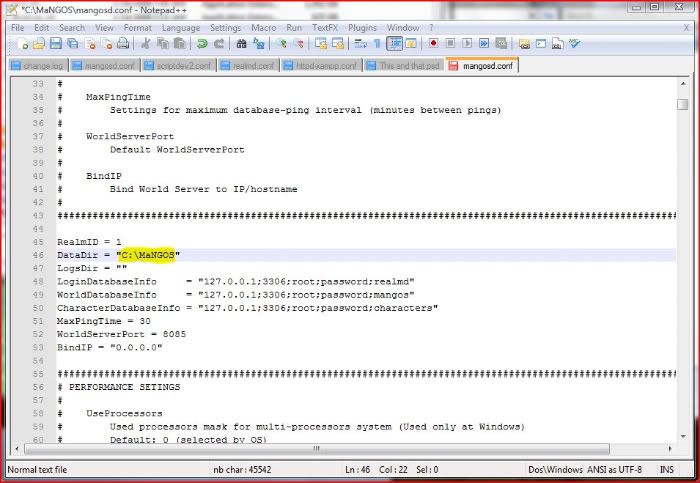
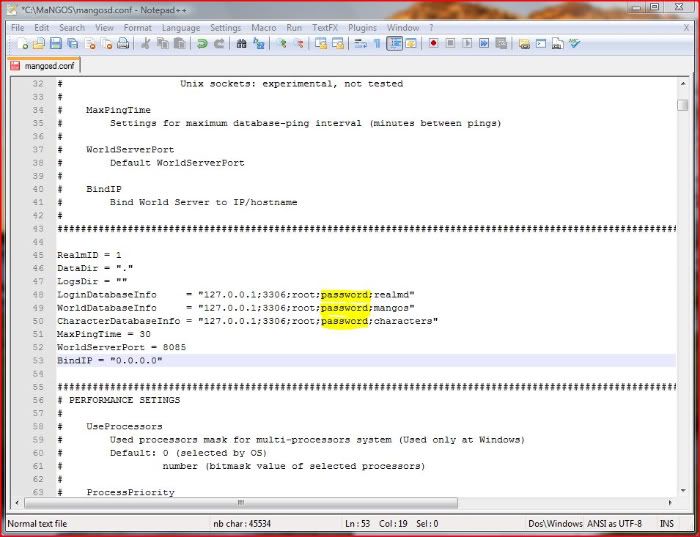
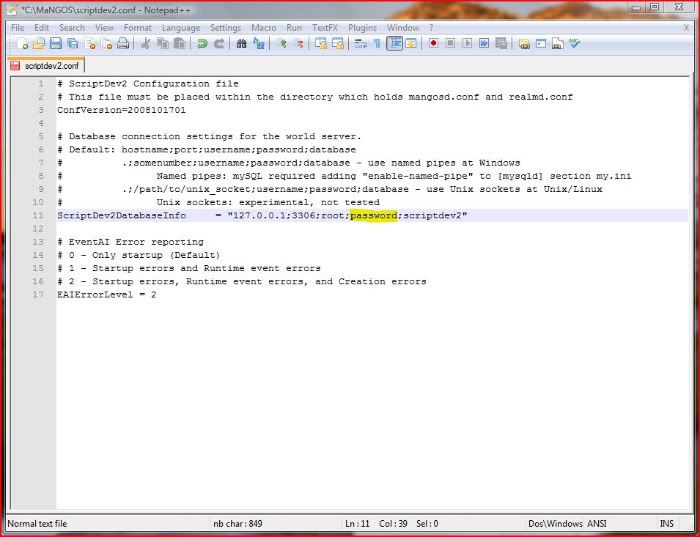
Next we need to set up the mangos, realm, and scriptdev2 conf files. Go to your MaNGOS directory. First open your "realmd.conf" file with your favorite test editor (notepad++ works wonders for tasks like this and is available for free from sourceforge.net). Replace "password" with your MySQL password. Rinse and repeat for "mangosd.conf" and "scriptdev2.conf". See pictures below for line locations.
Now all you need to do is run "mangosd.exe" and "realmd.exe" to start up the server. You may get a warning from your firewall asking for permissions for the server. If so, click allow. Now run World of Warcraft and logon with user name Administrator with password admin.
WOOT! You have just finished setting up your very own WOTLK server!!! Enjoy and have fun!!!
A few side notes... Death Knights in this release are working, however their starting area is not. To play a DK, you will have to use gm commands to move him/her out of the starting area and into the world at large. Also, Northrend is open, but mostly empty for right now. You can create new accounts within the mangos command line window by typing "account create <account name> <account password>. In order to access expansion content on a new account, you must first go into your realmd database using Navicat or SQLyog andopen the account table. highlight the line of the account you want to enable and scroll over to the expansion tab. Enter 1 into the field for BC, or 2 for WOTLK.

![[Guide] 3.0.3 WOTLK Mangos Server](./ocpbanners/1/4/8/8/7/7/1/5e8d192fde347ea9262c5d49360c76d4.png)
![[Guide] 3.0.3 WOTLK Mangos Server](https://www.ownedcore.com/assets/mm/images/wits.png "TradeSafe Middleman")
![[Guide] 3.0.3 WOTLK Mangos Server](https://www.ownedcore.com/forums/images/styles/OwnedCoreFX/addimg/wicc.png "CoreCoins")

Shout-Out
User Tag List
Results 1 to 15 of 58
-
01-18-2009 #1
 Member
- Reputation
- 10
- Join Date
- Apr 2007
- Posts
- 12
- Thanks G/R
- 0/0
- Trade Feedback
- 0 (0%)
- Mentioned
- 0 Post(s)
- Tagged
- 0 Thread(s)

[Guide] 3.0.3 WOTLK Mangos Server
Last edited by madhatternc; 01-22-2009 at 07:27 AM.
![[Guide] 3.0.3 WOTLK Mangos Server](https://www.ownedcore.com/images/ba/g/b2.gif)
-
01-18-2009 #2
Member
- Reputation
- 1
- Join Date
- Dec 2006
- Posts
- 6
- Thanks G/R
- 0/0
- Trade Feedback
- 0 (0%)
- Mentioned
- 0 Post(s)
- Tagged
- 0 Thread(s)
Hey I need some help here. When I start up realmd and mangosd I get the following error:
2009-01-18 16:28:34 ERROR:Check existing of map file './maps/0004331.map': not exist!
2009-01-18 16:28:34 ERROR:Correct *.map files not found in path './maps' or *.vmap/*vmdir files in './vmaps'. Please place *.map/*.vmap/*.vmdir files in appropriate directories or correct the DataDir value in the mangosd.conf file.
maps and vmaps files are both inside the MaNGOS directory, with successful extractions. Would really appreciate the help, thanks.
-
01-18-2009 #3
Member
- Reputation
- 10
- Join Date
- Apr 2007
- Posts
- 12
- Thanks G/R
- 0/0
- Trade Feedback
- 0 (0%)
- Mentioned
- 0 Post(s)
- Tagged
- 0 Thread(s)
Hmm. That is strange. Please verify that both maps and vmaps are located in the correct directory. If you have put the MaNGOS file directly in the C:\ directory the path for maps will be C:\MaNGOS\maps. The only way that I could replicate that particular error was by moving maps and vmaps to a different location. If you are still ecperiencing problems, please post your mangosd.conf file settings and I will try to help you further.
-
01-19-2009 #4
Member
- Reputation
- 1
- Join Date
- Dec 2006
- Posts
- 6
- Thanks G/R
- 0/0
- Trade Feedback
- 0 (0%)
- Mentioned
- 0 Post(s)
- Tagged
- 0 Thread(s)
I decided to download the maps and vmaps online to see if the extractors are messed up but error occured again.
Here's the mangosd conf file:
#####################################
# MaNGOS Configuration file #
#####################################
ConfVersion=2008080101
################################################################################ ###################################
# CONNECTIONS AND DIRECTORIES
#
# RealmID
# RealmID must match the realmlist inside the realmd database
#
# DataDir
# Data directory setting.
# Important: DataDir needs to be quoted, as it is a string which may contain space characters.
# Example: "@prefix@/share/mangos"
#
# LogsDir
# Logs directory setting.
# Important: Logs dir must exists, or all logs need to be disabled
# Default: "" - no log directory prefix, if used log names isn't absolute path
# then logs will be stored in current directory for run program.
#
#
# LoginDatabaseInfo
# WorldDatabaseInfo
# CharacterDatabaseInfo
# Database connection settings for the world server.
# Default: hostname;port;username;password;database
# .;somenumber;username;password;database - use named pipes at Windows
# Named pipes: mySQL required adding "enable-named-pipe" to [mysqld] section my.ini
# .;/path/to/unix_socket;username;password;database - use Unix sockets at Unix/Linux
# Unix sockets: experimental, not tested
#
# MaxPingTime
# Settings for maximum database-ping interval (minutes between pings)
#
# WorldServerPort
# Default WorldServerPort
#
# BindIP
# Bind World Server to IP/hostname
#
################################################################################ ###################################
RealmID = 1
DataDir = "."
LogsDir = ""
LoginDatabaseInfo = "127.0.0.1;3306;root;root;realmd"
WorldDatabaseInfo = "127.0.0.1;3306;root;root;mangos"
CharacterDatabaseInfo = "127.0.0.1;3306;root;root;characters"
MaxPingTime = 30
WorldServerPort = 8085
BindIP = "0.0.0.0"
################################################################################ ###################################
# PERFORMANCE SETINGS
#
# UseProcessors
# Used processors mask for multi-processors system (Used only at Windows)
# Default: 0 (selected by OS)
# number (bitmask value of selected processors)
#
# ProcessPriority
# Process priority setting (Used only at Windows)
# Default: 1 (HIGH)
# 0 (Normal)
#
# Compression
# Compression level for update packages sent to client (1..9)
# Default: 1 (speed)
# 9 (best compression)
#
# PlayerLimit
# Maximum number of players in the world. Excluding Mods, GM's and Admins
# Default: 100
# 0 (for infinite players)
# -1 (for Mods, GM's and Admins only)
# -2 (for GM's and Admins only)
# -3 (for Admins only)
#
# SaveRespawnTimeImmediately
# Save respawn time for creatures at death and for gameobjects at use/open
# Default: 1 (save creature/gameobject respawn time without waiting grid unload)
# 0 (save creature/gameobject respawn time at grid unload)
#
# MaxOverspeedPings
# Maximum overspeed ping count before player kick (minimum is 2, 0 used for disable check)
# Default: 2
#
# GridUnload
# Unload grids (if you have lot memory you can disable it to speed up player move to new grids second time)
# Default: 1 (unload grids)
# 0 (do not unload grids)
#
# SocketSelectTime
# Socket select time (in milliseconds)
# Default: 10000
#
# GridCleanUpDelay
# Grid clean up delay (in milliseconds)
# Default: 300000 (5 min)
#
# MapUpdateInterval
# Map update interval (in milliseconds)
# Default: 100
#
# ChangeWeatherInterval
# Weather update interval (in milliseconds)
# Default: 600000 (10 min)
#
# PlayerSaveInterval
# Player save interval (in milliseconds)
# Default: 900000 (15 min)
#
# vmap.enableLOS
# vmap.enableHeight
# Enable/Disable VMmap support for line of sight and height calculation
# Default: 1 (true)
# 0 (false)
#
# vmap.ignoreMapIds
# Map id that will be ignored by VMaps
# List of ids with delimiter ','
# If more then one id is defined and spaces are included, the string has to be enclosed by "
# Example: "369,0,1,530"
#
# vmap.ignoreSpellIds
# These spells are ignored for LoS calculation
# List of ids with delimiter ','
#
# DetectPosCollision
# Check final move position, summon position, etc for visible collision with other objects or
# wall (wall only if vmaps are enabled)
# Default: 1 (enable, required more CPU power usage)
# 0 (disable, less nice position selection but will less CPU power usage)
#
# TargetPosRecalculateRange
# Max distance from movement target point (+moving unit size) and targeted object (+size)
# after that new target movmeent point calculated. Max: melee attack range (5), min: contact range (0.5)
# More distance let have better performence, less distance let have more sensitive reaction at target move.
# Default: 1.5
#
# UpdateUptimeInterval
# Update realm uptime period in minutes (for save data in 'uptime' table). Must be > 0
# Default: 10 (minutes)
#
# MaxCoreStuckTime
# Periodically check if the process got freezed, if this is the case force crash after the specified
# amount of seconds. Must be > 0. Recommended > 10 secs if you use this.
# Default: 0 (Disabled)
#
# AddonChannel
# Permit/disable the use of the addon channel through the server
# (some client side addons can stop work correctly with disabled addon channel)
# Default: 1 (permit addon channel)
# 0 (do not permit addon channel)
#
################################################################################ ###################################
UseProcessors = 0
ProcessPriority = 1
Compression = 1
PlayerLimit = 100
SaveRespawnTimeImmediately = 1
MaxOverspeedPings = 2
GridUnload = 1
SocketSelectTime = 10000
GridCleanUpDelay = 300000
MapUpdateInterval = 100
ChangeWeatherInterval = 600000
PlayerSaveInterval = 900000
vmap.enableLOS = 1
vmap.enableHeight = 1
vmap.ignoreMapIds = "369"
vmap.ignoreSpellIds = "7720"
DetectPosCollision = 1
TargetPosRecalculateRange = 1.5
UpdateUptimeInterval = 10
MaxCoreStuckTime = 0
AddonChannel = 1
-
01-19-2009 #5
Member
- Reputation
- 10
- Join Date
- Apr 2007
- Posts
- 12
- Thanks G/R
- 0/0
- Trade Feedback
- 0 (0%)
- Mentioned
- 0 Post(s)
- Tagged
- 0 Thread(s)
Ok, lets try this. In your mangosd.conf file, chage the data dir option to reflect the path to your maps and vmaps. To verify the full path, go to the folder in which you have them filed in and right click maps. Select properties and copy the directory beside "Location:".
Hopefully this will solve your problem. Please post back and let me know.
-
01-19-2009 #6
Member
- Reputation
- 1
- Join Date
- Dec 2006
- Posts
- 6
- Thanks G/R
- 0/0
- Trade Feedback
- 0 (0%)
- Mentioned
- 0 Post(s)
- Tagged
- 0 Thread(s)
Seemed like a solid solution but it's still happening. I appreciate the help though. =)
ERROR:Check existing of map file 'C:\MaNGOS/maps/0004331.map': not exist!
ERROR:Correct *.map files not found in path 'C:\MaNGOS/maps' or *.vmap/*vmdir files in 'C:\MaNGOS/vmaps'. Please place *.map/*.vmap/*.vmdir files in appropriate directories or correct the DataDir value in the mangosd.conf file.
-
01-19-2009 #7
Member
- Reputation
- 10
- Join Date
- Apr 2007
- Posts
- 12
- Thanks G/R
- 0/0
- Trade Feedback
- 0 (0%)
- Mentioned
- 0 Post(s)
- Tagged
- 0 Thread(s)
Ok, lets try adding 0004331.map manually. Place this file directly into the maps folder and give it another shot.
0004331.map
-
01-19-2009 #8
Member
- Reputation
- 1
- Join Date
- Dec 2006
- Posts
- 6
- Thanks G/R
- 0/0
- Trade Feedback
- 0 (0%)
- Mentioned
- 0 Post(s)
- Tagged
- 0 Thread(s)
That seemed to work, but now it says 000_43_31.vmdir from vmaps is missing.
-
01-19-2009 #9
Member
- Reputation
- 10
- Join Date
- Apr 2007
- Posts
- 12
- Thanks G/R
- 0/0
- Trade Feedback
- 0 (0%)
- Mentioned
- 0 Post(s)
- Tagged
- 0 Thread(s)
000_43_31.vmap
000_43_31.vmdir
Try putting both of these in your vmaps folder.Last edited by madhatternc; 01-19-2009 at 04:47 AM.
-
01-19-2009 #10
Member
- Reputation
- 1
- Join Date
- Dec 2006
- Posts
- 6
- Thanks G/R
- 0/0
- Trade Feedback
- 0 (0%)
- Mentioned
- 0 Post(s)
- Tagged
- 0 Thread(s)
Now it's ERROR:Check existing of map file './maps/0004832.map': not exist!
Going to reextract the maps again.
-
01-19-2009 #11
Member
- Reputation
- 10
- Join Date
- Apr 2007
- Posts
- 12
- Thanks G/R
- 0/0
- Trade Feedback
- 0 (0%)
- Mentioned
- 0 Post(s)
- Tagged
- 0 Thread(s)
Wow, I'm at a loss for words... I am going to start compressing and uploading maps. I will post a link when it is finished(it will probably be tomorrow however). Also, you can disable vmap support in the mangosd.conf fille by changing the 1s to 0s. vmaps are not required for the server to run.

Just to make sure, you are using a version of WoW that has been updated to 3.0.3 with WoTLK installed to extract from... right?Last edited by madhatternc; 01-19-2009 at 05:36 AM.
-
01-19-2009 #12
Member
- Reputation
- 1
- Join Date
- Dec 2006
- Posts
- 6
- Thanks G/R
- 0/0
- Trade Feedback
- 0 (0%)
- Mentioned
- 0 Post(s)
- Tagged
- 0 Thread(s)
Yes I am, and I was able to get it going with vmaps disabled. It seems pretty good for the most part from what I've tested and your support was awesome, thank you! +rep When I reextracted the maps the file 0004832.map was located inside so maybe my previous extraction wasn't so successful after all >< So I'm reextracting the vmaps now and hopefully I get the same results. Thanks again!
-
01-20-2009 #13
Member
- Reputation
- 1
- Join Date
- Jun 2008
- Posts
- 4
- Thanks G/R
- 0/0
- Trade Feedback
- 0 (0%)
- Mentioned
- 0 Post(s)
- Tagged
- 0 Thread(s)
Ummmm i'm not sure if this is supposed to happen when i start mangosd
Could not connect to MySQL database at 127.0.01 : Access denied for user root localhost (using password: YES)
Cannot connect to world database 127.0.01;3306;root;password;****
-
01-20-2009 #14
Member
- Reputation
- 2
- Join Date
- Jan 2009
- Posts
- 8
- Thanks G/R
- 0/0
- Trade Feedback
- 0 (0%)
- Mentioned
- 0 Post(s)
- Tagged
- 0 Thread(s)

thank,good info
-
01-20-2009 #15
Member
- Reputation
- 1
- Join Date
- May 2007
- Posts
- 1
- Thanks G/R
- 0/0
- Trade Feedback
- 0 (0%)
- Mentioned
- 0 Post(s)
- Tagged
- 0 Thread(s)
Originally Posted by mab97
This means your password is wrong


 Reply With Quote
Similar Threads
-
[GUIDE] How to make a MaNGOS Server
By Lulzi in forum WoW EMU Guides & TutorialsReplies: 20Last Post: 08-05-2009, 03:40 AM -
[Guide] How to make a Mangos server.
By The God Father in forum WoW EMU Guides & TutorialsReplies: 4Last Post: 08-13-2008, 05:45 AM -
Forrest's Idiot-proof Guide to Setting Up Your Own MangoS Server
By Forrest in forum WoW EMU Guides & TutorialsReplies: 1Last Post: 01-29-2008, 07:44 AM -
Need a good guide to create Mangos server
By tobiasahlmo in forum WoW EMU Guides & TutorialsReplies: 3Last Post: 12-25-2007, 05:29 AM -
How to be a <GM> on a Mangos server, easy to follow youtube guide by me =D
By burningfear in forum World of Warcraft GuidesReplies: 6Last Post: 07-12-2007, 03:11 AM
-
OwnedCore Forums
casino news World of Warcraft Pokemon GO MMO Overwatch RTS Casino reviews bc game bc game bc game bc game bc game bc game bc game bc game bc game bc game bc game bc game bc game bc game bc game bc game bc game bc game bc game bc game bc game bc game bc game bc game bc game bc game bc game bc game bc game bc game bc game bc game bc game bc game bc game bc game bc game bc game bc game bc game bc game bc game bc game bc game bc game bc game bc game bc game bc game bc game -
casino
Casino Gambling Online casinos Casino en ligne Jackpot City no deposit bonus codes roobet Casino reviews Bitcoin casino Paypal Casino Lucky8 1xbit heycasino ✅Yeti Casino - 23 Free PayPal Casino: Secure ✅AllSlots Casino Bonus ✅Bitkingz Casino - ✅7Bit Casino - Reviews Betzino Casino France - BetPlay.io Casino - Best Book of dead Slot Review Introduction to -
CoreCoins
CoreCoins CoreCoins FAQ Shout-Out Banner Ads -
My OwnedCore
My Profile Notifications Settings Buy CoreCoins About Us


Privacy Policy | Cookie Policy | Terms | Contact Us
Available Payment Methods:-
![[Guide] 3.0.3 WOTLK Mangos Server](https://www.ownedcore.com/images/paybutton/paypal.png)
![[Guide] 3.0.3 WOTLK Mangos Server](https://www.ownedcore.com/images/paybutton/skrill.png)
![[Guide] 3.0.3 WOTLK Mangos Server](https://www.ownedcore.com/images/paybutton/payop.png)
-
Casino
Lucky8 | Jackpotcity | Drake Casino | No deposit bonus | USA CASINO | Dublinbet | BuzzLuck | Casino Bonus | Millionz | Bovada casino | Welcome Bonuses | BitCasino | Cresus Casino | Sportsbook | Betflip Casino | Bc Game | Lucky Dreams Casino | Slot machines | How to Play BlackJack Online | Oshi Casino | Stake Casino | Rollino Casino | ZenCasino | Casino Reviews | NeedForSpin | Casino | Mystake Casino | Casobet | Crypto Casino