
OK i written this guide a few years ago when people were not half as good as they are now so please forgive the spelling mistakes =P DONT RIP! NOTE: THIS IS PROBABLY SEEN TODAY AS A BEGINNER'S GUIDE TO GRAPHICS AND YOU WILL PRODUCE BASIC SIGS BUT WORTH READY IF YOU ARE NEW! btw written by the Brock meister
[centre] A Guide to becoming a Professional Graphic artist
Ok, here’s you, new to graphics. You may have tried pixel sigs and people laugh at you or you may just be putting text onto others work. You may be wondering “I wanna be a graphics artist who people are q-ing up to get a sig from me!” Well this guide is for you. Though before you get started I must tell you it is not easy.
Intro
In this guide I will show you the basics of becoming a master with a graphics program called the GIMP which you can download from GimpTalk.com
The GIMP is a very powerful free photo editing software. It can do as much and maybe even more than Adobe Photoshop. Although you may not of heard of it before the GIMP has a very big reputation on the net.
ContentsSection 1, the interface
- The Interface
- Layers/transparency!
- Your First sig!
- Outro
- Credits
Layers/transparency!
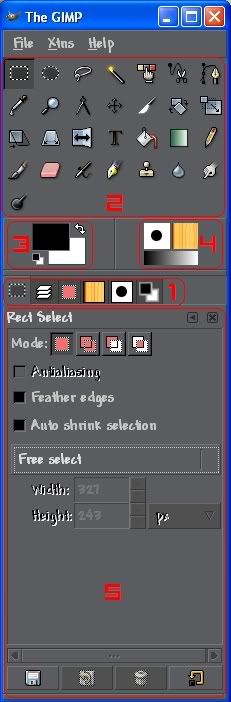
- This is the tab menu, one of the most important parts of the GIMP. This is where the access to ALL the tools and extra options you cannot find anywhere else.
- This selection of buttons is called the tool “tray” or “bin”. This is where you will gain access to your many tools on the GIMP
- Three is the color pallet of the GIMP. Note one color is in front of another, that is because many parts of the GIMP need two colors to work with and the GIMP has named them FORGROUND and BACKGROUND. As you can obviously guess the foreground is the color box infront of the other color box at the back.
- The mini tools pallet really doesn’t do much but though you can still change the gradients/etc it is really for info on what tools you are using
- The tab section is the biggest part of the GIMP and you can configure the options of your current tool
Layers are what EVERY major graphics program is about. Imagine you have one A4 sized photo on a piece of A4 paper. Now if you put another A4 piece of paper with a RuneHQ logo over the top your photo then your photo disappears but if you put that logo on see through paper, transparency, not only do you get the picture underneath but the RuneHQ logo on the top! I hoped that helped because I am going to talk a lot about layers later on. Please, please, please read through twice if that helps because if you don’t understand layers this tut isn’t gonna help you much!
Your First Sig!
So far you have learned about the basics of the GIMP and the concept of layers hopefully within the hour! It took me a month to get my head round layers! So this is it, the “Big Daddie”. Your first sig! Feel free to experiment with the GIMP before we move on.
Ok the first sig you are ever going to make in GIMP is going to be a grunge sig. Just brushes, nothing harmful.
Brushes you may be thinking, “how can little circles create such masterpieces of jumbled up mess?” Well with different shaped brushes you can. First your gonna need to download ‘em to your pc. We are going to use Ad Hero’s abstract brushes which can be downloaded at http://www.deviantart.com/deviation/23746179/. Once you have downloaded them, open the zipped folder and decompress it. Then open up my computer and go to c drive >> program files >> GIMP >> share >> GIMP >> 2.0 >> brushes and copy and paste the brush files(.GBR) from the downloaded file into the folder restart the GIMP and in the brushes toolbox there should be some more brushes available.
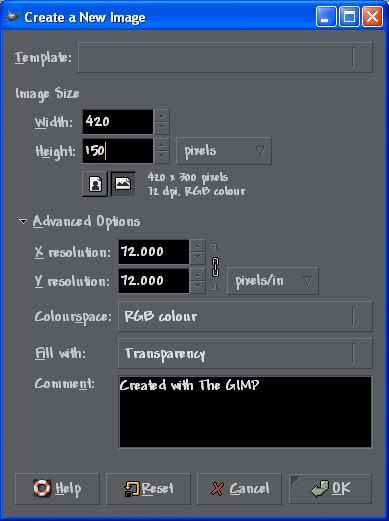
1.Create a new image 420 x 150 and make it a transparent background. Use below settings:
2. Paste away with your brushes
3.Then create a new layer and swap the colors around on the colors pallet and paste on the new layer.
REPEAT SEVERAL TIMES to get maximum effect
4. Create a new layer then put it behind all the other layers and fill it with white using the bucket tool.
5.Go to image > flatten image to make all the layers one when you are happy with your sig
- To add some color go to layer > colors > color ballence and change the levels to suit what color you want your sig to be.
- Add a border if you like and text and your done, GRATS you have completed your first ever sig.
APRIL 07
btw just a note when i did this guide i came out with
not THAT good but for a few years ago, that would have sold for 100k on runescape (back then i was sad)
4[b] Outro[b]
Well done and you have completed one section of the GIMP. But don’t get too full of yourself. GFX is a massive and everchanging world of art and there is a lot more to discover than you think. Soon your brushes folder will expand, you’ll get new skins on your GIMP and you’ll be that graphic artist that people are q-ing up to get a sig from.
More sections might be added to this guide, you never know…
Credits
Phil 999, me!
Brock (me)
GimpTalk.com , very good site and forums, check it out.
You, for reading!
Please leave feedback!
Scripts are like brushes, they download using the same method and can produce amazing effects like Lightsabres or outerglows.
To download scripts (e.g. lightsabre)::
Place to find script:
GimpTalk.com – go to the forums and the one dedicated to Scripts (there should be no viruses as they are checked but if you want, ask a mod first before downloading).
DeviantArt.com – great for all things art, they have brushes and scripts for GIMP
Download file and copy and paste into ::
c drive >> program files >> GIMP >> share >> GIMP >> 2.0 >> scripts
in your image window (from open or new file) select the path tool and follow this tutorial at [url]http://www.gimptalk.com/topic.php?a=v&t=602&f=8[url] and once you have selected your area open your lightsabre script (script-fu > lightsabre -or similar)and follow instructions, for other scripts do the same but without the selection bit, follow instructions either found in the Read Me file that comes with the downloaded packs for use tutorials
try::
http://www.gimptalk.com/index.php


Shout-Out
User Tag List
Results 1 to 1 of 1
-
04-07-2007 #1
 Member
- Reputation
- 8
- Join Date
- Oct 2006
- Posts
- 44
- Thanks G/R
- 0/0
- Trade Feedback
- 0 (0%)
- Mentioned
- 0 Post(s)
- Tagged
- 0 Thread(s)

Zero to hero, Graphics guide for $0!


 Reply With Quote
Similar Threads
-
[Gold] 1,000,000g On The AH - The [Pre-Legion] Guide For A Goldmaking Hero
By stevesgamebox in forum World of Warcraft GuidesReplies: 97Last Post: 10-11-2016, 01:00 PM -
Guide for your class in an instance!
By Bossman4 in forum World of Warcraft GuidesReplies: 5Last Post: 10-28-2006, 03:39 PM -
Full Guide for Dungeon Set 1 items (all classes)
By Cush in forum World of Warcraft GuidesReplies: 13Last Post: 09-07-2006, 03:07 PM -
Writing Guides: for Dummies
By Krazzee in forum World of Warcraft GuidesReplies: 3Last Post: 06-11-2006, 01:05 PM -
Temple of Ahn'Qiraj A guide for AQ40
By Matt in forum World of Warcraft GuidesReplies: 2Last Post: 03-14-2006, 12:49 AM
-
OwnedCore Forums
casino news World of Warcraft Pokemon GO MMO Overwatch RTS Casino reviews bc game bc game bc game bc game bc game bc game bc game bc game bc game bc game bc game bc game bc game bc game bc game bc game bc game bc game bc game bc game bc game bc game bc game bc game bc game bc game bc game bc game bc game bc game bc game bc game bc game bc game bc game bc game bc game bc game bc game bc game bc game bc game bc game bc game bc game bc game bc game bc game bc game bc game -
casino
Casino Gambling Online casinos Casino en ligne Jackpot City stake stake stake stake stake stake stake stake stake stake stake stake stake stake stake stake no deposit bonus codes roobet Casino reviews Bitcoin casino Paypal Casino Lucky8 1xbit heycasino ⭐Betway Casino - Best Magical Spin Casino - BlackJack Casino Rules - About Online Casinos - ✅N1 Casino Review - ✅Nitro Casino - Best Cresus Casino Bonus - ⭐ King Billy Casino BetKing Bookmaker - Best -
CoreCoins
CoreCoins CoreCoins FAQ Shout-Out Banner Ads -
My OwnedCore
My Profile Notifications Settings Buy CoreCoins About Us


Privacy Policy | Cookie Policy | Terms | Contact Us
Available Payment Methods:-


-
Casino
Lucky8 | Welcome Bonuses | Millionz | No deposit bonus | Sportsbook | Casobet | MrGreen | Mystake Casino | Lucky31 | Drake Casino | Bovada casino | Jackpotcity | PalmSlots Casino | NeedForSpin | How to Play BlackJack Online | Casino Bonus | Crypto Casino | BitCasino | Dublinbet | Cresus Casino | Lucky Dreams Casino | Slot machines | Casino Reviews | Oshi Casino | BuzzLuck | InstantPay | Casino deposit offers | Stake Casino | Bitstarz | Rollino Casino